User manual
ECHO Analyzer
version 2026/04/21
#8500
Content
Safety warning
00. ECHO likes to breathe
01. About firmware and hardware versions
02. Measuring principle
03. Analyzer control
04. Connection to mobile app
05. Calibration of the oxygen sensor
06. Calibration Using the Mobile Application
07. Ambient pressure
08. Helium sensor calibration
09. Carbon monoxide sensor calibration
09.1 Bump Test
10. Measuring O2 and He concentration
11. CO detection
12. Maximum Operating Depth (MOD) Display
13. Printing an Analyzed Gas Label
14. Setup menu
15. Measurement units
16. Gas calculations using a mobile app
17. Charging and battery status
18. Oxygen Sensor Replacement
19. CO Sensor Replacement
20. Battery replacement
21. Firmware Update
22. Storage when not in use for long periods
23. Error and Warning Messages
24. Technical data
25. Manual version
Safety warning
This analyzer is designed for measuring the content of oxygen and helium in an air-oxygen-helium gas mixture and possible carbon monoxide contamination. It cannot be used to analyze mixes containing other gases, including, for instance, mixes prepared using anything but pure gases or mixes in which air has been replaced with pure nitrogen (without atmospheric argon).
The physical and chemical principles of the sensors used do not guarantee that the sensors will be selectively sensitive to a specific gas (oxygen, helium); there are a number of gases to which the sensors respond. Therefore, the gas composition shown by the analyzer does not mean by itself that the real composition of the mix is equal to the displayed values.
The displayed mix composition is invalid unless the mixing technology ensures that there are no other gases present in the mix except air, pure oxygen and pure helium.
The analyzer is not a certified measuring instrument. The results of measuring are only informative and it is not possible to use such results where a certified measuring instrument is required.
When analyzing mixes in situations where the incorrect composition of the mixes could cause material damage, injury to health or threaten human health or life, for example in the case of breathing mixes for diving, the results of the analysis may not be used as confirmation of the correct mix composition. In these cases, the analyzer can only be used as an aid for increasing the probability that such incorrect mix composition will be detected before its use.
The correctness of the mix composition must be established by the technology used to prepare it. The correct preparation of breathing mixes for diving (nitrox – oxygen-enriched air, trimix – a mixture of air, oxygen and helium, heliox – a mixture of oxygen and helium) requires special knowledge and experience which is possible to gain, for example, through an appropriate course. A failure to apply such knowledge can lead to an incorrect mix, even though the results of the analysis are seemingly correct. Such a situation can also be the result of a failure to take into account the influence of temperature and compressibility, an insufficient blending of the mix and other factors.
Please remember that the analyzer can be broken or damaged and that the oxygen sensor is by its nature subject to ageing and thus its properties deteriorate. Therefore always verify the measured data in another way, such as by precise preparation of the mix, another analytical method, etc. In addition, the measured value must be subject to critical assessment using a common-sense approach and if it differs from the allowable variation of mixing accuracy, it must be considered invalid.
00. ECHO likes to breathe (Important handling tips)
- Measurements are only valid with gas actively flowing.
- Calibrate once before your first measurement of the day — not between measurements.
If the device has been sitting idle with a different gas inside, flush it before use.
A bit more detail
- ECHO has a long gas path combining up to four sensors.
- With active flow it flushes completely within 5 seconds — but without it, stale gas can slowly linger and produce a seemingly drifting reading.
Flushing with air
- If the device has been sitting with a different gas inside, give it a few good breaths: 2–5 passes of air with ~20-second pauses in between.
- In normal use, you don't need to think about this — a stable reading is reached within seconds of gas flow starting.
This means waving ECHO around will not fill it with air – you need to properly induce airflow, placing ECHO on a cylinder valve or using a professional flow limiter.
Calibration tips
- Prefer using a compressed gas source – e.g. a cylinder with air or oxygen.
- When using ambient air, draw from the gas inlet — fresh air will enter through the exhaust port near the oxygen sensor.
01. About firmware and hardware versions
The He/O2 analyzer is equipped with a microprocessor whose program (firmware) is continuously updated. This manual is for the initial firmware release 1.6.3, but the manual can be applied to any hardware version.
02. Measuring principle
The described measuring principle is valid only for mixes of air, oxygen and helium.
An electrochemical sensor is used to determine the oxygen content. The voltage at the sensor’s output is proportional to the oxygen content in the analyzed mix. The sensor has a limited service life and the proportionality of the dependence of voltage on the oxygen content changes over time; therefore, it has to be regularly calibrated. It is possible to choose between single-point, two-point and three-point calibration. Single-point calibration is fast, especially if air is chosen as the calibrating mix. For greater accuracy of the measurement, two-point calibration is used with two different mixes, typically air and pure oxygen. For strongly hypoxic mixes, i.e. mixes containing less than approximately 15% oxygen, three-point calibration is recommended. In this case, the third calibration gas should be a gas with zero oxygen content, i.e. pure helium or argon.
Helium content is determined on the basis of measuring the speed of sound in the analyzed mix. The speed of sound depends on the content of helium and oxygen, and the temperature of the mix. The dependence of the speed of sound on pressure is small and can be disregarded under normal atmospheric pressure.
At 0º C the speed of sound is approximately 970 m/s in pure helium, 330 m/s in air and 315 m/s in pure oxygen. Raising the temperature by one degree increases the speed of sound by 0.175 %. The speed of sound in the mix is described by a non-linear function of temperature, oxygen content and helium content.
The content of helium is determined by measuring the speed of sound, temperature of the mix and the content of oxygen. When measuring the concentration of helium, it is therefore necessary to have the oxygen sensor correctly calibrated or to know the oxygen content and enter it into the instrument.
The speed of sound is measured directly as the time it takes for an acoustic impulse to travel between two microphones. This measurement is performed alternately in both directions to make it possible to eliminate the influence of the gas flow-rate in the probe on the calculation. The acoustic impulses are heard as weak “clicks” from the probe in the helium-measuring mode.
Gas is delivered to the analyzer from a sampler connected to the compressed-gas tank and the gas flow is controlled using a nozzle to provide the volume needed for the analysis.
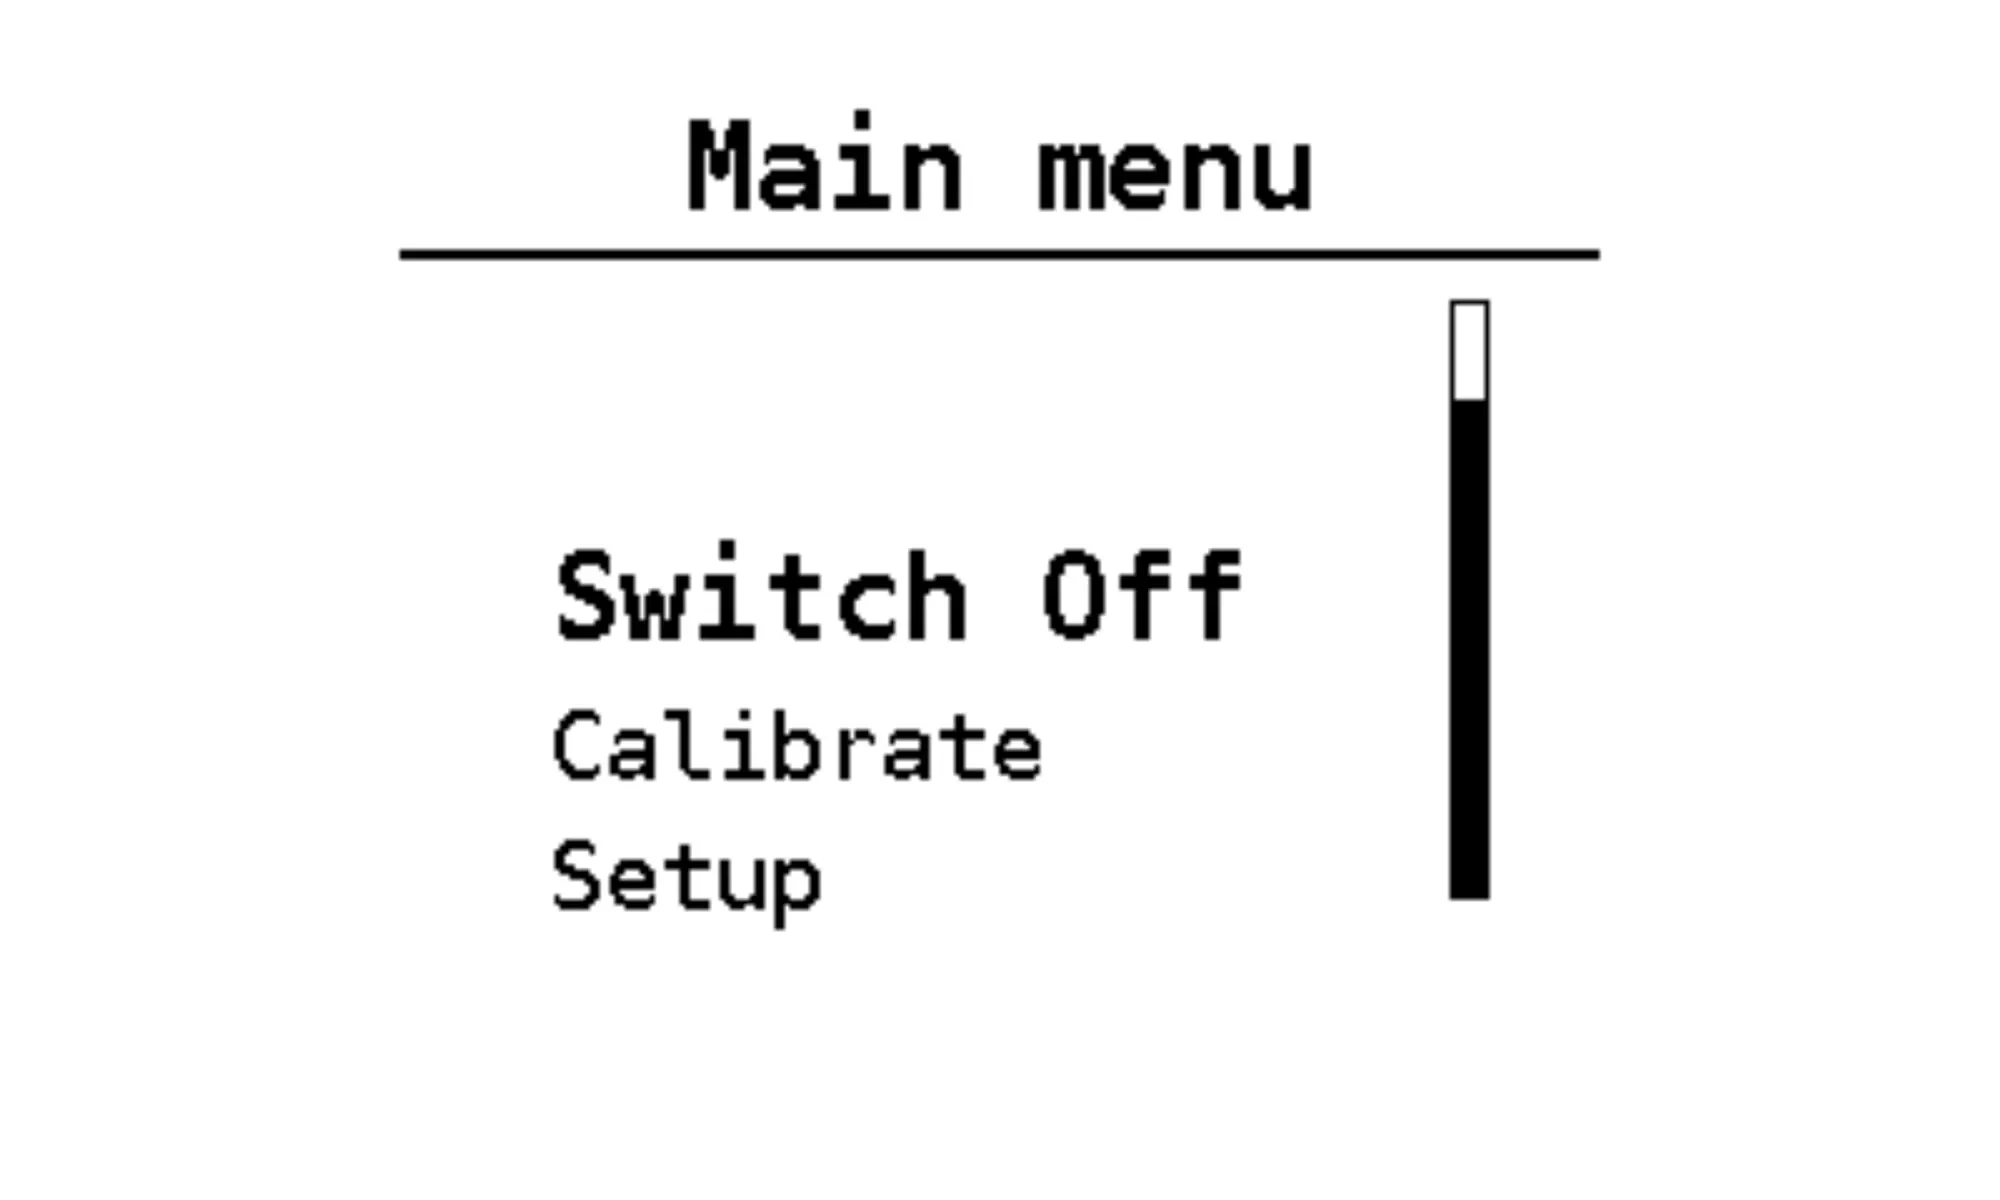
03. Analyzer control
ECHO has a single multifunction button. Switching on/off and control is done by long or short press of this button.
SWITCH ON
Long press of the button (1s)
CALL MENU
Long press of the button
MENU SCROLLING
Short button press
POSITION SELECTION
Long press of the button
LEAVE MENU
Short press to scroll to Quit and confirm with a long press
SWITCH OFF
Extra long press (3s) or from the menu
RESET
In case of an unresponsive device, hold button for 15s or longer, the device will go through a full power cycle.
04. Connection to mobile app
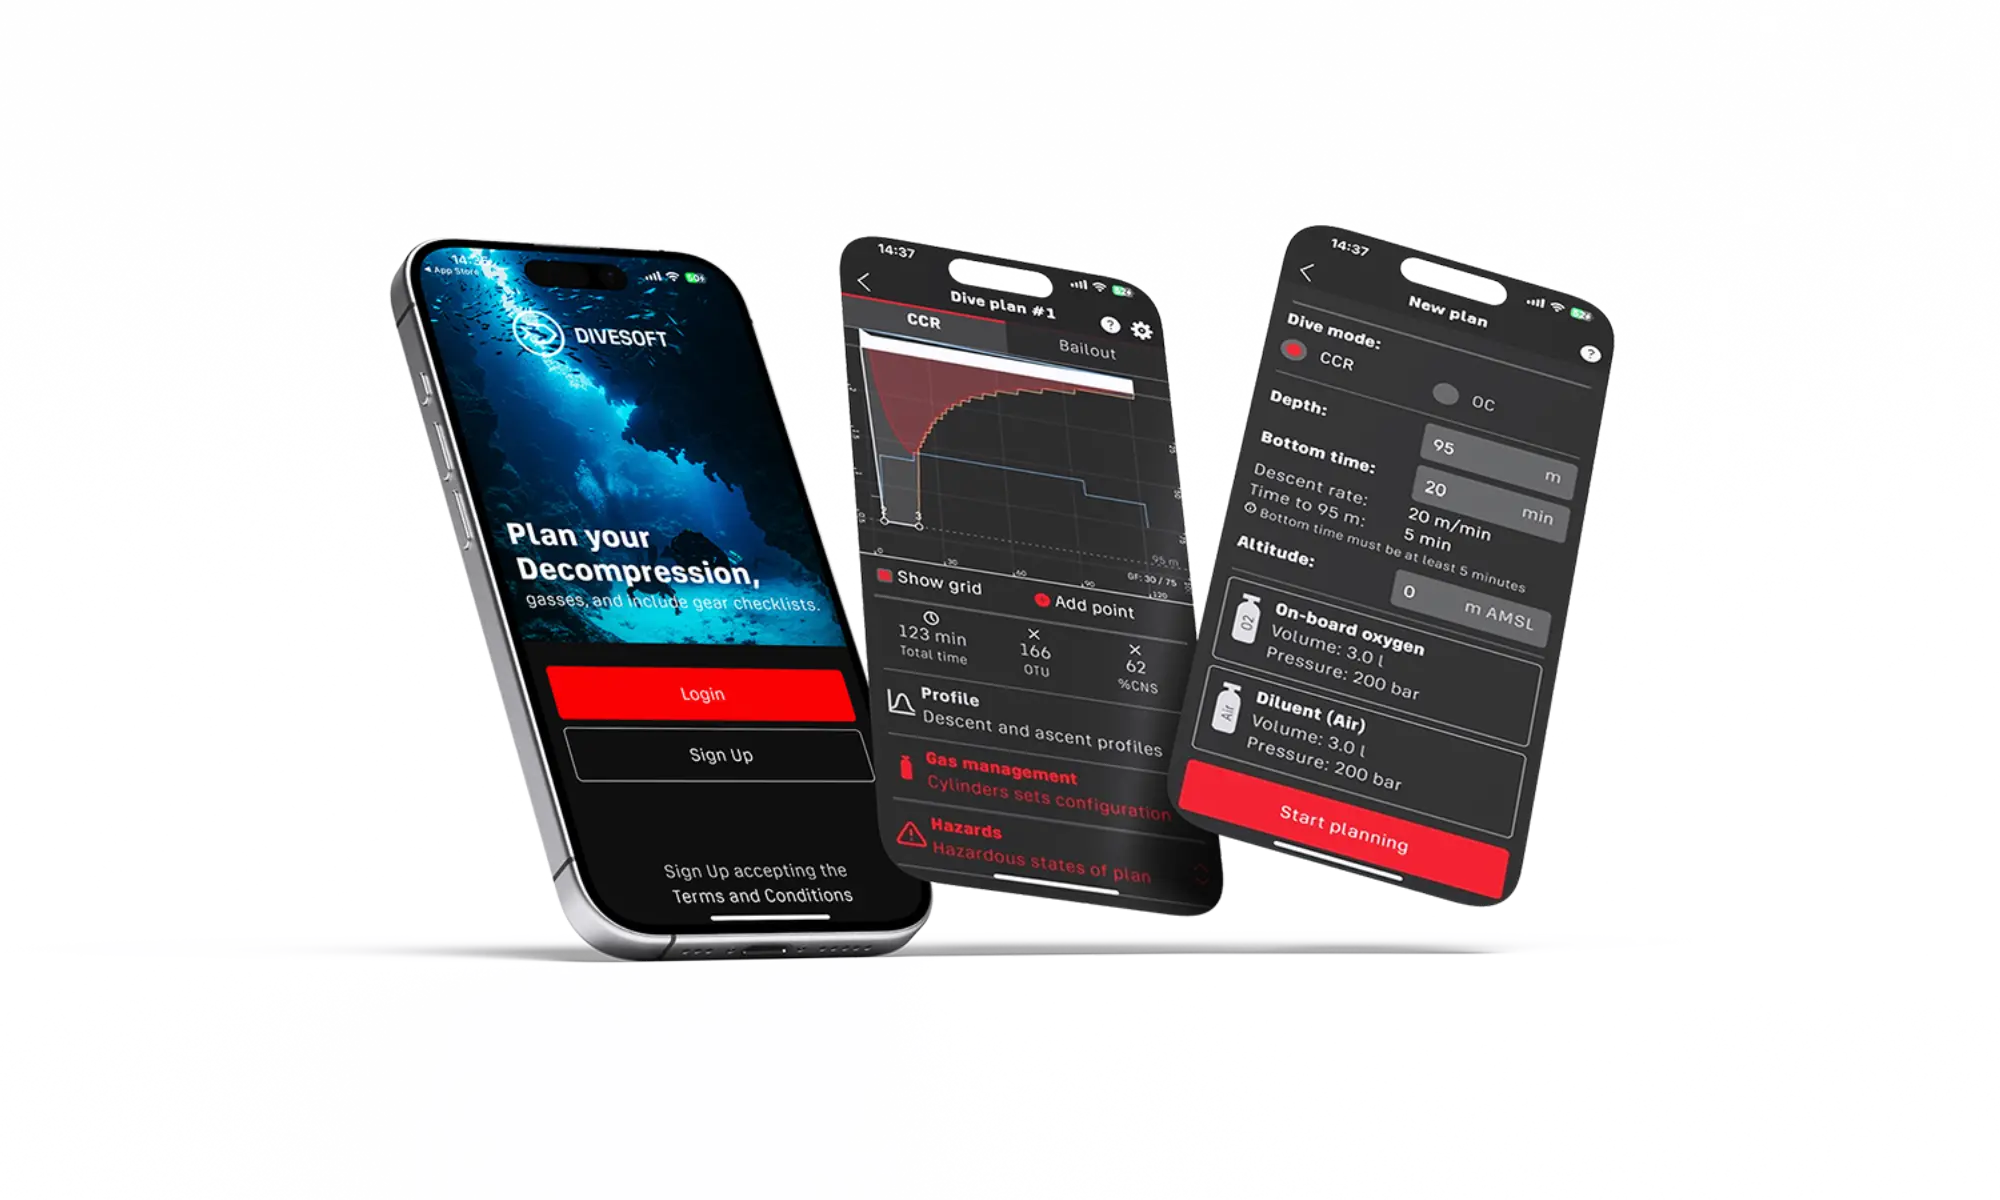
The values displayed on the device screen and the availability of advanced functions are limited. A significant extension of data visualization, control options, and the use of calculated values for gas preparation is achieved by connecting the analyzer to the Divesoft.App mobile application.
The mobile application is available for smartphones running Android and Apple iOS operating systems.
Download the mobile app
https://www.divesoft.com/en/app
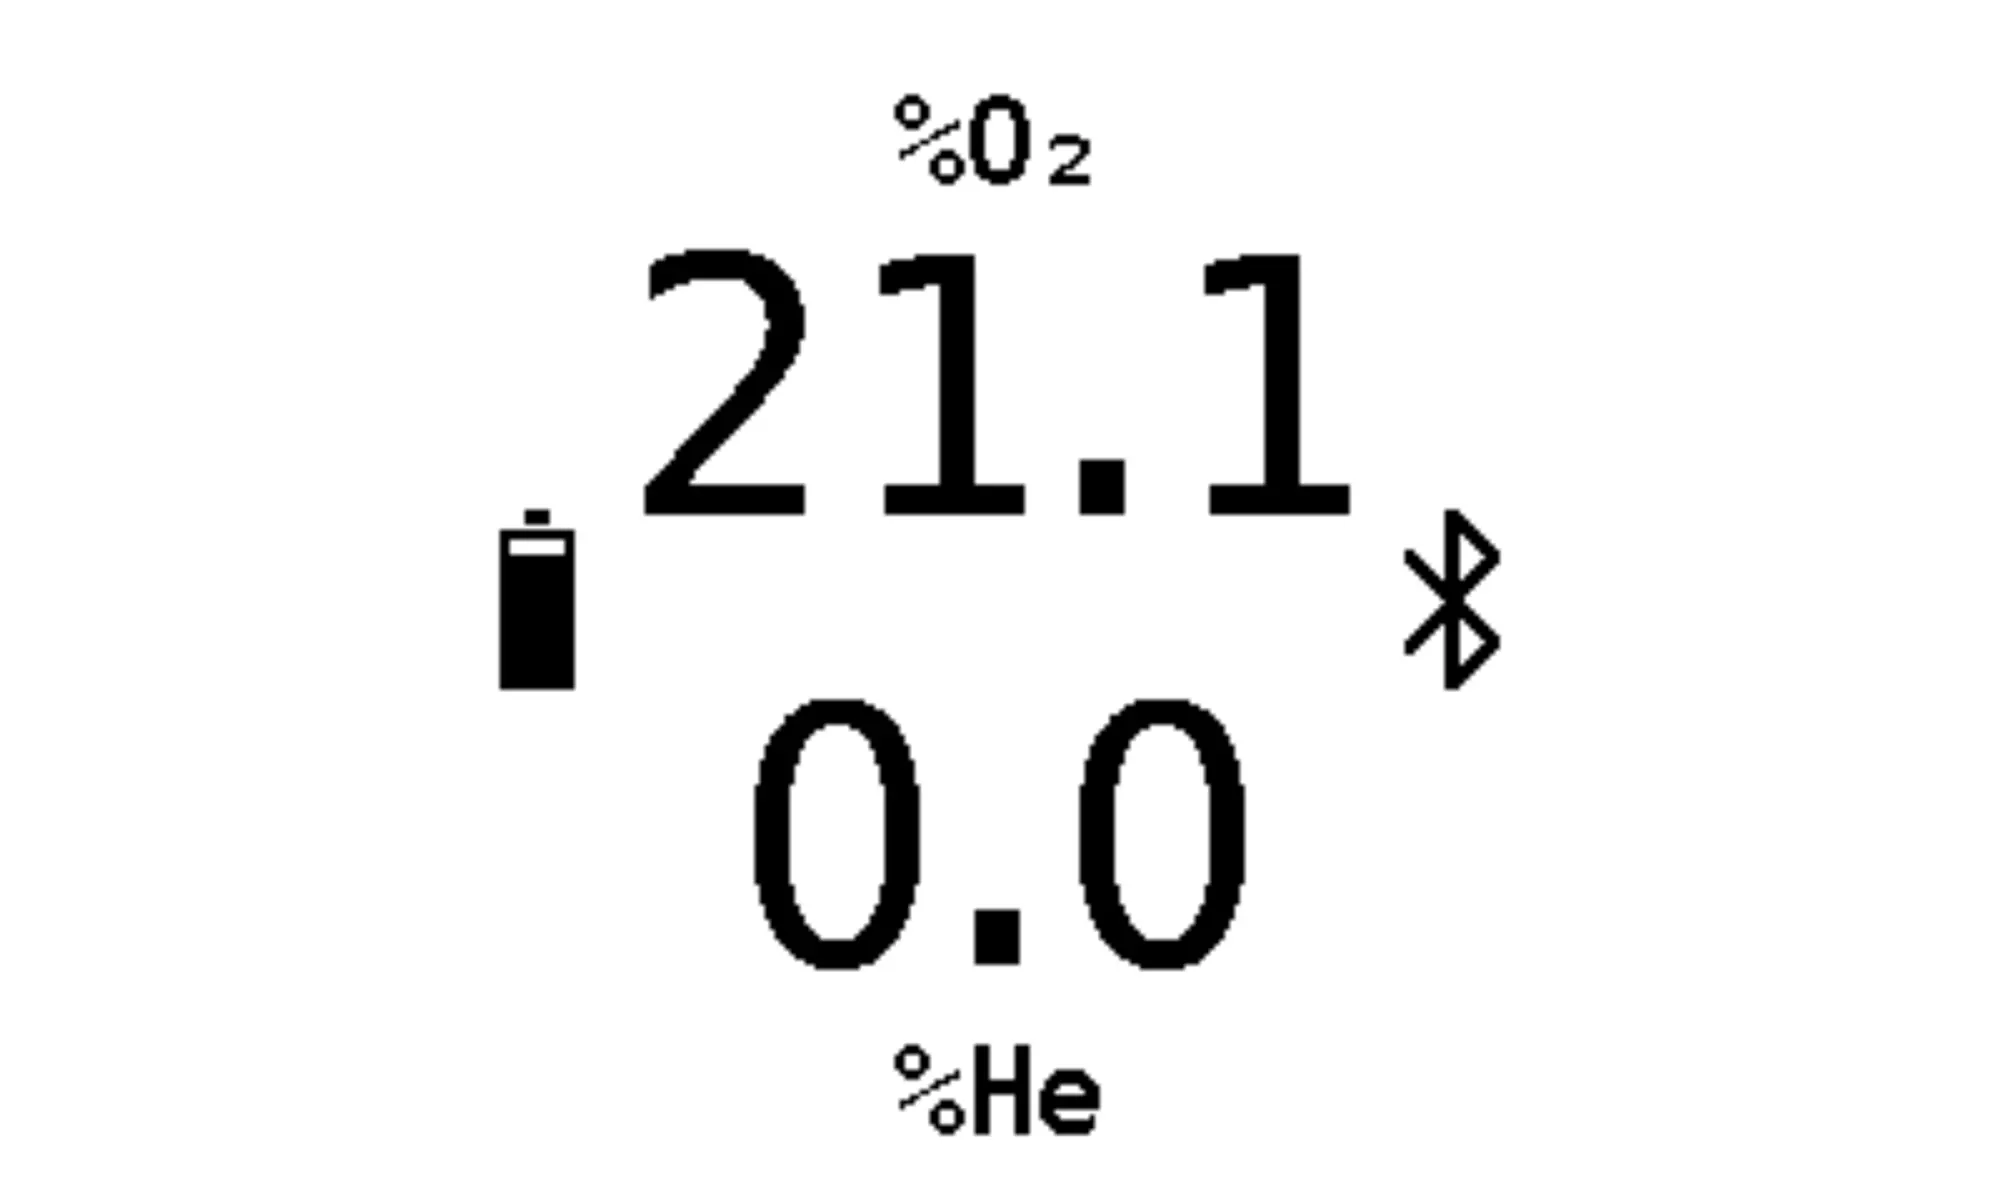
Pairing indication
Bluetooth symbol flashes - ECHO is not paired with the app - searching
Bluetooth symbol stable - ECHO is connected to the device
Pairing
1. Switch on ECHO
2. Turn on the mobile app in Analyzer mode
3. The app will offer you the available Bluetooth analyzers. If it doesn't, press the three dots on the top right
4. Select ECHO from the list
5. A context menu will pop up in the app - press Pair
6. The ECHO analyser will show you the PIN. Enter this in the box currently offered in the app.
Troubleshooting Pairing Issues
If the mobile application does not display an option to pair with the ECHO analyzer, even though the Bluetooth icon is flashing on the device display, the analyzer may already be paired with another mobile device.
In this case, the existing pairing must be removed directly on the ECHO analyzer by following the steps below:
1. Press and hold to open the device menu.
2. Use short presses to scroll down to Setup.
3. Press and hold to select Setup.
4. Press and hold to select Bluetooth.
5. Use short presses to scroll to Erase pair, then press and hold to select it.
6. Press and hold to confirm deletion of the pairing, or short press to cancel the action.
05. Calibration of the oxygen sensor
The oxygen sensor’s properties change over time and it is therefore necessary to recalibrate it. We recommend that such calibration be performed at least once a month. ECHO analyzer has a built-in barometer sensor, which corrects itself. If you require the most precise results, calibrate the sensor before each measuring.
NOTE: Solid state O2 sensor calibration interval is 6 months, or if value in ambient air significantly differ from expected - when accounted for humidity - see table at the end of this chapter.
Calibration of the sensor is performed as either single-point or two-point or three-point.
During single-point calibration, the content of oxygen in air, which is known and constant (20.95 %), is measured by the sensor. The calibration constant of the sensor is set so that the instrument displays 21.0 % (after rounding).
Two-point calibration proceeds in the same manner as single-point calibration, but uses two calibration gases – pure oxygen and air. Two-point calibration is more arduous as it requires the use of oxygen. However, it provides more precise results during measuring.
Thee-point calibration is recommended only for measuring hypoxic mixes, containing less than approximately 15 % oxygen. In this case, the third calibration gas should be a gas with zero oxygen content, i.e. pure helium or argon. Three-point calibration before measuring mixtures with a higher oxygen content can, on the contrary, lead to inaccurate measurements.
The values displayed on the device screen and the availability of advanced functions are limited. A significant extension of data visualization, control options, and the use of calculated values for gas preparation is achieved by connecting the analyzer to the Divesoft.App mobile application. Calibration can be performed either directly through the device menu or, after connecting to the analyzer, within the Divesoft.App environment. One-point and two-point calibration can be carried out directly on the device, while three-point calibration is available exclusively through the mobile application.
Enter the menu (long press) Scroll to Calibration with short presses and confirm (long press).
Short press to scroll through the options. Long press to select one of the options.
O2 Sensor – recommended to be performed regularly with a maximum interval of one day
He Sensor – the helium sensor does not need to be calibrated at all, or only in the case of an aberrant helium measurement. If you still decide to calibrate the helium sensor, then calibrate in air and without flow (disconnected tubing).
Return – takes you level back in the menu
Quit – return to the main screen
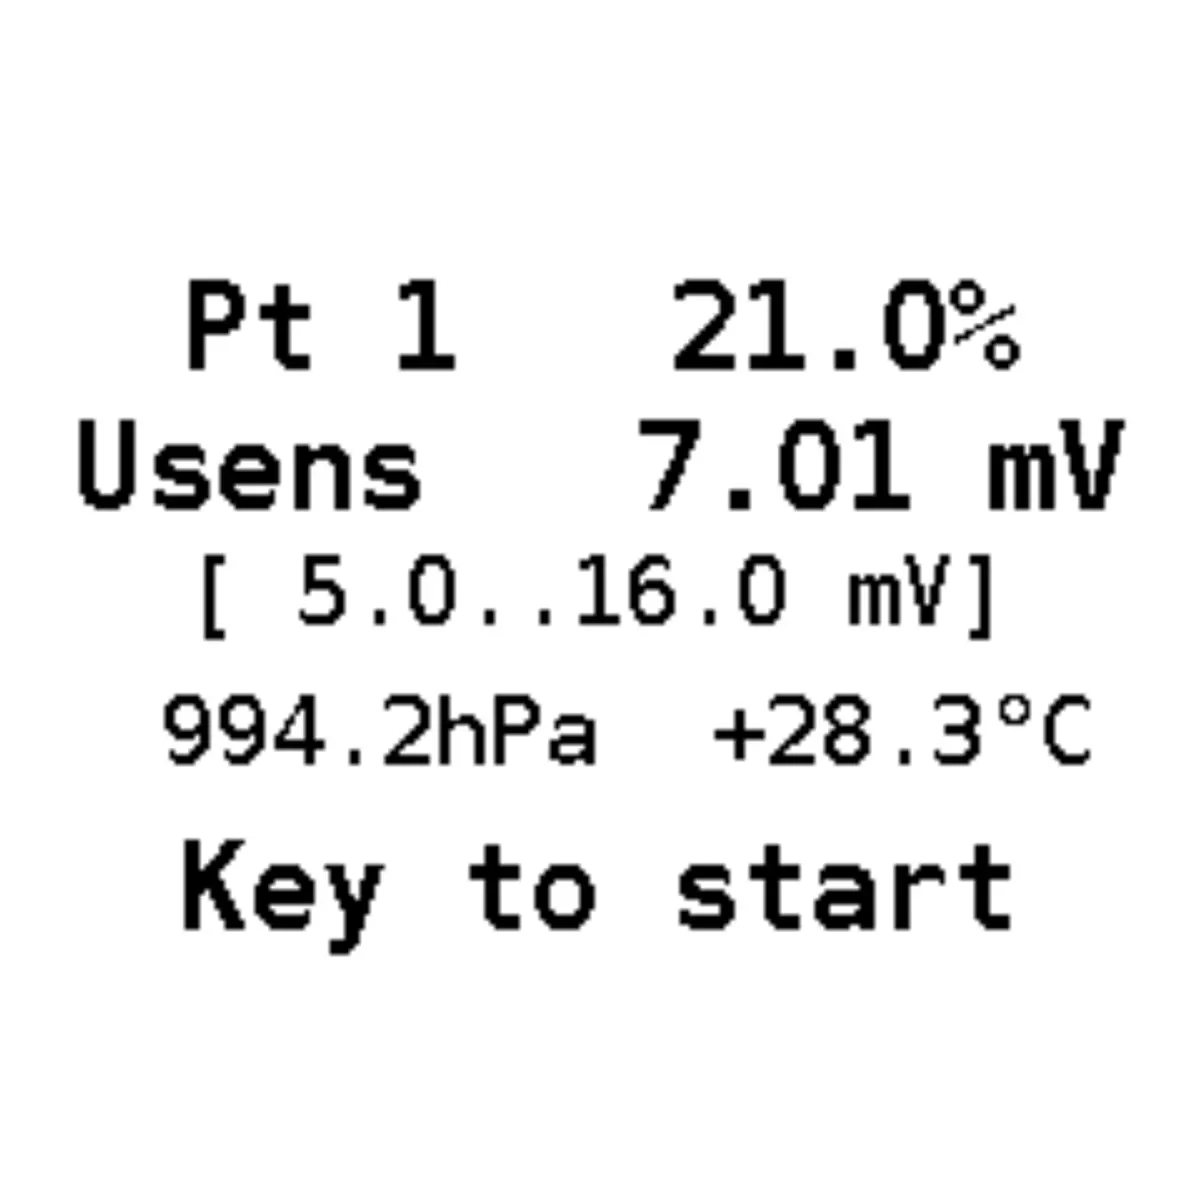
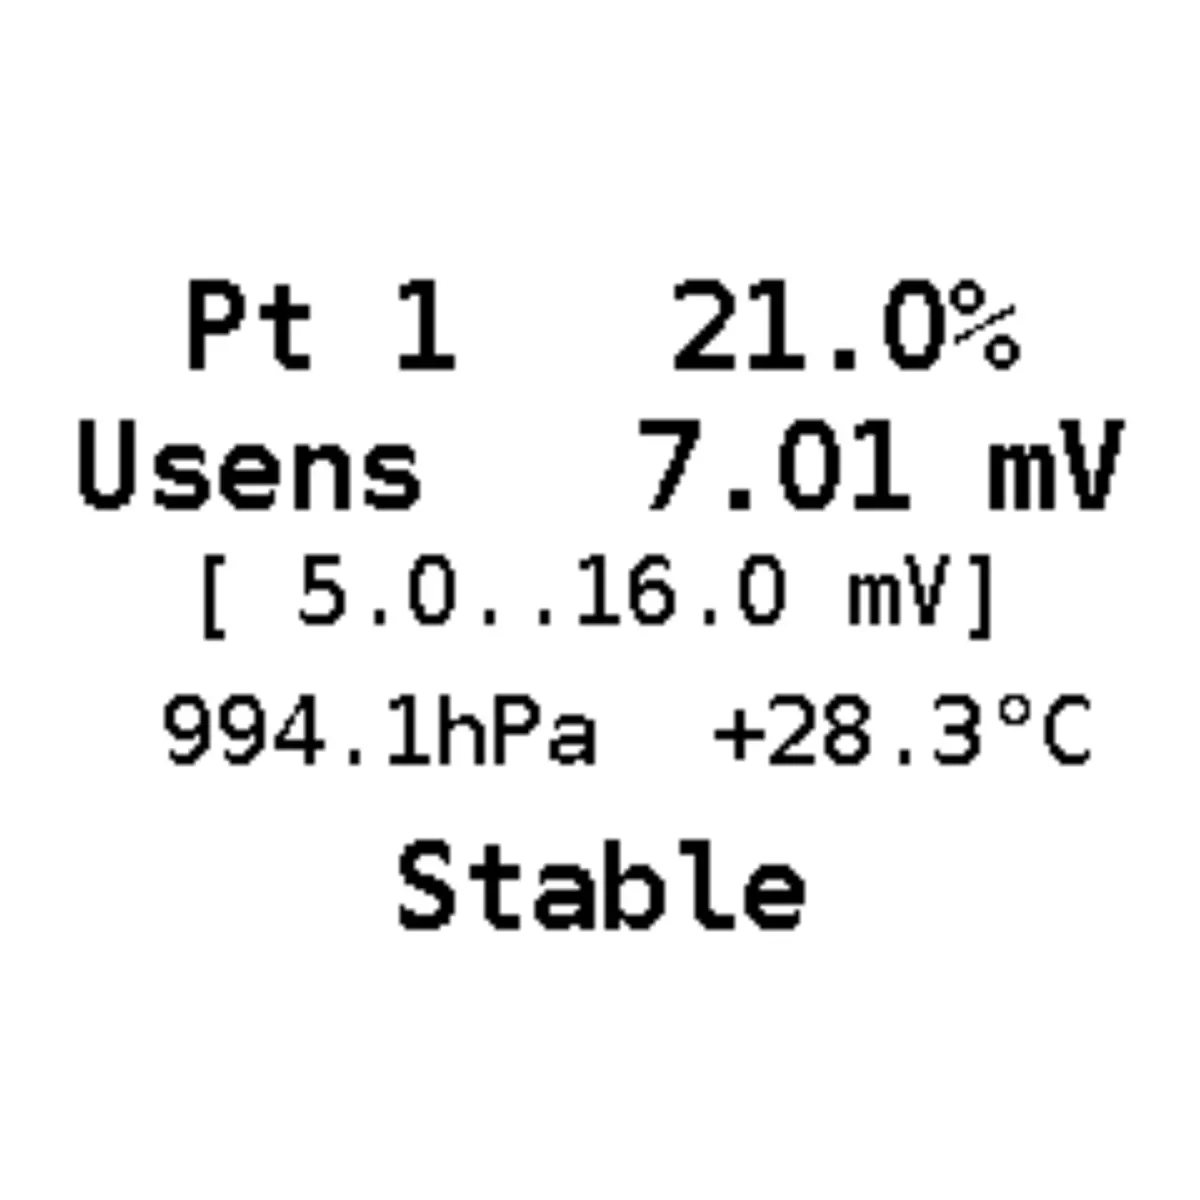
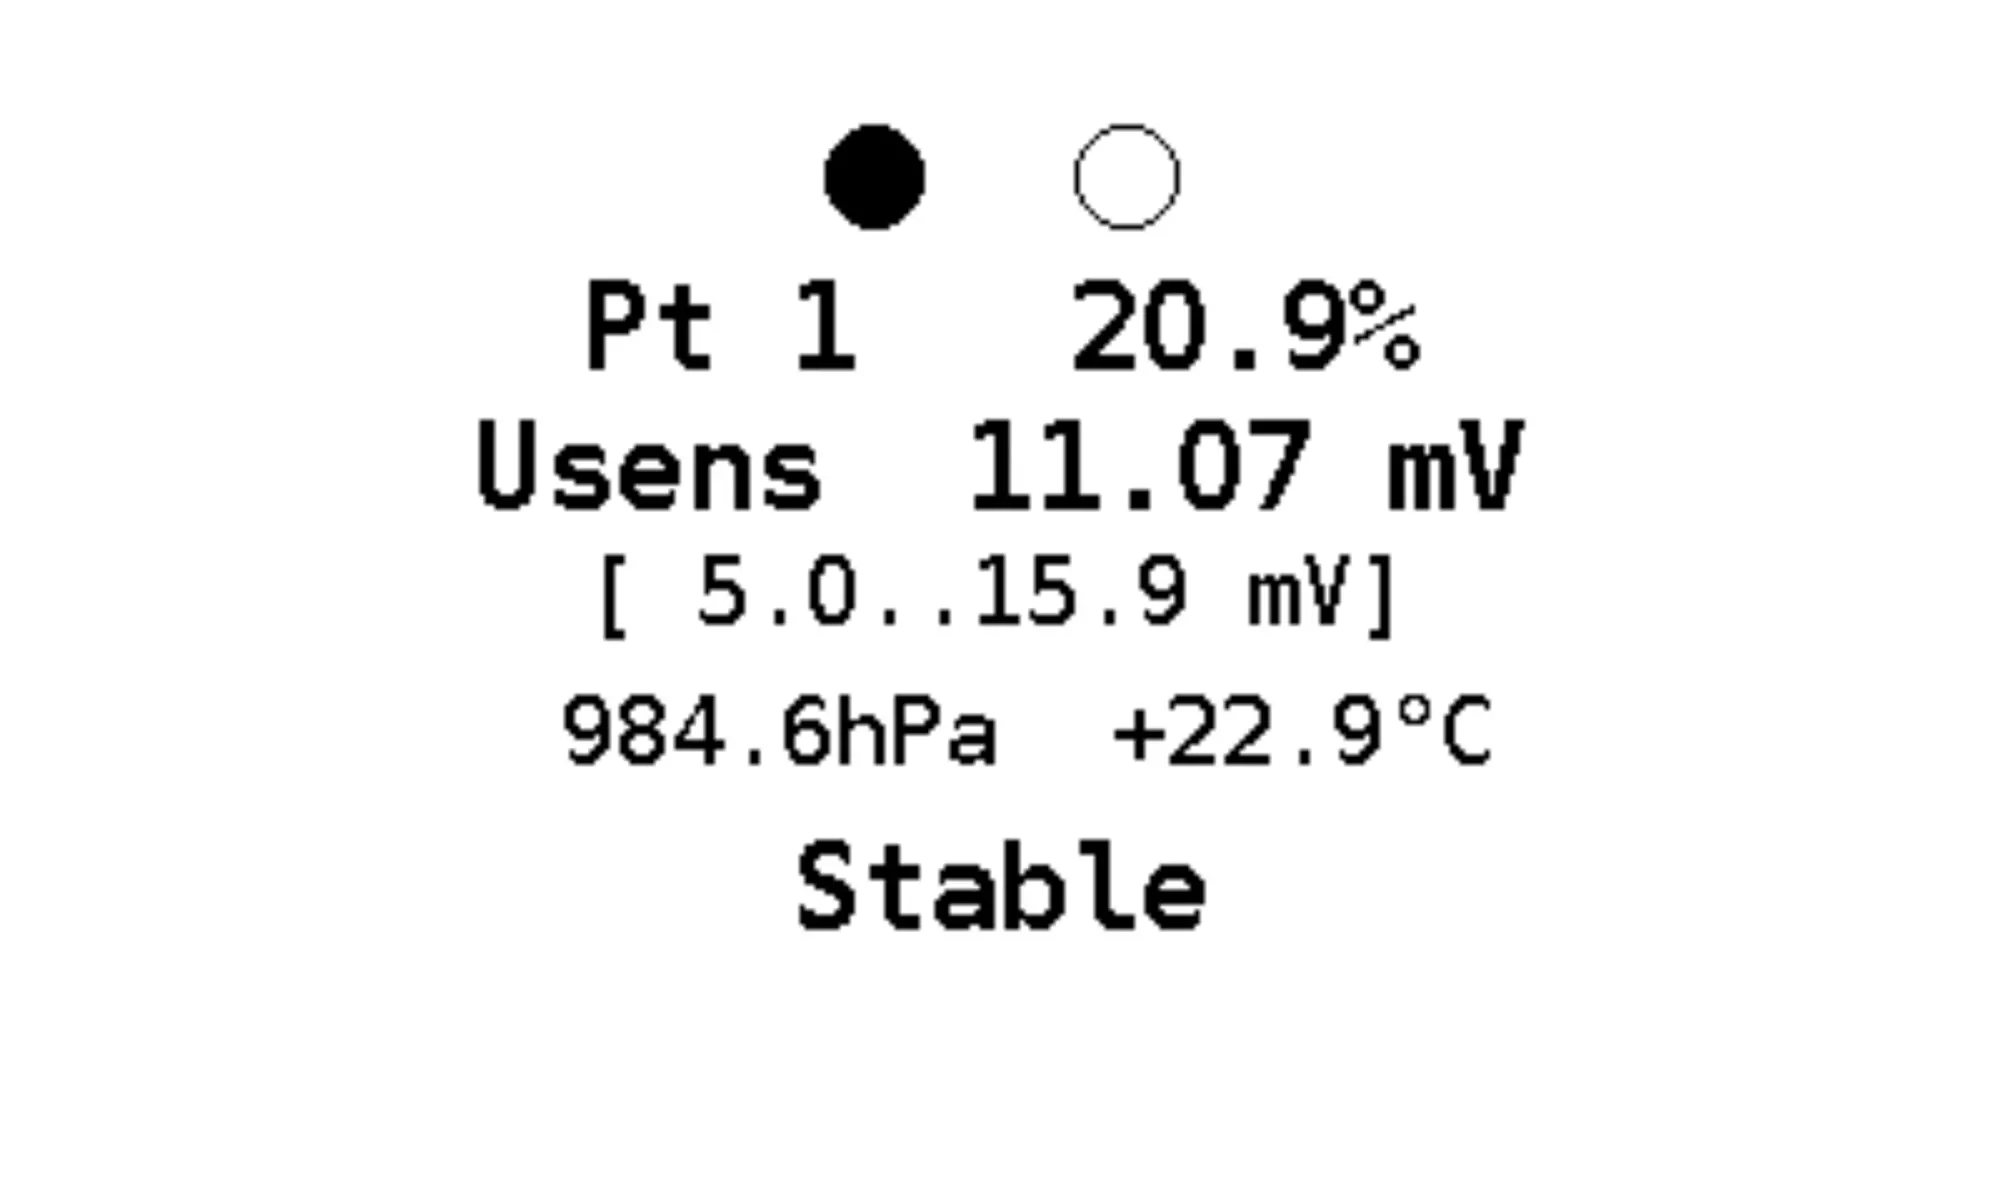
Oxygen sensor calibration
Short press to cycle through the options. Long press to select one of the options.
Air
calibrate with air
1. It is necessary to ensure that there is air on the sensor. If you have measured a gas other than air before calibration, you can speed up the venting of the measuring labyrinth by sucking the gas out of the measuring inlet port with your mouth.
2. Long press to select Air calibration
3. Short press to start calibration / Long press to cancel calibration
4. Wait for the values to stabilize (the countdown at the bottom of the screen)
5. Confirm the calibration with short press
Oxygen
calibrate with 100% oxygen.
1. It is necessary to ensure that 100% oxygen is present at the sensor. Use a gas source where you can be sure of the correct composition, quality and purity. For calibration, preferably connect one of the DIVESOFT flow limiters and connect the tubing to the ECHO inlet measuring port.
2. Long press to select Oxygen calibration
3. Short press to start calibration / Long press to cancel calibration
4. Wait for the values to stabilize (the countdown at the bottom of the screen)
5. Confirm the calibration with short press
Air+O2
two-point calibration with air and oxygen for more accurate calibration. Long press to select Air+O2
Step 1 – air
1. It is necessary to ensure that there is air on the sensor. If you have measured a gas other than air before calibration, you can speed up the venting of the measuring labyrinth by sucking the gas out of the measuring inlet port with your mouth.
2. Short press to start calibration / Long press to cancel calibration
3. Wait for the values to stabilize (the countdown at the bottom of the screen)
4. Short press to confirm the calibration step 1 and move to calibration step 2
Step 2 - oxygen
1. It is necessary to ensure that 100% oxygen is present at the sensor. Use a gas source where you can be sure of the correct composition, quality and purity. For calibration, preferably connect one of the DIVESOFT flow limiters and connect the tubing to the ECHO inlet measuring port.
2. Short press to start calibration / Long press to cancel calibration
3. Wait for the values to stabilize (the countdown at the bottom of the screen)
4. Confirm the calibration with short press
Correction of the oxygen content in the air
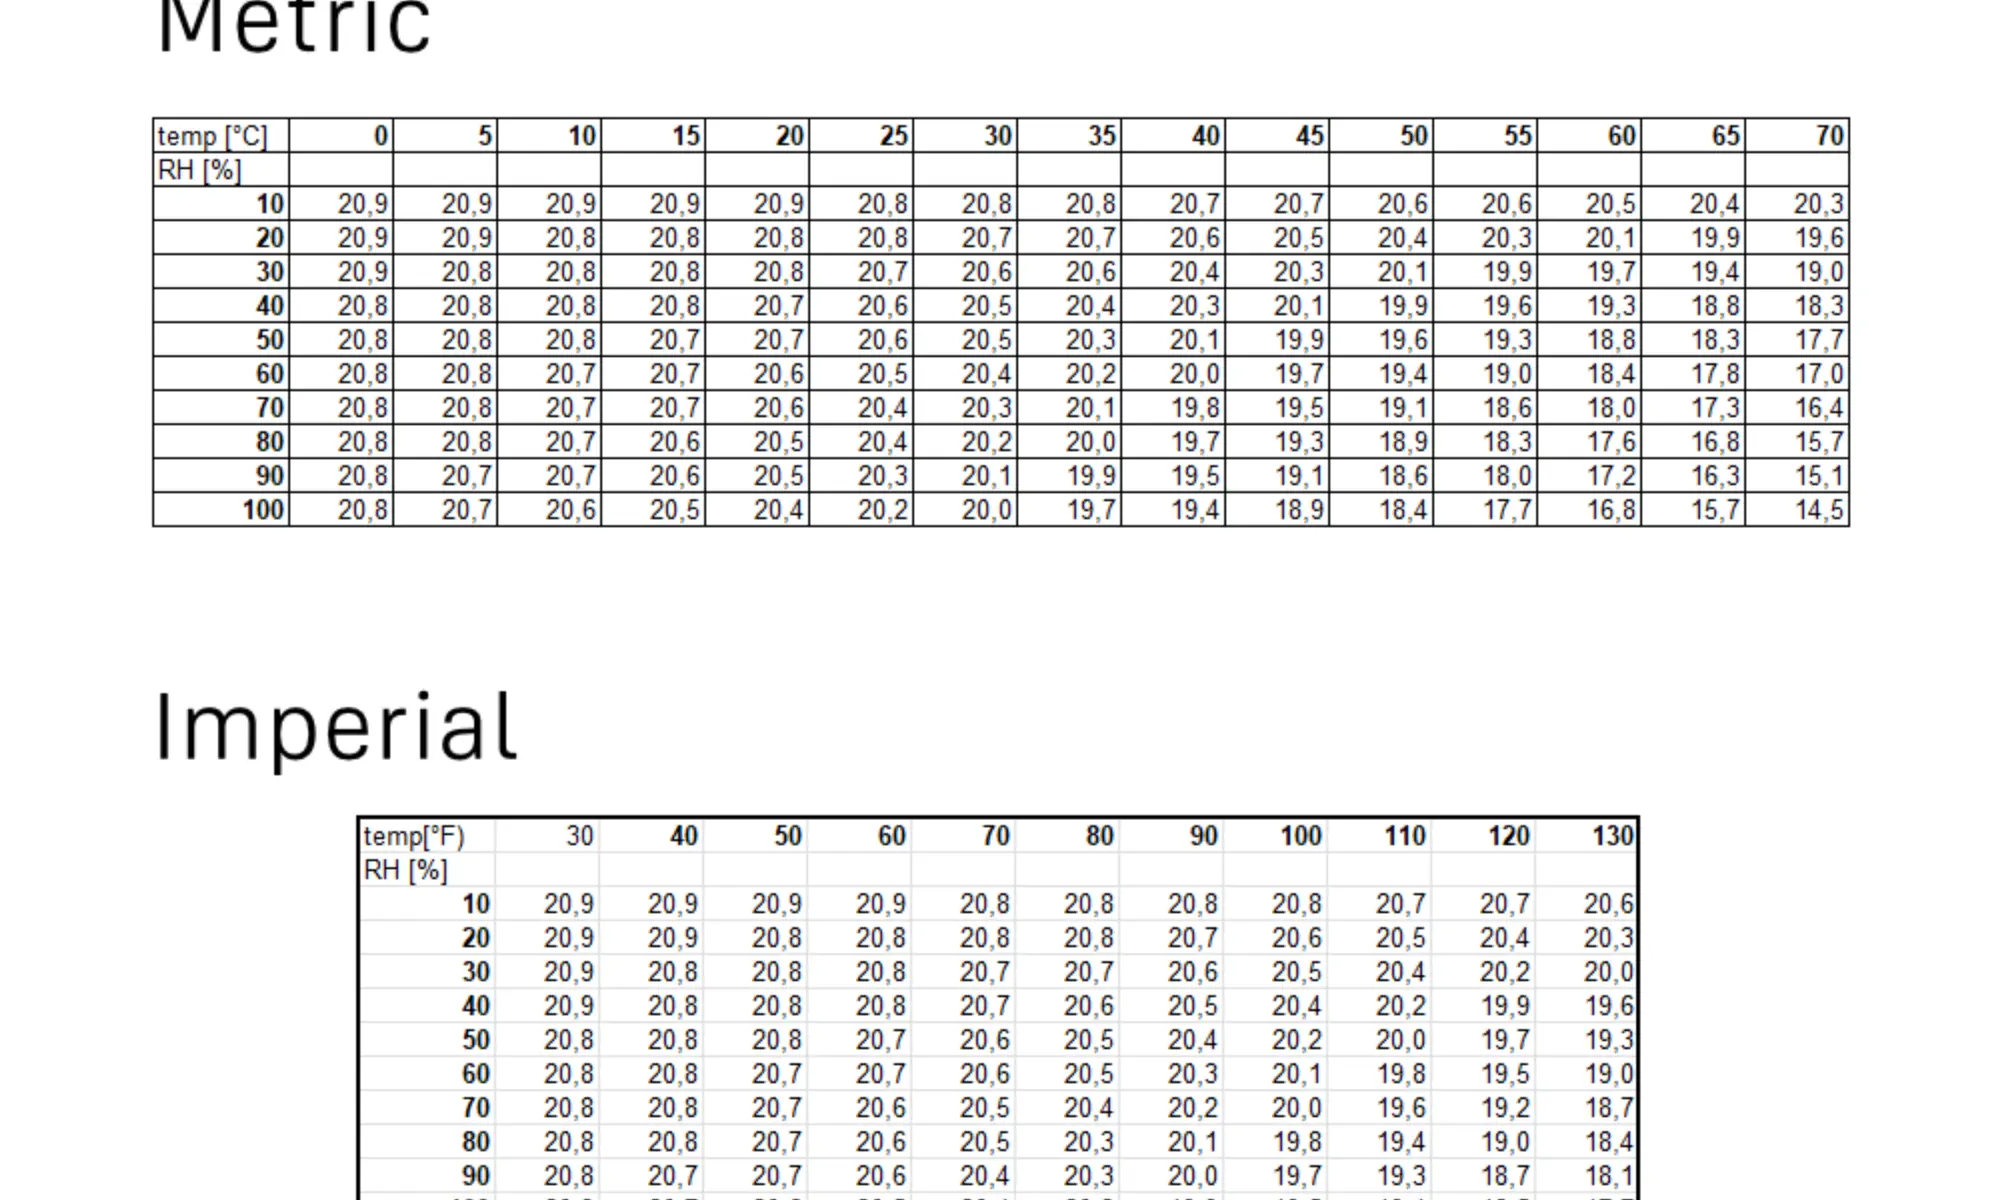
The oxygen content of the air is not constant, but varies with ambient conditions. The amount of oxygen is displaced by water vapour in the air. Therefore, the oxygen content decreases with increasing temperature and humidity. To accurately calibrate the oxygen sensor, use the correction tables below and set the correct value when calibrating to ambient air.
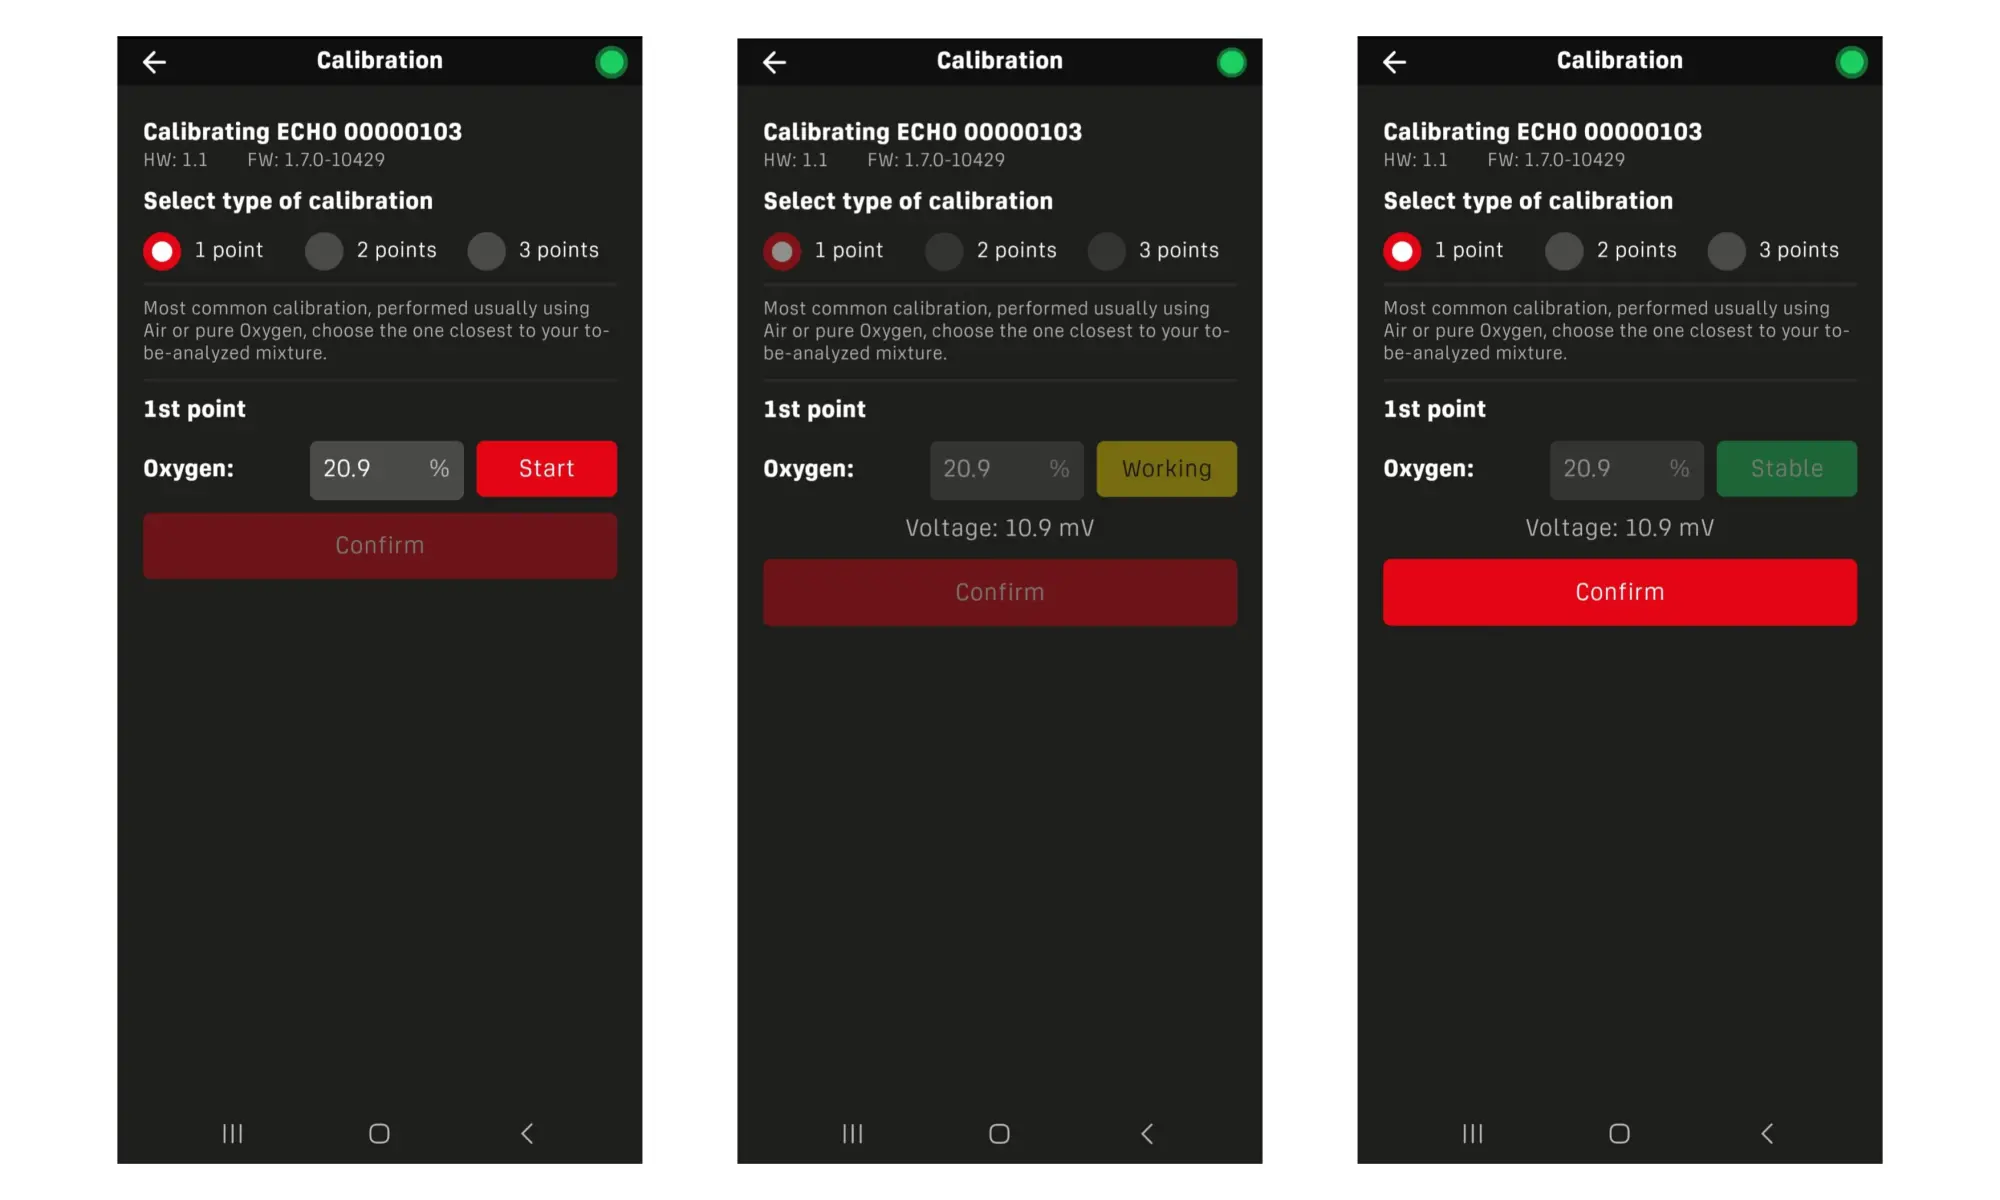
06. Calibration Using the Mobile Application
Calibration Using the Mobile Application
Calibration performed through the Divesoft.App is more user-friendly, clearer, and provides extended functionality compared to calibration performed directly on the device. In addition, the mobile application allows three-point calibration, which improves accuracy when analyzing hypoxic gas mixtures.
To use the mobile application, the app must be downloaded, installed, and paired with the ECHO analyzer (see chapter Connection to Mobile App).
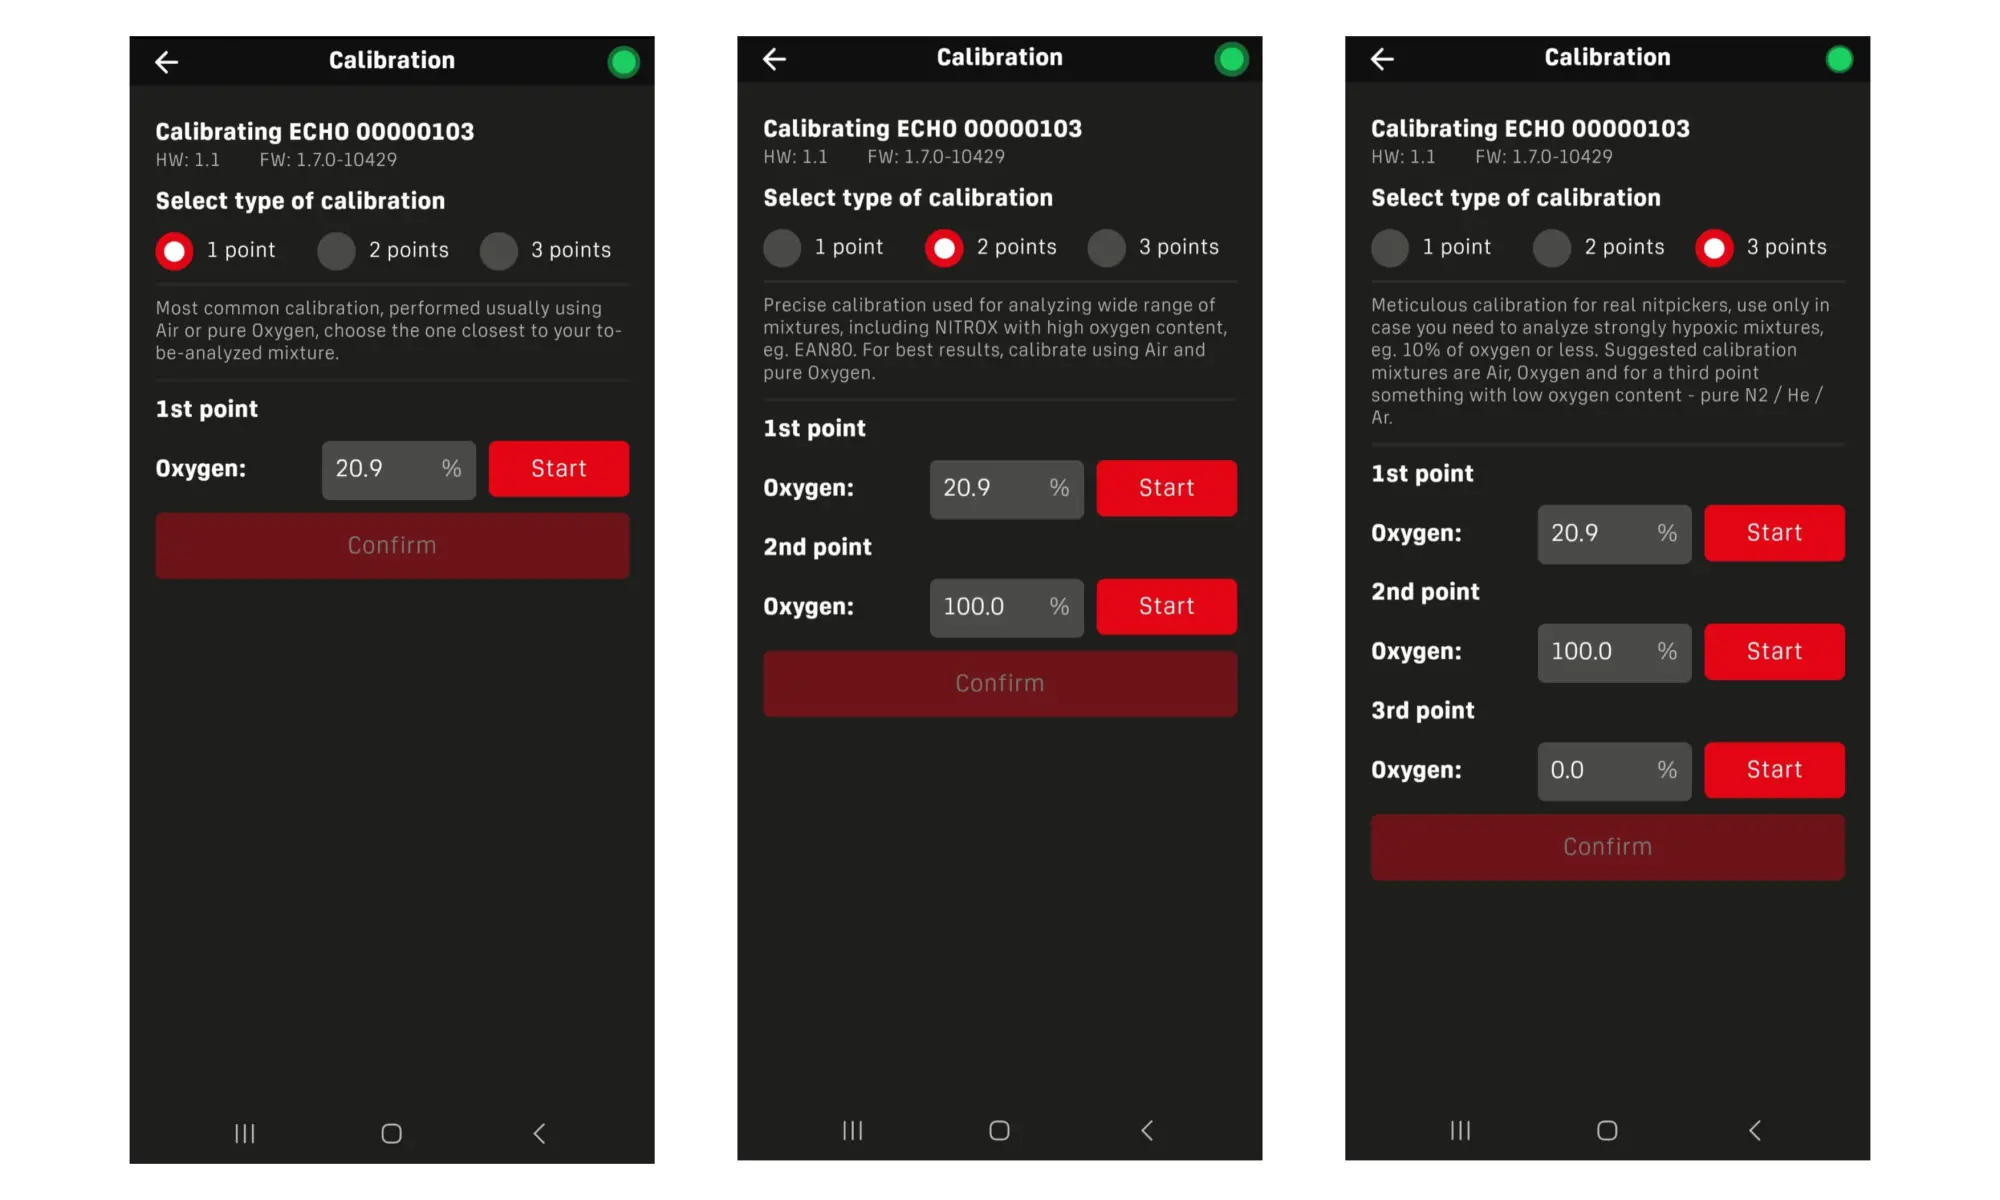
Calibration Procedure
1. After pairing, open the Divesoft.App.
2. Enter the Analyzer section.
3. Press and hold the red “Calibrate” button.
4. Select one-point, two-point, or three-point calibration.
(An explanation of calibration types and their recommended use is provided in Chapter 05 – Calibration of the Oxygen Sensor.)
5. Connect the calibration gas and open the valve.
6. Wait until the sensor reading stabilizes.
7. Once the sensor is stable, confirm the calibration point in the application and connect the next calibration gas if required.
Multi-Point Calibration Notes
• When performing two-point or three-point calibration, calibration can begin with any calibration gas.
• The calibration points may be completed in any order, allowing flexibility based on gas availability.
• This approach is especially useful in field conditions or when working with hypoxic mixtures.
07. Ambient pressure
Analyzer is equipped with a barometric pressure sensor. Thanks to this device can be calibrated for the atmospheric conditions and altitude. The atmospheric pressure and altitude can be displayed in the menu ambient pressure. Altitude is calculated from the ambient pressure and, depending on atmospheric conditions may differ from reality.
08. Helium sensor calibration
The helium sensor used in the ECHO analyzer is factory calibrated during the manufacturing process. Thanks to the measurement technology employed, the sensor exhibits excellent long-term stability, and no user calibration is required during normal operation.
Because helium measurement does not rely on consumable or aging-sensitive components, the sensor output remains stable over time. As a result, routine or periodic calibration of the helium sensor is not necessary.
For this reason, helium sensor calibration is not available in the ECHO device menu, and no calibration option is provided for helium measurement.
09. Carbon monoxide sensor calibration
Why Calibration Is Necessary
Over time, electrochemical sensors experience a gradual drift in their output signal.
Electrochemical CO sensors have a finite operational lifetime, regardless of use. The factory installed sensor has a manufacturer rated lifetime of 2 years from the date of manufacture.
Important: The sensor must be replaced regardless of apparent function once the rated service life has elapsed. An aged sensor may continue to produce readings while having significantly reduced sensitivity, potentially failing to alarm at dangerous concentrations.
Calibration Interval
The sensor should be calibrated at least every 6 months, or:
- After any sensor replacement
- After exposure to very high CO concentrations (above sensor range)
- After extended storage (>3 months without use)
If the zero reading shows persistent non-zero offset in clean air
Calibration Procedure
- Perform CO sensor zero calibration preferably outside or in a well ventilated room - clean air is absolute necessity.
- Do not attempt a calibration in a parking lot, underground parking garage or other enclosed space with a vehicles nearby.
- Flush the analyzer with a clean air, or wave it for 15 seconds to get the fresh air to the sensor near the outled vent.
- Ensure the analyzer has been powered on for at least 5 minutes to allow the sensor to stabilize.
- Navigate to the Calibrate / Gas Sensors / Gas1 zero and follow the on-screen instructions.
09.1 Bump Test
A bump test (functional test) is a quick exposure to a known concentration of CO to verify that the sensor responds and the alarm triggers correctly. It is not a substitute for full calibration — it confirms the sensor and alarm system are functional, not that the readings are accurate to a specific value.
A bump test should be performed:
- Before each day of use in safety-critical applications
- Before each dive trip or operational deployment
- After any period of storage exceeding 3 months
This is consistent with best practices for electrochemical gas detectors and with guidance from organizations such as the Industrial Scientific Gas Detection safety standards.
Bump Test Procedure
- Perform bump test outside, or open a window, Carbon Monoxide is a dangerous gas in higher concentrations.
- Power on the analyzer and allow it to warm up (minimum 5 minutes).
- Confirm the reading in clean air is 0 ppm (or within ±1 ppm).
- Apply bump test gas (10 – 50ppm CO) into the ECHO inlet for 5s.
- CAUTION do not use bump gas with CO concentration above 100ppm, which may result in a permanent CO sensor damage.
Confirm:
- The reading shows at least 80% of the bump gas CO concentration within 30 seconds
- The audible and/or visual alarm activates as long as above 5ppm
- Remove gas, flush ECHO with air, and confirm the reading returns to near zero within 60 seconds.
Fail condition: If the sensor does not respond, does not reach the expected concentration, or the alarm does not trigger, remove the analyzer from service immediately and perform a full calibration or replace the sensor.
Record the bump test result (pass/fail) in the maintenance log.
10. Measuring O2 and He concentration
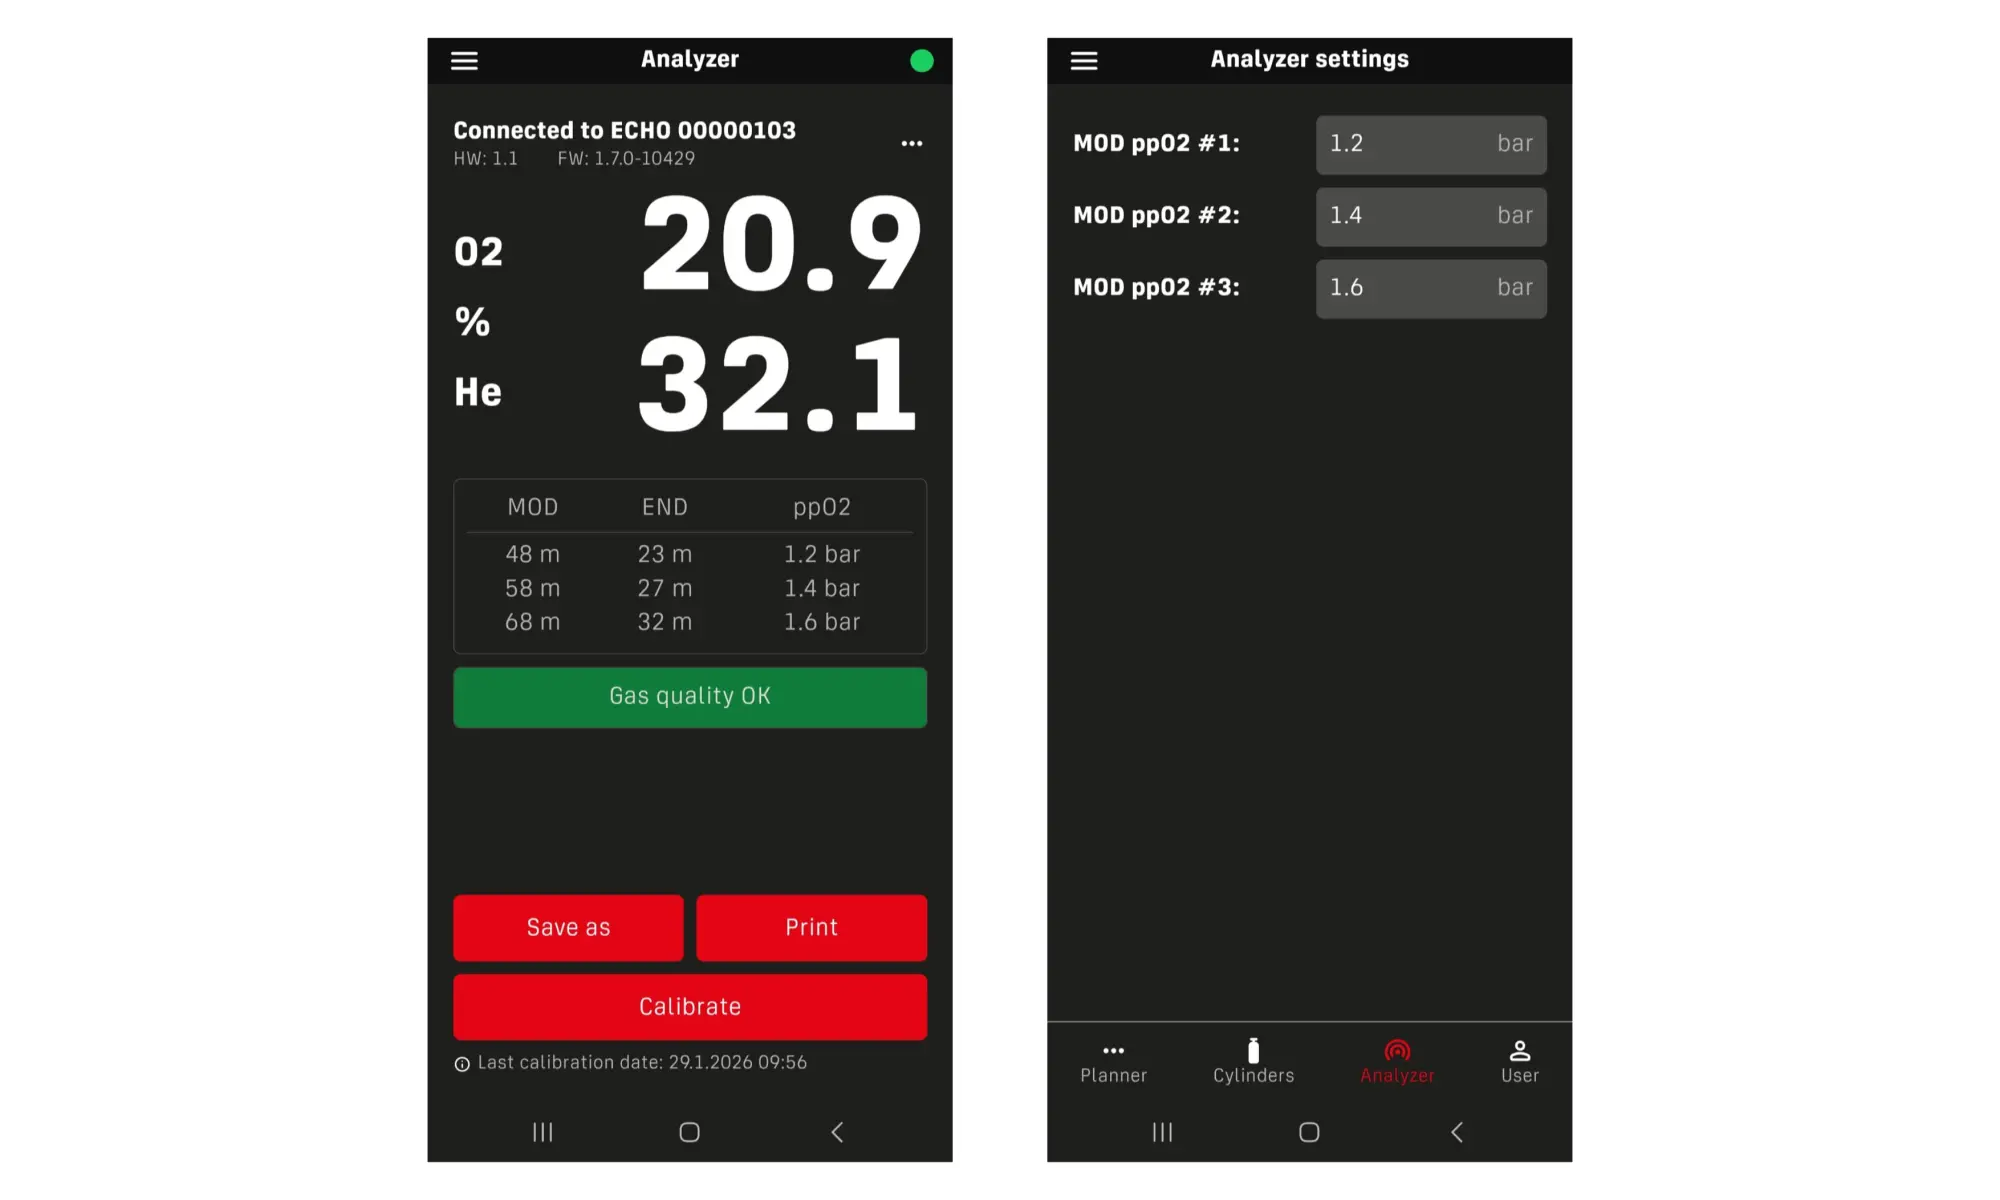
The ECHO analyzer is designed for simple and reliable analysis of breathing gases used in diving. The ECHO analyzer allows users to monitor measured gas values directly on the ECHO device display or, when connected to a mobile device, on a smartphone or tablet using the Divesoft.App in Analyzer mode.
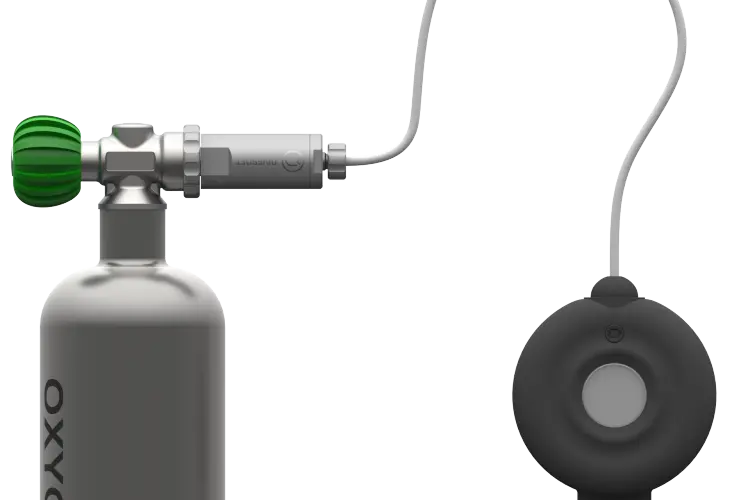
The analyzer is equipped with a built-in basic flow limiter, which can be placed directly against the cylinder valve. This solution is suitable for the analysis of air and nitrox mixtures.
For helium-containing mixtures (trimix or heliox), the use of an additional external flow limiter is recommended. A dedicated flow limiter (e.g. Flow Limiter Mk2) ensures accurate and stable gas sampling while minimizing unnecessary gas loss during the analysis process.
Analysis Steps
1. Ensure that the analyzer is powered on.
Upon activation, the analyzer automatically switches to oxygen and helium measurement mode. No additional setup is required.
2. Place the built-in flow limiter against the cylinder valve.
If an external flow limiter is used, connect the flow limiter to the cylinder valve and link it to the opening of the ECHO flow limiter using the supplied hose.
3. Slowly open the cylinder valve to allow gas to flow into the analyzer.
4. After approximately 5–10 seconds, the measured gas composition will be displayed on the ECHO analyzer screen.
If the analyzer is connected to the mobile application, the measured values will also be displayed on the mobile device.
5. Wait until the displayed values stabilize before recording or confirming the measurement result. Stable readings are essential for accurate gas analysis.
11. CO detection
Carbon monoxide is a substance that is produced by imperfect combustion. It is therefore present around open fires or in the exhaust gases of combustion engines. Carbon monoxide has a direct effect on human health and is life-threatening in combination with high ambient pressure. The natural concentration of carbon monoxide in the air is around 0-10 ppm, in urban areas this can be as high as 200 ppm. The first signs of carbon monoxide poisoning at atmospheric pressure appear at a concentration of around 200 ppm, with life-threatening concentrations above 400 ppm.
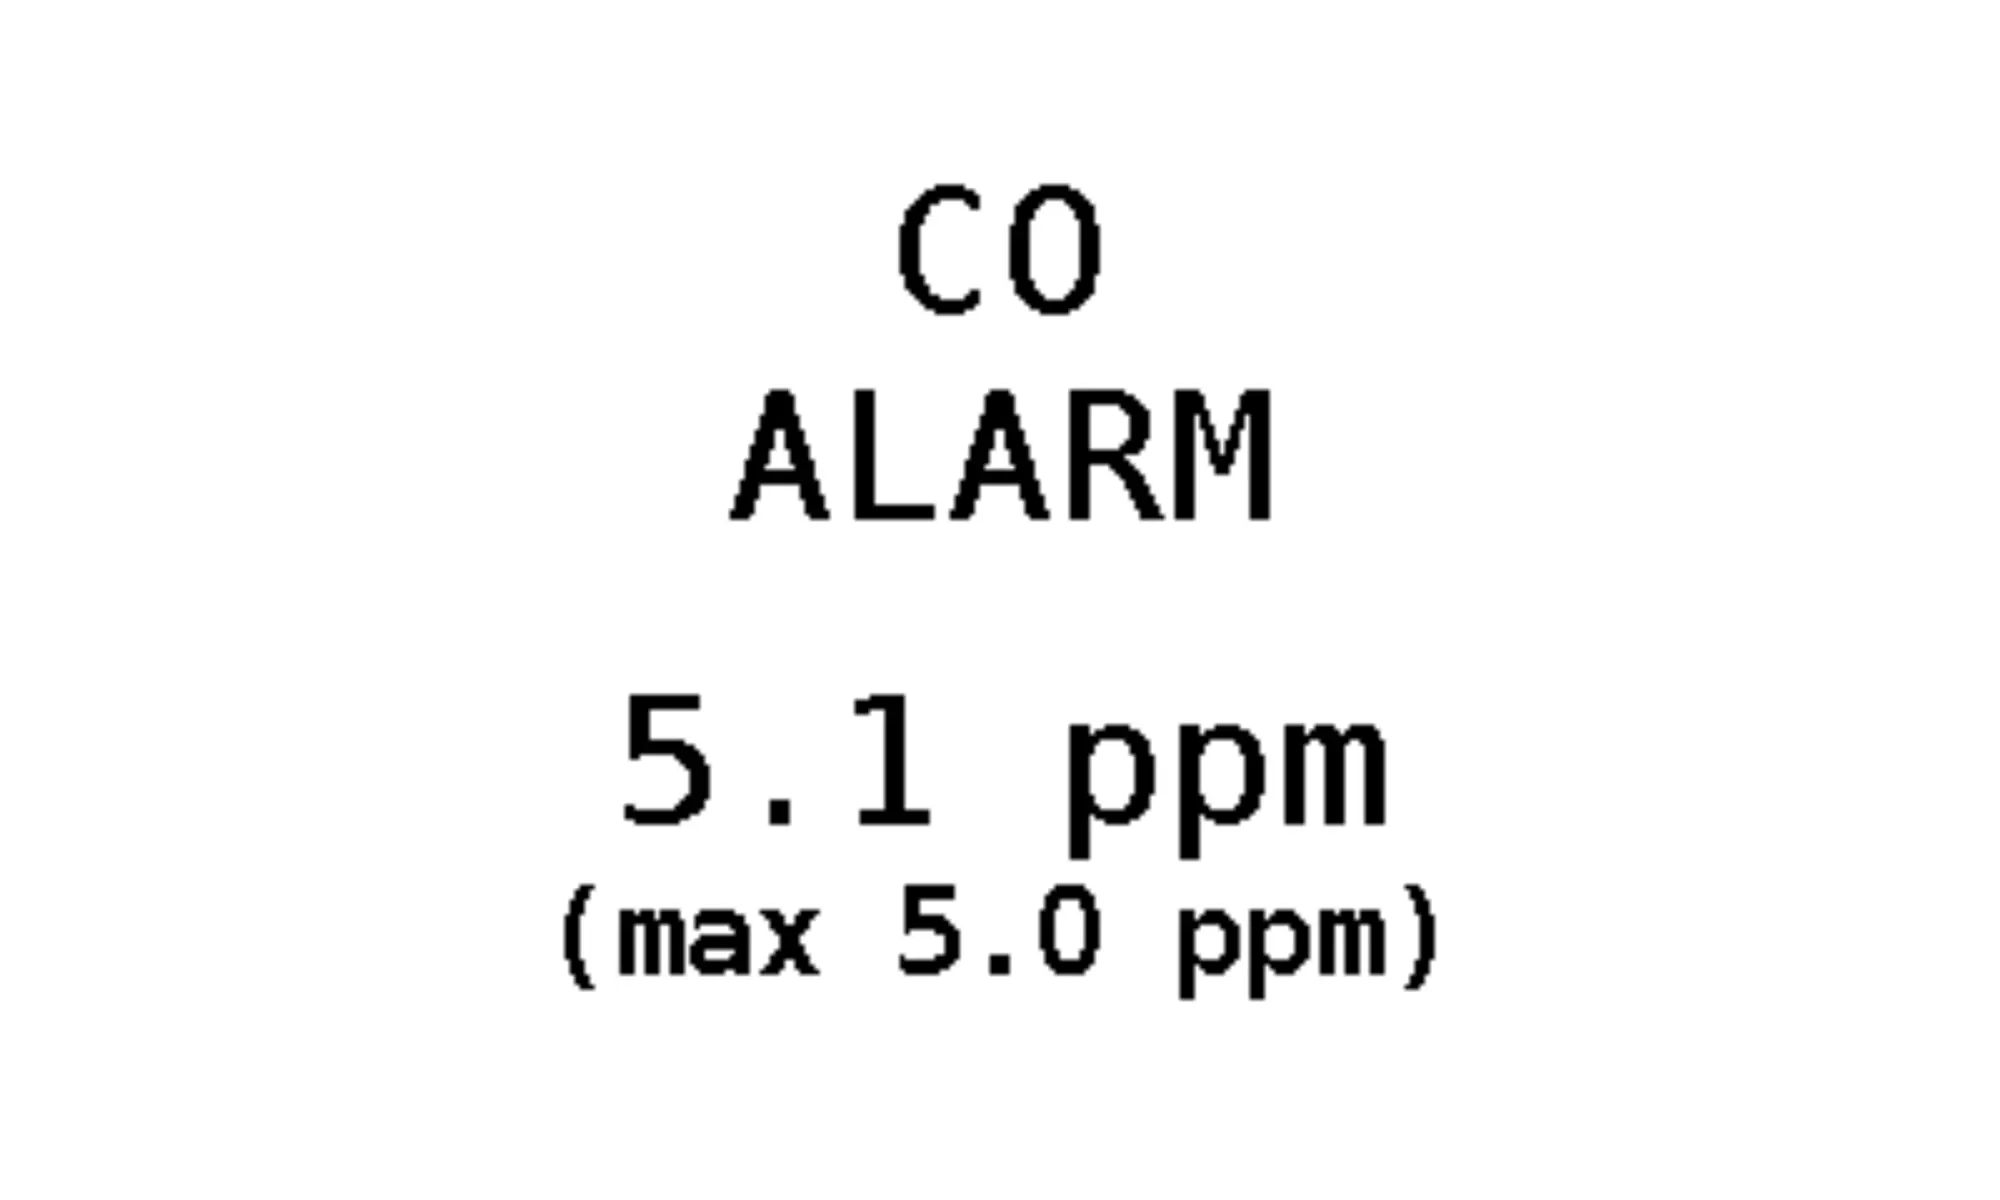
In a hyperbaric environment the partial pressure of CO increases, therefore when using diving breathing gases the maximum permissible level of CO in the mixture is 5 ppm.
If the limit is exceeded, an alarm appears on the ECHO display followed by audible alarm.
In the Divesoft.App, you can click the Gas quality bar, which will show you the current CO concentration. In case of dangerous values, the bar will turn red and warn you of the dangerous value.
CAUTION
- Under no circumstances place the ECHO near an internal combustion engine exhaust.
- Exposing ECHO to CO concentration over 100ppm can permanently damage the CO sensor !
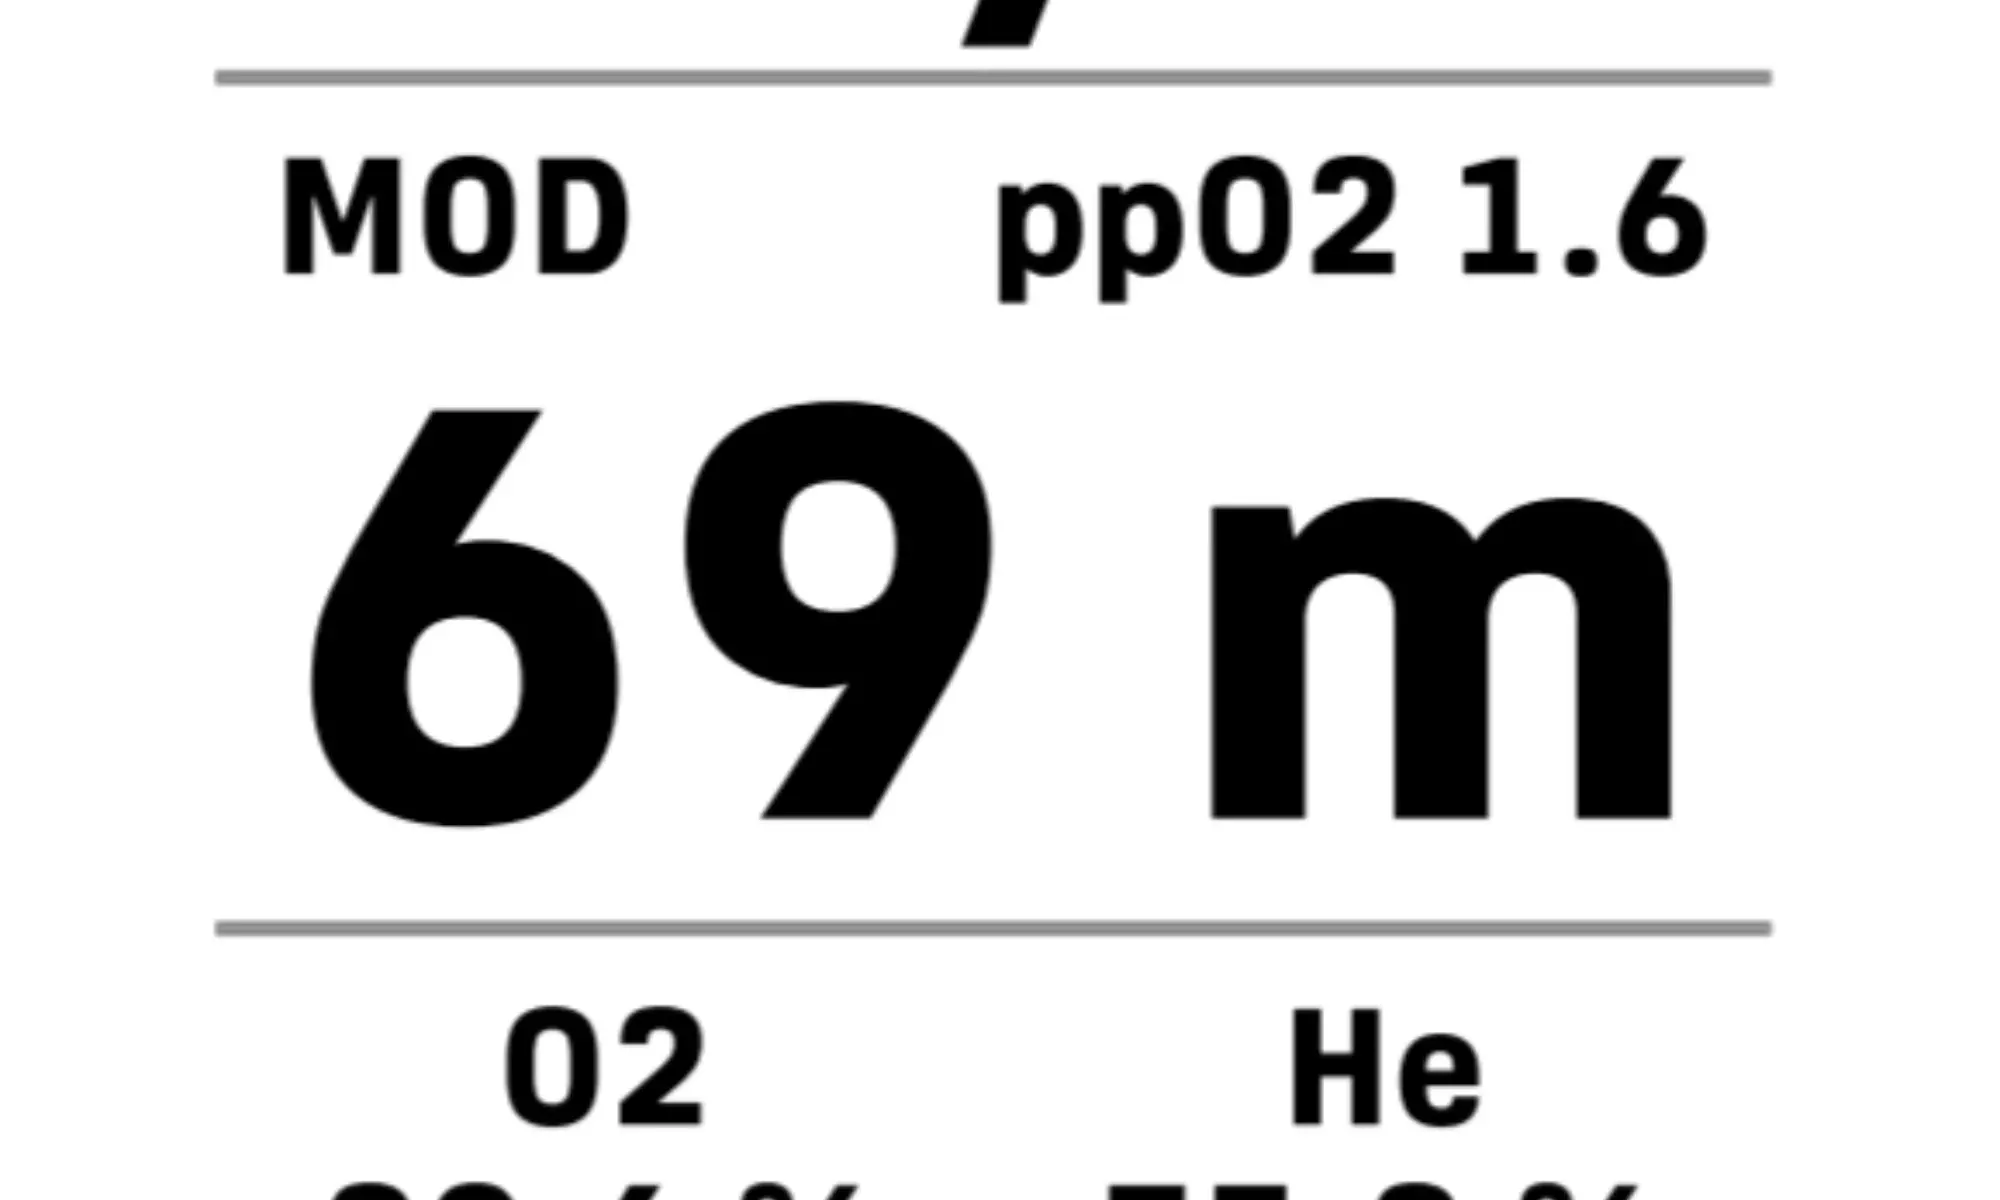
12. Maximum Operating Depth (MOD) Display
The calculation and display of Maximum Operating Depth (MOD) are available exclusively through the mobile application. When the analyzer is connected to the mobile device, MOD values are shown in the Divesoft.App in Analyzer mode. The application displays three separate MOD values, each corresponding to a different maximum allowable oxygen partial pressure (PO₂).
Default MOD Settings By default, the following PO₂ limits are used for MOD calculation:
• PO₂ = 1.2 bar
• PO₂ = 1.4 bar
• PO₂ = 1.6 bar
These values correspond to commonly accepted oxygen exposure limits in diving practice:
• PO₂ 1.4 bar – standard limit for recreational diving
• PO₂ 1.6 bar – typical limit for decompression gases
• PO₂ 1.2 bar – a conservative limit suitable for demanding conditions or increased safety margins
Customizing PO₂ Limits
If different PO₂ limits are required, the values can be adjusted directly in the mobile application. This may be useful, for example, when analyzing diluent gases, where a lower maximum PO₂ value (such as PO₂ = 1.0 bar) is preferred.
To change the PO₂ limits:
1. Open the Divesoft.App.
2. Switch to the Analyzer section using the bottom navigation bar.
3. Enter the Analyzer settings.
4. Adjust the PO₂ values as required.
The MOD values will be recalculated automatically based on the new settings.
13. Printing an Analyzed Gas Label
Printing a gas analysis label is available only through the Divesoft.App.
After completing the gas analysis and connecting the analyzer to the mobile application, proceed as follows:
1. In the Divesoft.App, press the Print button.
2. The application generates a PDF (.pdf) file, which is saved on the mobile device.
3. The PDF file can be shared using any compatible application on the smartphone or tablet.
4. The label can be sent to a label printer and printed for marking the cylinder with the analyzed gas information.
This function allows clear and standardized labeling of breathing gas cylinders directly after analysis.
Enter the menu by press and hold the button.
The Setup menu provides access to device configuration and system settings. It contains the following items:
• Bluetooth
• Config.
• Screen
• Factory def.
• Return
• Quit
Selecting Return moves one level back in the menu structure.
Selecting Quit exits the menu and returns the device to measurement mode.
Bluetooth
The Bluetooth menu contains options related to pairing the ECHO analyzer with a mobile device.
Available options:
• BLE pairing
Initiates Bluetooth pairing with the mobile application.
• Erase pair.
Deletes the current pairing with the mobile application and frees the analyzer for pairing with a new mobile device.
Config.
The Config. menu contains sensor-related configuration options.
Sensor
Select the currently used oxygen sensor type:
• R22
Standard galvanic oxygen sensor.
• DVO2
Solid-state oxygen sensor.
⚠️ Important:
Only Dive O₂ solid-state oxygen sensors are supported.
To connect a Dive O₂ sensor, a special interface cable is required and must be requested separately.
Dive O₂ sensor characteristics:
• Extremely long service life (more than 10 years)
• Reduced calibration requirements
• Must not be exposed to temperatures exceeding 60 °C
N₂ Src
Select the nitrogen reference source used for calculations:
• Atmospheric nitrogen with residual argon
• Pure nitrogen
This setting is intended primarily for laboratory measurements or specialized use.
For standard diving gas analysis, the difference between these options is negligible.
Units
Setting measurement units between imperial and metric
Screen
The Screen menu allows customization of display appearance.
Available options:
• Orient.
Sets the display orientation in 90° increments.
• Inverse
Switches display rendering between:
o black text on a white background, and
o white text on a black background.
• Splash
Configures the startup screen animation:
o Full – full startup animation
o Short – displays only hardware and software version information
Factory def.
Selecting Factory def. restores all device settings to their original factory defaults.
15. Measurement units
The ECHO analyzer supports both metric and imperial unit systems. The selected unit system affects the display of depth and pressure-related values where applicable.
Regardless of the selected unit system, the following measurement units are always used:
• Oxygen partial pressure (PO₂): displayed in bar
• Gas composition: displayed in percent (%)
• Carbon monoxide (CO): displayed in parts per million (ppm)
Carbon Monoxide Unit – ppm
ppm (parts per million) is a unit expressing the concentration of a gas as the number of parts of that gas per one million parts of the gas mixture.
In practical terms:
• 1 ppm means 1 part of CO per 1,000,000 parts of breathing gas
• ppm is a ratio, not an absolute pressure value
Relationship Between ppm and Pressure
Although ppm is a concentration ratio, it is directly related to pressure:
• The partial pressure of CO is proportional to its concentration (ppm) and the ambient pressure.
• As ambient pressure increases (for example with depth), the partial pressure of CO increases, even if the ppm value remains the same.
This means that:
• A gas mixture with a fixed CO concentration (e.g. 5 ppm) becomes more hazardous at greater depths, because the CO partial pressure rises with increasing pressure.
For this reason, CO limits are defined in ppm at surface pressure, and strict limits are applied to breathing gases intended for diving.
16. Gas calculations using a mobile app
By using the mobile application, the functionality of the ECHO analyzer is significantly extended. One of the key features is the ability to perform breathing gas calculations for dive planning and gas mixing calculations, including the generation of a final gas preparation recipe. All calculations are performed within the Divesoft.App after the analyzer is connected.
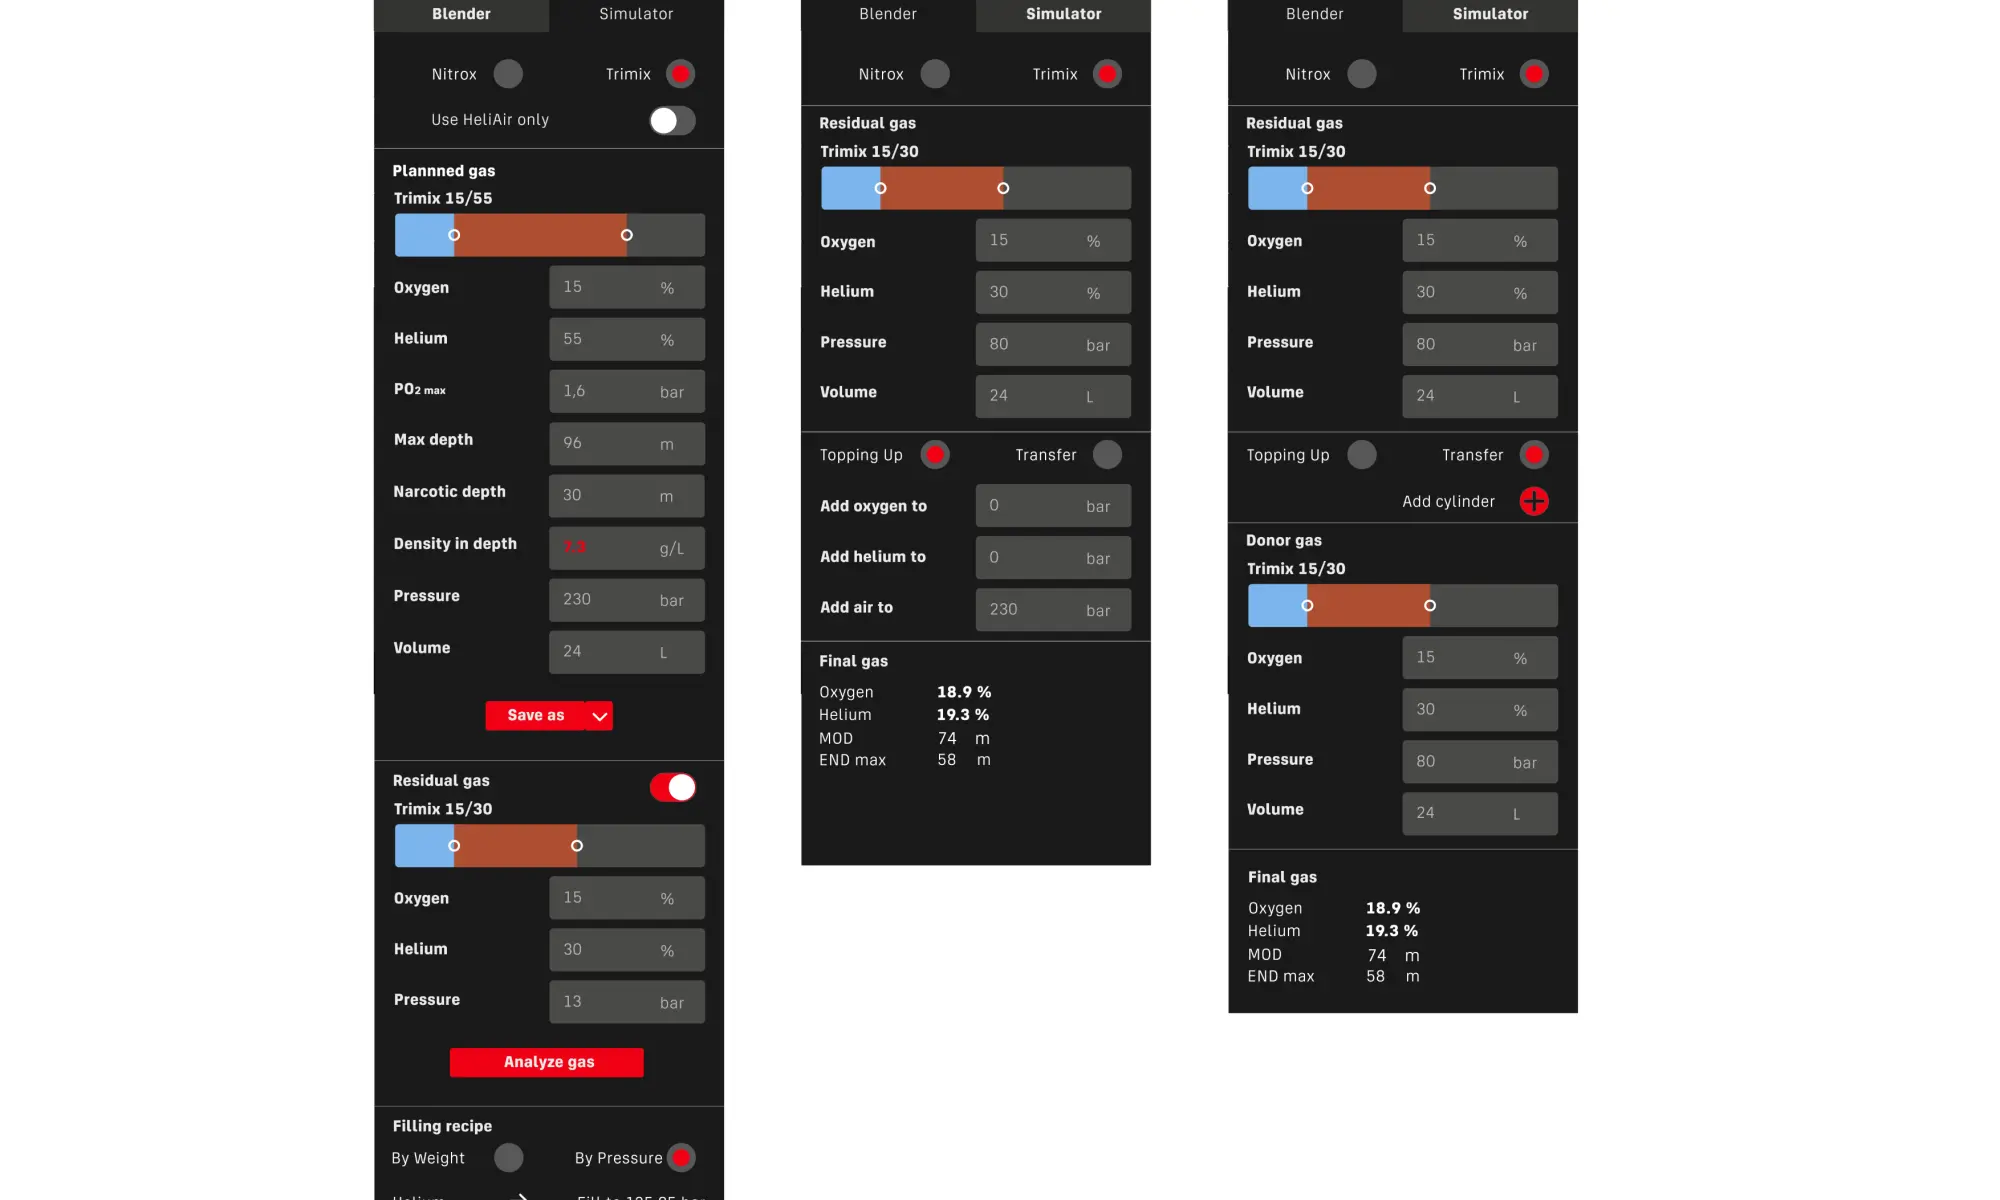
Ideal Gas Calculation
The application allows calculation of an ideal breathing gas for a specific dive depth based on user-defined parameters.
The gas composition is calculated according to the parameters that are actively entered. If certain parameters are not specified, the application automatically prioritizes the remaining defined limits.
For example:
• If a maximum gas density is specified but END is not entered, the application calculates the gas based on the maximum allowed density and the configured maximum PO₂. The corresponding END is then calculated automatically.
• The same logic applies to other parameters such as PO₂ limits, END, or gas density.
Conversely, if a specific gas composition is entered, the application calculates the usable depth range and the gas properties at the selected depth.
Gas Mixing
To prepare a gas mixture, enter the existing gas in the cylinder at the bottom of the screen. The application then calculates a step-by-step filling procedure to achieve the desired final mixture.
An option “Heliair only” can be enabled to avoid the addition of pure oxygen during the mixing process.
Simulator
The Simulator tab allows calculation of the resulting gas mixture when combining gases with defined pressure and volume by gas transfer.
This includes:
• Mixing gases from multiple cylinders (multi-step gas transfer)
• Topping up a mixture with compressor air to a specified pressure
Additional cylinders can be added to simulate complex or multi-stage filling procedures.
Saving Gas Mixtures
Any calculated or simulated gas mixture can be saved in the My Cylinders section for later reference or reuse.
17. Charging and battery status
Charging the Battery
Charge the ECHO analyzer using its USB-C charging port and a standard USB power adapter with an output of 5 V and at least 0.5 A.
Use a high-quality USB-C cable intended for charging electronic devices.
⚠️ Do not use fast-charging or high-voltage chargers. The analyzer is designed for standard USB power only.
Battery Status Indication
The current battery charge level is displayed on the right side of the ECHO display as a battery icon. This indicator provides a quick overview of the remaining battery capacity during operation.
Battery Charging Guidelines and Best Practices
The ECHO analyzer uses a rechargeable lithium-based battery. To maximize battery lifespan and maintain reliable performance, please observe the following recommendations:
• The battery performs best when kept between 20% and 80% charge during regular use.
• Frequent deep discharge to 0% should be avoided whenever possible.
• Continuous charging at 100% for extended periods may accelerate battery aging.
Recommended Charging Practice
• Recharge the analyzer when the battery level drops to approximately 20–30%.
• Disconnect the charger once the battery is fully charged.
• Avoid leaving the device permanently connected to the charger.
When Not to Charge the Battery
• Do not charge the analyzer if it has been exposed to extreme temperatures.
• Avoid charging if the device is very hot or very cold; allow it to return to room temperature first.
• Do not charge the battery if the device or cable is visibly damaged.
Storage Recommendations
For long-term storage:
• Store the analyzer with the battery charged to approximately 40–60%.
• Recharge the battery periodically (every few months) to prevent deep discharge.
Following these guidelines helps reduce battery wear and ensures long service life of the internal accumulator.
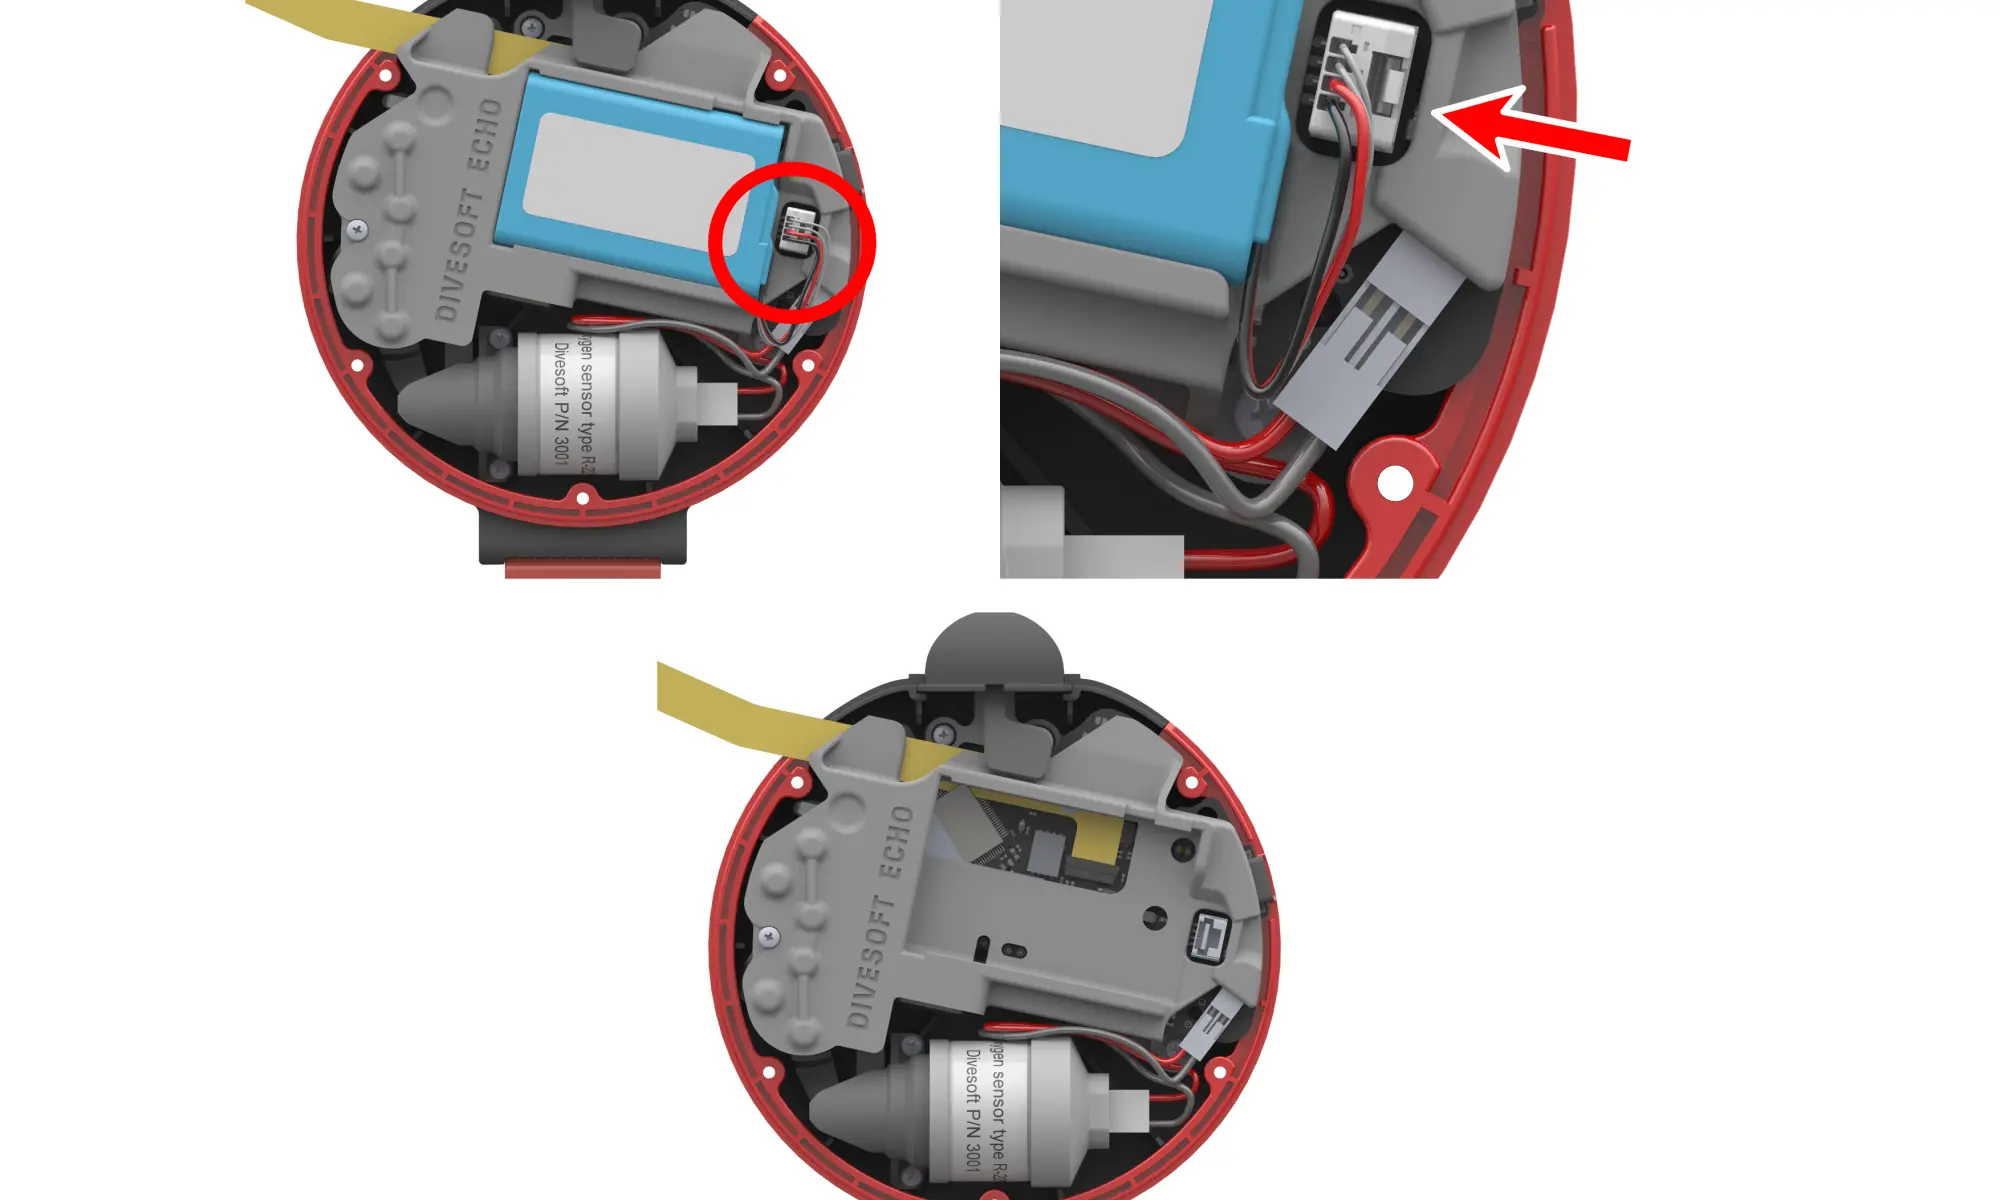
18. Oxygen Sensor Replacement
Galvanic oxygen sensors have a limited service life because the sensing reaction gradually consumes the internal materials. Under normal operating conditions, the oxygen sensor typically requires replacement after 12–24 months, depending on usage, exposure, and environmental conditions.
Replacement Procedure
1. Ensure the analyzer is powered off and disconnected from any gas source.
2. Using a suitable tool, loosen and remove the five screws on the rear side of the analyzer.
3. Carefully open the rear cover of the analyzer.
4. Disconnect the oxygen sensor cable from the electronics.
5. Unscrew the oxygen sensor from the analyzer housing.
6. Disconnect the Molex connector from the sensor cable.
7. Connect the sensor cable to the new oxygen sensor using the Molex connector.
8. Screw the new oxygen sensor into the analyzer housing.
9. Reconnect the sensor cable to the electronics.
10. Close the rear cover and secure it with the five screws.
Please note: R22 sensor cable is not compatible with solid state O2 sensor.
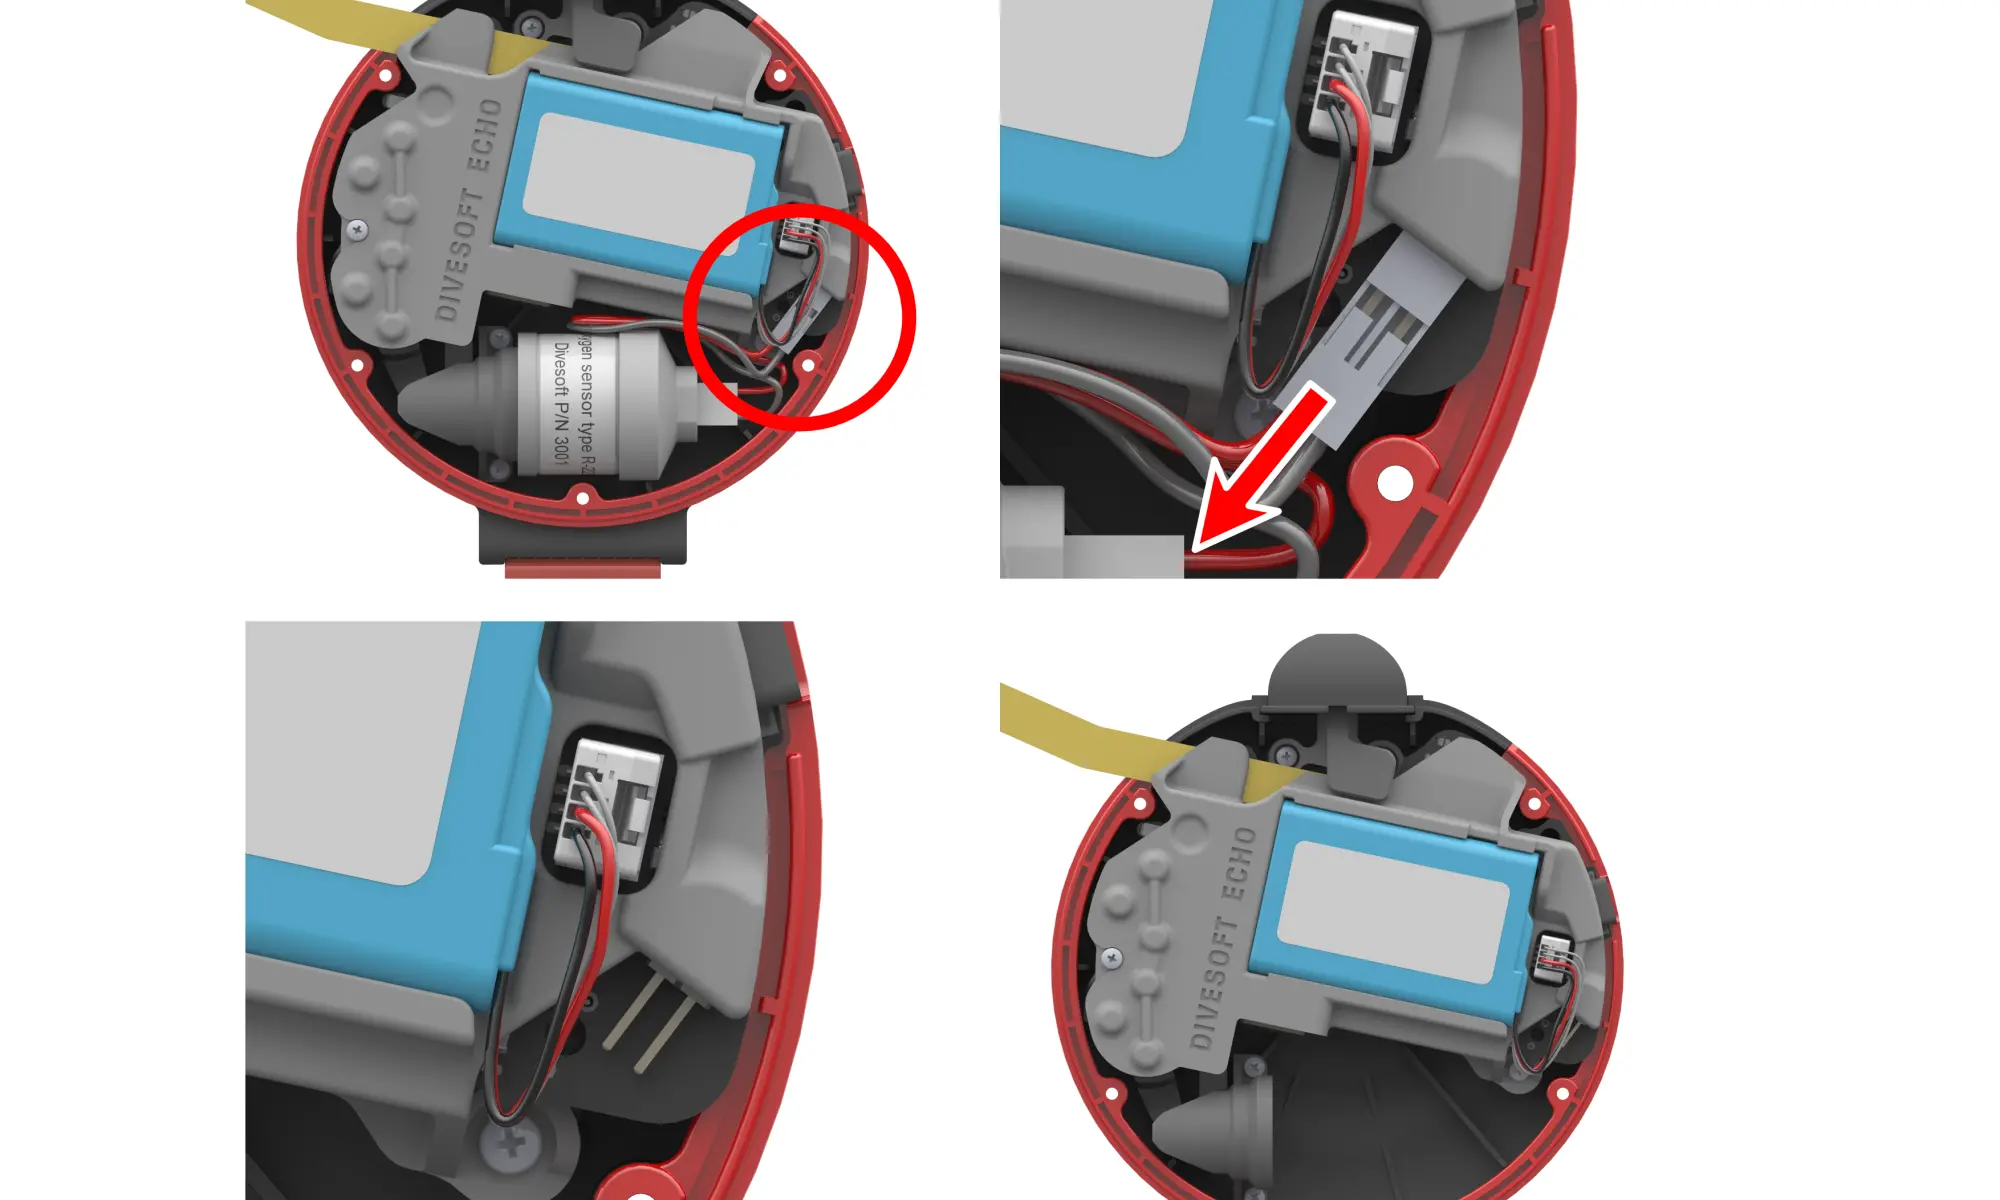
Important Note
⚠️ Do not screw the oxygen sensor into the analyzer with the cable attached.
Doing so may twist or damage the sensor cable.
19. CO Sensor Replacement
The CO sensor replacement is performed by the authorized service points, since it consists of multiple steps - CO sensor replacement, factory calibration data update and a bump test. Please get in touch with one of our service points or ask your dealer to schedule a CO sensor replacement. Divesoft Service Points Map
20. Battery replacement
The ECHO analyzer is powered by a rechargeable lithium-ion battery. Over time and after many charge cycles, the battery capacity gradually decreases. When noticeably reduced operating time is observed, the battery should be replaced.
Replacement Procedure
1. Ensure the analyzer is powered off and disconnected from any power source.
2. Using a suitable tool, loosen and remove the five screws on the rear side of the analyzer.
3. Carefully open the rear cover of the analyzer.
4. Remove the battery from its holder by gently releasing it from the slot.
5. Disconnect the battery cable, which is permanently attached to the battery.
6. Insert the new battery into the designated holder.
7. Connect the battery cable to the electronics.
8. Close the rear cover and secure it with the five screws.
21. Firmware Update
The ECHO firmware can be updated wirelessly using the Divesoft.app mobile application, available for both Android and iOS devices.
Updating the Firmware
1. Turn on the ECHO device.
2. Open the Divesoft.app application on your mobile phone.
3. On the main screen, select the DEVICES tile.
4. Divesoft.App will automatically start searching for nearby devices. (Make sure Bluetooth is enabled on your mobile phone.)
5. If do not see your ECHO, use the red "plus" in the upper right corner.
6. Select the appropriate ECHO device from the list of detected devices.
7. If a new firmware version is available, the application will automatically offer the update.
8. Start the update process in the application.
9. The firmware update will then proceed automatically.
Important Notes
- Positively do not use the "nRF DFU App" for ECHO update.
- Keep your phone within Bluetooth range of the ECHO device during the entire update process.
- Do not turn off the ECHO device or close the application while the update is in progress.
- After the update is completed, the device may restart automatically.
- If your bluetooth update fails, use USB cable and center.divesoft.com
22. Storage when not in use for long periods
If the ECHO analyzer will not be used for an extended period of time, proper storage helps maintain device performance and prolong the service life of internal components.
General Storage Conditions
• Store the analyzer in a clean, dry environment.
• Avoid exposure to direct sunlight, moisture, and dust.
• Recommended storage temperature is 10 °C to 30 °C.
Battery
• Store the analyzer with the battery charged to approximately 40–60%.
• Avoid storing the device with a fully discharged or fully charged battery.
• Recharge the battery periodically during long-term storage to prevent deep discharge.
Oxygen and CO Sensors
• Store the analyzer in clean air, free of solvent vapors, exhaust gases, or other contaminants.
• Avoid exposure to high concentrations of oxygen, carbon monoxide, or other reactive gases.
• Do not store the device in sealed containers with chemicals or fuels.
Additional Notes
• Avoid mechanical stress or pressure on the device during storage.
• Allow the analyzer to reach room temperature before use after long-term storage.
22. Error and Warning Messages
The ECHO analyzer continuously monitors the status of its internal components and sensors. If a fault or abnormal condition is detected, an error or warning message is displayed on the screen. This chapter explains the meaning of these messages and provides basic guidance on how to proceed.
Messages Displayed During Power-On
ERROR: O₂ sensor missing, damaged or misconfigured
No functional oxygen sensor was detected.
This error may occur if:
• A solid-state oxygen sensor is connected but does not communicate with the device.
• An electrochemical oxygen sensor is connected, but its output voltage is below 0.5 mV.
Action:
Check that a compatible oxygen sensor is correctly connected and configured. Replace the sensor if necessary.
WARNING: O₂ sensor too weak – Replace sensor
The electrochemical oxygen sensor output is low (sensor voltage < 5 mV).
This warning may also appear temporarily if the analyzer was previously exposed to a hypoxic gas mixture.
Action:
If the warning persists, replace the oxygen sensor.
ERROR: xxx doesn’t work correctly
A malfunction was detected in one of the internal components.
The placeholder xxx may refer to one of the following:
• He sensor
• Bluetooth adapter
• Barometer
• Humidity sensor
• CO sensor
For the CO sensor, this error may indicate that:
• The CO sensor is not installed,
• The sensor does not communicate correctly, or
• A different type of sensor is installed instead of a CO sensor
(a CO sensor is mandatory).
Action:
Except for sensor replacement or correction of an incorrect sensor type, these errors require service inspection.
WARNING: Low / High temperature – may work incorrectly
The internal temperature of the analyzer is outside the specified operating range of 5 °C to 40 °C.
Action:
Allow the device to acclimate until it reaches the normal operating temperature range.
Messages Displayed During Operation
HAL ERROR: file fff, line X
An internal firmware error has occurred.
Action:
Please contact the Divesoft support and provide detailed information about the manipulation that preceeded the error. Usually the error disappears over the pover cycle. If the error persists, please contact authorized service centre.
Troubleshooting Summary
• O₂ sensor errors can usually be resolved by checking, replacing, or correctly configuring the oxygen sensor.
• CO sensor errors may be resolved if an incorrect sensor is installed; otherwise, service is required.
• Temperature warnings are resolved by returning the device to the specified operating temperature range.
• All other hardware or system errors require professional service intervention.
23. Technical data
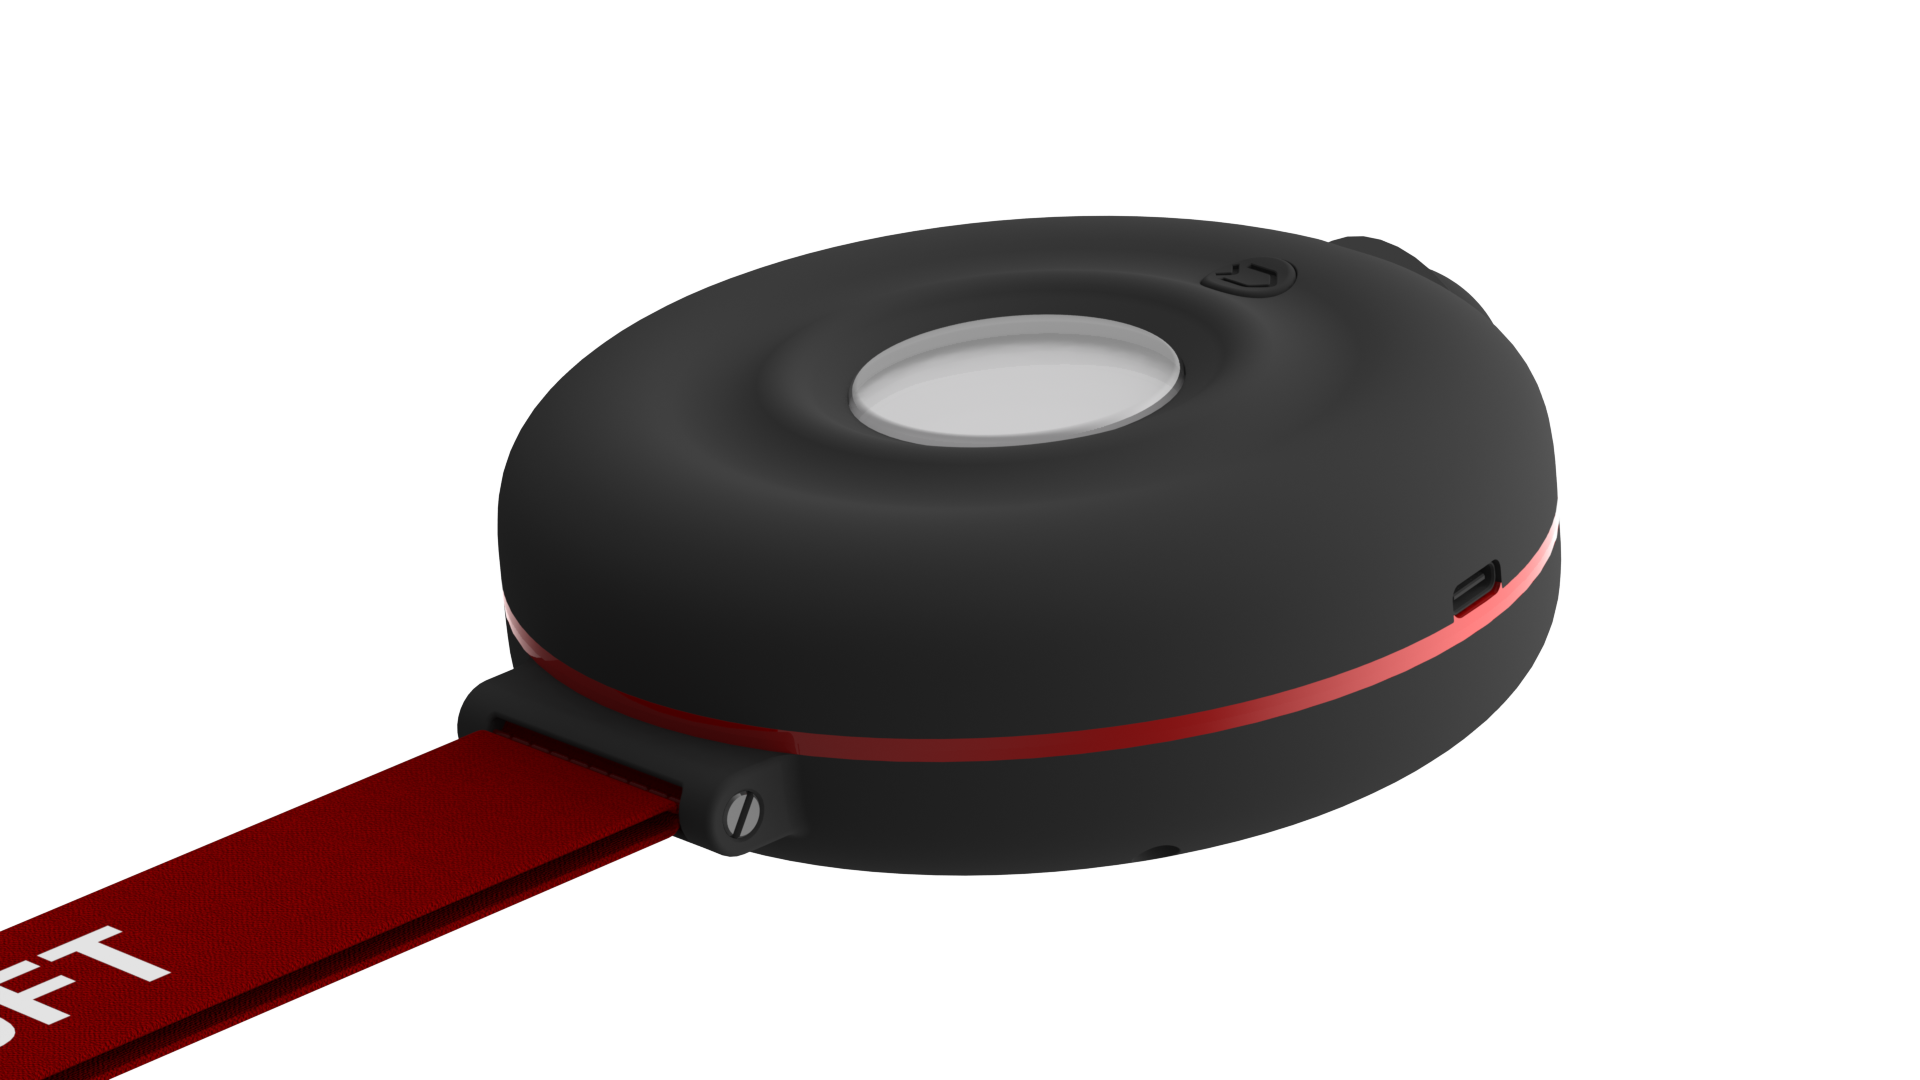
The ECHO analyzer is a compact, portable breathing gas analyzer designed for reliable analysis of oxygen, helium, and carbon monoxide in diving gases. The device combines long battery life, advanced sensor technology, and wireless connectivity with a mobile application.
Display
• Type: HR-TFT (High Reflective TFT)
• Description:
High-contrast display with excellent readability, including outdoor and bright-light conditions
(HR-TFT = High Reflective Thin-Film Transistor display)
Power Supply
• Battery type: Rechargeable lithium battery
• Battery capacity: 3.7 Wh
• Operating time:
o up to 100 hours with R22S galvanic O₂ sensor
o up to 50 hours with DVO₂ solid-state O₂ sensor
• Charging interface: USB-C
• Charging parameters: 5 V / 1 A
• Typical charging time: approx. 2.5 hours
Sensors
Oxygen (O₂)
• R22S galvanic oxygen sensor (standard)
• DVO₂ solid-state oxygen sensor (optional)
o Solid-state measurement technology
o Extremely long service life
o Under normal use, expected to last for the entire lifetime of the analyzer
o For dive centers and filling stations, expected service life 10+ years
Helium (He)
• Solid-state helium sensor
• Service life: unlimited
• Factory calibrated
• No user calibration required
Carbon Monoxide (CO)
• Electrochemical CO sensor
• Manufacturer-guaranteed lifetime: 2 years from unpacking
• Recommended zero calibration: every 2–6 months in clean air
• CO warning threshold: 5 ppm
Connectivity and Features
• Bluetooth Low Energy (BLE)
• Connection to Divesoft.App
o Large and clear display of measured values
o Extended data visualization
o Calibration of sensors
o Firmware updates
o Label printing via the mobile application
Mechanical Design
• Compact handheld housing
• Integrated wrist strap
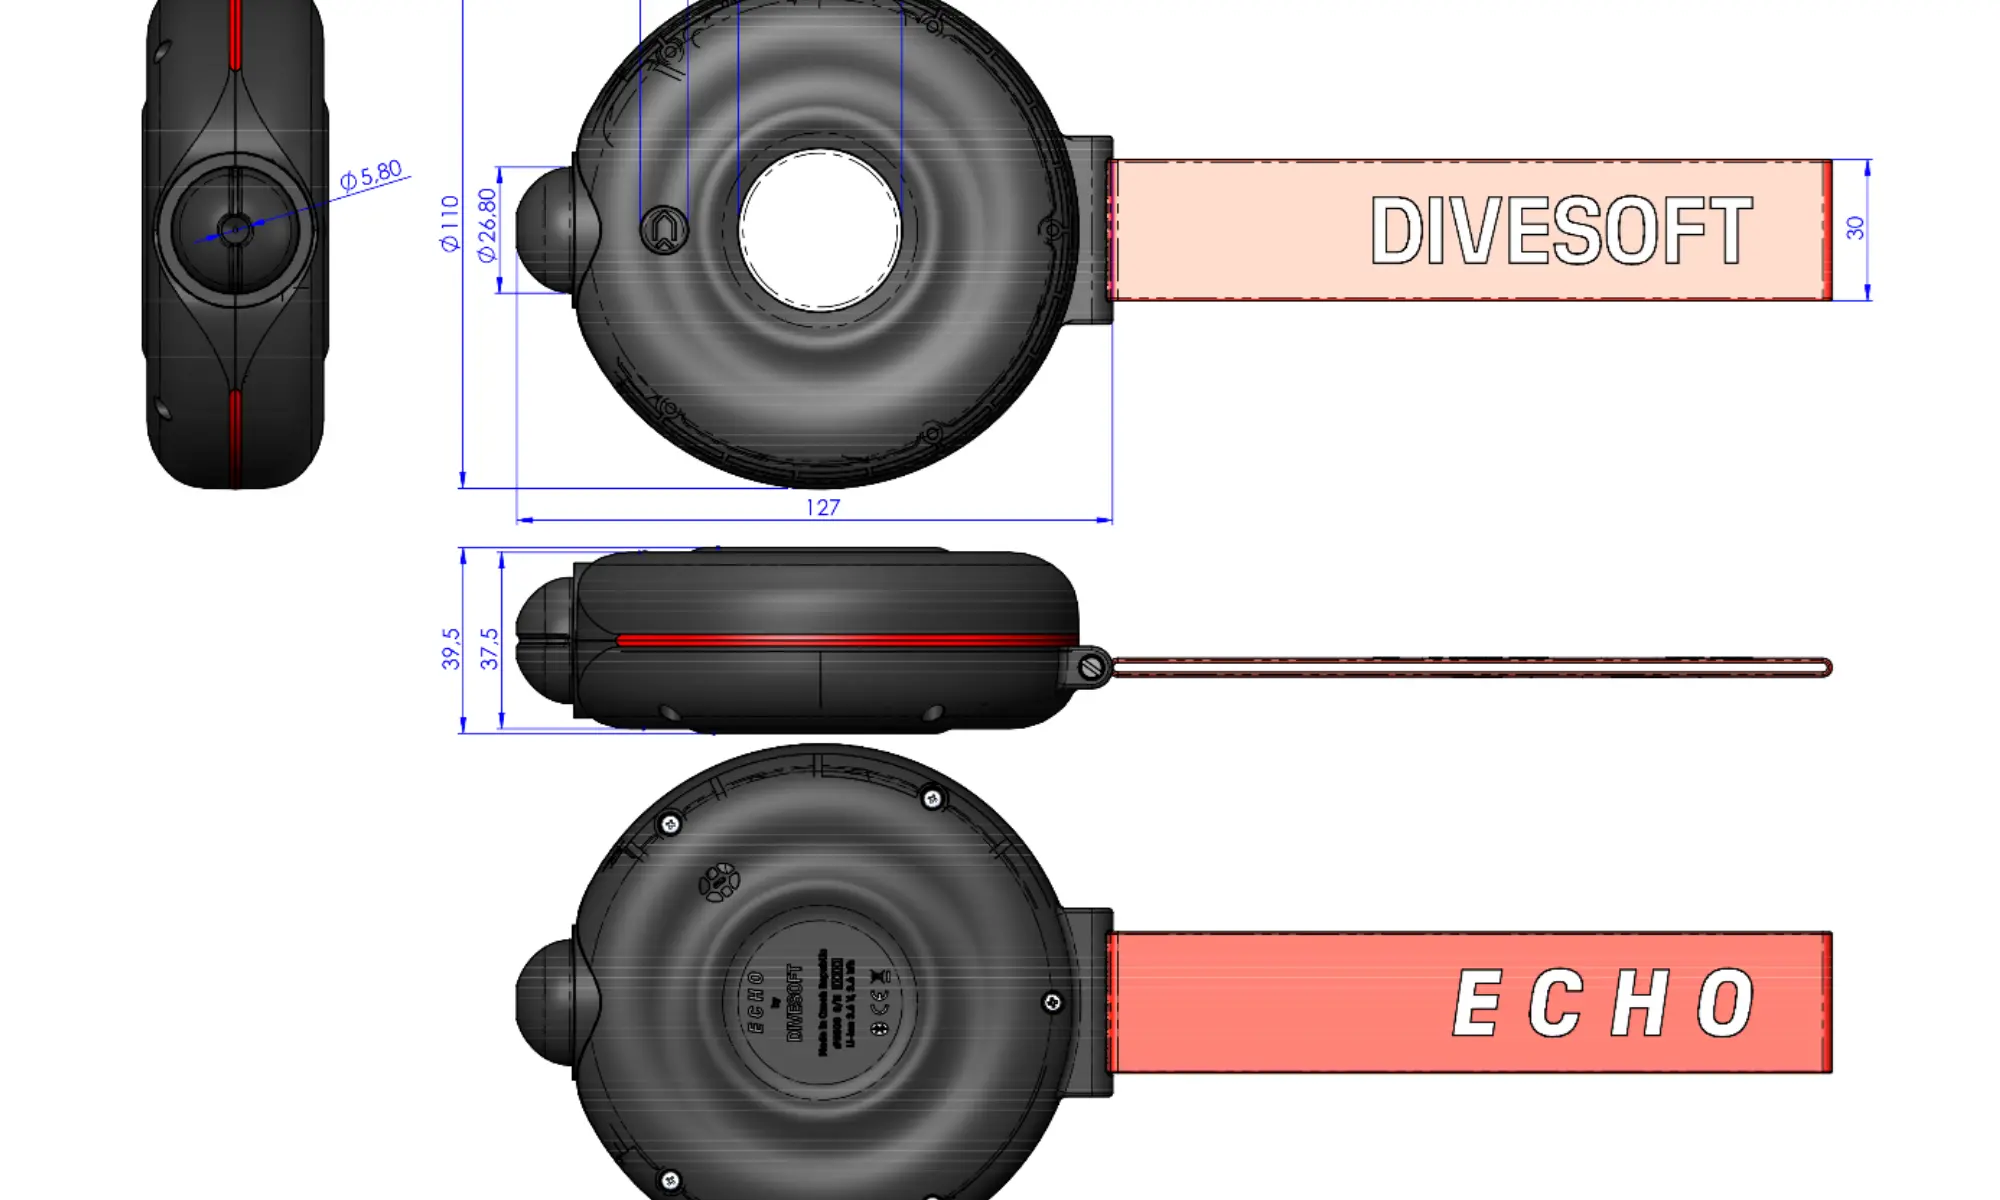
Dimensions
• Main body diameter: approx. 127 mm
• Body thickness: approx. 37.5 mm
• Body width: approx. 110 mm
• Overall length (including strap): approx. 410 mm
• Weight 288g
Operating temperature
• 0 to +45° C (32 – 113° F)
• Keep in mind that R22S oxygen sensor can show slow response time when below 5° C (41° F)
• Store at temperature 10 - 30° C (50 - 86° F)
ECHO ANALYZER - USER MANUAL
Date of issue: 02 February 2026
HW 1.0, FW 2.0.0
Author: Jakub Šimánek
Published by Divesoft s.r.o.