Section: 2. Control-unit operation
2.1.1 Surface mode inputs
2.1.2 Dive mode inputs
2.1.3 Language
2.3.1 Entering surface mode
2.3.2 Surface mode primary screen
2.3.3 Surface mode O2 sensors screen
2.3.4 Switching to other modes
2.3.5 ppO2 control in surface mode
2.4.1 Editor use
2.4.2 Setpoints
2.4.3 Mixtures
2.4.4 Decompression
2.4.5 Alarms
2.4.6 Preferences
2.4.7 Calibration
2.4.8 Faulty sensors
2.5.1 Detailed screen
2.5.2 Synoptic screen
2.5.3 Big Screen
2.5.4 Dive profile screen
2.5.5 Sensors screen
2.5.6 TTS Screen
2.6.1 Entering CCR mode
2.6.2 Switching to other modes
2.6.3 ppO2 regulation
2.6.4 Decompression
2.6.5 Specific handset control
2.7.1 Entering manual CCR mode
2.7.2 Switching to other modes
2.7.3 ppO2 regulation
2.7.4 Decompression
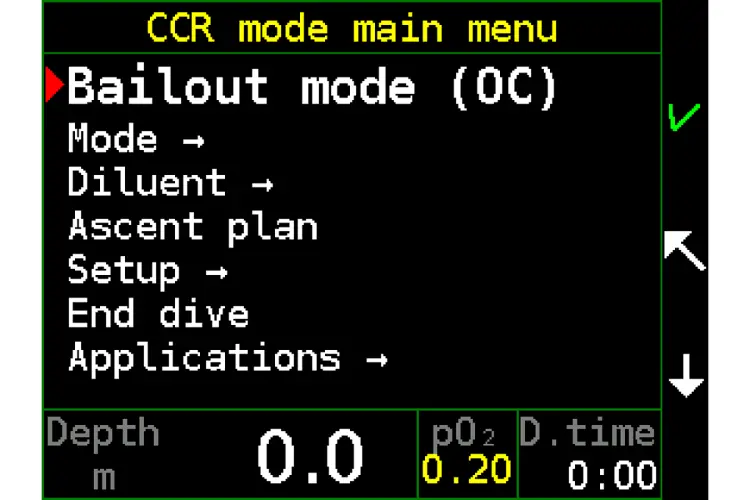
2.8.1 Entering bailout OC mode
2.8.2 Switching to other modes
2.8.3 Mixture
2.8.4 Decompression
2.8.5 Specific handset control
2.12 List of pop-up alarms and notifications on CCR Liberty
2.12.1 Critical priority
2.12.2 High priority
2.12.3 Medium priority
2.12.4 Notifications
2. Control-unit operation
2.1 Control elements
All electronics in the CCR Liberty are controlled via the handsets.
The following inputs and combinations are distinguished by:
- Press upper key
- Press lower key
- Press both keys
- Long press upper key
- Long press lower key
- Long press both keys
- Coded key press (press both keys, then release one key and press it again, then release both keys)
- Tilt the HS away from yourself
- Tilt the HS toward yourself
- Tilt the HS to the left
- Tilt the HS to the right
- Tap the display glass
- Shine a light on the display
“Long press” means pressing the key for more than 2.5 seconds. The key-press operation can be terminated by releasing the key one is currently on or when the last key is released (when pressing both keys).
The configuration of a given HS – whether set up for the left or right hand – will determine the tilting directions and which keys will constitute upper/lower.
The HS tilting configuration can be changed by tapping on the HS from any of the four sides.
2.1.1 Surface mode inputs
The keys and other inputs have assigned meanings in connection with the current item navigated to in the menu. At the same time, however, general rules, which apply wherever possible, are determined for their use.
- Press upper key — select menu item
- Press lower key — scroll through the menu
- Press both keys — exit the menu without performing any action
- Long press upper key — page up. Valid in Log book only. This has additional functions in the standard menu, indicated by a double check mark icon: - enable or disable mixture without entering mixture edit (Setup/Mixtures/OC; Setup/Mixtures/CCR) - Switching On/Off daylight saving (Setup/Preferences/Time&GPS/Timezone).
– enable or disable mixture without entering mixture edit (Setup/Mixtures/OC; Setup/Mixtures/CCR)
– Switching On/Off daylight saving (Setup/Preferences/Time&GPS/Timezone).
- Long press lower key — page down
- Long press both keys — return to main screen
- Coded key press — switch to maintenance mode (this can be done only from the main screen)
- Tilt HS away from yourself — increase the entered digit by one or check box
- Tilt HS toward yourself — decrease the entered digit by one or uncheck box
- Tilt HS to the left — move the cursor to the left
- Tilt HS to the right — move the cursor to the right
In certain instances, such as in the menu or editing screen, helpful symbols relating to the keys are displayed. A symbol can be either next to a single key indicating the action executed if the corresponding key is pressed, or between the keys (indicating the action executed if both keys are pressed).
The |↓| symbol indicates the user can scroll through the menu. Scrolling in the menu is cyclical, so the cursor will return to the top of the menu list. A scroll-up function is not available due to the two-key control.
The |↖| symbol means going back one level without executing any action.
The |√| symbol represents selecting an item or confirming an action.
2.1.2 Dive mode inputs
The input meanings in surface mode also apply to dive mode. Some exceptions are:
Long press upper key — shifts the setpoint to the next higher setpoint
Long press lower key — shifts the setpoint to the next lower setpoint
When playing decompression games, the tilting repsonse is more sensitive. Digit entry via tilting is limited to special cases only while in dive mode.
Tapping on the display glass will switch on the display if it was switched off. It is now also possible to set numeric values using the button editor. Setup/Preferences/Controls/Editor nav.
In the dark, shining a dive light on the display activates it in the same way as tapping on the glass. In a naturally lit environment, the display can be activated by covering and then uncovering it.
2.1.3 Language
All textual information on the CCR Liberty is in English. Controlling the apparatus requires knowledge of the English language at a level that at least allows the user to thoroughly understand this information.
2.2 Switching on the unit
Switching on the CCR Liberty’s control unit requires it to be in standby mode, which is indicated on the HUD (slowly flashing blue LED) and the buddy display (slowly flashing green LED).
If the jumpers are removed (or turned so that the pins are not inserted in the connector), the rebreather’s control unit cannot be turned on, except with USB power when connected to a computer via an adapter.
2.2.1 Activation
The CCR Liberty is activated by pressing both keys on either handset for three seconds.
Automatic activation occurs in the event the units is submerged to a depth greater than 1.5 m. In such a case, the user cannot continue the dive, and must perform complete pre-dive preparation on the surface as soon as possible.
It is also possible to switch on the CCR Liberty via automatic activation in the event of damaging or losing both handsets. Using this option is risky and should thus be considered only for a rescue attempt, for example, evacuating a diver from a siphoning cave.
Upon activation, the rebreather switches to surface mode. If submerged to a depth greater than 1.5 m, the rebreather automatically switches to CCR mode (assuming the jumpers are connected to the batteries). Due to a low depth sampling rate when the unit is switched off, the rebreather will automatically switch on after approximately one minute of being submerged at a depth greater than 1.5 meters.
WARNING: NEVER BREATHE FROM A UNIT THAT IS SWITCHED OFF! This can result in serious injury or death.
2.3 Surface mode
2.3.1 Entering surface mode
The CCR Liberty switches to surface mode when turned on by pressing the keys. In the water, surface mode can be selected in the menu if the depth is less than 1.5 m.
2.3.2 Surface mode primary screen
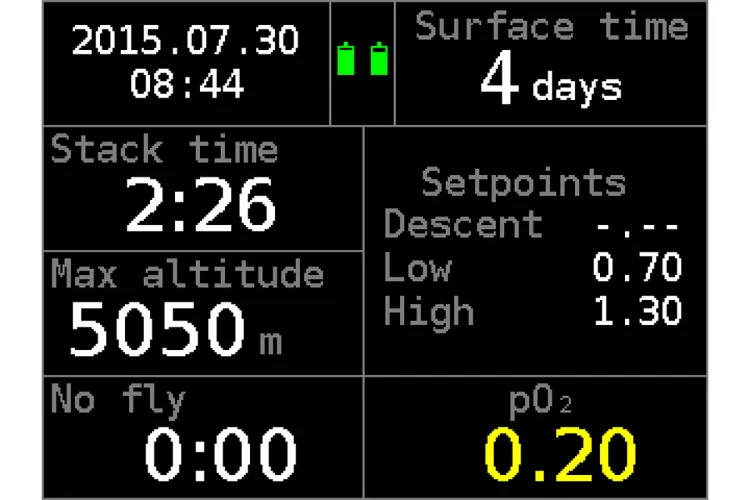
Date and Time
Maintain a correct local time setting; it will be used for log recording.
Stack time
The scrubber stack timer runs continuously in dive mode (except OC bailout) regardless of depth, and it can be set to run on the surface (more in “Stack timer sfc.”).
If you spend a long time in dive mode while not breathing from the rebreather’s loop, then increase the time for the stack time warning.
Don’t forget to reset the timer when you refill the scrubber (Predive → Stack time reset).
Max altitude
The maximum allowed altitude calculation is based on the ZHL decompression algorithm with an additional safety margin (GF = 0.80). It is a continuation of the decompression calculations and functions in the same manner as a decompression ceiling.
No fly
The calculation of the no-fly time is based on the maximum allowed altitude according to the Bühlmann decompression algorithm ZHL.
The air pressure in the cabin of a commercial aircraft is maintained at a level corresponding to air pressure at 1800–2400 m (6000–8000 feet) above sea level while cruising altitude falls in the range 11 000–12 200 m (36 000–40 000 feet).
The no-fly time calculation uses the decisive altitude of 4464 m (14 646 ft). At this altitude compartments containing the oxygen masks will be opened automatically and the oxygen masks will drop down in front of the aircraft passengers.
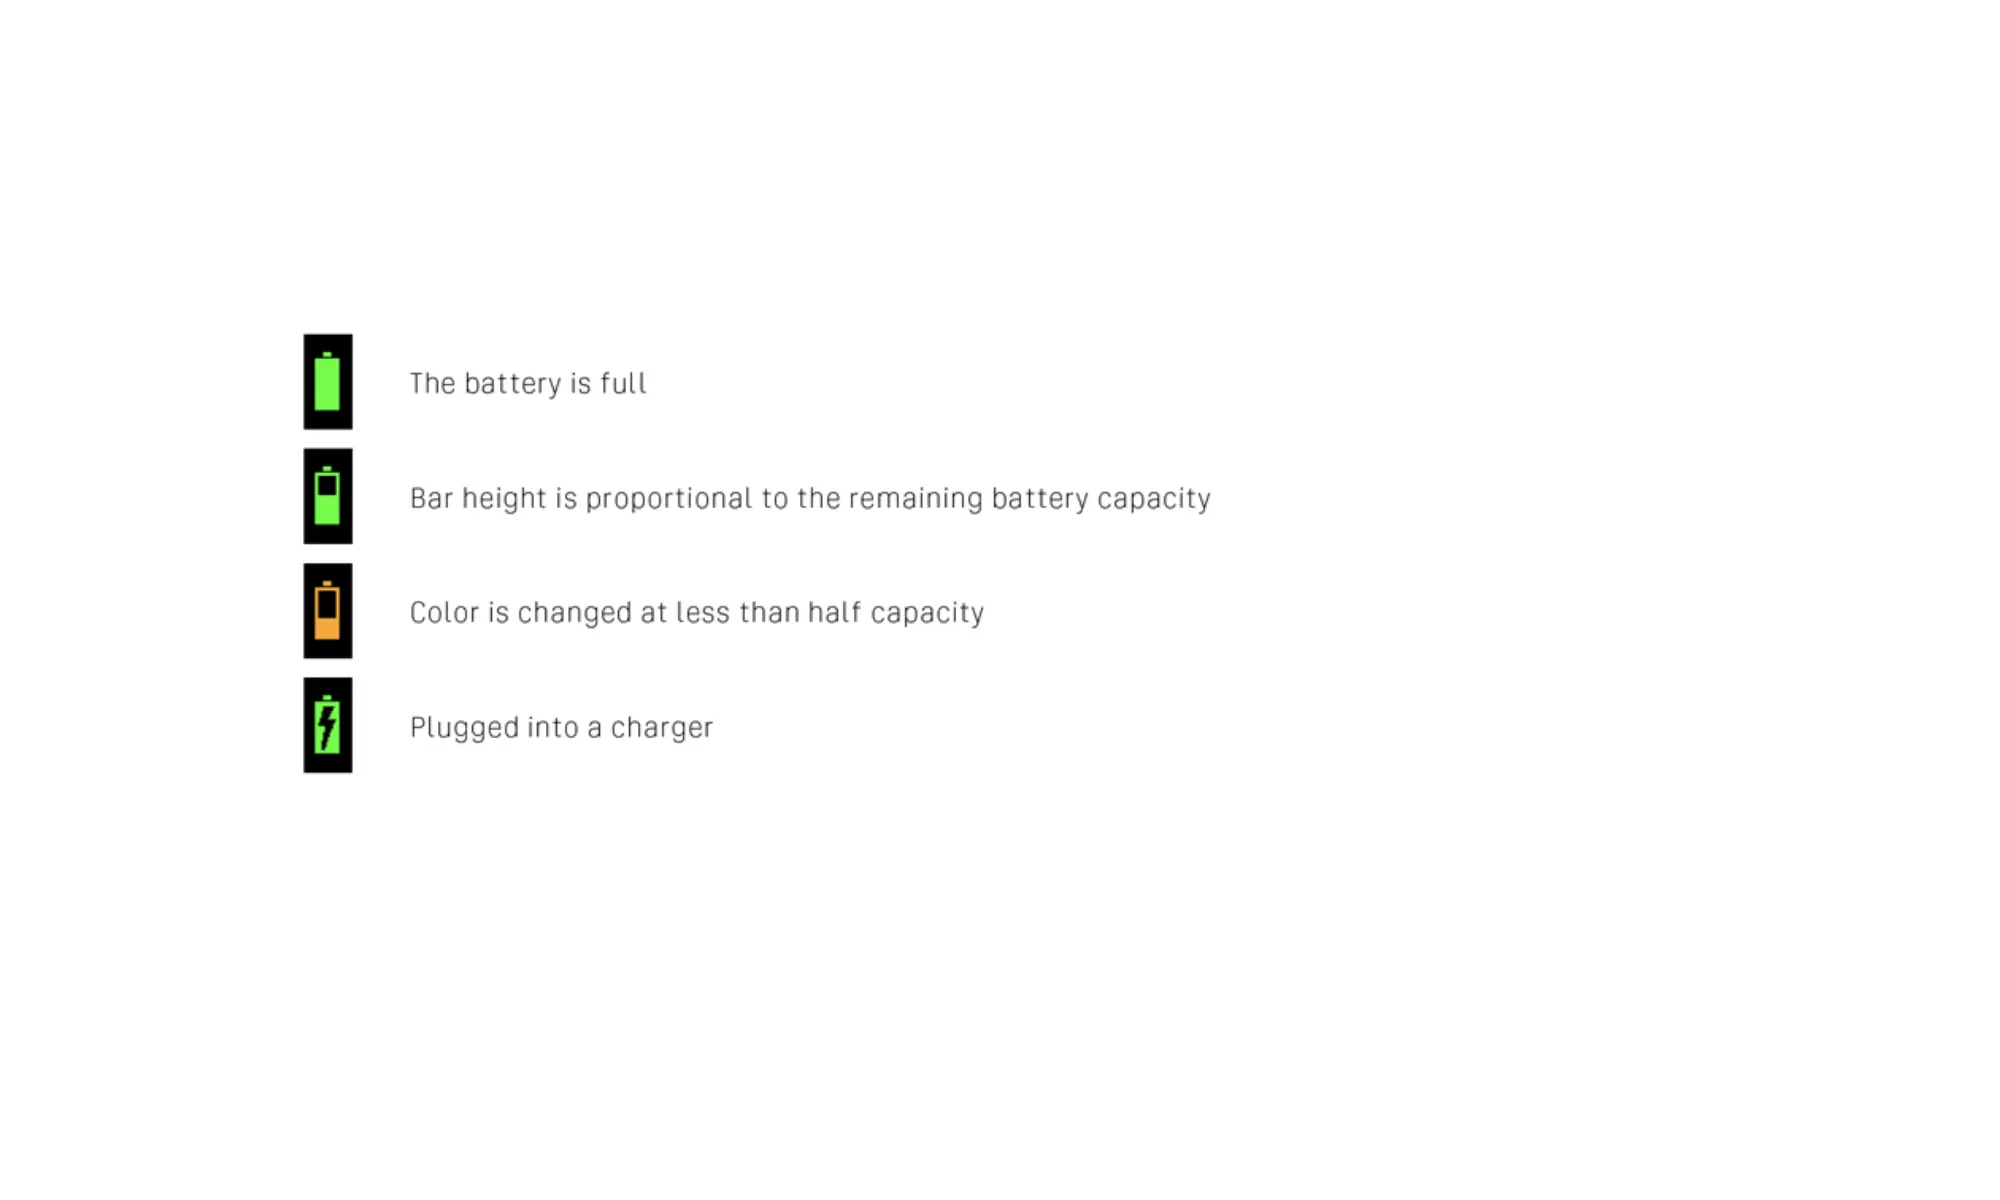
Battery symbol
A graphical indication shows the remaining battery capacity. The two batteries are indicated separately.
Setpoints
Descent (“-.--“ if disabled), low and high setpoints are listed.
ppO2
The measured partial pressure of oxygen is displayed.
2.3.3 Surface mode O2 sensors screen
To switch between the different screens in surface mode, press the top button. Both ppO2 and sensor voltage can be read. If a sensor is not an operational state (not connected, offline, error, excluded, disabled, uncalibrated), the appropriate tag appears instead of the ppO2 value.
You can also find the local time, the max. difference between the sensor readings, and the stack time on the O2 sensors screen.
If after replacing the oxygen sensor you see its voltage is negative (-10mV), then it means that the connector to the sensor is wired backwards.
2.3.4 Switching to other modes
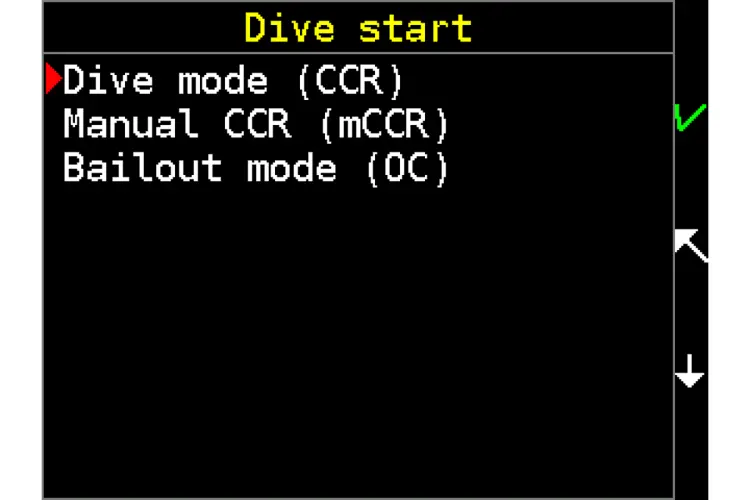
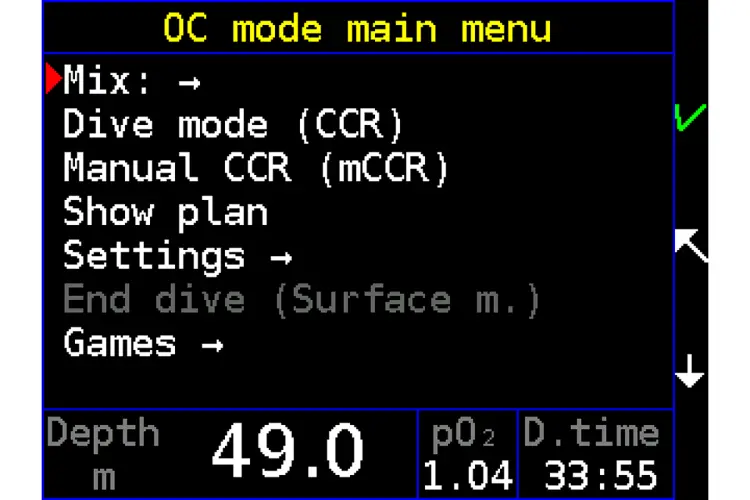
In the menu the user can switch from surface mode to the CCR, manual CCR, bailout and standby modes.
If submerged to a depth greater than 1.5 m, the rebreather automatically switches to CCR mode.
2.3.5 ppO2 control in surface mode
Simple ppO2 control is started in surface mode. If the oxygen content in the loop falls below 19% (with respect to the current atmospheric pressure) the solenoid will open to add 0.5 liter of oxygen. This should ensure that the partial pressure of oxygen will climb to a value of at least 0.23bar. Oxygen is then injected in six-second intervals (three seconds after the last closing of a solenoid). This control algorithm is intended to prevent a dangerous ppO2 decline and the subsequent loss of consciousness of the user, who may have mistakenly breathed from the circuit without activating dive mode.
ppO2 control is subject to other conditions; the oxygen cylinder must be full, connected, and open. PpO2 sensors must also be installed and calibrated. It is advised for the user to avoid excessive physical activity prior to diving on the CCR Liberty, as doing so may cause a higher consumption of oxygen.
ppO2 control in surface mode only maintains the oxygen level closely above the hypoxia threshold; therefore, it may not be used routinely for breathing. Oxygen addition is not active when the head is connected to the charger.
2.4 Setup
The CCR Liberty is configured in surface mode. Activate the surface mode main menu with a short press of both keys and select Setup.
Some values can be set during a dive; however, this is reserved for resolving exceptional situations only.
The values set will depend primarily on the user’s experience, physiology, and personal preferences. The fact that the CCR Liberty enables the user to choose his/her own values does not mean such a setting is safe or suitable for the individual and their planned dive.
If you are not sure which value to set, leave the values on the default setting.
The manufacturer does not provide a warranty for incorrectly operating the CCR Liberty if the faulty operation is the result of an improper setup.
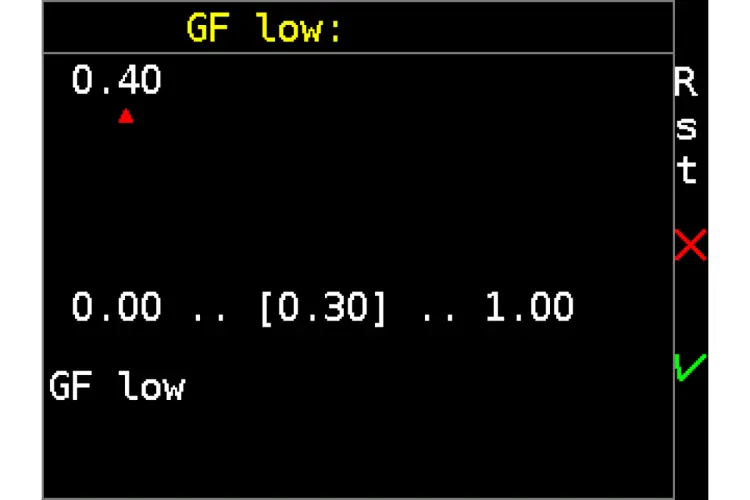
The factory default setting values are indicated by square brackets.
2.4.1 Editor use
Most of the values are edited in a similar manner.
– Press lower key - moves the cursor
– Press upper key - iterates 0-9 (if we are limited by the maximum value, then 0-MAX)
– Long press lower key - moves back by one character
– Long press upper key - resets the value to default and moves the cursor to the beginning
– To save, move the cursor to the last character and press again to confirm
Aletrnative editing method by tilting
Tilt toward yourself— decrease the digit by one or uncheck box.
- – Tilt to the left — move the cursor to the left
- – Tilt to the right — move the cursor to the right
- – Press upper key — discard editing (reset to previous value)
- – Long press upper key — reset to default value
- – Press both keys — exit without save
- – Press lower key — save and exit
Permissible range is indicated by minimum .. [default] .. maximum value.
The display shows a brief description below.
2.4.2 Setpoints
Use descent SP [Off]
This enables the use of the descent setpoint.
- – Use descent setpoint [On] enables Descent setpopint when starting a dive
- – Use descent setpoint [On+Sfc] the same as above + when surface to 0.3m or less activates again Descent SP for repeat dives, siphon dives and others.
See also chapter 2.6.3 Descent setpoint.
Use deco SP [On/Off]
Turns on or off the decompression setpoint used especially during the ascent.
ppO2 descent [0.4 bar]
Value of the descent setpoint (range: 0.2—1.0 bar).
See also chapter 2.6.3 Descent setpoint.
ppO2 low [0.7 bar]
Value of the low setpoint (range: 0.4—1.3 bars).
See also chapter 2.6.3 Setpoint.
ppO2 high [1.3 bar]
Value of the high setpoint (range: 0.7—1.6 bars).
See also chapter 2.6.3 Setpoint.
FO2 limit [90%]
The setpoint is limited to the percentage of ambient pressure (range: 60—96%).
Setting a percentage that is too low reduces the effectiveness of decompression in shallow depths. Setting a percentage that is too high in shallow depths increases the intake of oxygen, which makes it necessary to discharge the contents of the breathing loop and makes balancing more difficult.
See also section 2.6.3 Setpoint limitation.
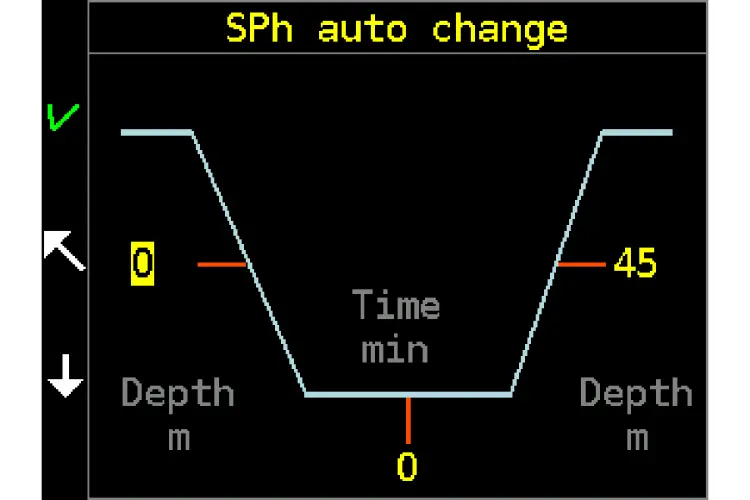
SPh auto
Automatic switching to high setpoint if values greater than 0 are entered into the chart, the unit will automatically switch to high setpoint according to specified parameters when underwater. This can occur due to exceeding a certain depth during descent, bottom time, or exceeding a certain depth during ascent.
The values are entered into the chart of the dive profile schematic. Navigate the chart with the bottom button, select the item with the top button, tilt to edit.
For re-dive activation, the diver must first ascend to 0.3m or shallower, and on subsequent dives (without exiting dive mode) AutoSP-High or AutoSP-Descent is reset at 1.5m.
SPdeco auto
Setting of automatic decompression setpoint switch.
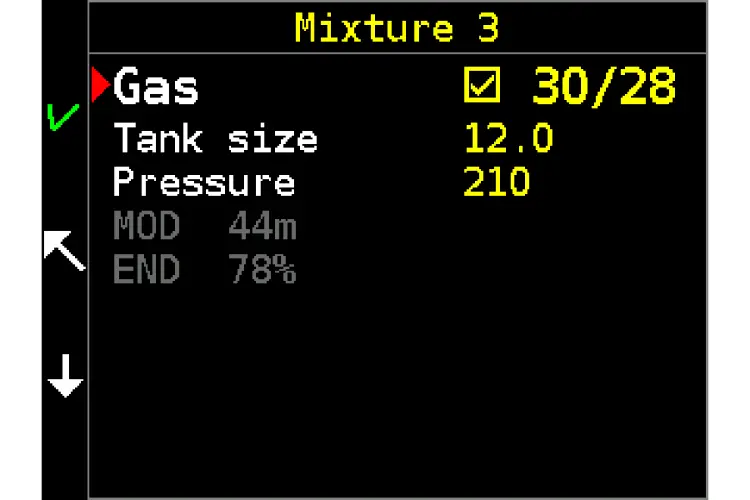
2.4.3 Mixtures
CCR
Eight different diluent mixtures with variable fractions of oxygen, nitrogen and helium can be preset.
Select the mixture to edit with the upper key short press, and use tilting for changing the values or cursor position.
Each mixture can be enabled (marked checkbox) or disabled (clear checkbox). This can be done in the editing screen or via a shortcut – long press of the upper key in the list of mixtures.
Next to every gas mix MOD and END is displayed. MOD is calculated in a way in which the diluent will always be able to dilute the mixture in the loop. It is calculated from a partial pressure 0.2 bar lower than the high setpoint.
The mixture you use as a diluent must be one of the selected mixtures. Setting an incorrect diluent composition will lead to an incorrect calculation of the decompression procedure and can lead to an inaccurate proportion of oxygen in the mixture if the rebreather switches to indirect measuring using the He sensors.
See also section 3.2.5 Diluent.
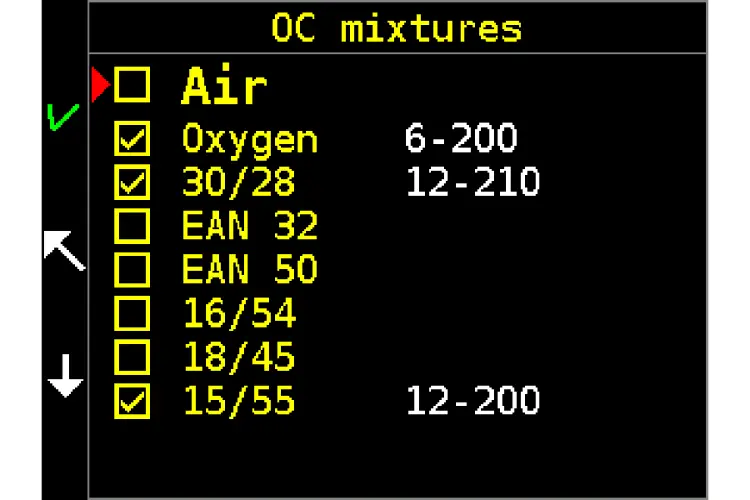
OC
Eight different OC bailout mixtures with various fractions of oxygen, nitrogen, and helium can be preset.
Each mixture can be enabled (marked checkbox) or disabled (clear checkbox). Only enabled mixtures can be selected.
Next to every gas mix a pressure (bar or PSI) and cylinder volume (litres or cubic feet) is displayed. During mixture editing, we set individual items separately. MOD (maximal operational depth) is displayed in a grey font, taking a maximum ppO2 of 1.6 bar and END (equivalent narcotic depth) into consideration. END is usually expressed as the depth at which diving with air would have the same narcotic effects as the inert gases used in the current mixture. This theoretical depth is the equivalent of a specific target depth. In this case, however, the target depth is not known, therefore, the END is expressed as the % narcotic effect of the mixture on the air.
Mixtures that you have prepared for bailout (or staging) must be entered and enabled.
Unused gas mixes must be disabled. Otherwise, the gas management calculations or BO RMT will be skewed.
In an emergency, a mixture can be enabled or even newly defined during a dive. However, this shoud be reserved for emergency situations only.
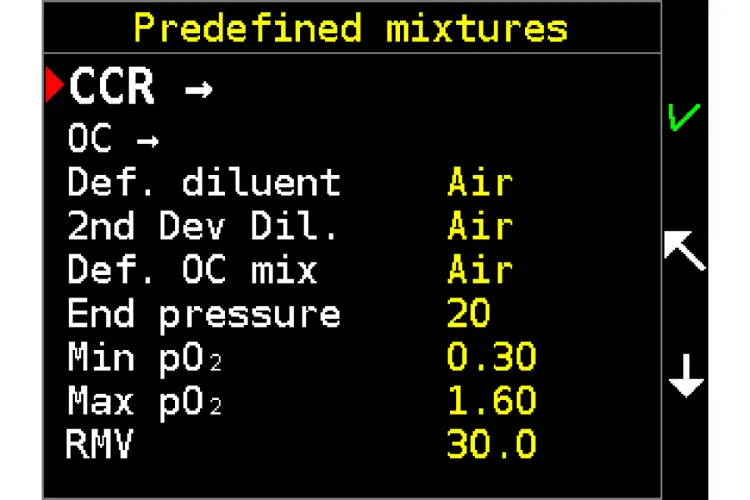
Def. diluent
An alternative default diluent can only be selected from mixtures that are enabled.
2ndDef. Dil
If a backup rebreather is used, it defines the composition of the diluent in the backup for relevant decompression calculations.
Def. OC mix
An alternative default OC bailout mixture can be selected only from mixtures that are enabled.
End pressure
End-of-cylinder pressure for planning gas management in the scheduler and BO RMT during the dive.
Min PO2
Specifies the usability of OC mixtures with respect to the minimum ppO2.
Max PO2
Specifies the usability of OC mixtures with respect to maximum ppO2.
RMV
Respiration minute volume is used to calculate gas management in scheduler and BO RMT during dive. We recommend setting a sufficient margin to deal with an emergency situation. RMV during a CO2 hit can significantly exceed 50 l / min.
2.4.4 Decompression
GF low [0.30]
Gradient factor at the start of decompression (range: 0.05—1.00)
GF low determines an additional increase in safety at the decompression ceiling depth at the start of decompression. Setting a value of 1.00 corresponds to the Bühlmann decompression algorithm without an additional increase in safety using the gradient factor method.
Setting low values leads to deeper and longer stops at the start of decompression.
GF high [0.80]
Gradient factor at the end of decompression (range: 0.10—1.00)
GF high determines an additional increase in safety when ascending to the surface. Setting a value of 1.00 corresponds to the Bühlmann decompression algorithm without an additional increase in safety using the gradient factor method.
Setting low values leads to longer shallow decompression stops.
Bailout GF low [0.80]
Gradient factor for bailout at the start of decompression (range: 0.05—1.00)
As a general rule for bailout GF low, a higher GF value (a lower additional increase in safety) is set.
Bailout GF high [0.95]
Gradient factor for bailout at the end of decompression (range: 0.10—1.00)
As a general rule for bailout GF high, a higher GF value (a lower additional increase in safety) is set.
Deco model
You can choose between the decompression models ZH-L16B and ZH-L16C. Decompression model C is slightly more conservative than model B.
Rate & zone
This item allows you to set the descent and ascent speeds. The input is done in the schematic dive profile chart. Navigate the chart with the bottom button, select the item with the top button, tilt to edit. The "descent rate" is rate used exclusively in planner for descend. The following "warn under" depth is the first depth from which you may get the descend rate alarm, if you exceed the set "max rate". This setting is intended to limit the possible HPNS caused by fast descend in the deep part of the dive.
The ascent rates are divided into three zones: the maximum depth of the first limit; from the first limit to a second limit; and finally from the second limit to the surface. These limits can be defined in the graph on the right. The rates in the individual zones are part of the graph on the left output side.
Planner setup
The planner is used to help setup decompression and gas management plans. For a detailed description, see Planner settings – section 3.1.1
Reset deco data
This resets the saturation of inert gases and the calculation of oxygen toxicity to a state that corresponds to a very long period after the previous dive.
A diver that uses the CCR Liberty after resetting the decompression data should not dive for 48 hours prior to submersion with the reset apparatus. Do not dive for 24 hours with a reset apparatus after significantly increasing altitude above sea level.
2.4.5 Alarms
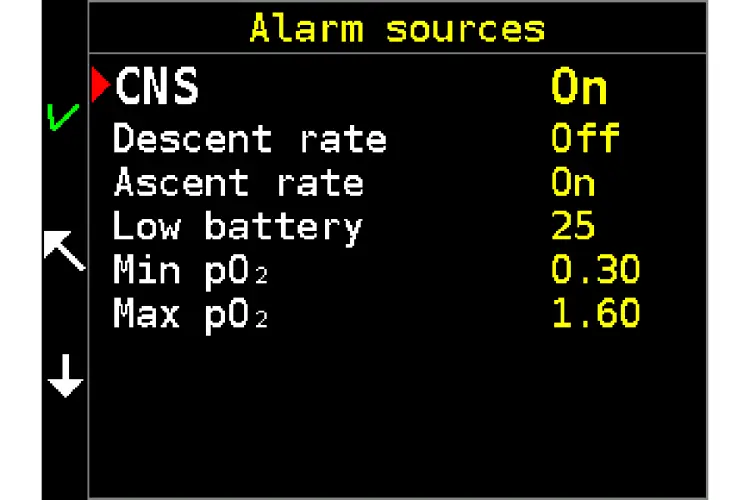
Alarm sources
CNS [On]
Oxygen toxicity limit has been reached.
Descent rate [Off]
Descent rate has exceeded the set limit.
Ascent rate [On]
Ascent rate has exceeded the set limit; the system tolerates very short, fast movements.
Low battery [25%]
Battery power has dropped below the set limit (range: 0—40%). Setting 0 means deactivation of this alarm.
Min PO2
Specifies the lower limit for ppO2 alarm in CCR dive mode.
Max PO2
Specifies the upper limit for ppO2 alarm in CCR dive mode.
Air inegr.
Enables or disables low cylinder pressure alarms or loss of communication with the transmitter.
Notifications
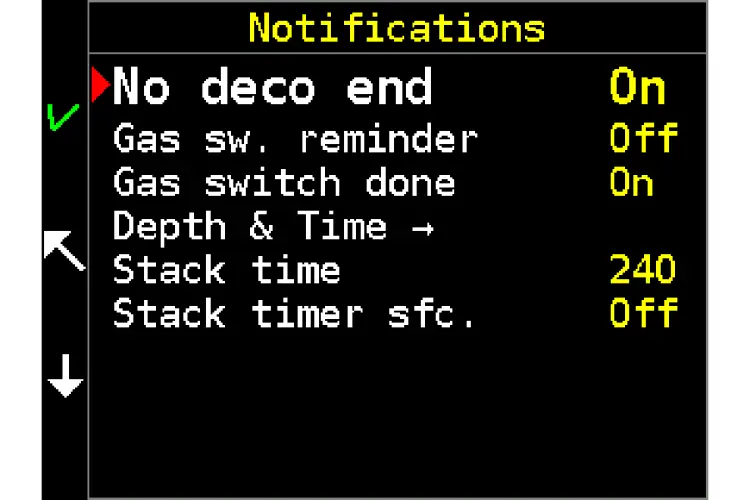
No deco end [On]
End of the dive in zero time (Bühlmann decompression model terminology), i.e. notification that it will be necessary to reduce the ascent rate and/or perform decompression stops.
Gas switch reminder [Off]
The alarm advises the user to switch to a different mix. This is used only in bailout OC mode.
Gas switch done [On]
Notifies that a change in mixture (in bailout OC mode) or diluent has been executed.
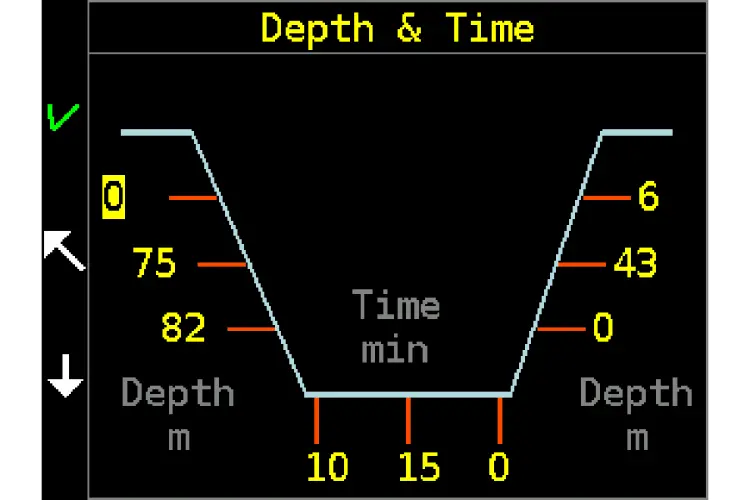
Depth & Time
Depth and time notifications are set through a dive schematic graph. Navigate the graph using the bottom button, select with the top button, and set the values by tilting the computer.
Notification that the set depth during the descent has been reached. It is possible to set three separate depths within the range of 0 — 300 m. 0 means deactivation of the notification.
Notification that the dive time has been reached. It is possible to set three separate times within the range of 0 — 999 min. 0 means deactivation of the notification.
Notification that the set depth during the ascent has been reached. It is possible to set three separate depths within the range of 0 — 300 m. 0 means deactivation of the notification.
Stack time [150 min]
Notification that the cumulative time in any close circuit dive mode has been reached (range: 0 — 360min). 0 means deactivation of the notification.
To reset a timer go to the Predive menu.
Stack timer sfc.
This feature can be set to not count stack time when in surface mode.
On – counted on the surface
Off – not counted on the surface
BO RMT expiration
Enables or disables notification for end of bottom time with respect to bailout gas supply for emergency surfacing.
2.4.6 Preferences
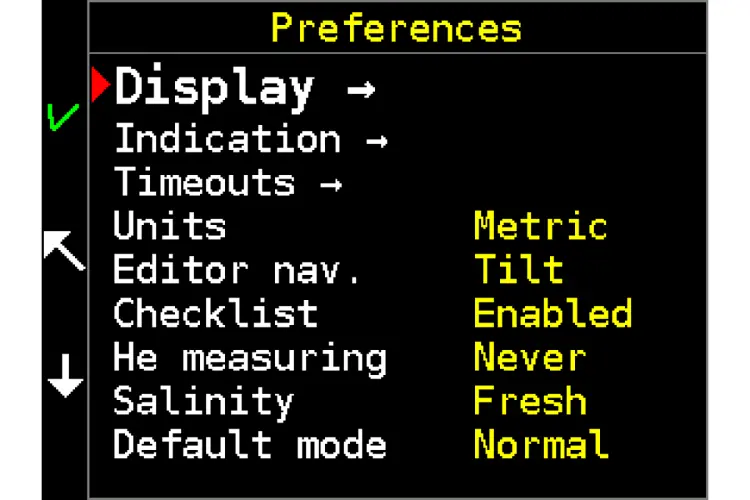
Display
Orientation
Setting for left/right hand.
Brightness
Adjusts the brightness of the handset display. Note: Display brightness significantly affects battery life.
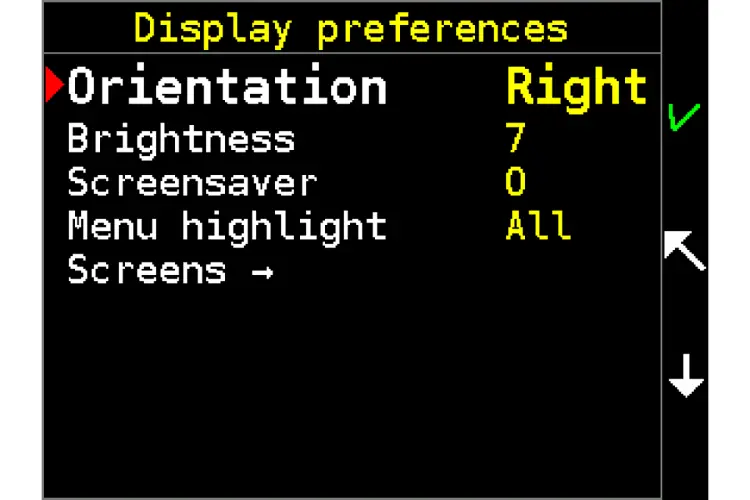
Screensaver
The display becomes inactive after a set period of timer (range: 0—120 s). 0 means that the display will be constantly active.
Screens
Any of the five following screens can be enabled or disabled. This can be done during a dive.
Detailed — the primary screen displays all necessary information
Synoptic — the depth value is easy to read; it is accompanied by other important information
Big — the most important information written in large characters
Graph — Dive profile screen
O2 sensors — detailed state of the sensors
TTS – Time to surface screen with unique BO RMT value and future TTS
Cylinder press. [Num.] / [Graph] / [All]
Determines how cylinder pressures are displayed on the detail screen. Numerically instead of time and CNS, or graphically instead of solenoid opening symbols.
Indication
Auxiliary displays
This refers to setting the position of HUD and buddy display. The default position for the HUD is on the right side and on the left side for the BD.
Color blind mode
If you cannot distinguish blue and green LED lights on the HUD, switch the color blind mode on. See section 1.10.3 Color Blind mode.
Timeouts
Key delay [0]
Minimum key press duration (range: 1 — 5, in 100 ms).
Auto switch off [45]
This represents the time period after which the CCR Liberty switches from surface mode to standby mode (range: 0 — 999 min.). 0 deactivates automatic switching to standby mode. If no handset is connected, a switch-off will occur after 150 minutes regardless of the setting.
Time & GPS
Set time
Sets the time manualy only when GPS synchronisation is not used
Timezone + DST [ ' ]
Time zone setting – necessary for correct synchronization with GPS long hold summer/winter time
Date format [ISO / EU / US]
ISO "YYYY-MM-DD"
EU "DD.MM.YYYY"
US "MM/DD/YYYY"
GPS Sync Time [On / Off]
Automatic time synchronisation according to GPS
GPS Log2SD [Off/DiveDay/Always]
Logging of the traveled route to SD card (downloadable via USB cable) logs every 20s position + HDOP (accuracy) *.GPX – xml format for google maps.
DiveDay - logs approx. 30 minutes before dive and 30 minutes after surfacing, marks dive and surfacing location.
Always – always logs if it has a signal ... not recommended because it will generate enough files on the SD card.
GPS format [DDDDD...]
Setting format and coordinate display
"DD.DDDDD"
"DDMM.MMM"
"DDMMSS.S"
Units & Misc
Units [Metric]
Metric and imperial units can be set for the entire apparatus. All physical calculations are internally executed using the metric system; results are converted for display only.
Salinity
This feature assesses the appropriate water salinity (Fresh/Sea). It has a direct influence to depth measurement.
Checklist [enabled]
When entering CCR mode from the surface mode menu, a checklist is displayed. This can be disabled.
BoCCR setting[Off/On]
In other menus it enables setting of relevant items for CCR bailout (Mixtures, Default mode, Bailout stby (CCR) mode).
Default mode [Main /Bailout]
Default mode of the unit when switched on by diving / jumping into the water.
Help [On/Off]
Help for each menu item, displayed after 10s on one line.
Editor navig. [Tilt]
The numbers in the editor can be increased or decreased by tilt or by tap. The tapping option may require some practice. Do not change the tilt setting unless you have a strong reason for preferring the tapping.
He measuring [TMX only]
TMX only – He sensors are used only in the case that the selected diluent contains > 20% helium. Never – He sensors are permanently deactivate.
2.4.7 Calibration
Calibrate He-Air
The He sensors are calibrated with air. The sensor is stable for a long period of time; therefore, perform a calibration only after replacing the sensor or if there are doubts about its accuracy. Sensors must be free of any traces of helium.
O2 purity [99.5%].
The oxygen concentration in the calibration gas can be set. If possible, use oxygen with a purity of at least 99.5% for calibration.
Do not use air for calibration. The partial pressure of oxygen in air at atmospheric pressure differs significantly from the partial pressures determined by the setpoints. At the end of its service life, an oxygen sensor can successfully undergo calibration to 21% (air) but will no longer be capable of measuring a ppO2 of 1 bar or higher.
See also section 3.2.8 Calibration of oxygen sensors and 3.2.5 Oxygen.
Calibrate pressure
Recomm. days [3 days]
Recalibration of the oxygen sensors will be recommended after a set number of days (range: 0—30).
Horizontal calibration
The accelerometers are used for control by tilting and tapping. They have to be calibrated. Place the handset on a level surface (e.g. a table) before starting a calibration.
2.4.8 Faulty sensors
Oxygen sensors
This is the oxygen sensor status overwiev. Based on the results, the user may have to exclude individual oxygen sensors for ppO2 calculation.
Normal – no sensor malfunction detected; the sensor is used as a data source.
Uncalibrated – sensor has not been calibrated.
Excluded – sensor excluded automatically by the algorithm. The algorithm can return the sensor to Normal status if it determines that the reason for exclusion has no longer exists.
Disabled – sensor excluded manually.
Error – sensor not present, or bad contact.
Offline – sensor not available (digital communication at the module level is not functioning).
Helium sensors
It is possible to include and exclude helium sensors.
Normal – no sensor malfunction detected; the sensor is used as a data source.
Uncalibrated – sensor has not been calibrated.
Disabled – sensor excluded manually.
Error – sensor not present, or bad contact.
Offline – sensor not available (digital communication at the module level is not functioning).
Pressure sensors
This is the pressure sensor status overview. Based on the results, the user may have to manually exclude individual sensors. Do not start a dive with more than one malfunctioning pressure sensor.
Normal – no sensor malfunction detected; the sensor is used as a data source.
Disabled – sensor excluded manually.
Error – sensor not present, or bad contact.
Offline – sensor not available (digital communication at the module level is not functioning).
See also section 1.9.5 Pressure and depth measurement.
Other devices
You can switch off a solenoid that is not functioning properly. If so, the other solenoid overtakes completely, and its frequency is corrected from 12 seconds to 6.
pO2 source
Switching the data source for the control of oxygen partial-pressure in the loop
O2 – Oxygen sensors are used for measuring and controlling the oxygen
He – He sensors are used to indirectly measure and control the oxygen
pO2 source is only allowed if helium measurement is enabled
2.5 Dive mode
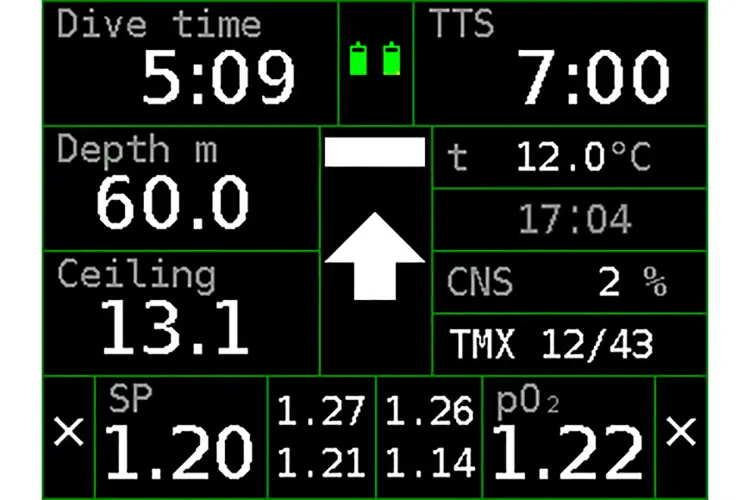
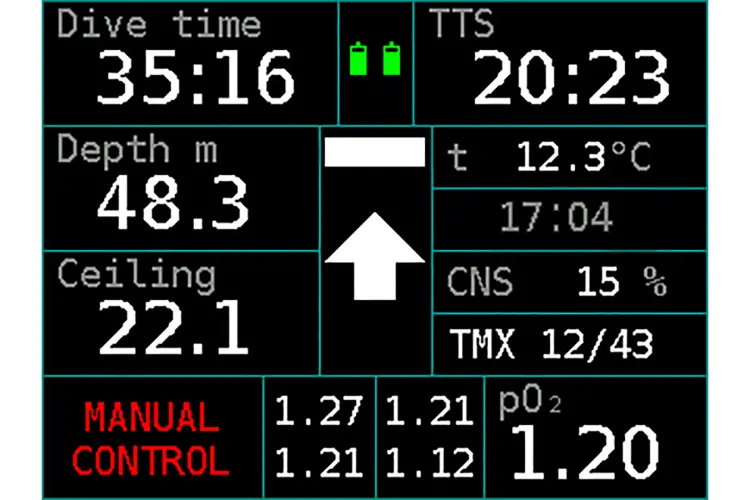
2.5.1 Detailed screen
The primary screen displays all necessary information during a dive. Most information is provided by clear values and unambiguous symbols.
Dive time The timer starts after submersion (depth > 1.5 m) and halts after surfacing (depth < 0.5 m). In case
of a stay on the surface (or at a very shallow depth) followed by a second submersion (during a time set in the dive termination timeout) the dive time indicated will be the time from the first submersion including the surface time.
Depth
The depth can be read in the units selected in the setup (m or ft). Depth is calculated from measured hydrostatic pressure. Fresh water (default) or seawater density can be set for the depth calculation (units and salinity are set in Setup → Preferences).
Setting fresh/sea water does not affect decompression calculations. Decompression is based on ambient pressure and is independent of the displayed depth.
No deco
You can stay for the indicated time at the current depth, breathing the current mixture (current He content and current SP), to avoid a decompression obligation. It is, however, presumed that the diver will follow the recommended ascent rate.
During the dive, there is a situation where the No Deco indicator already shows a zero value, but the decompression ceiling value is still not displayed. Such a situation can last for tens of seconds. The scenario is due to the fact that the No deco time has ended and the decompression ceiling is below the surface level, but its value is so low that there is no need for staged decompression as a free ascent is advised.
Ceiling
The depth of the decompression ceiling decreases continuously up to the surface. The stops displayed are never random. Always stay below the depth of the ceiling, even if the ceiling depth is very shallow.
The ceiling indicator in the Liberty replaces the indicator of decompression stops. The diver selects the depth at which they do the decompression stop or steadily ascends in accordance to the decompression ceiling. This approach may be more effective in terms of decompression time. Time reference is TTS (Time To Surface). Do not follow the decompression ceiling at low depths if conditions do not permit it. Waves, currents, positive lift of gear at a shallow depth, no visual reference, and other factors can cause uncontrolled ascent above the ceiling or completely hinder decompression at this level.
Ascending above the ceiling generates a warning. A further violation of more than 1 m (3 ft), leads to an additional alarm. Both alarms are logged. The decompression calculation will continue without a penalization. The diver is responsible to decide how to minimize the probability of severe consequences.
Decompression is no longer required when the ceiling value disappears. In that case, it is possible to surface.
TTS
The time to surface (TTS) includes the complete decompression profile. The rounding of TTS is influenced by the settings in Menu / Setup / Decompression / Planner setup / Rounding. The rounding can be set to 60 s, 30 s, 1 s.
Battery symbols
Combined graphic symbol
A combined graphic symbol on the detailed screen is intended for rapid awareness. It tells the diver what must be done. The color of the warning symbols changes from yellow to red according to the degree of severity.

t (Temperature)
Water temperature is measured inside the HS housing. After a water temperature change wait about 1-2 minutes until the temperature reading is stable. The air temperature is affected by many factors and is only an approximate reading. If you see a yellow exclamation mark next to the temperature value, it means that the other handset is not communicating and the temperature is calculated based on only one sensor. In case you are using only one handset, you can switch the unit to the sidemount settings: Setup / Preferences / Controls & Build / Mount -> Side.
CNS
The so called “oxygen clock” is a percentage of consumption of CNS toxicity limit. Calculation is based on NOAA oxygen exposure limits.
See also section 3.4.1 Breathing high oxygen content gases.
Diluent
The currently used diluent is displayed.
Solenoid symbols
In the lower left and right corners, there are symbols indicating the state of the solenoids according to data from the control units.
X – solenoid is closed
= – solenoid is opened
SP
The setpoint is a required ppO2 value. The setpoint values are usually displayed in white. The setpoint value will be displayed in yellow when the value is not physically reachable (ex. Setpoint of 1.4 in 2 meters). The evaluation of the ability to reach the setpoint is influenced by the maximum FO2. For instance, a setpoint of 1.3 in 3 meters can be reached, but only if there is 100% of oxygen in the loop, but if the FO2 is set to 80% then the setpoint will be displayed in yellow, and the solenoid will not add oxygen for as long as the value of ppO2 does not drop below 1.04bar [1.3×0.8]. The setpoint value will be displayed in red only when the setpoint is changed.
For information on adjusting the setpoint, see section 2.6.3 Setpoints.
O2 sensors
The ppO2 measured by individual O2 sensors is displayed.
ppO2
The ppO2 can be measured directly (using O2 sensors) or indirectly (using He fraction sensors). It shows the average value.
See section 1.9.2 Direct measurement of ppO2 and 1.9.3 Measurement of He content.
Exclamation mark
If a yellow exclamation mark is displayed next to a value, it means that one or more sensors were excluded. This applies to the measurement of ppO2, temperature, pressure and helium.
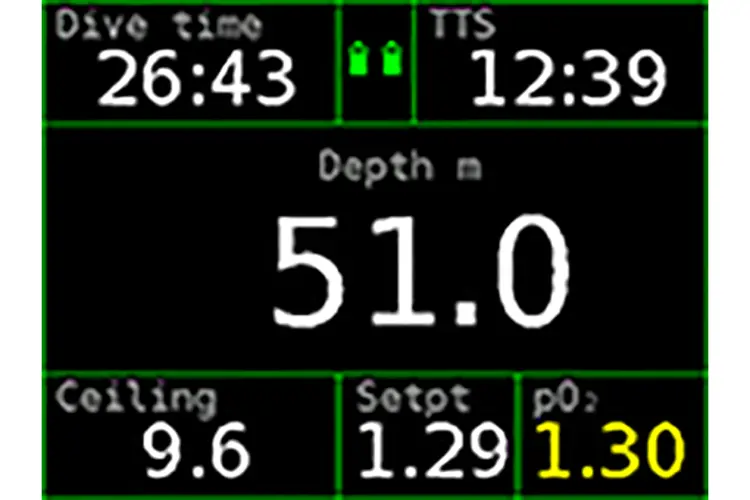
2.5.2 Synoptic screen
The depth value is easy to read. It is accompanied by other important information.
The value meanings are indicated on the screen.
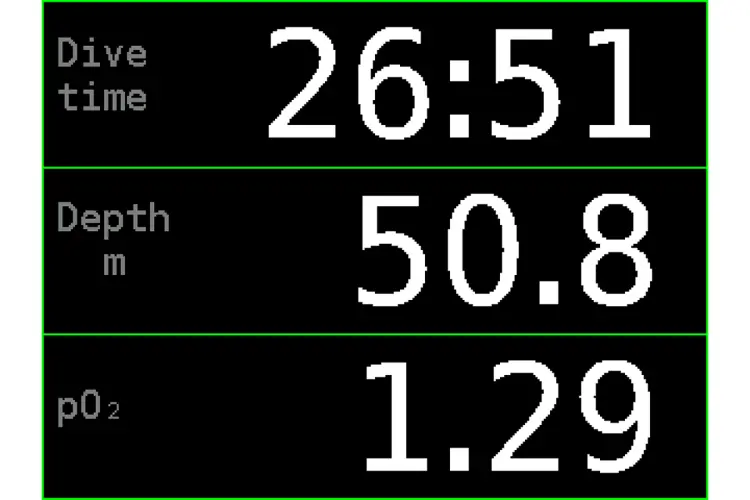
2.5.3 Big Screen
The most important information is written in big characters.
This screen is useful when visibility is very bad. Many divers can read the numbers even without a mask.
2.5.4 Dive profile screen

Start
The time of submersion is useful for checking compliance with the schedule.
Avg
The average depth is indicated with the yellow horizontal line and with a number displayed in yellow.
Current depth
See lower left corner.
Dive time
Runtime of current dive is placed in lower right corner.
Max
This is the maximum depth reached during the dive. The field with this value is placed in the middle of the bottom line.

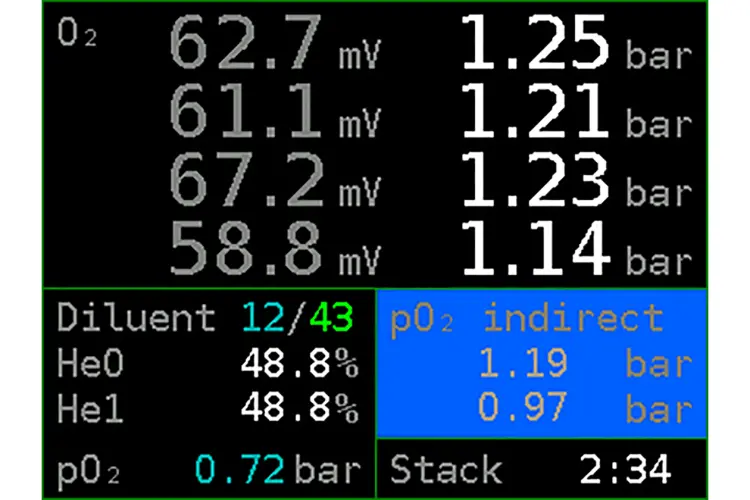
2.5.5 Sensors screen
This screen displays the value potentials of the sensors and their calibrated ppO2 values.
Diluent
The composition of the current diluent (O2/He)
He0 / He1
Helium content in the loop as detected by the individual helium sensors. Under ideal conditions the measured value will correspond to the fraction of helium in the diluent.
pO2
Partial pressure of oxygen in diluent at current depth.
pO2 indirect
Indirectly measured ppO2 using helium sensors. The cell is shaded blue. When using indirect measurment of ppO2 via the helium sensors, the cell will also be shaded blue.
Stack
Scrubber stack time
2.5.6 TTS Screen
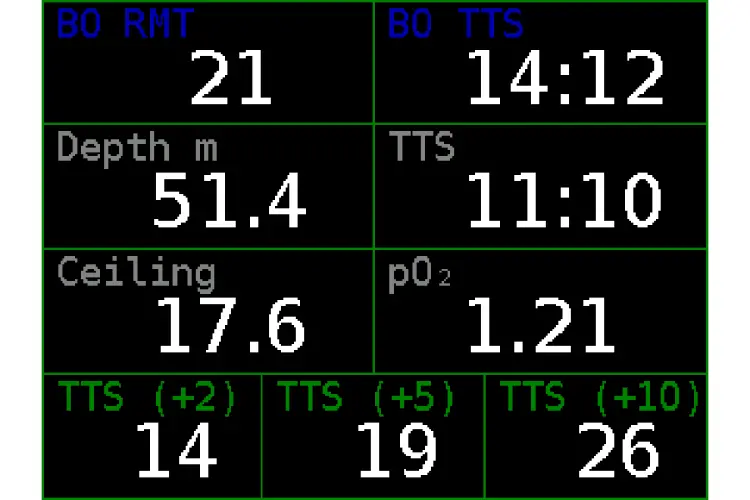
This screen contains useful and unique timeout information.
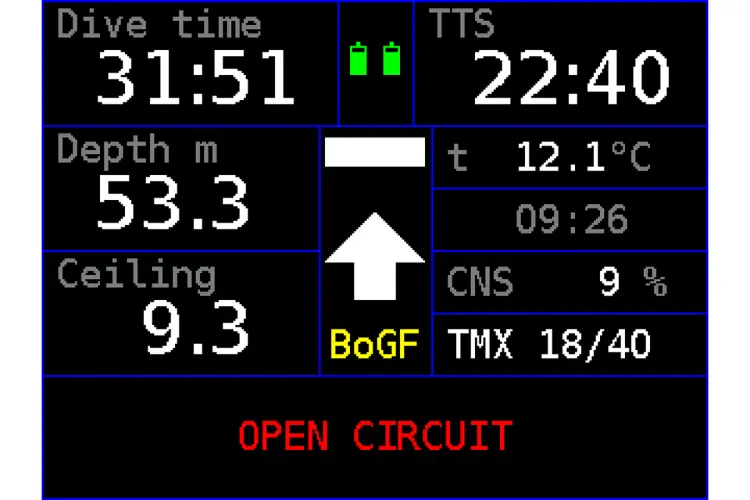
BO RMT
Bailout remaining time is the time that determines the maximum stay length at the current depth so that the bailout gas supply is sufficient for the entire ascent, including decompression.
The algorithm counts all the set gases and their amount together with the specified minute consumption (RMV). In order for the calculation to be correct, it is always necessary to accurately enter the volume, pressure, and composition of the gas and to have only those gases actually used in the gas list. BO RMT is calculated based on the Bailout GF setting. If bailout rebreather is used as bailout source and Bo CCR mode is enabled in Setup -> Miscellaneous, then BO RMT is calculated based on:
- – battery life
- – scrubber depletion (Stack time)
- – AI i oxygen pressure and the specified bottle size, it calculates a metabolic consumption of 1.6 l/min
The value is displayed in Bo CCR mode on the "Sensors screen" instead of the helium sensors. When the BORMT expires BoCCR will trigger an alarm.
BO TTS
The time required to surface in the case of OC bail out ascent. The ascent time is calculated according to the Bailout GF setting
TTS (+2) (+5) (+10)
The values of these three items represent future TTS (i.e. the length of ascent if the diver stays at the current depth for the next 2, 5, or 10 minutes). In the saturation phase of the dive, the values increase gradually; in the desaturation phase; it is the opposite.
2.6 CCR mode
This is the primary dive mode with the CCR Liberty.
2.6.1 Entering CCR mode
The standard method of switching to CCR mode is by selecting it in the menu from surface mode. If submersion to a depth greater than 1.5 m occurs in surface mode or standby mode, the rebreather will automatically switch to CCR mode. Do not intentionally use this switching method; it is intended only for emergency situations.
The process of switching to dive mode has the following course. By choosing dive mode, oxygen injection is started immediately based on the current partial pressure of oxygen and setpoint settings. At the same time, oxygen sensors are automatically verified, and their calibration is checked. If the calibration is older than the established number of calibration days, or the sensor voltages differ by more than 10%, warnings and recommendations for new calibration of oxygen sensors are shown.
The next step is a pre-dive checklist. The diver should follow this list step by step and personally check all the items marked on it. Move to the next screen using the bottom button.
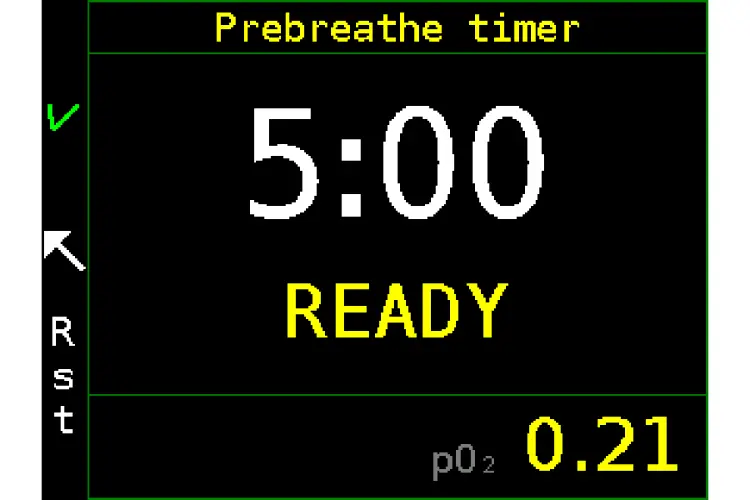
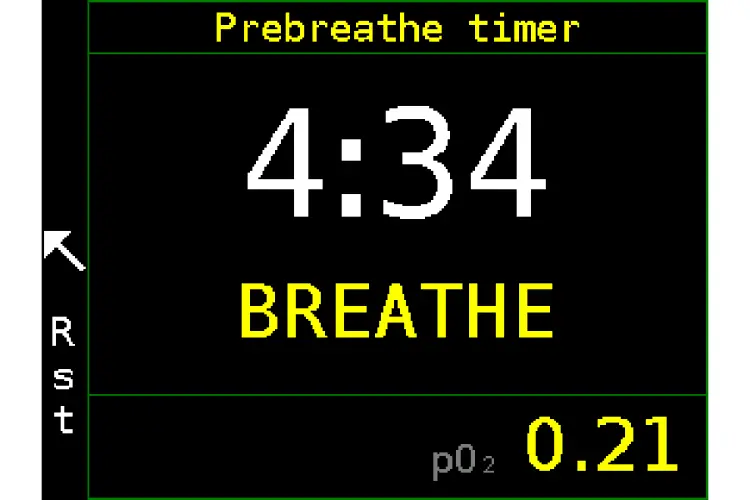
After checking all the checklist items, the prebreathe screen appears. Prepare the device for prebreathing. Press the upper button to count down the pre-breathing time. The rules and procedure for prebreathing are described in section 3.2.12.
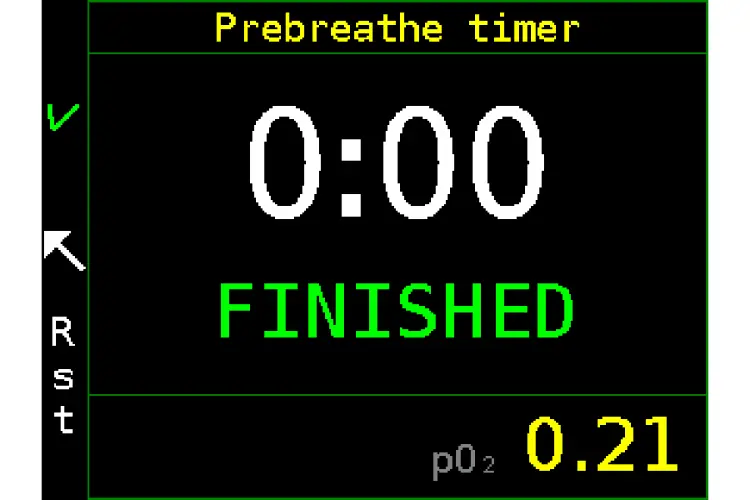
In the lower right corner, the average ppO2 is displayed. All sensors and other values can be monitored on the second handset, where all dive mode screens are accessible. If pre-breathing is interrupted, the countdown can be reset with the lower key.
The end of pre-breathing is reported by vibration and “FINISHED”. If the diver does not continue by himself, after a few seconds, the basic Dive mode screen will automatically appear
2.6.2 Switching to other modes
It is possible to switch from CCR mode to the manual CCR and bailout OC modes in the menu. If the current depth is less than 1.5 m, it is possible to switch to surface mode and standby mode.
2.6.3 ppO2 regulation
The basic function of the CCR Liberty is to maintain correct partial pressure of oxygen.
A predictive algorithm of ppO2 control is used. Measured ppO2 is adjusted according to the mathematical model of the breathing loop. The calculation of O2 delivery and possible subsequent opening of the solenoid is performed at six-second intervals. Oxygen is added alternately using the solenoids corresponding to both control units.
In the event that it is not possible to determine the actual depth (due to a malfunction or manual exclusion of all pressure sensors), regulation of oxygen delivery switches to a simple algorithm.
Setpoint
The setpoint is a required ppO2 value; for information on adjusting the setpoint, see section 2.4.2 Setpoints. Two special values, “low setpoint” and “high setpoint” are fixed. These can be selected simply by a long press of the upper key (for the high setpoint) or lower key (for the low setpoint).
In the default setting, the low setpoint has the value of 0.7 bar (70 kPa). It is possible to reset it within the range of 0.4 to 1.3 bar.
In the standard setting, the high setpoint has the value of 1.3 bar (130 kPa). It is possible to reset it within the range of 0.7 to 1.6 bar.
Upon starting the CCR dive mode, the low setpoint is activated by default.
Descent setpoint
The descent setpoint is designed for situations when the diver needs to rapidly descend to a given depth, for example, when diving in a current. The utilized algorithm uses the natural rise of ppO2 during descent. It is necessary to descend rapidly; the natural rise of ppO2 has to be faster than the oxygen consumption.
Use of the descent setpoint must be enabled in the configuration.
If it is enabled, the descent setpoint is automatically activated when switching from surface mode to CCR mode. It cannot be activated in another way. The descent setpoint has a variable value. The initial set value gives the ppO2 on the surface. At depth, the current setpoint increases linearly by 0.2 bar (20 kPa) for every 10 m of depth (i.e. it increases by the same absolute values as when diving with an open circuit with air, only with a different initial value).
The descent setpoint is automatically switched to the low setpoint upon reaching that value or upon completing or significantly slowing down the descent, but no later than after ten minutes.
When using the descent setpoint, the user must continuously check whether he/she has reached or exceeded the maximum physiologically permissible ppO2 limit and adjust the rate of descent accordingly, or take other measures.
Descent setpoint can be re-enabled by key shortcut or from the Setpoint menu (if we are at an applicable depth).
If On+Sfc is set in Setup / Setpoints / then the descent setpoint at the surface will never timeout.
WARNING: if the initial Descent SP value is lower than the set threshold for the Low ppO2 alarm, then while the Descent SP is active it will only alarm if it reaches 0.05bar less than the current Descent SP value - this is especially true at depths shallower than 6m when the Descent SP is set to 0.2bar (at the surface) and the default Low ppO2 alarm is 0.3bar.
Setpoint limitation
Besides the set value, the setpoint limit is defined by the ambient pressure. For example, at a depth of 3 m, where the hydrostatic pressure is 1.3 bars, ppO2 can reach a maximum of 1.3 bar when using pure oxygen.
Since obtaining a presice 100% of oxygen in the loop is not always practical, the setpoint is set at 90% of the ambient pressure by default. This value can be reset within the range from 60% to 96%.
Emergency ppO2 control
If all chemical sensors are not valid (error, disabled etc.), the depth is < 6m/20ft, and the ppO2 source is form O2 sensors, an emergency O2 injection + alarm is done every 6s.
The unit assumes that in a depth lower than six meters the risk of hypoxia is greater than the risk of hyperoxia, and prevents the fatal consequences of dysfunctional or disabled sensors. In this case, the diver must not continue his/her descent until the ppO2 stabilizes and the diver is sure of the breathing mixture.
Emergency ppO2 control by indirect measuring with He sensors
If all chemical sensors fail in dive mode, an alarm “pO2 measuring lost” is brought up.
Indirect measurement of ppO2 using helium sensors can only be activated manually, provided that the helium measurement setting is switched on (TMX only) and the helium fraction in the diluent is greater than 20%. When using indirect oxygen measurement with helium sensors, always be sure that helium sensors are calibrated and functional.
For indirect oxygen measurements, all fields displayed with ppO2 are blue.
2.6.4 Decompression
The decompression algorithm takes measured ppO2 values and inert gases according to the set diluent composition into account.
During a dive, the safety level can be set in the menu by switching the set of standard and bailout gradient factors (GFs) without affecting the mode in which the CCR Liberty is operating.
2.6.5 Specific handset control
Long press upper key — next higher setpoint
Long press lower key — next lower setpoint
If Descent SP and Deco SP are enabled in the settings, switching with key shortcuts also takes place between them.
2.7 Manual CCR mode
This mode serves primarily for training
2.7.1 Entering manual CCR mode
It is possible to switch to manual CCR mode from the menu in CCR mode, bailout OC mode, or surface mode.
2.7.2 Switching to other modes
In the menu, it is possible to switch from manual CCR mode to CCR mode and bailout OC mode. If the current depth is less than 1.5 m, it is possible to switch to surface mode and standby mode.
2.7.3 ppO2 regulation
Manual CCR mode is based upon CCR mode. However, automatic replenishment of oxygen is not available, and ppO2 regulation is performed only manually. The display of ppO2, decompression calculations, and other data is operational.
It is assumed that the user adds oxygen manually using the manual bypass valve or by manipulating the oxygen-cylinder valve if any solenoid is locked in the open state.
If the ppO2 falls below 0.3 bar, then oxygen will be added to the breathing loop automatically for safety reasons. This is possible only if the solenoids are operational and an oxygen supply is available.
When manually adding oxygen to the breathing loop, anticipate a delay between adding oxygen and the change in measured values. This delay is due to the fact that oxygen is added to the exhalation bag and the mixture must pass through the scrubber before it reaches the sensors.
2.7.4 Decompression
The decompression algorithm takes measured ppO2 values and inert gases according to the set diluent composition into account.
2.8 Bailout OC mode
This mode serves primarily for resolving emergency situations.
2.8.1 Entering bailout OC mode
Switching to bailout OC mode is achievable from the menu in CCR mode, manual CCR mode, or surface mode.
2.8.2 Switching to other modes
In the menu, it is possible to switch from bailout OC mode to CCR mode and manual CCR mode. If the current depth is less than 1.5 m, it is possible to switch to surface mode and standby mode.
2.8.3 Mixture
In bailout mode it is assumed that the diver will not breathe from the apparatus’s breathing loop but will rather use a separate open-circuit apparatus. Automatic ppO2 regulation is deactivated in bailout mode; the apparatus functions only as a decompression computer.
Due to this, you must not breathe from the unit, if it is switched to bailout OC mode
Up to eight breathing mixtures are can be available in this mode. The user can select the currently utilized mixture from the menu or can successively select individual mixtures with a long press of the upper or lower key. After switching to bailout OC mode, the configured default mixture is set.
2.8.4 Decompression
The decompression algorithm takes the partial-pressure values according to depth and the set mixture into account.
After switching to bailout OC mode, the safety level is automatically set using the bailout gradient factors (GFs). It is possible to switch between the standard and bailout GF sets in the menu without affecting the mode in which the CCR Liberty is operating. If the diver switches back to the CCR mode during the dive, the GF automatically switches back to Standard GF.
2.8.5 Specific handset control
Long press upper key — change of mixture (up according to the list, cyclically)
Long press lower key — change of mixture (down according to the list, cyclically)
2.9 Ascent plan

In any diving mode, you can view the current ascent plan with the entire decompression course. Although Decompression is shown on the Liberty using the depth of the decompression ceiling and time to surface, the Ascent plan is displayed in decompression stops at intervals of 3 m. The last column displays the gas with which the decompression stop is calculated
If a diver is in no-deco time, only “Free ascent” is shown.
Calculating and displaying the Ascent Plan is also affected by the Planner setup setting; in particular, the depth of the last decompression stop (whether the ascent is calculated with all available mixes), or with the current mix only. Details of settings are in section 3.1.1 Planner settings.
2.10 Setup in Dive mode
During the dive, many preconfigured factors can be changed, such as setting a new temporary setpoint, adding a new mix, removing a lost mixture, changing the diluent, or adjusting the brightness of the display or HUD.

Setpoint
You can set a new temporary setpoint by adding or subtracting from the value of the current setpoint. To increase the current setpoint, press +0.1, until you reach the desired setpoint. Once you have reached the desired value, move the cursor to Accept and confirm the change by pressing the upper button.
To decrease the current setpoint, move the cursor to -0.1 and press the top button repeatedly until you reach your setpoint. Once you have reached the desired value, move the cursor to Accept and confirm the change by pressing the upper button.
These setpoints are only temporary. By switching to low or high setpoint, a temporary setpoint is deleted, and the procedure described above has to be repeated to reset it.
Set high
Switch to high setpoint
Set low
Switch to low setpoint
Faulty sensors
In the event one or more sensors malfunction, it is necessary to exclude the faulty sensors from averaging. Disable the non-functional sensor or switch the oxygen measurement mode (oxygen or helium sensors). Faulty sensors would cause a poor evaluation of the unit’s condition, which could have fatal consequences. The procedure for excluding and including all sensors is the same as the procedure in the surface mode – see section 2.4.8 Faulty sensors.
Bailout GF
Bailout gradient factors are used to accelerate decompression during an emergency. This reduces the safety margin to the acceptable minimum time for a safe ascent to the surface. Once the device is switched to Bailout GF, this item changes to Standard GF, which then can be used to switch back to standard gradient factors.
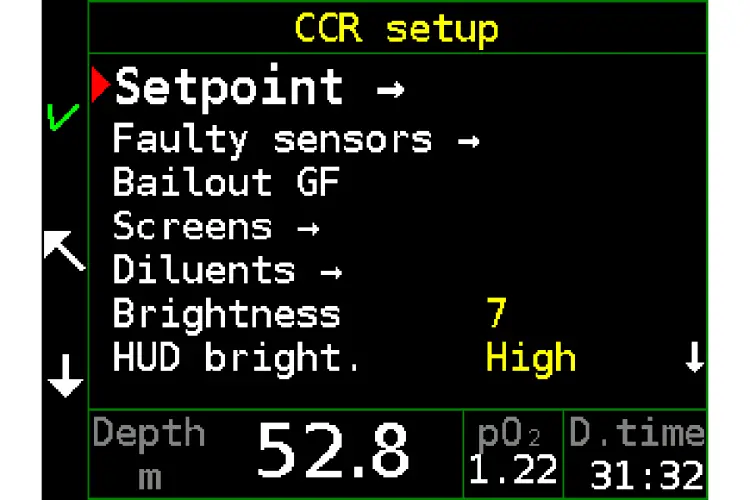
Screens
This feature turns some screens on or off. The procedure is the same as the surface mode setting; see Chapter 2.4.6 Preferences.
Diluents
The diluent setup feature is used to switch or set a new diluent if another diluent is used from an off-board source. In order for the diluent to be used correctly with respect to the decompression and the He-N2 ratio, a diluent flush should be performed to replace the original gas.
Mixtures (OC mode only)
This feature can be used to edit current bailout mixtures or add a new bailout mixture. It is also possible to deselect a lost decompression bottle so it is not counted in the ascent calculation. The setting is the same as setting the blends in surface mode: chapter 2.4.3 Mixtures.
Brightness
Adjust the brightness of the display (1-10). The brightness of the display significantly affects the power consumption. To save the battery, reduce the brightness of the display to the lowest acceptable level.
HUD brightness
The HUD diode brightness can be set to 3 different levels. In very dark conditions, the full brightness of the diodes may be irritating, but in sunny shallow water the low brightness may be less visible. The intensity is adjusted by pressing the upper button.
2.11 Games
Do not disable error messages and notifications if the games are played underwater.
Make sure you maintain your position while playing during a dive. Check the pressure gauges and rebreather state on the second handset on a regular basis. Playing a game will reduce your attention. Remember: you want to dive safely, not just achieve a higher level in the game!
2.11.1 Sokoban
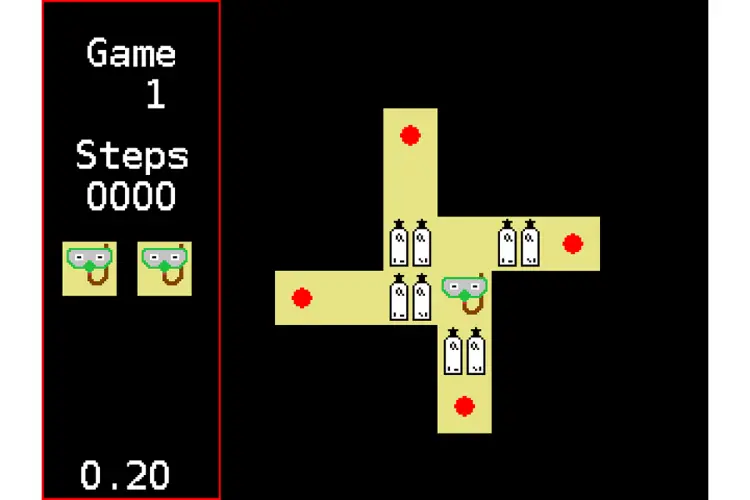
Sokoban is a type of transport puzzle, in which the player (a diving mask with snorkel) pushes cylinders or crates around in a warehouse, trying to get them to storage locations (red dots).
The game is played on a board of squares, where each square is either a floor or a wall. Some floor squares contain cylinders, and some floor squares are marked as storage locations.
The player is confined to the board and may move horizontally or vertically onto empty squares (never through walls or boxes). The player can also bump into a cylinder, which pushes it into the square beyond. Cylinders may not be pushed into other cylinders or walls, and they cannot be pulled. The puzzle is solved when all cylinders are in the storage locations.
2.11.2 Snake
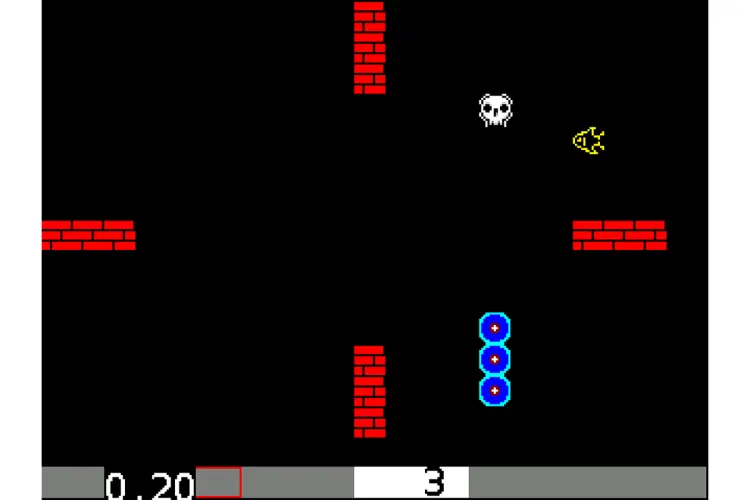
Snake is a game where the player maneuvers a line (the snake) which grows in length and is, itself, a primary obstacle.
The player controls the head of the snake. As it moves forward, it leaves a trail behind, resembling a moving snake. The snake has a specific length. The player loses when the snake runs into the screen border, a trail or another obstacle, eats poison (skull), or starves to death.
The snake can lose its length slowly (every 30 steps), and when it is too short, it dies from starvation.
The player attempts to eat fish by running into them with the head of the snake. Each fish eaten makes the snake longer, so maneuvering becomes progressively more difficult.
2.12 List of pop-up alarms and notifications on CCR Liberty
This is exhaustive list of all possible alarms and messages displayed as a pop-up on the Liberty CCR handset.
Messages are categorized according to priority, the “Critical”, “High” and “Medium” are all some kind of a failure or diver error.
The “Notifications” are informative messages with the lowest priority, e.g. deco stop end, etc.
In the “Customization” paragraph is the path through menu to the relevant item with [default] option in square brackets.
Please note that most menu items are available only in surface mode, but few are available only in dive.
2.12.1 Critical priority
Low pO2
The loop ppO2 have fallen below the “Min pO2” threshold. When the ppO2 falls even further, the alarm repeats every 0.1 bar.
For example, with default settings of ppO2 0.3 bar, first alarm sounds at ppO2 just below 0.3 bar, then another at 0.2 bar, and at 0.1 bar.
Customization
Setup / Alarms / Alarm Sources / Min pO2 [0.3]
Surface mode uses fixed threshold of 0.18 bar.
High pO2
The loop (or OC mixture) ppO2 exceeded the “Max pO2” threshold. If the ppO2 keep rising, the alarm repeats every 0.2 bar.
For example, with default value of 1.6 bar, first alarm sounds just above the 1.6 bar, then at 1.8 bar, 2.0 bar etc.
Customization
CCR
Setup / Alarms / Alarm Sources / Max pO2 [1.6]
OC
Setup / Mixtures / Max pO2 bottom [1.4]
Setup / Mixtures / Max pO2 deco [1.6]
Please note that internally the "Setup / Mixtures / Max pO2 deco" equals "Setup / Alarms / Alarm Sources / Max pO2".
Changing one will change the other as well.
PO2 measuring lost
All O2 sensors are malfunctioning or disabled, the Liberty has no means of reading current ppO2.
If you are using trimix as a diluent, and have helium sensors in working order, then you can manually switch to the backup computed ppO2 reading using helium sensors. The “pO2 backup mode” notification will follow, and all ppO2 values will have a blue background to signify that they are not from the chemical oxygen sensors.
Customization
Switching to backup O2 reading:
Setup / Faulty sensors / pO2 source [O2]
Above ceiling
Diver is less than 1m above the calculated decompression ceiling.
Very above ceiling
Diver is more than 1m above the calculated decompression ceiling.
2.12.2 High priority
Check O2 sensors !
This alarm occurs only if you have one or more oxygen sensors excluded, but not manually disabled. Alarm is triggered once an automatically excluded sensor exceeds the threshold for high ppO2 alarm (see section “Critical”).
This message is a clear signal for performing a sensors validation, usually by diluent flush. You are looking to confirm which sensors are faulty and which are working correctly (even the excluded ones). Once you decide that with confidence, then you can manually disable the sensors which are faulty.
There is possibility that the excluded sensor(s) is the only working one, and the rest is limiting, unable to reach the current ppO2. This situation has happened before, and therefore is only a question of time when it will happen again.
When you are confident that the excluded sensor is indeed faulty, you can manually disable the sensor to suppress this alarm.
Please note that you can manually re-include the excluded sensor in the faulty sensors screen as well.
Customization
Manually disable and enable sensors:
Setup / Faulty sensors / Oxygen sensors
Oxygen #3 excluded
One of the oxygen sensors is deviating from the average calculated from the three other sensors by more than a 0.1 bar for at least 15 seconds. Unless disabled by diver, the sensor will be automatically enabled again, once it fits into the average for at least 10 seconds. The inclusion does not generate any alarm or notification.
Be aware that once you have one sensor excluded, the average ppO2 is calculated from the three valid sensors. Also, any other exclusion compares one sensor to the other two, which is more prone to exclude a valid sensor if the other two become current limited.
If you want to avoid automatic inclusion of the once excluded sensor, then you can manually disable it.
Customization
Manually disable and enable sensors:
Setup / Faulty sensors / Oxygen sensors
Pressure #1 excluded
Liberty uses four sensors in total, two for each computer unit. So, although extremely rare, you may see this message.
You may see this message after damaging fine pressure sensors (marked with “F” in system check) by diving to depths of over 150m.
Customization
Manually disable and enable sensors:
Setup / Faulty sensors / Pressure sensors
Other CU down
The Liberty head contains two control units “CU”, they are connected by one communication line. If one of the CUs stops responding for 10 seconds, the alarm is raised.
If the one CU goes offline, either by a low battery or malfunction of any kind, the other CU keeps full functionality, injecting oxygen using its own solenoid. CU is limited only by having two oxygen cells, two pressure sensors, one HS.
When using only one HS in sidemount, it is advised to connect HUD to one side and a handset to the other side of the head. So even running on one CU, you keep the ability to read loop ppO2 on either HS or HUD.
CNS O2 toxicity 115%
The oxygen toxicity alarm sounds in three stages, at 75%, 90% and 100%. To notify the diver that he is reaching the NOAA oxygen exposure limit.
If you need to prolong your stay underwater, reaching the CNS limit, you can lower the setpoint to find a compromise between oxygen exposure and decompression time.
Customization
Setup / Alarms / Alarm Sources / CNS [On]
Stack time 240 min
The scrubber timer alarm. You can modify the notification time in surface menu according to your habits. Also, you can customize whether the timer should be active on the surface, or underwater only.
Customization
Setup / Alarms / Notifications / Stack time [150’]
Setup / Alarms / Notifications / Stack timer on sfc. [On]
On … timer running all the time when Liberty is in dive mode, even on the surface.
Off … timer running underwater only (below 1.5m).
SLOW DOWN !!!
Ascent speed exceeded 60m per minute.
Customization
Setup / Alarms / Alarm sources / Ascent rate [On]
pO2 emergency mode
Notification after manual switch to calculating ppO2 from helium sensors data. See also „pO2 measuring lost“.
Customization
Setup / Faulty sensors / pO2 source [O2]
Pressure sens. diff.
Only two pressure sensors are available and they differ by 1.5m or more. For example, when running on one CU and the fine pressure sensor is faulty.
Customization
Setup / Faulty sensors / Pressure sensors
Disable or enable desired pressure sensor.
Pressure #3 sensor bad
Pressure sensor value differs from the average of other pressure sensors by 1.5m or more.
Customization
Setup / Faulty sensors / Pressure sensors
Disable or enable desired pressure sensor.
High humidity CU L
It occurs when the humidity in the CU is higher than 75%.
Low battery
The battery level has reached warning level. Liberty has two batteries – one for each side, each battery then has its own alarm.
Customization
Setup / Alarms / Alarm sources / Low battery % [25]
Please note that setting the level below 10% suppresses the “Critical battery” alarm.
Furthermore, setting the alarm threshold too low, may result in warning too late to be useful.
Critical battery
The battery level has reached fixed level of 10%, the two batteries has separate alarms.
Customization
Fixed at 10% battery level.
This alarm is not customizable, though please note that setting “Low battery” warning level below 10% suppresses the critical alarm. The diver will get only the “Low Battery” alarm.
2.12.3 Medium priority
Slow down
The ascent or descent speed exceeded the set value.
Customization
Setup / Decompression / Rates & zones
Please note that ascent and descent rates are used also in the dive planner, TTS and ascent plan calculations.
BO RMT 4´
Bailout remaining time advance warning, warns about 5’ before expiration. For more information see “BO RMT expired” below.
BO RMT expired
Bailout remaining time expired. This marks a point of dive when the OC bailout will just last if you begin your ascent immediately. The calculations are based upon the decompression settings, enabled OC mixtures, cylinder volumes and pressures, respiratory minute value etc.
Warning
The BO RMT is only relevant, when you have all configuration set precisely for the current dive. Especially the OC mixtures setting, having enabled other OC mixtures than you take on the dive will render the BORMT calculation invalid.
BO RMT expired CNS
Liberty FW version 2.12 and up.
Bailout remaining time for the dual CCR mode is active only when the “BOCCR settings” is enabled. This alarm is only in the Bailout CCR mode.
The last word indicates what is the limiting factor. At the moment that can be Battery, Stack and CNS.
Customization
Setup / Miscellaneous / BOCCR settings [Off]
Global Bailout CCR switch also decides whether the BO RMT calculation will be OC or CCR.
Lost Gas EAN 50
Open circuit mode only.
Notification that the best mix at this depth is marked “lost” resulting in ascent plan and TTS recalculation without the best mix. Switching to this gas will remove the “lost” tag and recalculate the ascent including the current best mix again.
This message can be caused for example by ignoring the “Switch to EAN50” at 21m notification (see below). The algorithm is 1st notification, 2’ pause, 2nd notification, 2’ pause and if even at this point diver did not switch to the advised gas, the gas is marked as “lost”.
Customization
Setup / Alarms / Notifications / Gas sw. reminder[Off]
The “Lost gas” feature is available only when “Gas sw. remainder” is turned on.
2.12.4 Notifications
High setpoint
Setpoint change notification, automatic or manual. The automatic switch to high setpoint is configurable in menu “SPh auto”.
Customization
Setup / Setpoints / SPh auto [Off]
Automatic switch to high setpoint, you may set a depth in descent, after a time or depth in ascent.
Low setpoint
Setpoint change notification, automatic or manual.
Automatic switch to setpoint low is possible only when using descent setpoint feature. With the descent setpoint active, the Liberty will automatically switch to low setpoint once the loop ppO2 reach the low setpoint, or after 10’ from submersion.
Customization
Setup / Setpoints / Use descent SP [Off]
Setup / Setpoints / ppO2 descent [0.4]
Setpoint 1.1
Setpoint change manual, immediately after setting custom SP.
Customization
Setup / Setpoint / Accept
Custom setpoint is available in dive mode only.
Mode BO CCR
Manual or automatic mode change notification – OC, CCR, mCCR, BO CCR.
Automatic mode change is possible only from BO CCR to CCR, when the loop ppO2 falls 20% below the diluent ppO2 at current depth. For example, when the diver starts breathing from the unit in the BO CCR mode, without changing mode to CCR.
Please note that this is intended as an emergency feature only.
No deco end
End of the no-decompression part of the dive.
Customization
Setup / Alarms / Notifications / No deco end [On]
Depth 55 m reached
Custom depth notification, diver can set three depth notifications for descent, and three for ascent.
Customization
Setup / Alarms / Notifications / Depth & Time
Time 33´ elapsed
Custom elapsed dive time notification, diver can set three different notifications.
Customization
Setup / Alarms / Notifications / Depth & Time
Bookmark 3
Notification that user bookmark has been saved to dive log.
Customization
Applications / Add bookmark
This item is available in dive mode only.
Switch to EAN50
Open circuit only.
Notification for a gas change based on current depth, available mixtures and set maximum ppO2.
Customization
Setup / Alarms / Notifications / Gas sw. remainder [Off]
EAN50
Open circuit only.
Switched to an OC mixture, automatic notification immediately after gas switch in menu as a confirmation of a successful gas switch.
Diluent TMX 10/50
Switched to a different diluent, automatic notification immediately after a diluent switch in menu as a confirmation of a successful diluent switch.
Factory defaults
All user settings have been reset to factory defaults.
Customization
Setup / Miscellaneous / Factory defaults