User manual
Freedom / Nitrox, Trimix & CCR dive computer
HW rev. 3.1, FW 1.18.2
Contents
Section 02: Operation
02.1 Control elements
02.1.1 Meanings of inputs in surface modes
02.1.2 Meanings of inputs in dive modes
02.1.3 Language
02.2 Brightness control
02.3 Switching on the unit
02.4 Switching off the unit
Section 03: Diving
03.1 Surface mode
03.1.1 Entering surface mode
03.1.2 Surface mode screen
03.1.3 Switching to other modes
03.2 Open Circuit
03.2.1 Entering open circuit mode
03.2.2 Detailed screen
03.2.3 Synoptic screen
03.2.4 Big Screen
03.2.5 Dive profile screen
03.2.6 Dive menu
03.2.7 Gas switch shortcut
03.3 Fixed setpoint CCR
03.3.1 Predive and submersion
03.3.2 Setpoint
03.3.3 Dive menu
03.3.4 Stack time
03.4 Measured CCR
03.4.1 O2 sensors connection
03.4.2 O2 sensors calibration
03.4.3 pO2 reading
03.5 Gauge
03.5.1 Synoptic screen
03.5.2 Big Screen
03.5.3 Dive profile screen
03.5.4 Dive menu
03.6 Free
03.6.1 Surface screen
03.6.2 Dive screen
03.7 Advised strategies
03.7.1 Diving in darkness
03.7.2 Decompression
Section 02: Operation
02.1 Control elements
For technical specification of inputs see "10.3 Control elements" in the Hardware section.
02.1.1 Meanings of inputs in surface modes
The keys and other inputs are assigned meanings in connection with the current navigation item in the menu. At the same time, however, general rules, which apply wherever possible, are determined for their use.
Press upper key – confirm the menu item just selected
Press lower key – cycle downward through the menu
Press both keys – exit the menu without performing any action
Long press upper key – page up
Long press lower key – page down
Long press both keys – return to main screen
Coded key press (press both keys, then release one key and press it again, then release both keys) – enter service functions menu
Tilt away from yourself – increase of the entered digit by one or check flag
Tilt toward yourself– decrease of the entered digit by one or uncheck flag
Tilt to the left – move the cursor to the left
Tilt to the right – move the cursor to the right
Wherever possible (menu, editing screen), helpful symbols relating to the keys are displayed. A symbol can be either next to a key, indicating the action executed during a short key press, or between the keys, indicating the action executed during a short press of both keys.
The |↓| symbol next to a key means move down one row in the menu. Moving in the menu is cyclical, so the first row appears again after the last row. The move-up function is not available.
The |↑| symbol means return one level without executing any action.
The |v| symbol represents confirmation of the action or selection.
02.1.2 Meanings of inputs in dive modes
The meanings of inputs are the same as in surface modes. Other possibilities are:
Long press upper key – gas switch shortcut (previous mixture)
Long press lower key – gas switch shortcut (next mixture)
Tilting is expanded with movement in games; otherwise, entry of digits, for which tilting is used in surface modes, is limited during the dive to only special cases.
Tapping on the display glass – switch on the display if it is switched off.
Shining a light on the display – in the dark, illuminating the display with a dive light activates it similarly as when tapping on the glass. In the light, the display can be activated by covering and then uncovering it.
02.1.3 Language
All textual information on the Divesoft Freedom is in English. Controlling the apparatus requires knowledge of the English language minimally at a level that allows the user to thoroughly understand this information.
02.2 Brightness control
The 3 levels of the display backlight brightness can be switched by the lower key; the display off, the level set in the Setup → Preferences → Display → Brightness and the maximum brightness (equivalent to
level 9).
If the display is off, then use the short press to switch it on. The second and subsequent press with a short delay between presses (< 1 s) switches the brightness level.
The display can’t shine through disturbed silt or mud on low brightness. If it is necessary to switch to the maximal brightness just short press the lower key repeatedly. The maximum brightness will be set after two
button pushes (if the display was off in the beginning) or three pushes (if the display was on).
Adjusting the function of the lower button may override the brightness control.
"Lower bttn." to ""Prev Scr"
"Stopw btn." to "Base" or "Always".
The setting is placed in the same place as the Lower bttn. BottomTimer: Setup -> Preferences -> Lower bttn.
Other licences: Setup -> Preferences -> User interface -> Lower bttn.
See also Advised strategies – "3.7.1 Diving in darkness". This way of brightness control works in all modes except gauge and free mode, where lower button is assigned to stopwatch.
02.3 Switching on the unit
The device is switched on by pressing both keys for three seconds.
Automatic activation occurs in the event of entering the water in standby mode. If submerged to a depth greater than 1.5 m, the computer switches to default mode (OC in the default setting, can be changed in Setup → Preferences).
Automatic activation is not immediate, it is necessary to wait a few seconds. The computer may be switched on automatically in higher depth if a descent is rapid. It does not affect the decompression calculation but the first few seconds of the dive profile record will be lost.
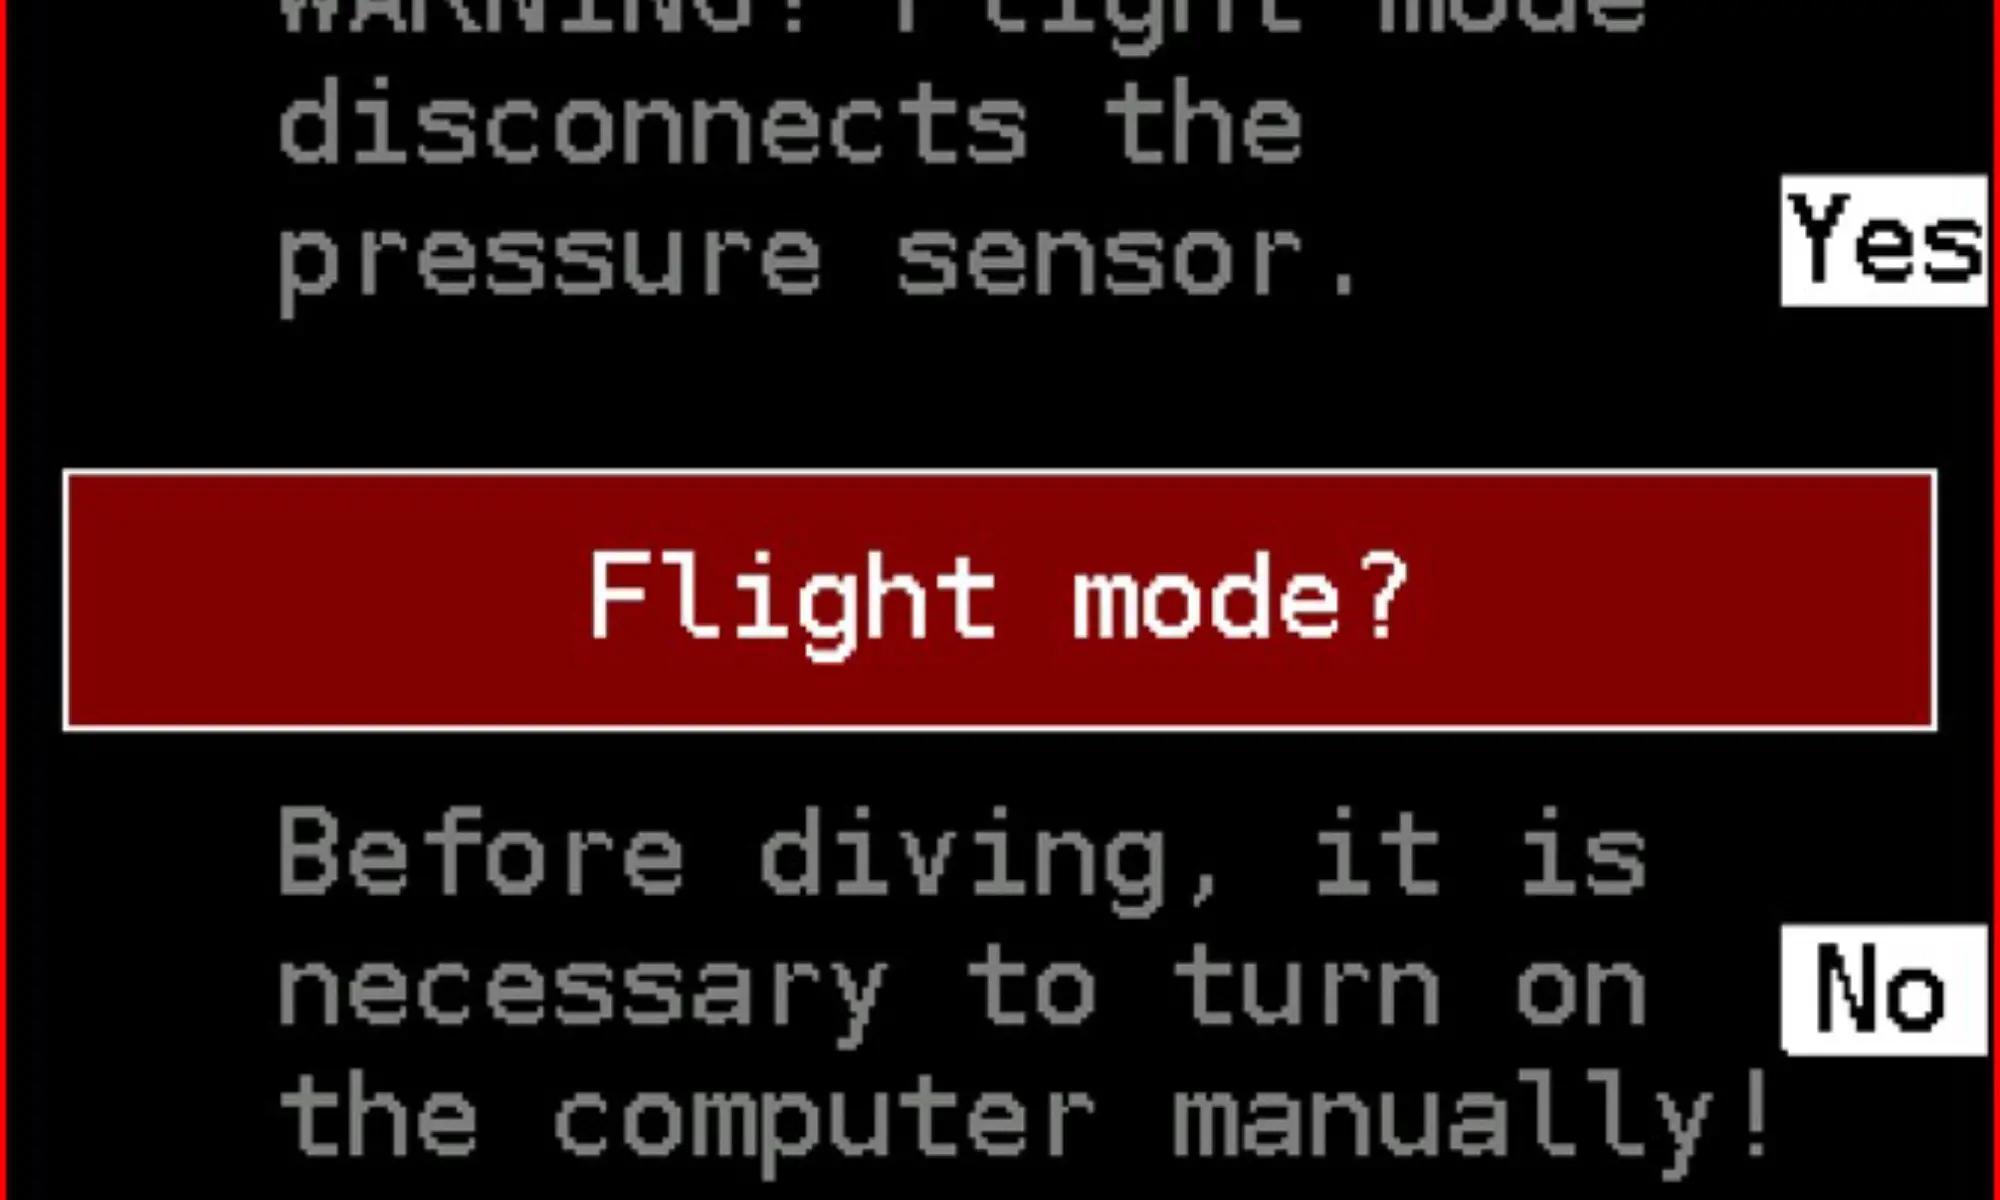
The automatic activation on submersion is disabled when switched to the flight mode.
In case the diver forgets to switch on the computer after a flight the computer will switch on at 5 m depth within 1 minute.
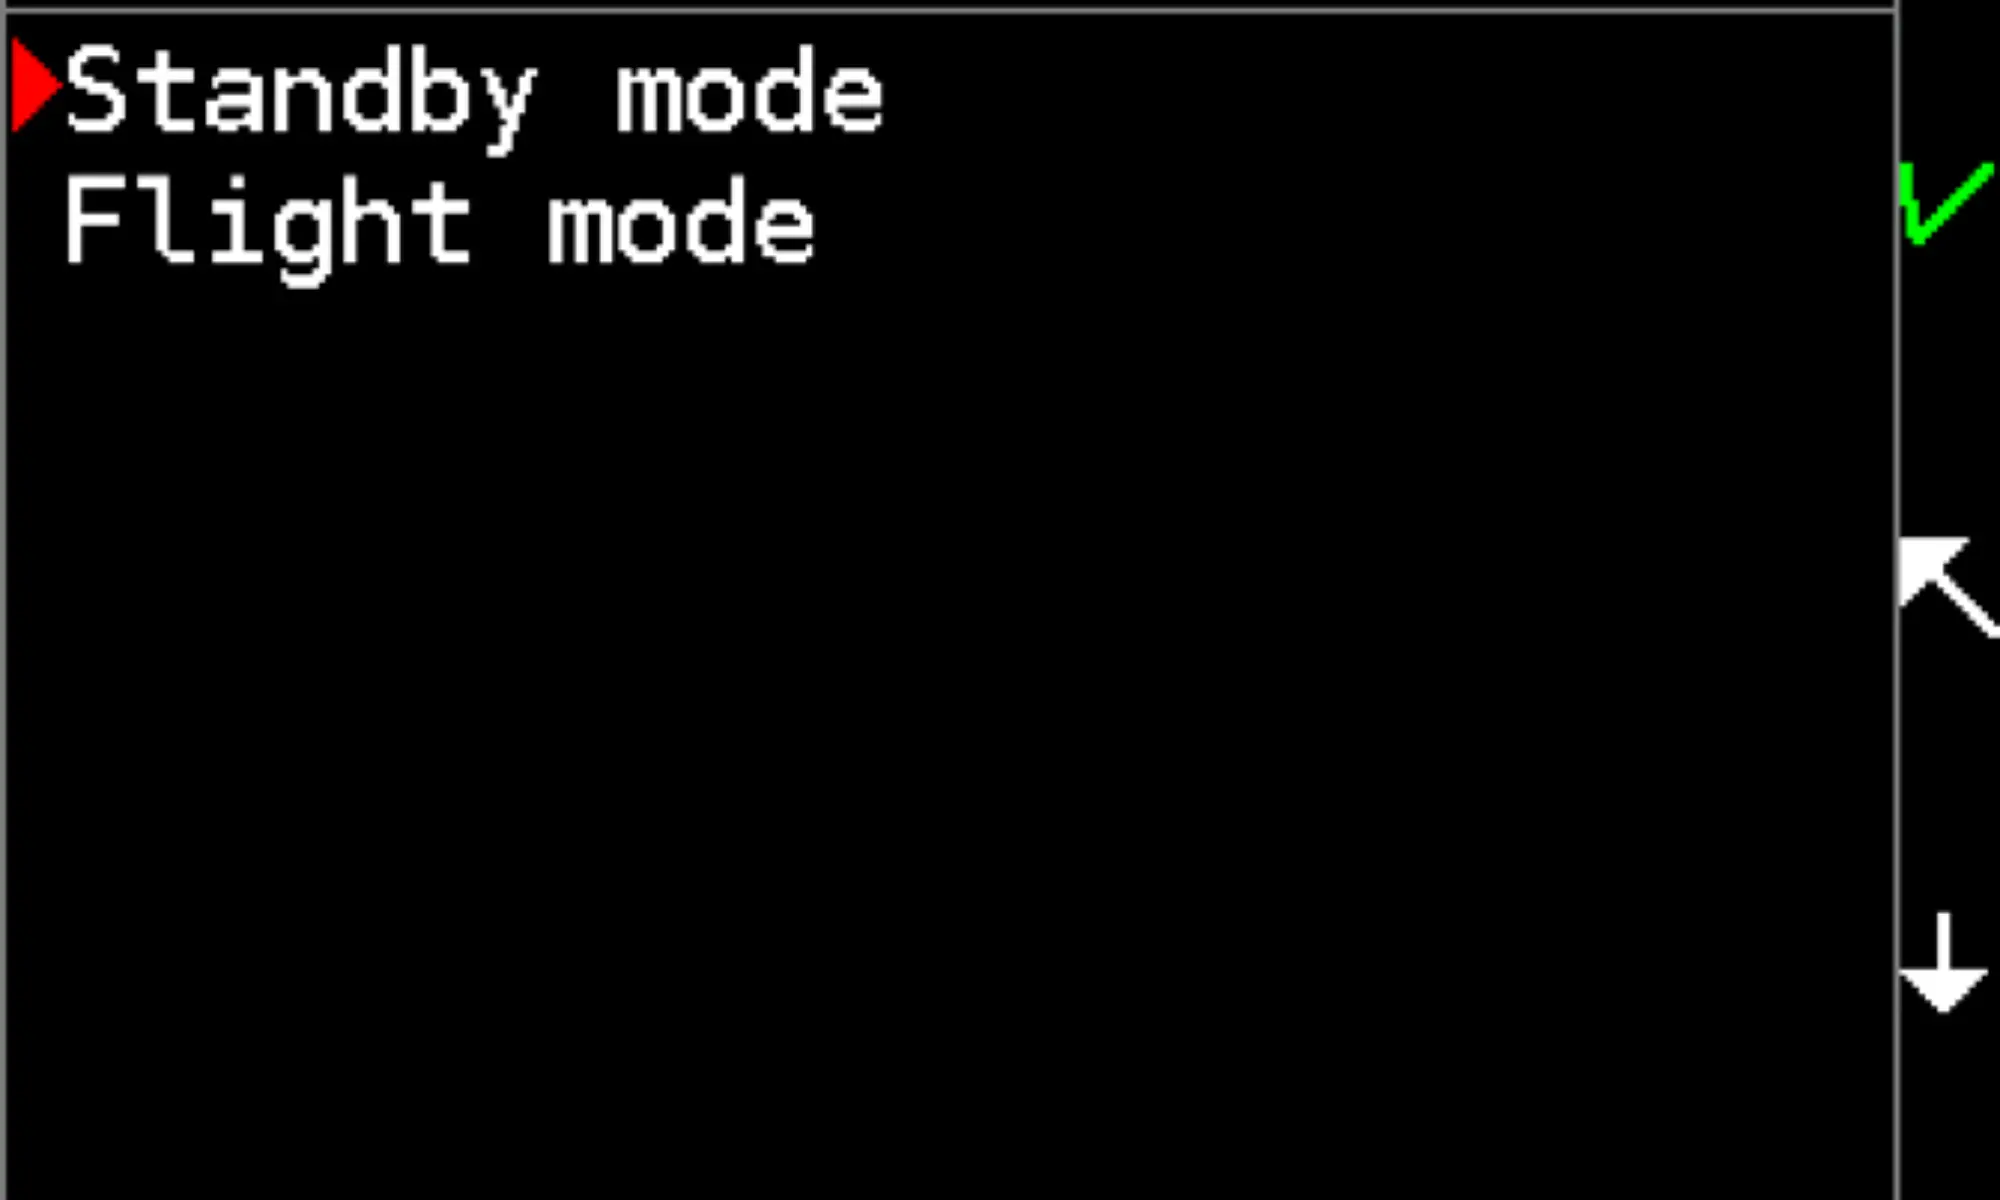
02.4 Switching off the unit
Enter the menu from surface mode, select Switch off and Standby mode in the second menu.
Or you can select Flight mode in the second menu. This prevents an automatic activation due to a rapid pressure change and confusion of the surface level detection algorithm.
You can switch off directly from dive mode while on the surface. This way the unit will be switched to standby mode, so automatic activation by submersion is enabled.
The other way to switch off is by waiting for a timeout.
Upon surfacing the Freedom will switch to surface mode after time set in the dive termination timeout. Then it will switch to standby mode after time set in the surface idle timeout. Pushing any button restarts the idle timer in the surface mode.
Section 03: Diving
03.1 Surface mode
The surface mode is indicated by the gray table gridlines.
03.1.1 Entering surface mode
The Divesoft Freedom switches to surface mode upon being switched on.
03.1.2 Surface mode screen
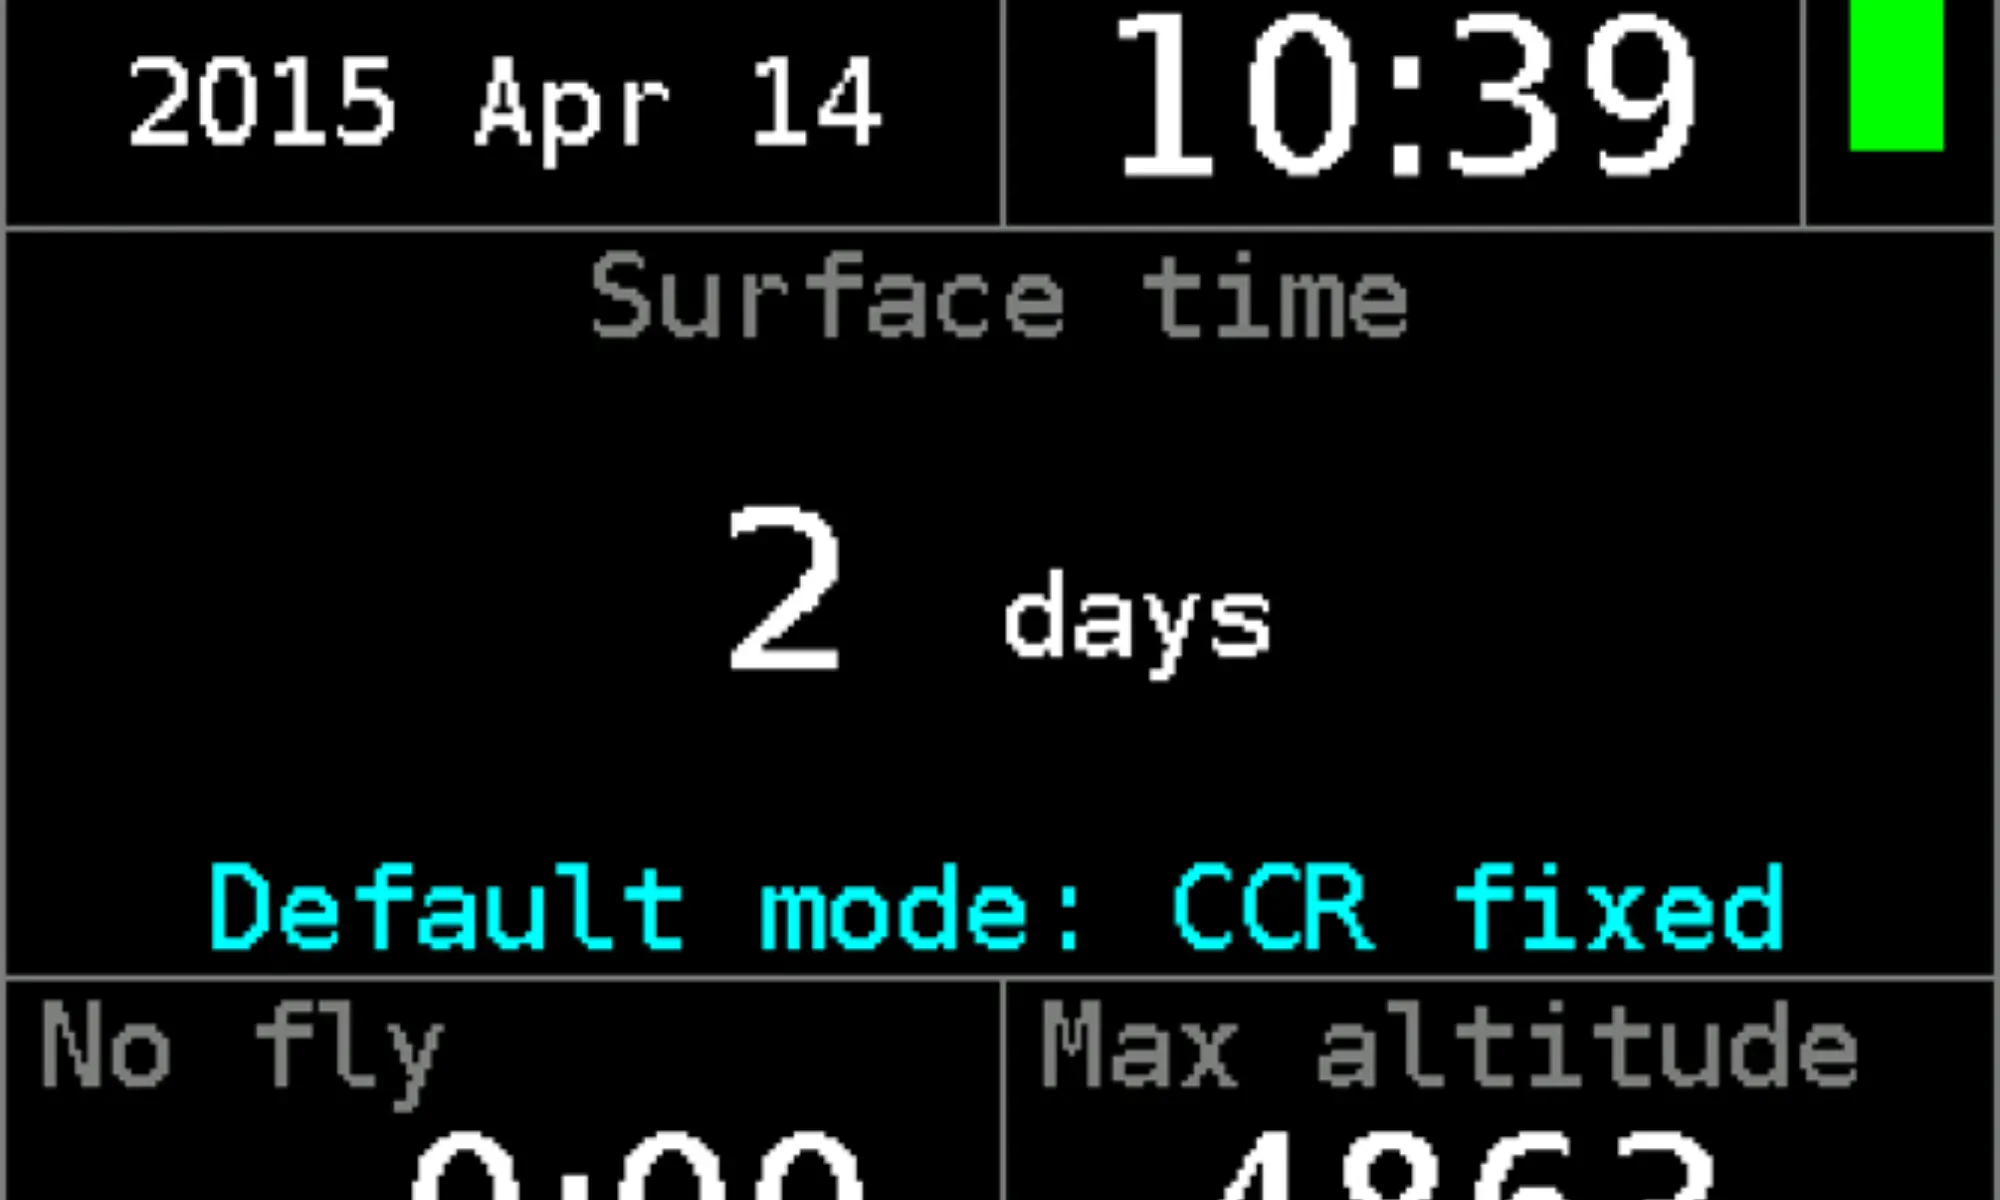
Date and Time
Maintain correct local time setting. It will be used for log recording.
The date format can be set in
Setup -> Miscellaneous -> Date format
Surface time
The time from a previous dive. If it was 99 days ago or more, then FREEDOM banner appears instead of the time.
Default mode
The dive mode, to which the Freedom will be switched if submerged to a depth greater than 1.5 m.
No fly
The calculation of the no fly time is based on the maximum allowed altitude according to the Bühlmann’s decompression algorithm ZHL. The air pressure in the cabin of a commercial aircraft is maintained at a level corresponding to air pressure at 1800–2400 m (6000–8000 feet) above sea level while cruising altitude falls in the range 11 000–12 200 m (36 000–40 000 feet).
The no fly time calculation uses the decisive altitude 4464 m (14 646 ft). At this altitude compartments containing the oxygen masks will be opened automatically and the oxygen masks will drop down in front of the aircraft passengers.
Max altitude
The maximum allowed altitude calculation is based on the ZHL decompression algorithm with an additional safety margin (GF = 0.80).

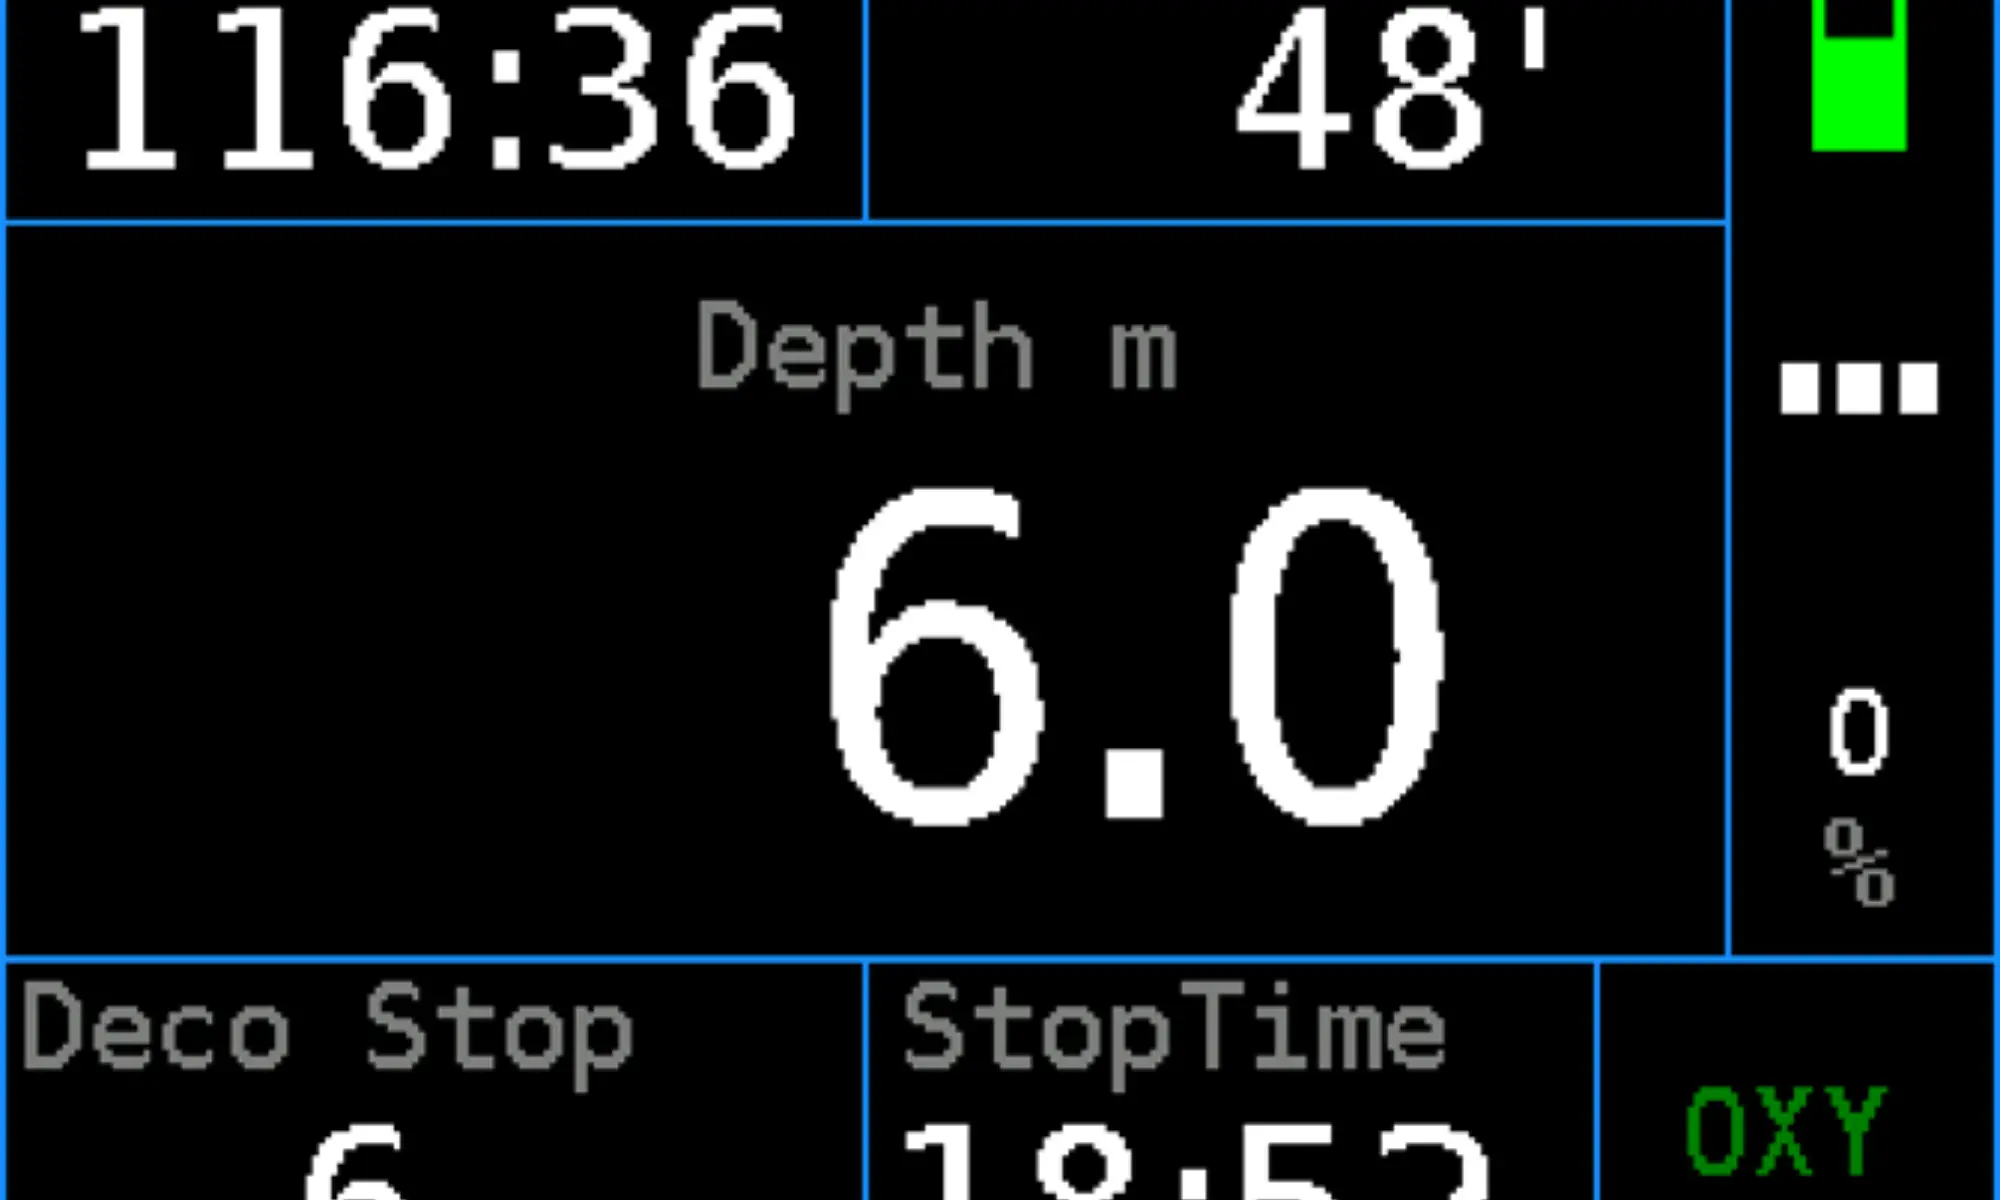
Battery symbol
A graphical indication of remaining battery capacity. The estimated capacity of full battery is about
10 hours.
For detailed information see the battery screen in the system check.
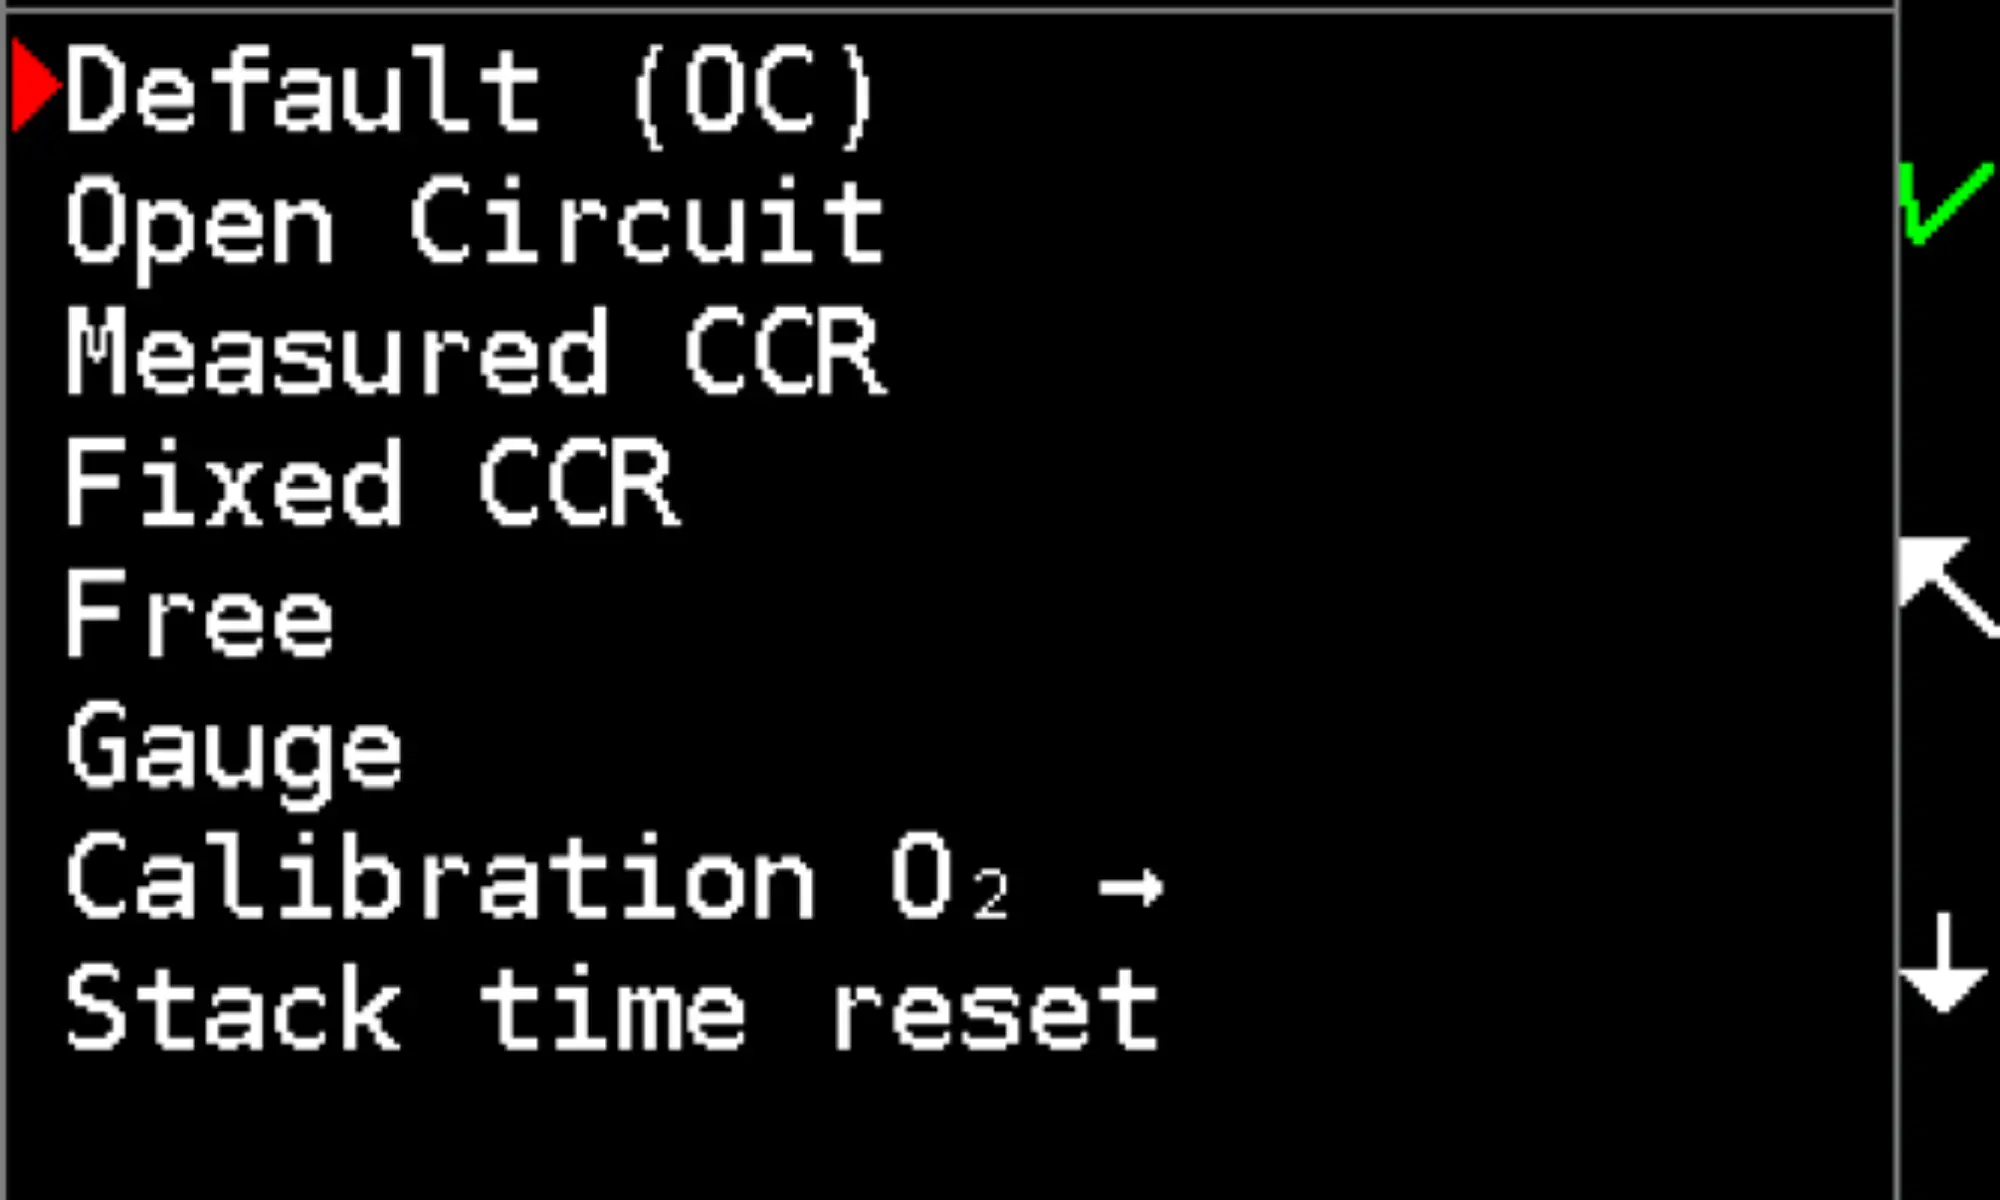
03.1.3 Switching to other modes
In the menu → Dive, the user can switch from surface mode to open
circuit, rebreather, gauge and freediving modes.
A dive mode cannot start while the Divesoft Freedom is connected
to USB port or charger. See also Powering in hyperbaric environment
(See section 10.1.1).
The Freedom computer can also be switched to the service menu.
See chapter "8.2 Service functions".
03.2 Open Circuit
The open circuit mode is indicated by the blue table gridlines.
03.2.1 Entering open circuit mode
Open circuit mode can be entered from the menu in surface mode, by automatic activation after submersion (if set as the default mode) or as a bailout from CCR mode (the Close Circuit version only).
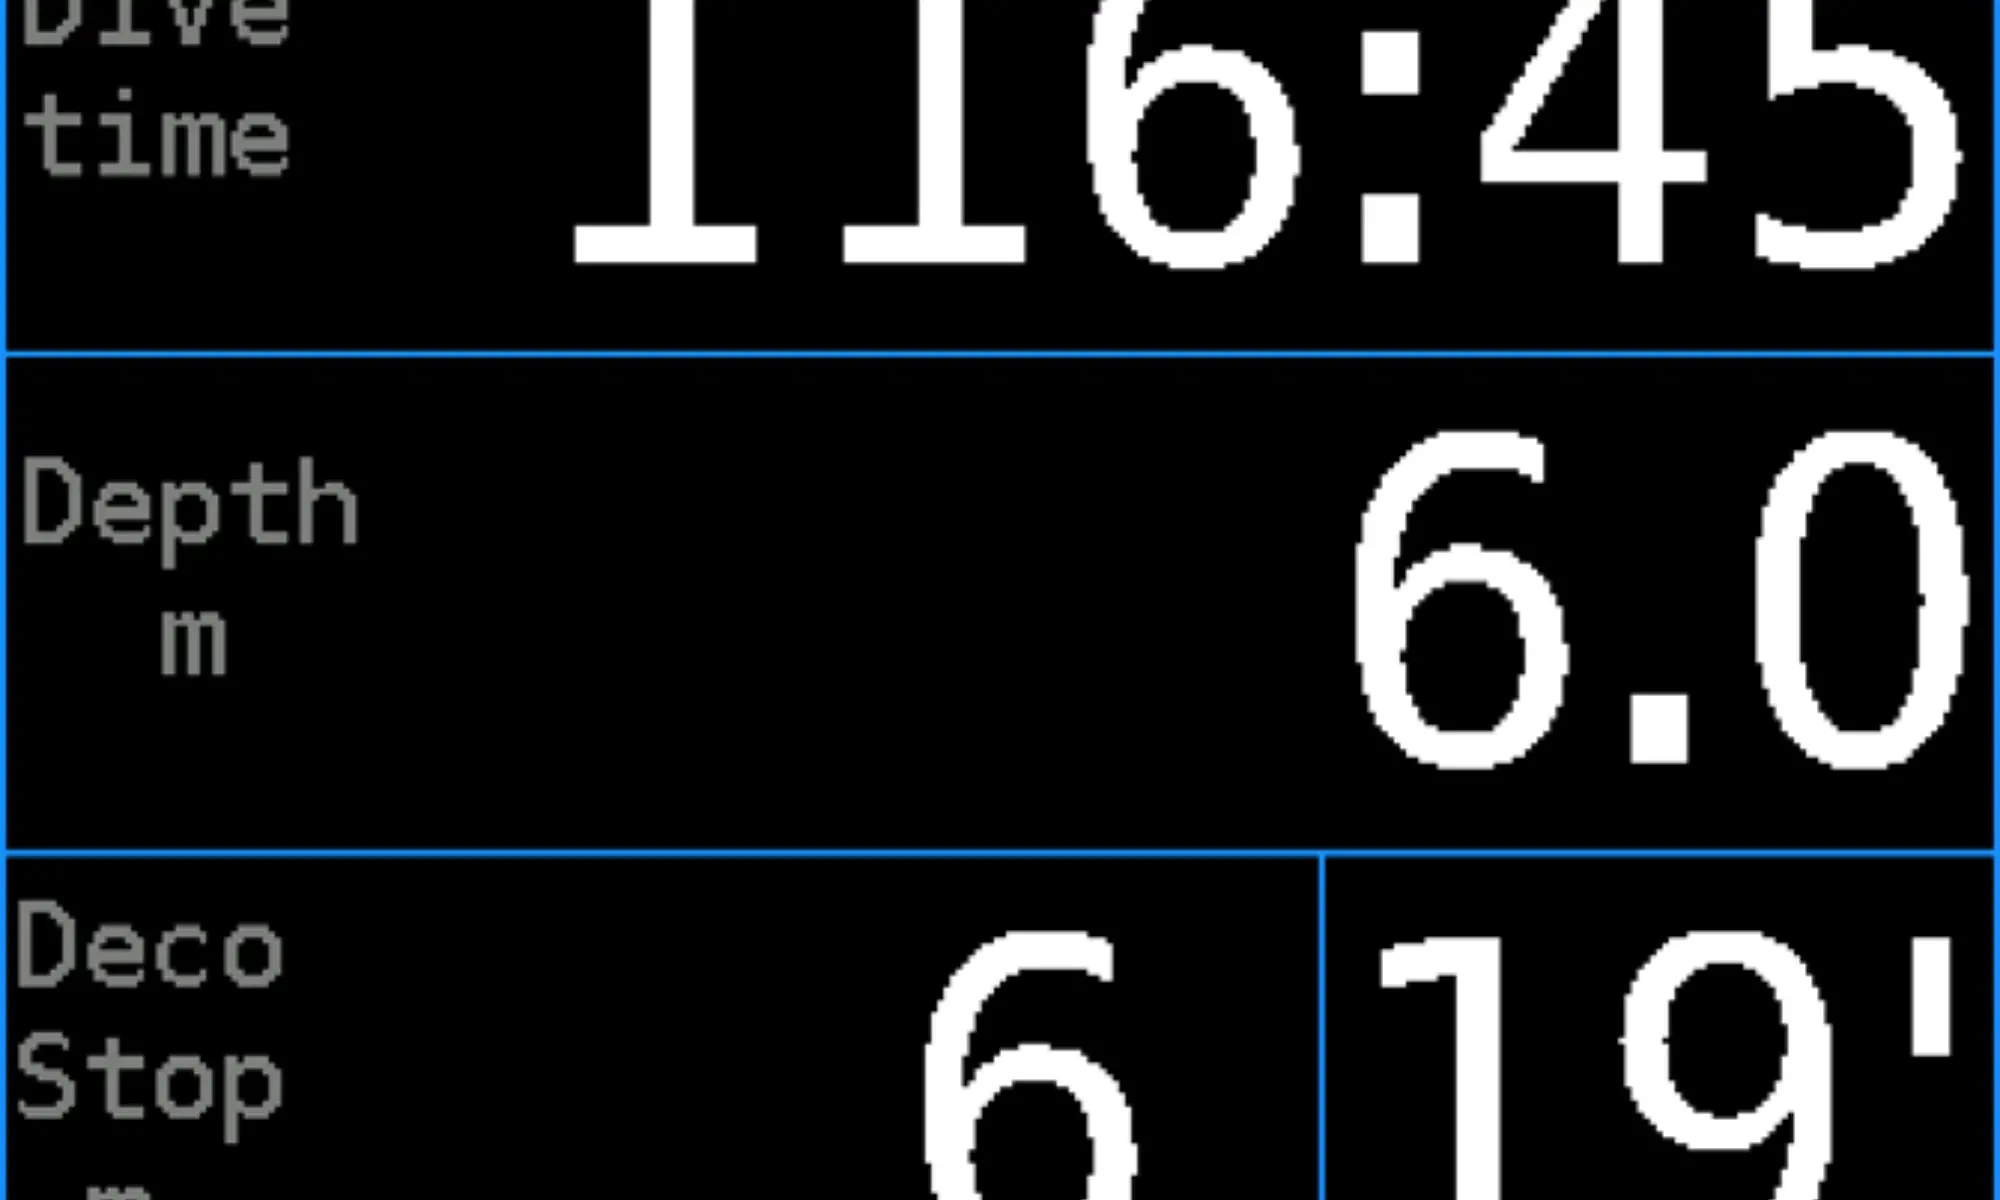
03.2.2 Detailed screen
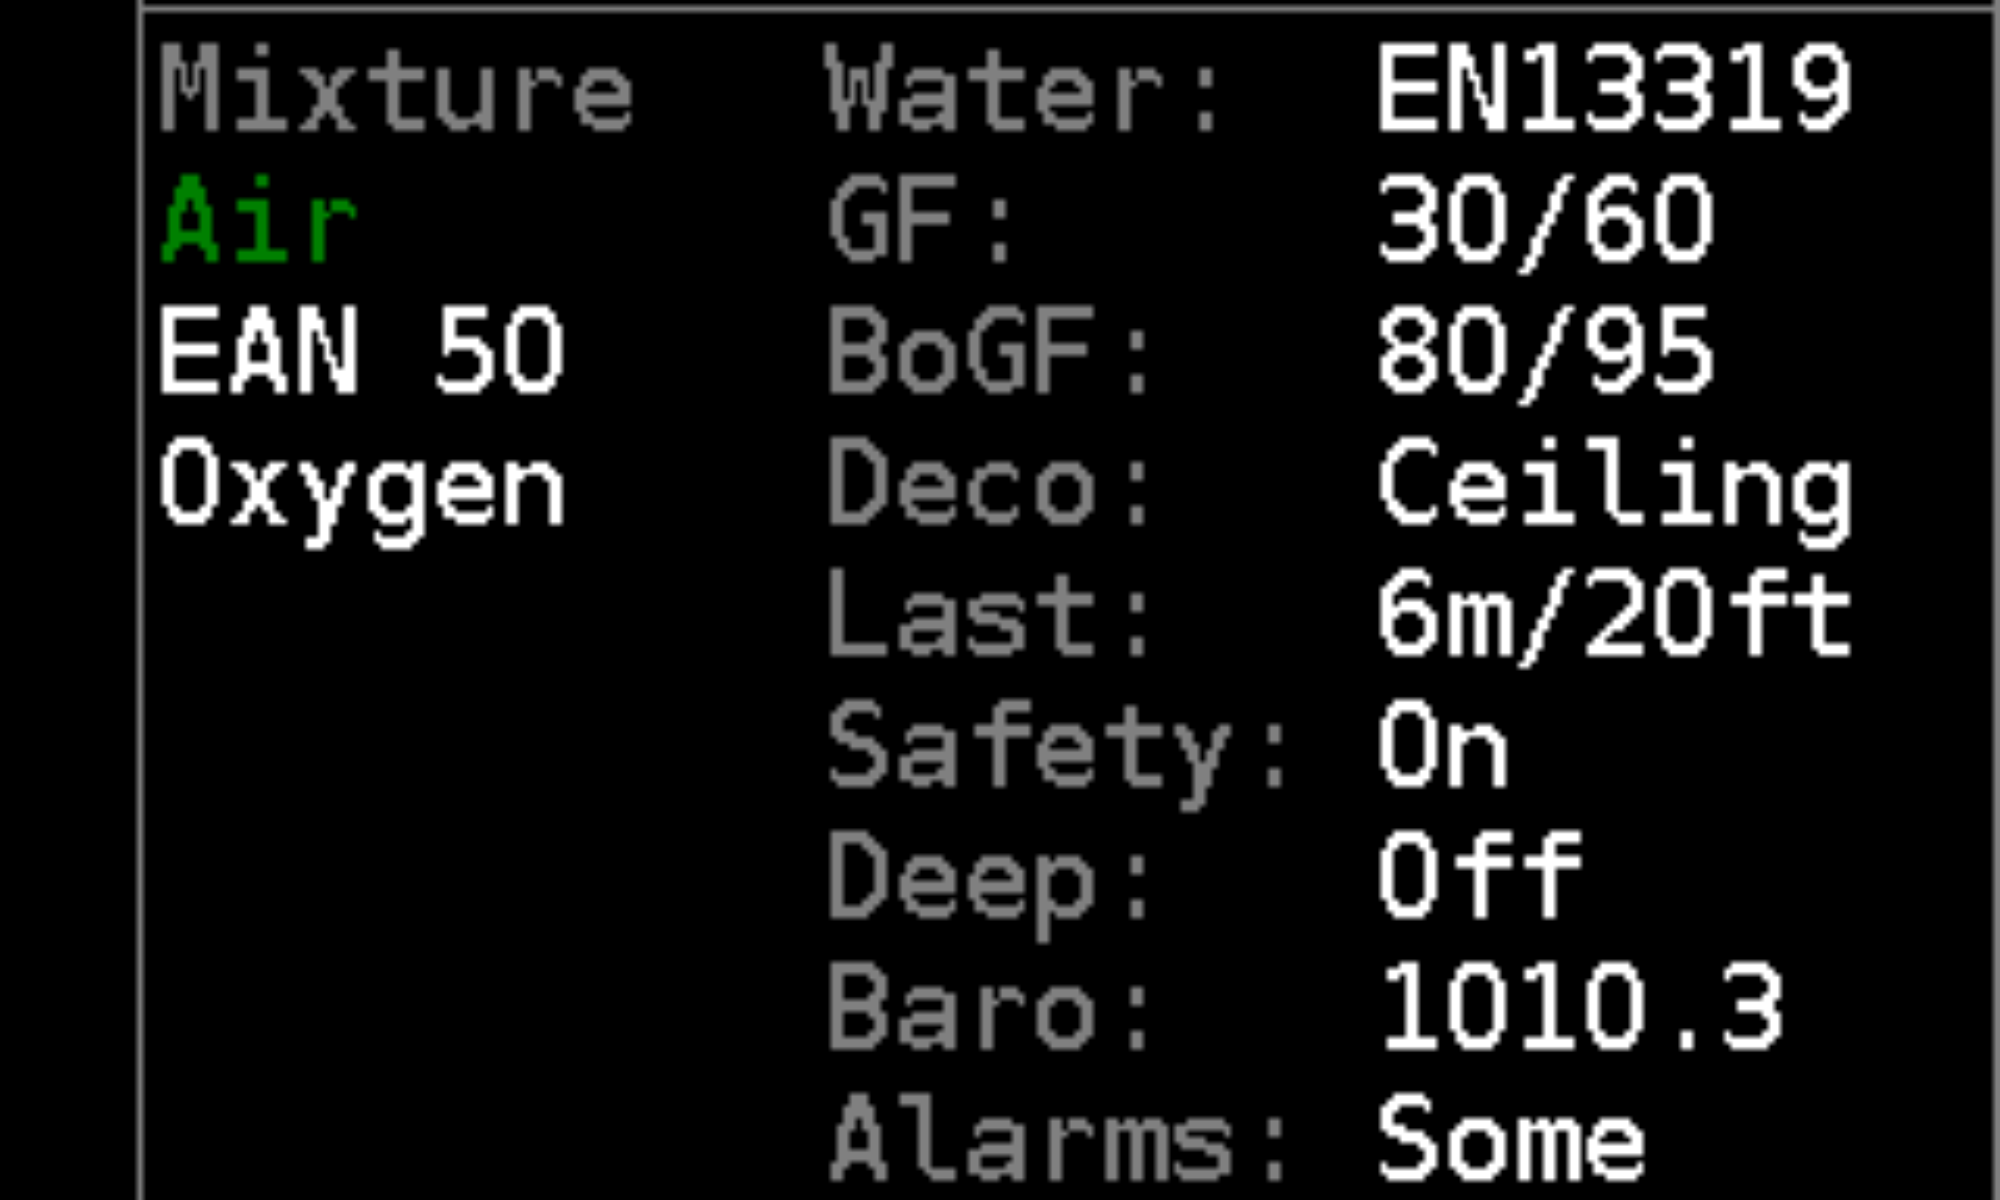
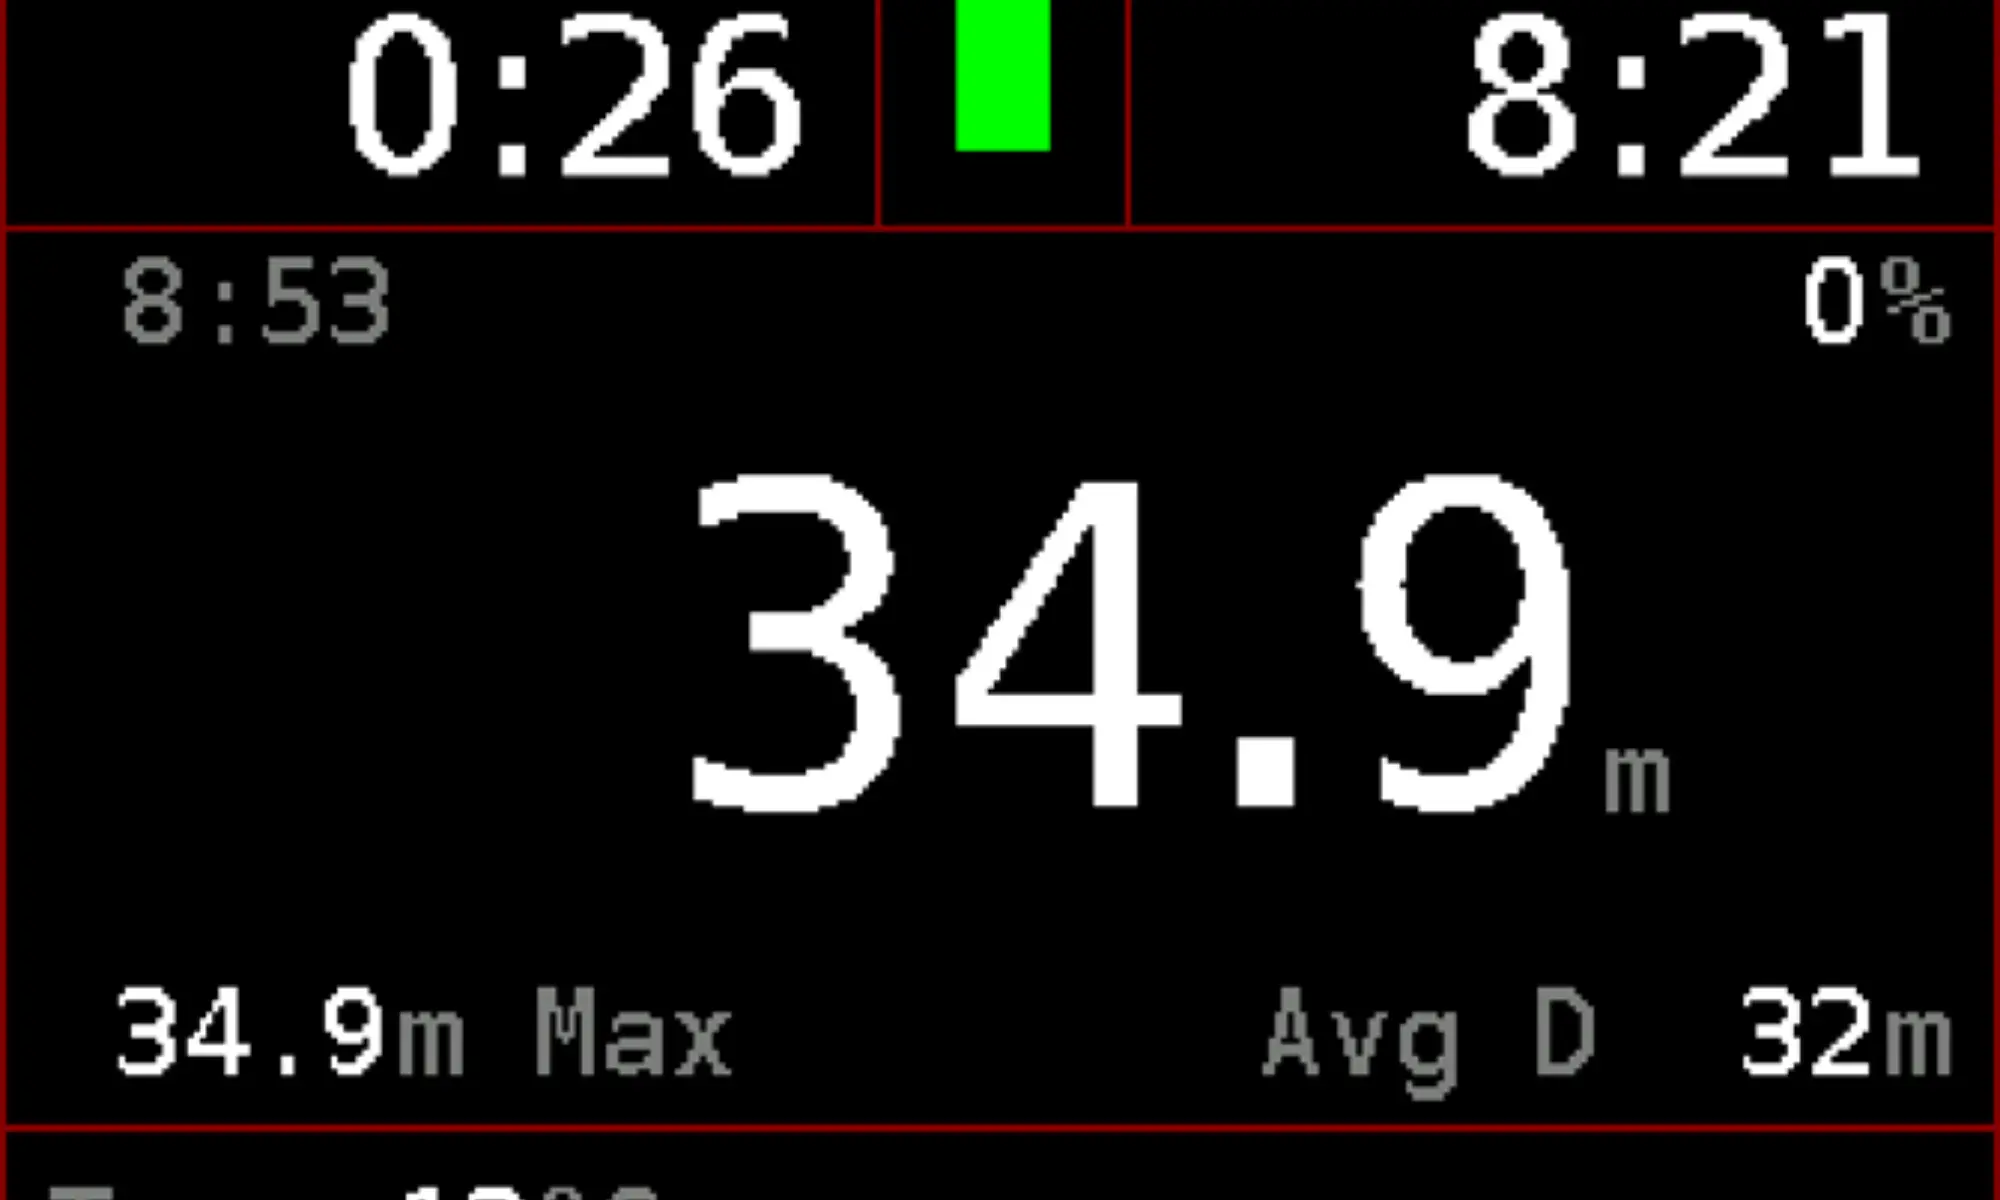
The primary screen displays all necessary information during a dive. Depth The depth can be read in the units set in the setup (m or ft). Depth is calculated from measured hydrostatic pressure. Fresh water (default) or seawater density can be set for the depth calculation.
Setting of fresh/sea water doesn’t affect decompression calculations. Decompression is based on ambient pressure and is independent of displayed depth. Only depth of decompression stops is rounded up to usual values according to settings of fresh/sea water and metric/imperial units.
Dive time
The timer starts after submersion (depth > 1.5 m) and halts after surfacing (depth < 0.5 m). In case of
stay on the surface (or at very shallow depth) followed by a second submersion (during a time set in the
dive termination timeout) the dive time indicated will be the time from the first submersion including the
surface time.
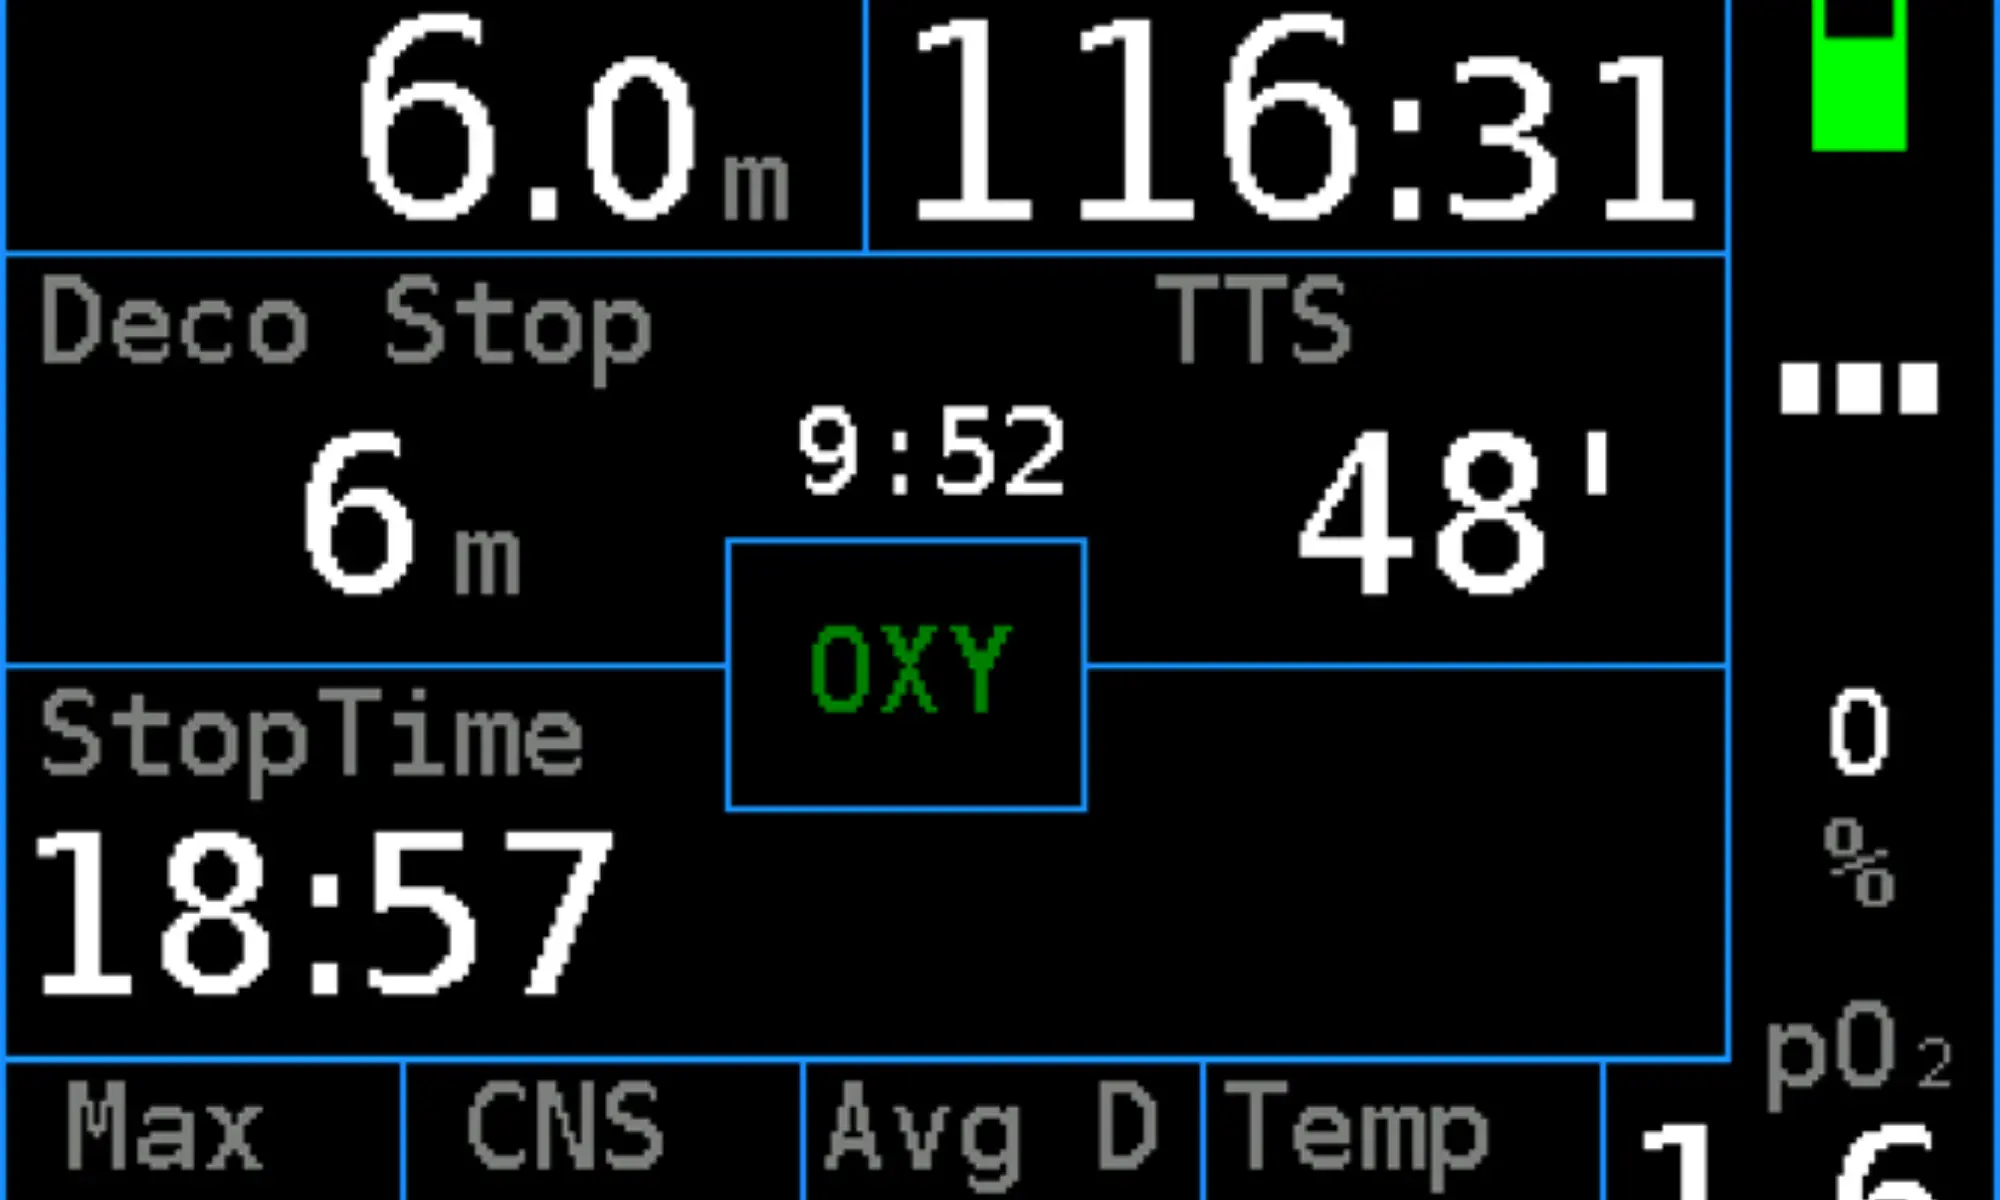
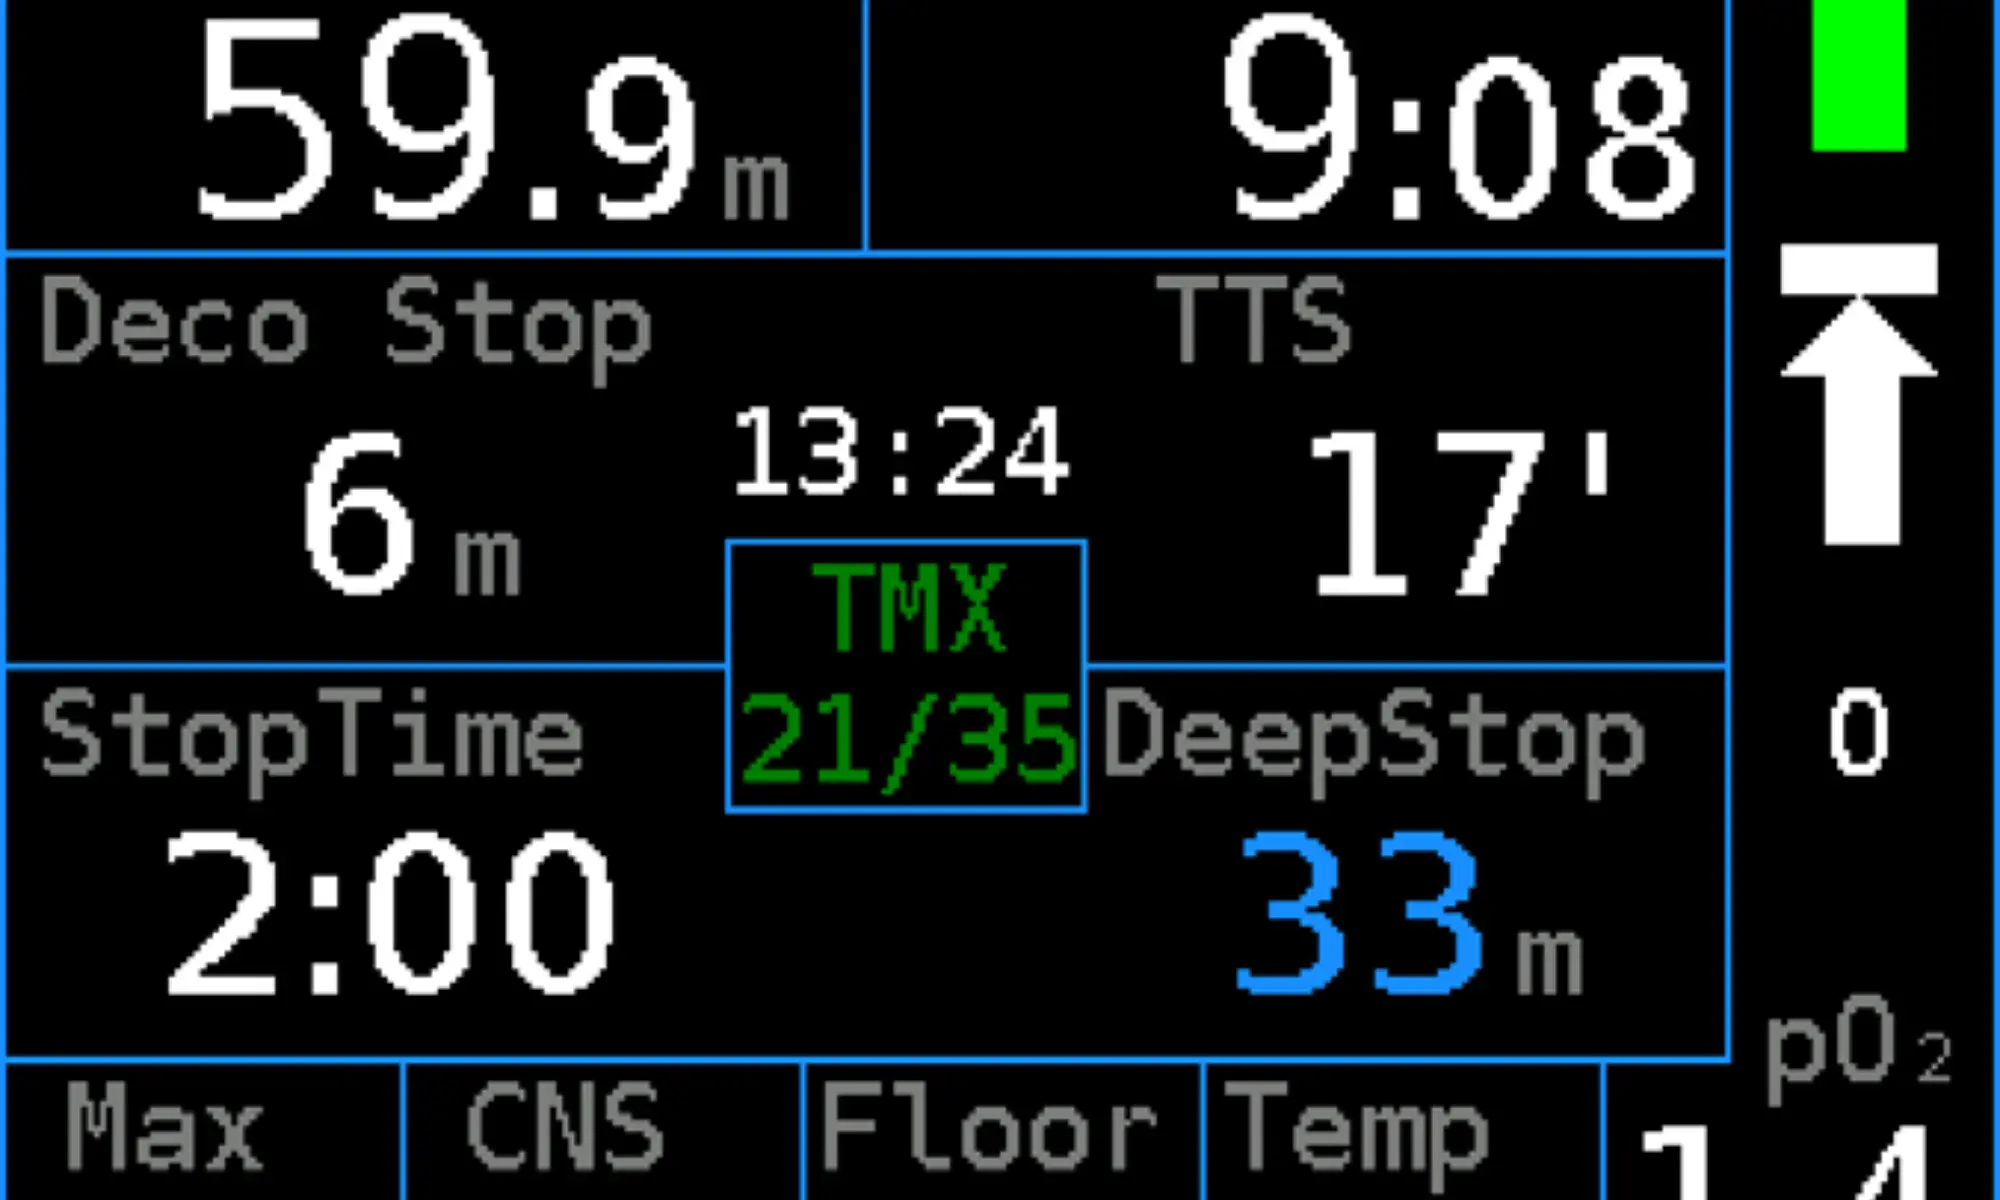
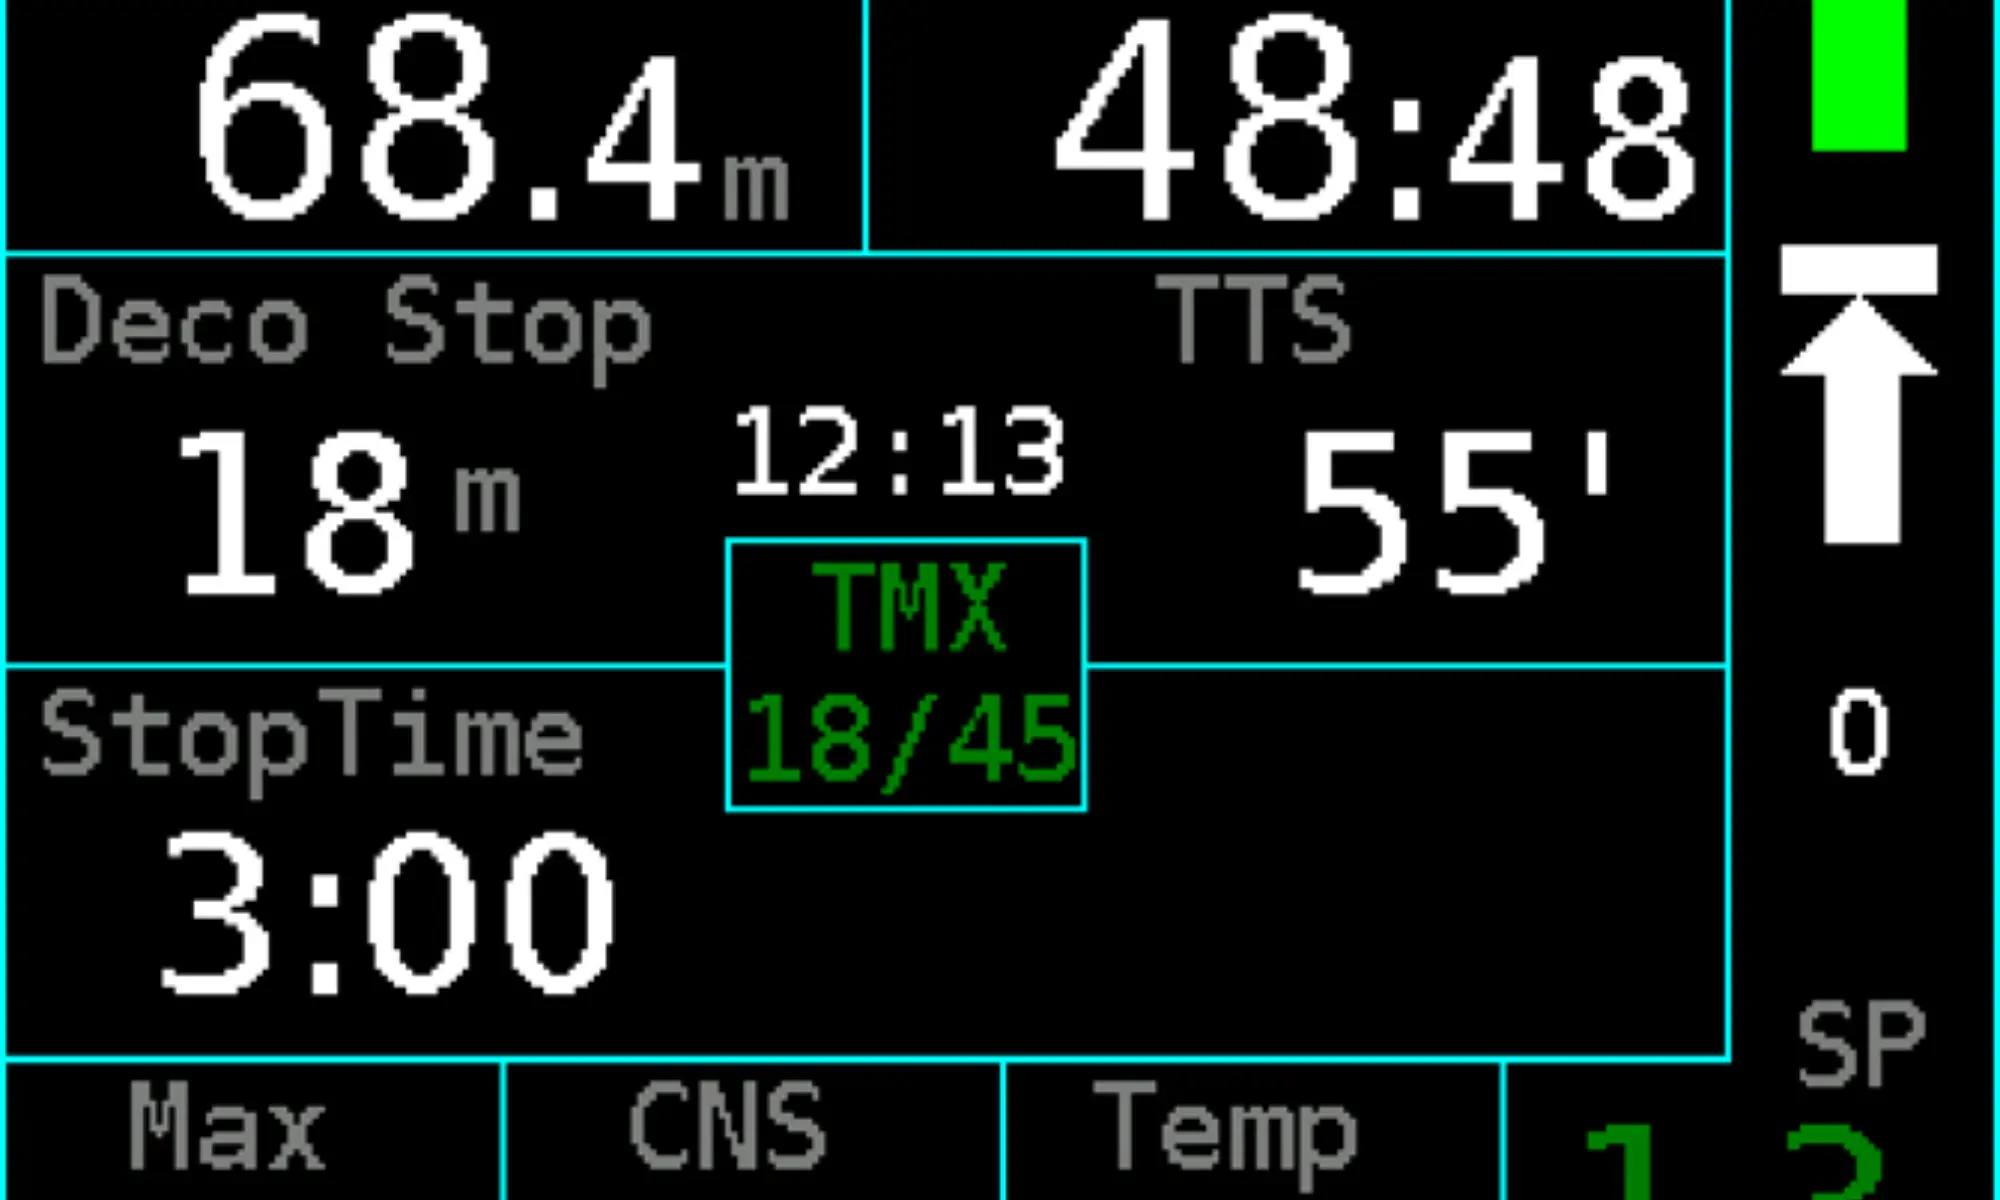
Deco Stop Alternatively, "Gas switch" will be displayed if it is a gas switch stop
The depth of the decompression stop can be read in the units set in the setup (m or ft). Last stop depth
depends on settings.
The Deco Stop value is shown only if the stops decompression regimen is set. See Setup → Decompression
→ Deco stops (See section 4.2.4).
Stop Time
Length of the decompression stop at the Deco Stop depth. While on stop, there is a countdown timer here.
Rounding of the decompression stop length depends on setting.
The Stop Time value is shown only if the stops decompression regimen is set. See Setup → Decompression
→ Deco stops (See section 4.2.4).
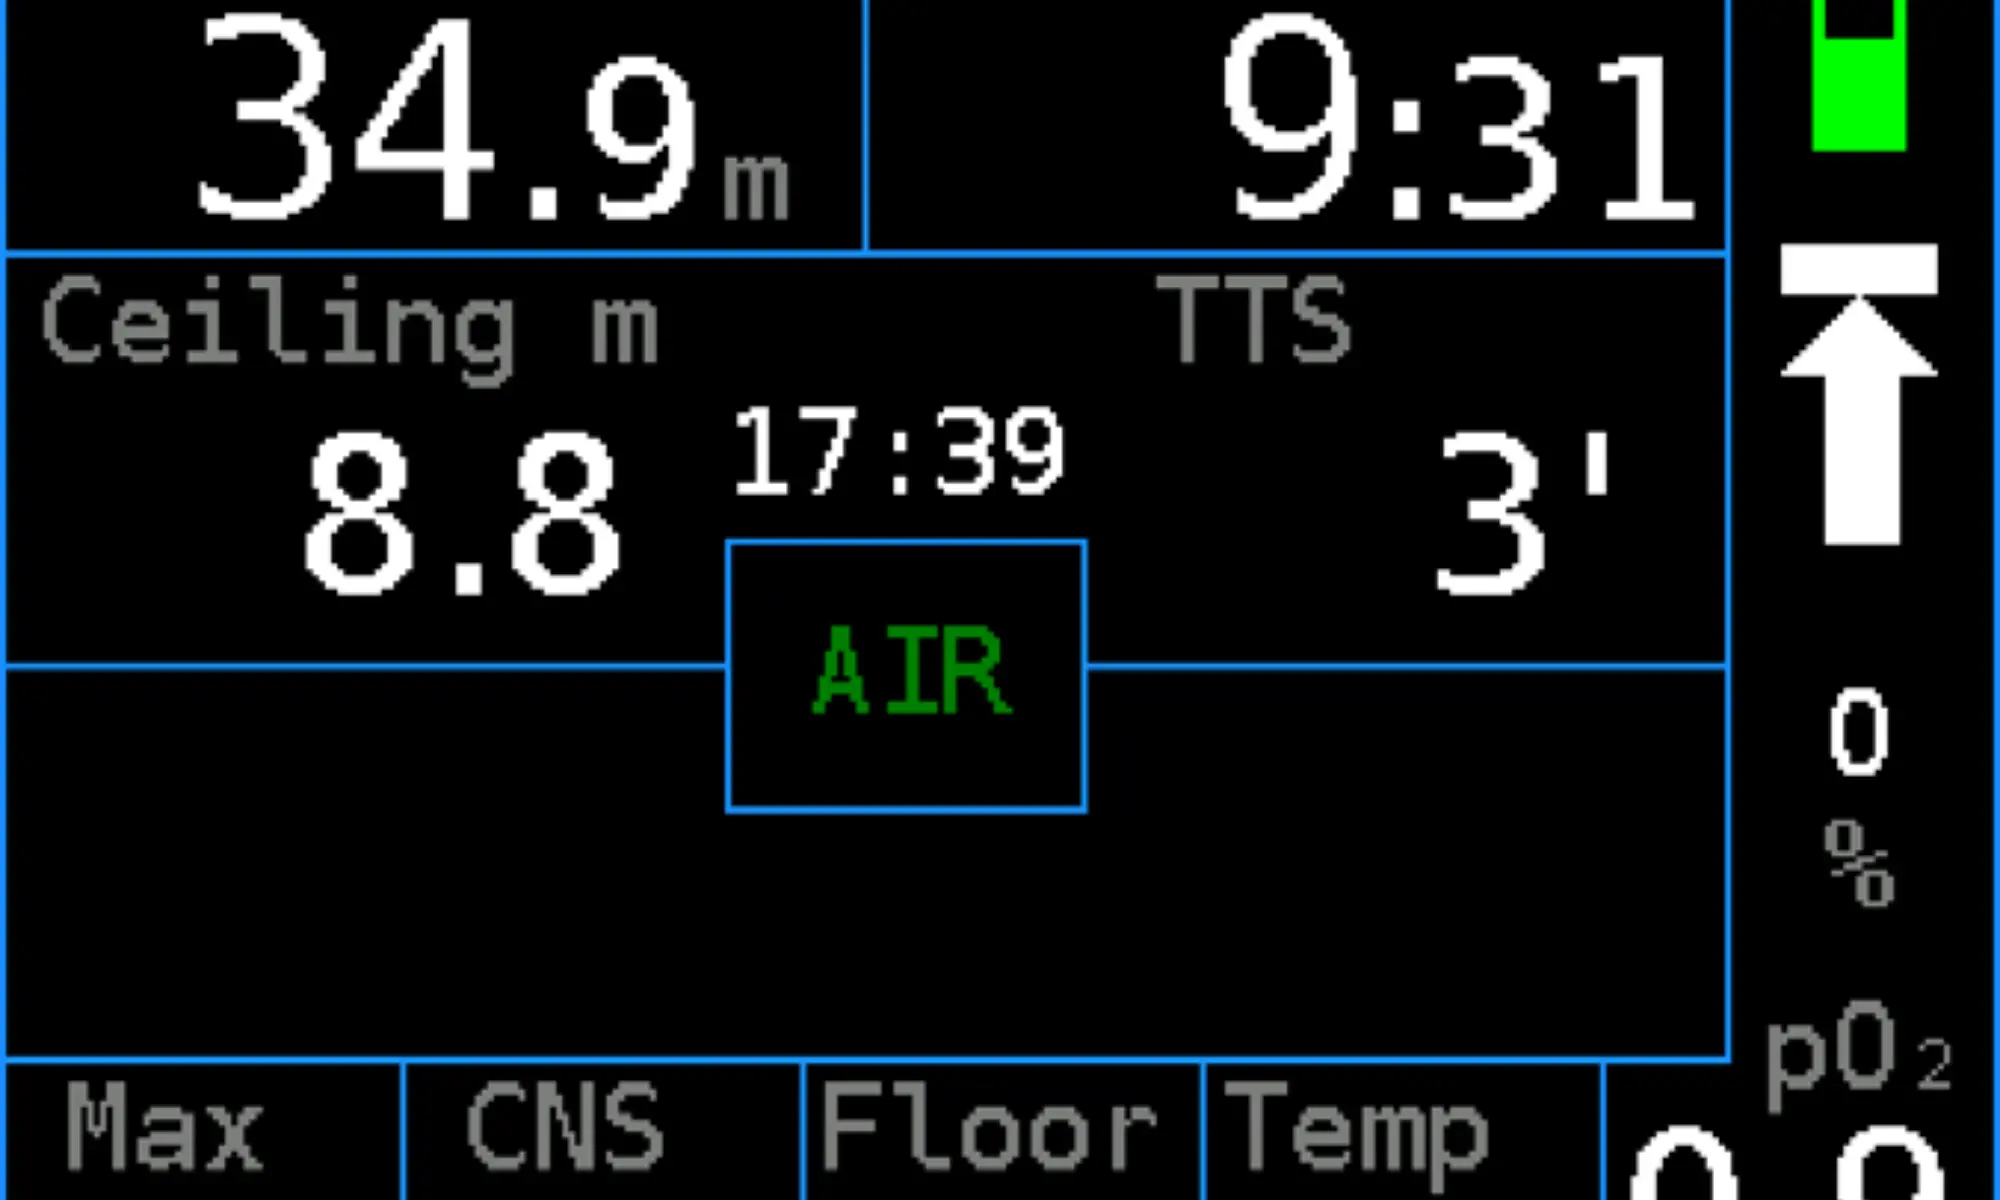
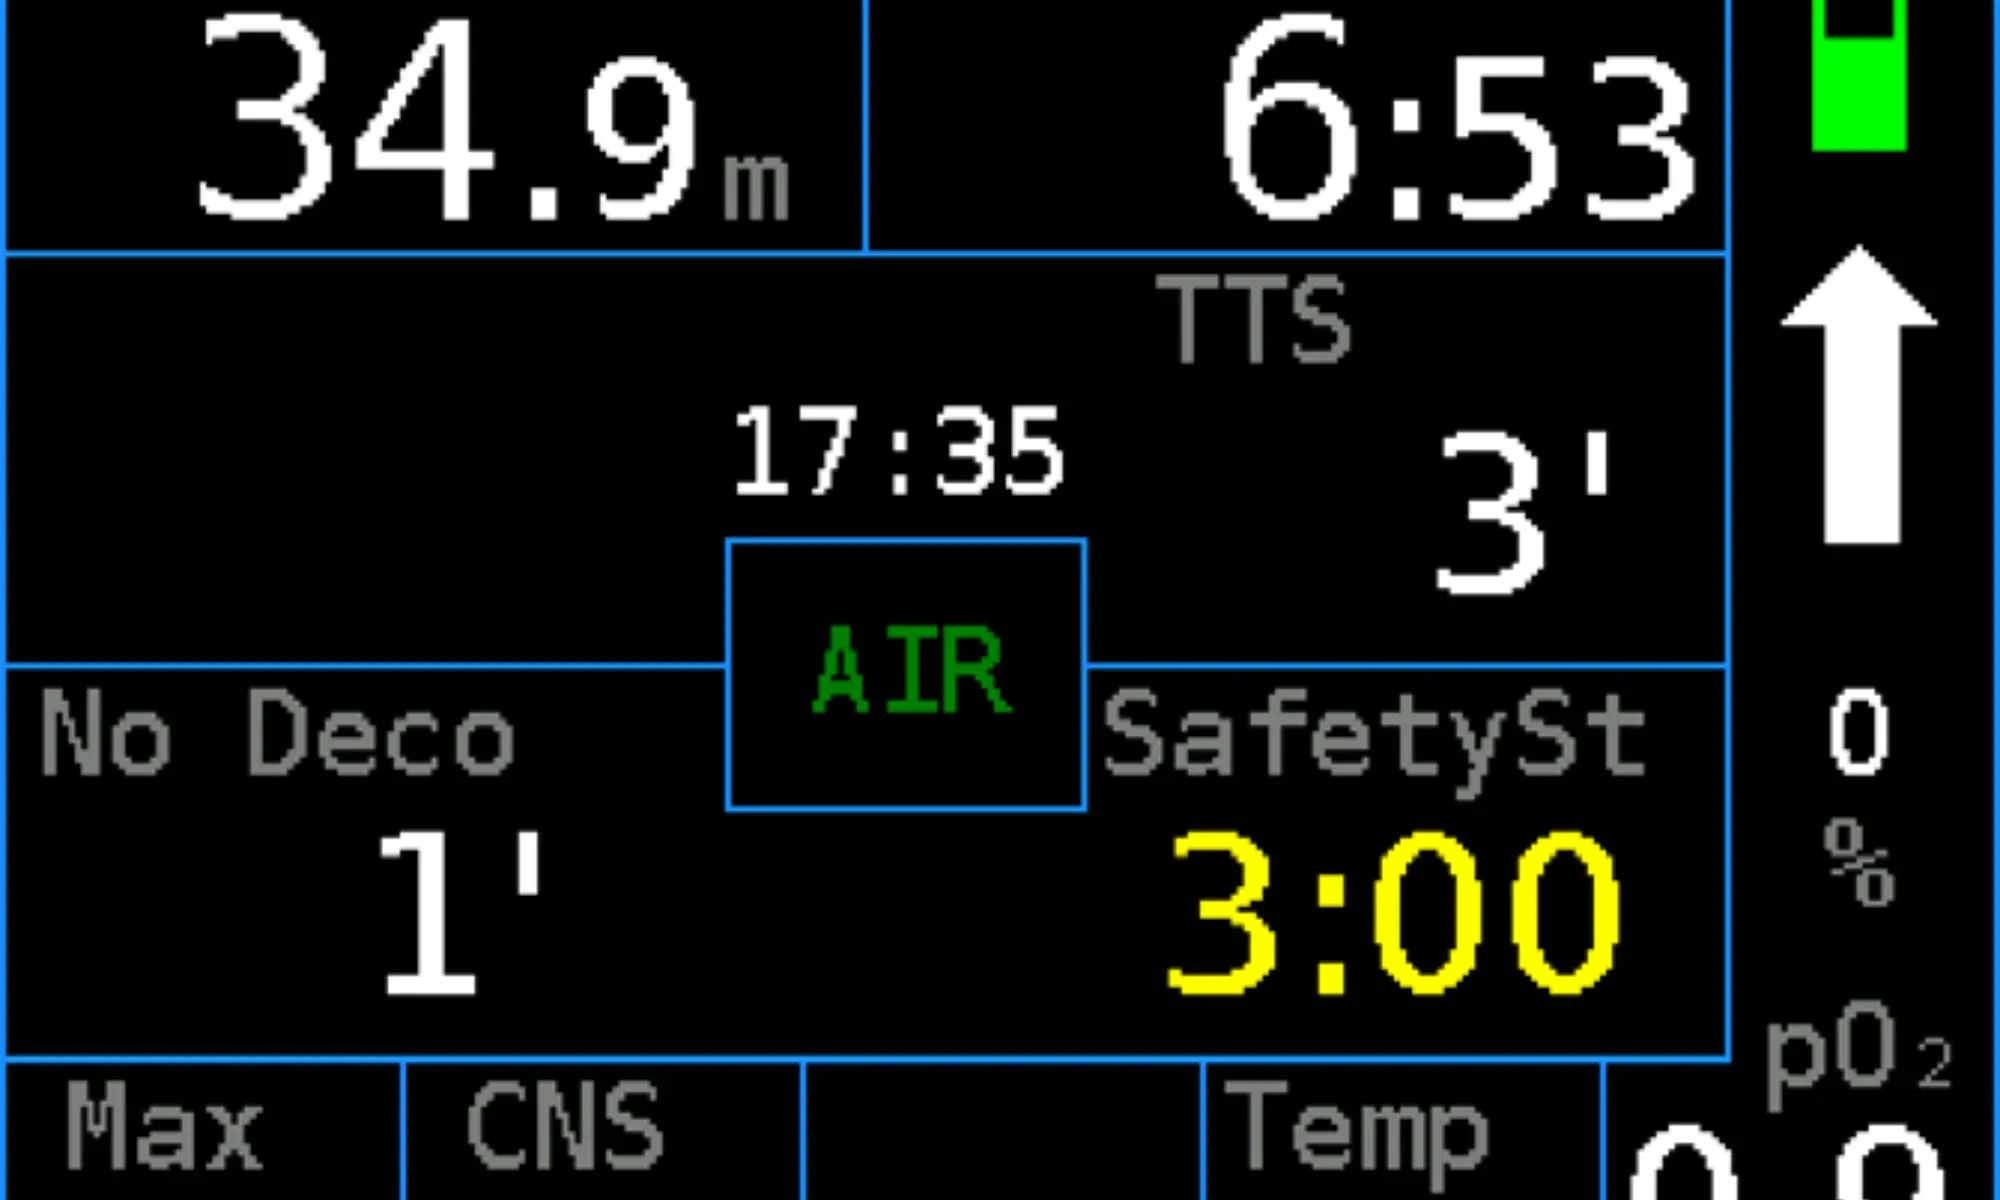
TTS
The time to surface (TTS) includes the complete decompression profile. If optimal gas is selected in the
decompression settings, then the TTS considers changing of gases from the list of active mixtures; the gas
switch time is included.
If the current gas setting is selected in the decompression settings, then only the actual gas is used for
a TTS calculation.
Ceiling
The ceiling value is shown only if the ceiling decompression regimen
is set. See Setup → Decompression → Deco stops (c4.2.4).
The depth of the decompression ceiling decreases continuously up to
the surface. The reading is not artificially stopped anywhere during
the ascent. Always stay below the depth of the ceiling, even if the
ceiling depth is very shallow.
Ascent above the ceiling generates a warning. Further violation,
more than 1 m (3 ft), leads to an additional alarm. Both alarms are
logged. The Freedom will continue in open circuit dive mode. It will
not switch to a gauge mode or even an SOS mode. Diver should make
responsible decision in order to minimize the probability of severe
consequences.
No deco
You can stay for the indicated time at the current depth, breathing the current mixture, to avoid
a decompression obligation.
SafetySt
Length of the safety stop is 3 min. The safety stop can be carried out within depth from 6 to 3 m (20 to
10 ft). The safety stop is indicated if the maximum depth of a dive was greater than 10 m (30 ft).
Countdown of the safety stop is interrupted at depths greater than 6 m. Descent to depths greater than 10 m resets the time of the safety stop back to 3 min. A violation of the 3 m ceiling is logged (silently). Ascent above 1.8 m generates an alarm and leads to the end of the safety stop regimen for a current dive. The safety stop can be switched off. See Setup → Decompression → Safety stop [On] (See section 4.2.2).
DeepStop
The depth of the upcoming deep stop is based on Richard
Pyle’s algorithm. A timer countdown starts here after arriving to the
displayed deep stop depth.
Violation of the deep stop is logged but no alarm is generated
because deep stops are considered as an additional safety factor
only.
These Pyle deep stops are shown only if switched on. See Setup →
Decompression → Deep stops (See section 4.2.4).
Local Time
The local time is shown on the display directly above the mixture
indication.
Mixture
The center of the display indicates the current gas mixture.
Warning: If the breathing mixture is not identical to the indicated mixture, then the calculated
decompression profile will be wrong and may be dangerous to follow. In that case you must use a backup
method of the decompression profile calculation.
Max
This shows the maximum depth reached during a dive.
CNS
Exposure to high oxygen partial pressure may under certain circumstances cause acute (CNS) oxygen
poisoning. This may cause the affected person to drown.
The so called “oxygen clock” is a percentage of consumption of CNS toxicity limit. Calculation is based on
NOAA oxygen exposure limits.
pO2 (bar) Maximum Single Exposure (minutes) Maximum per 24 hr (minutes) 1.60 45 150 1.55 83 165 1.50 120 180 1.45 135 180 1.40 150 180 1.35 165 195 1.30 180 210 1.25 195 225 1.20 210 240 1.10 240 270 1.00 300 300 0.90 360 360 0.80 450 450 0.70 570 570 0.60 720 720
CNS oxygen clock value does not take chronic (pulmonary) oxygen poisoning into account. For exposures common to technical diving, chronic toxicity manifestations are not significant. For very long dives it is necessary to calculate with long-term exposure limits and to limit the overall exposure. When pO2 ≥ 1.4 bar then the CNS toxicity limit is always shorter than the pulmonary toxicity limit. For calculations related to chronic toxicity use the REPEX method that you know from the nitrox diving course. The Divesoft Freedom does not perform calculations associated with chronic oxygen toxicity.
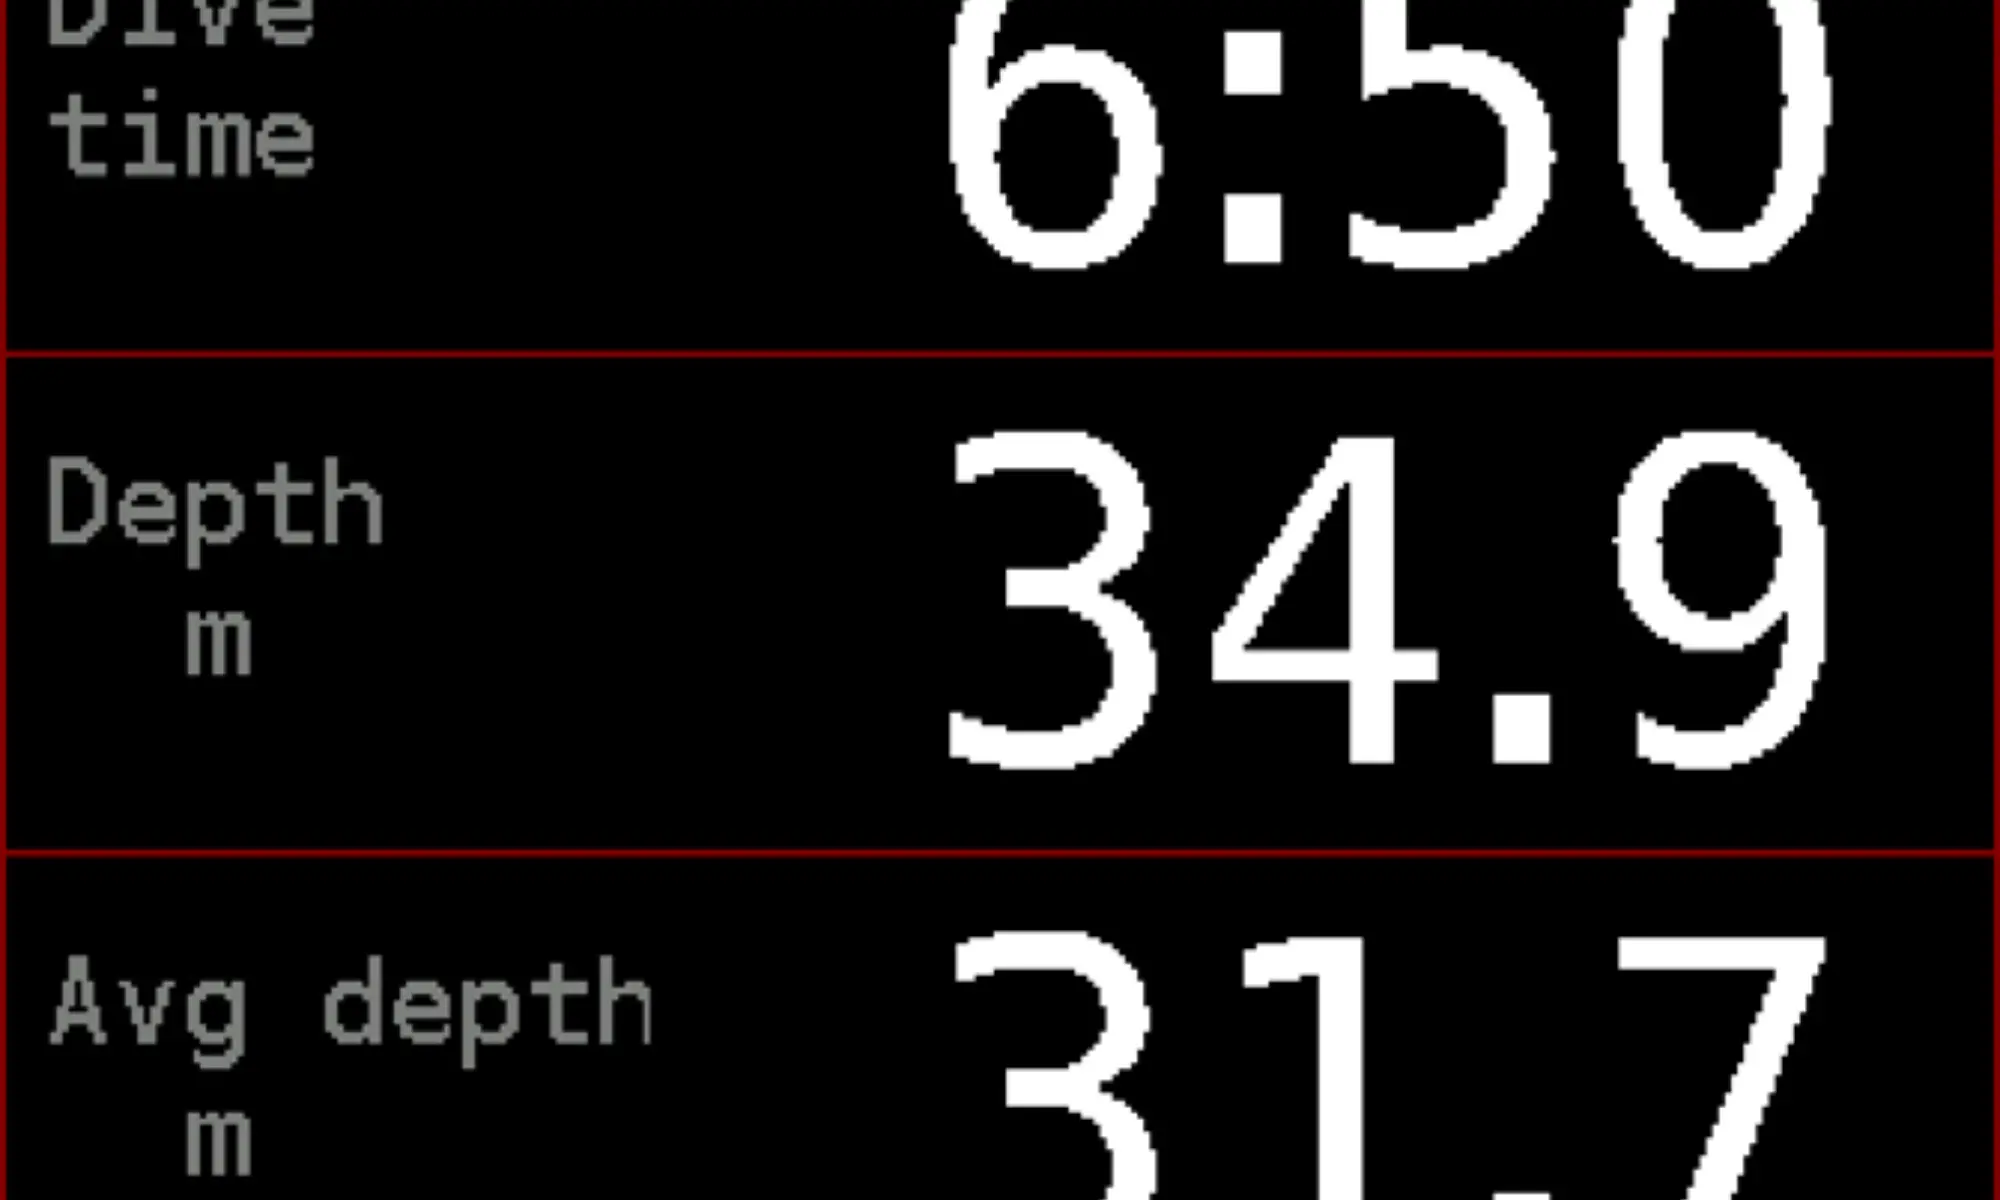
Avg D
Average depth. It is possible to create a new start point for depth averaging; in dive menu select Settings →
Reset average.
BottomTimer: Reset average
Floor Decompression floor is the depth at which the time to surface (TTS) does not increase. Calculation of the decompression floor is approximate. Staying at the exact depth of the indicated floor leads to a modest decrease in the upcoming decompression time. This position on the detailed screen is customizable. You can alter the decompression floor or average depth in Setup → Preferences → Display → OC Row4/Col3.
Temp
Water temperature is measured inside the computer case. After temperature change wait about
1–2 minutes until the temperature reading reaches a stable value. The temperature in air is affected by
many factors and is only an indication.
A temperature correction can be set in Setup → Calibration for better accuracy.
pO2
The calculation is based on depth and O2
fraction in breathing mixture.
Combined graphic symbol
The combined graphic symbol on the detailed screen is intended for rapid orientation. It tells the diver what
must be done. The color of the warning symbols changes from yellow to red according to the degree of
importance.
Permitted to ascend to the surface.
Permitted to ascend to the depth of the decompression stop or decompression ceiling.
The depth of the decompression ceiling or decompression stop has been reached; do not change depth.
The depth of the safety stop has been reached; do not change depth.
The ascent rate has been exceeded; slow down your ascent.
The current depth is less than the depth of the decompression ceiling; descend.
Vertical speed
There is an indication of the ascent or descent rate below the combined graphical symbol. Can be set to
a relative (%) or absolute (m/min or ft/min) reading. The relative reading is based on the maximum ascent
or descent rate.
BottomTimer setting: "Setup → Preferences → Vert. rate"
Other licences: "Setup → Preferences → User interface → Vert. rate"
Battery symbol
A graphical indication of the remaining battery capacity. See chapter Surface mode – Battery symbol
(See section 3.1.2).
03.2.3 Synoptic screen
The depth value is easy to read. It is accompanied by other important information. The meaning of all values is identical to the detailed screen.
03.2.4 Big Screen
The most important information is written in really big characters.
This screen is useful in very bad visibility. Many divers can read
numbers even without a mask.
The meaning of all values is identical to the detailed screen.
On the "Big Screen" you can customize the bottom line in Gauge mode.
BottomTimer: "Setup -> Preferences -> Big depth"
Other linces:"Setup -> Preferences -> User interface -> Big depth"
- "Avg" displays average depth
- "Max" displays maximum depth
- "Only" displays current depth ONLY, nothing else.
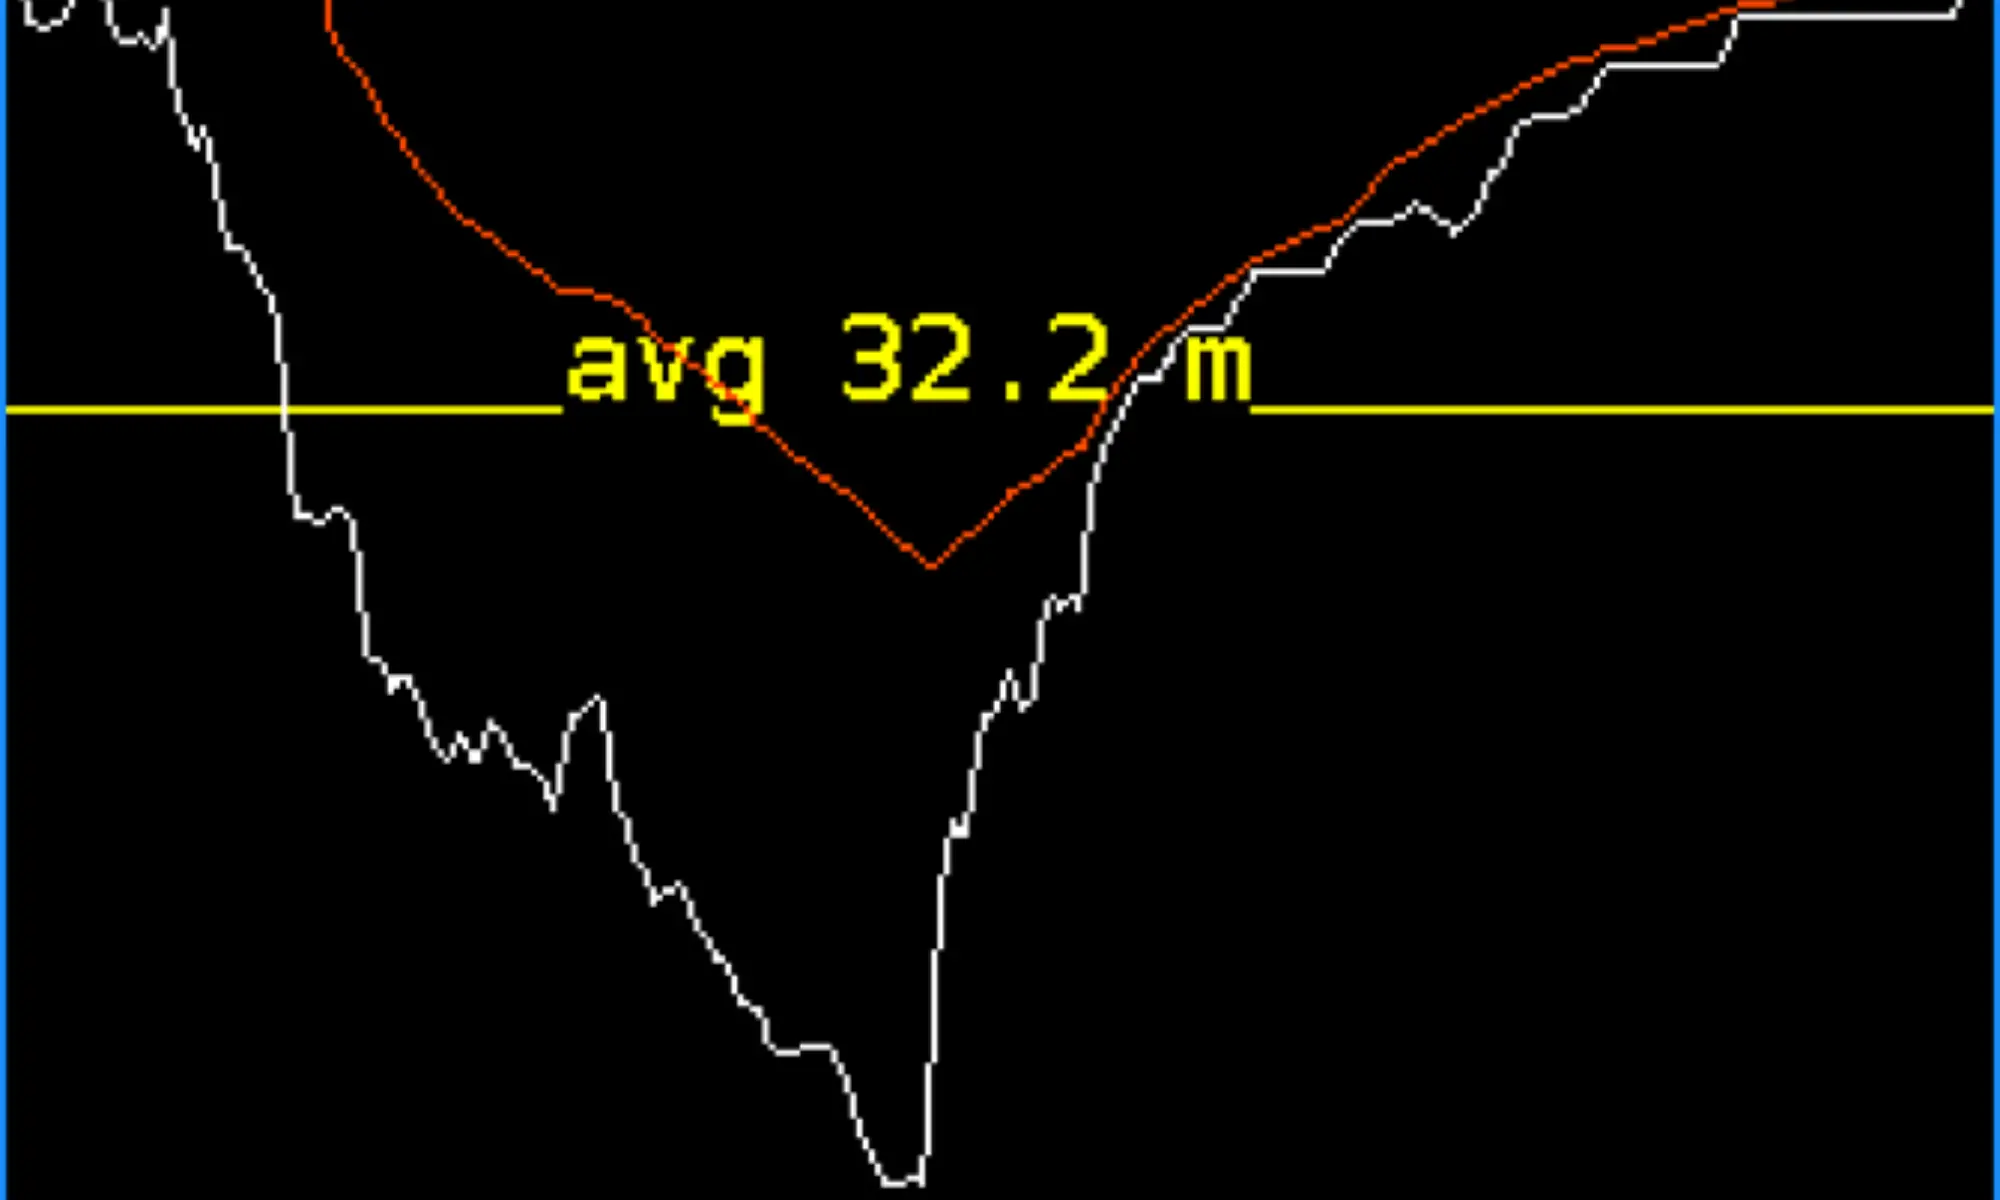
03.2.5 Dive profile screen
Start
The time of submersion is useful for checking compliance with the
schedule.
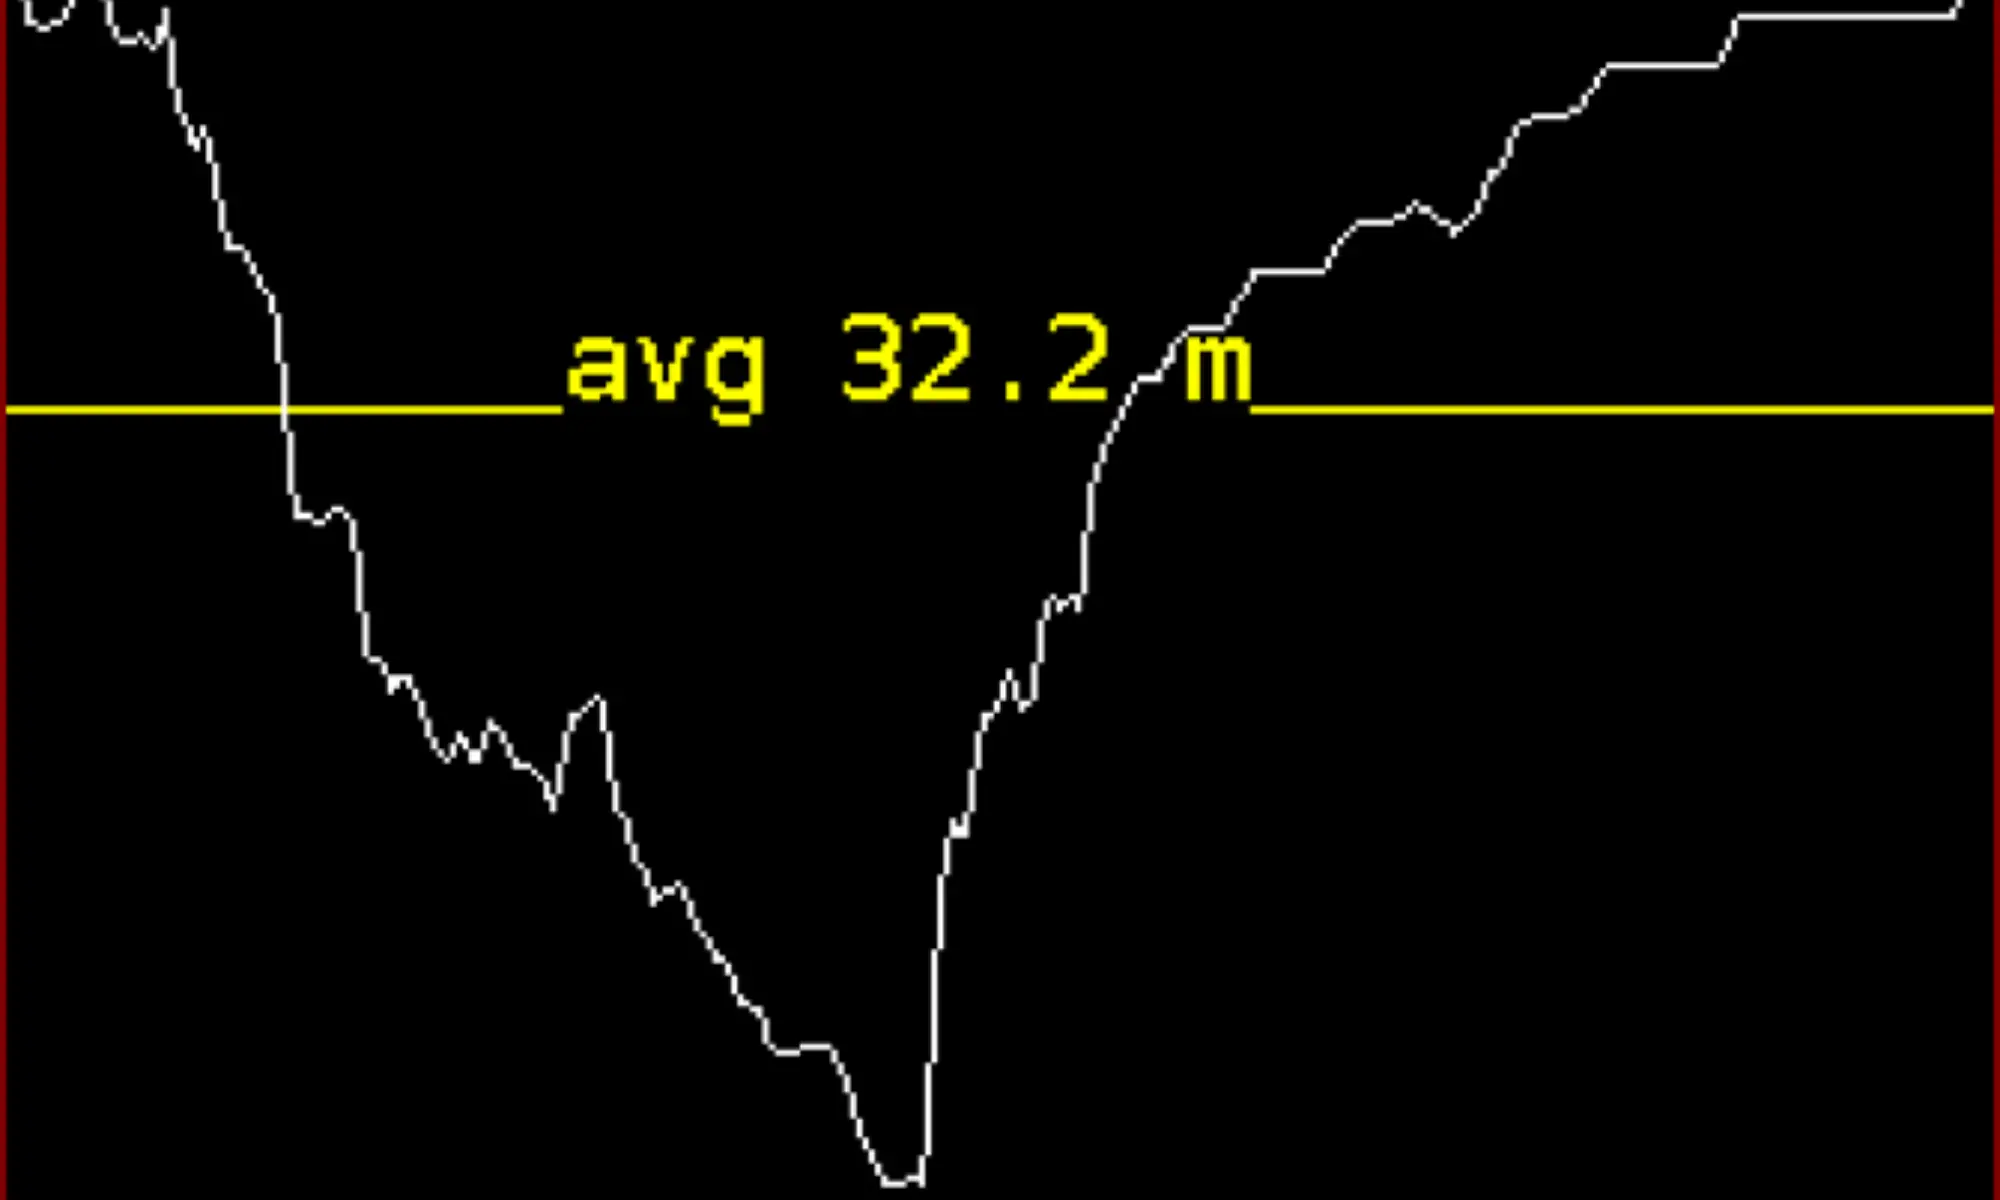
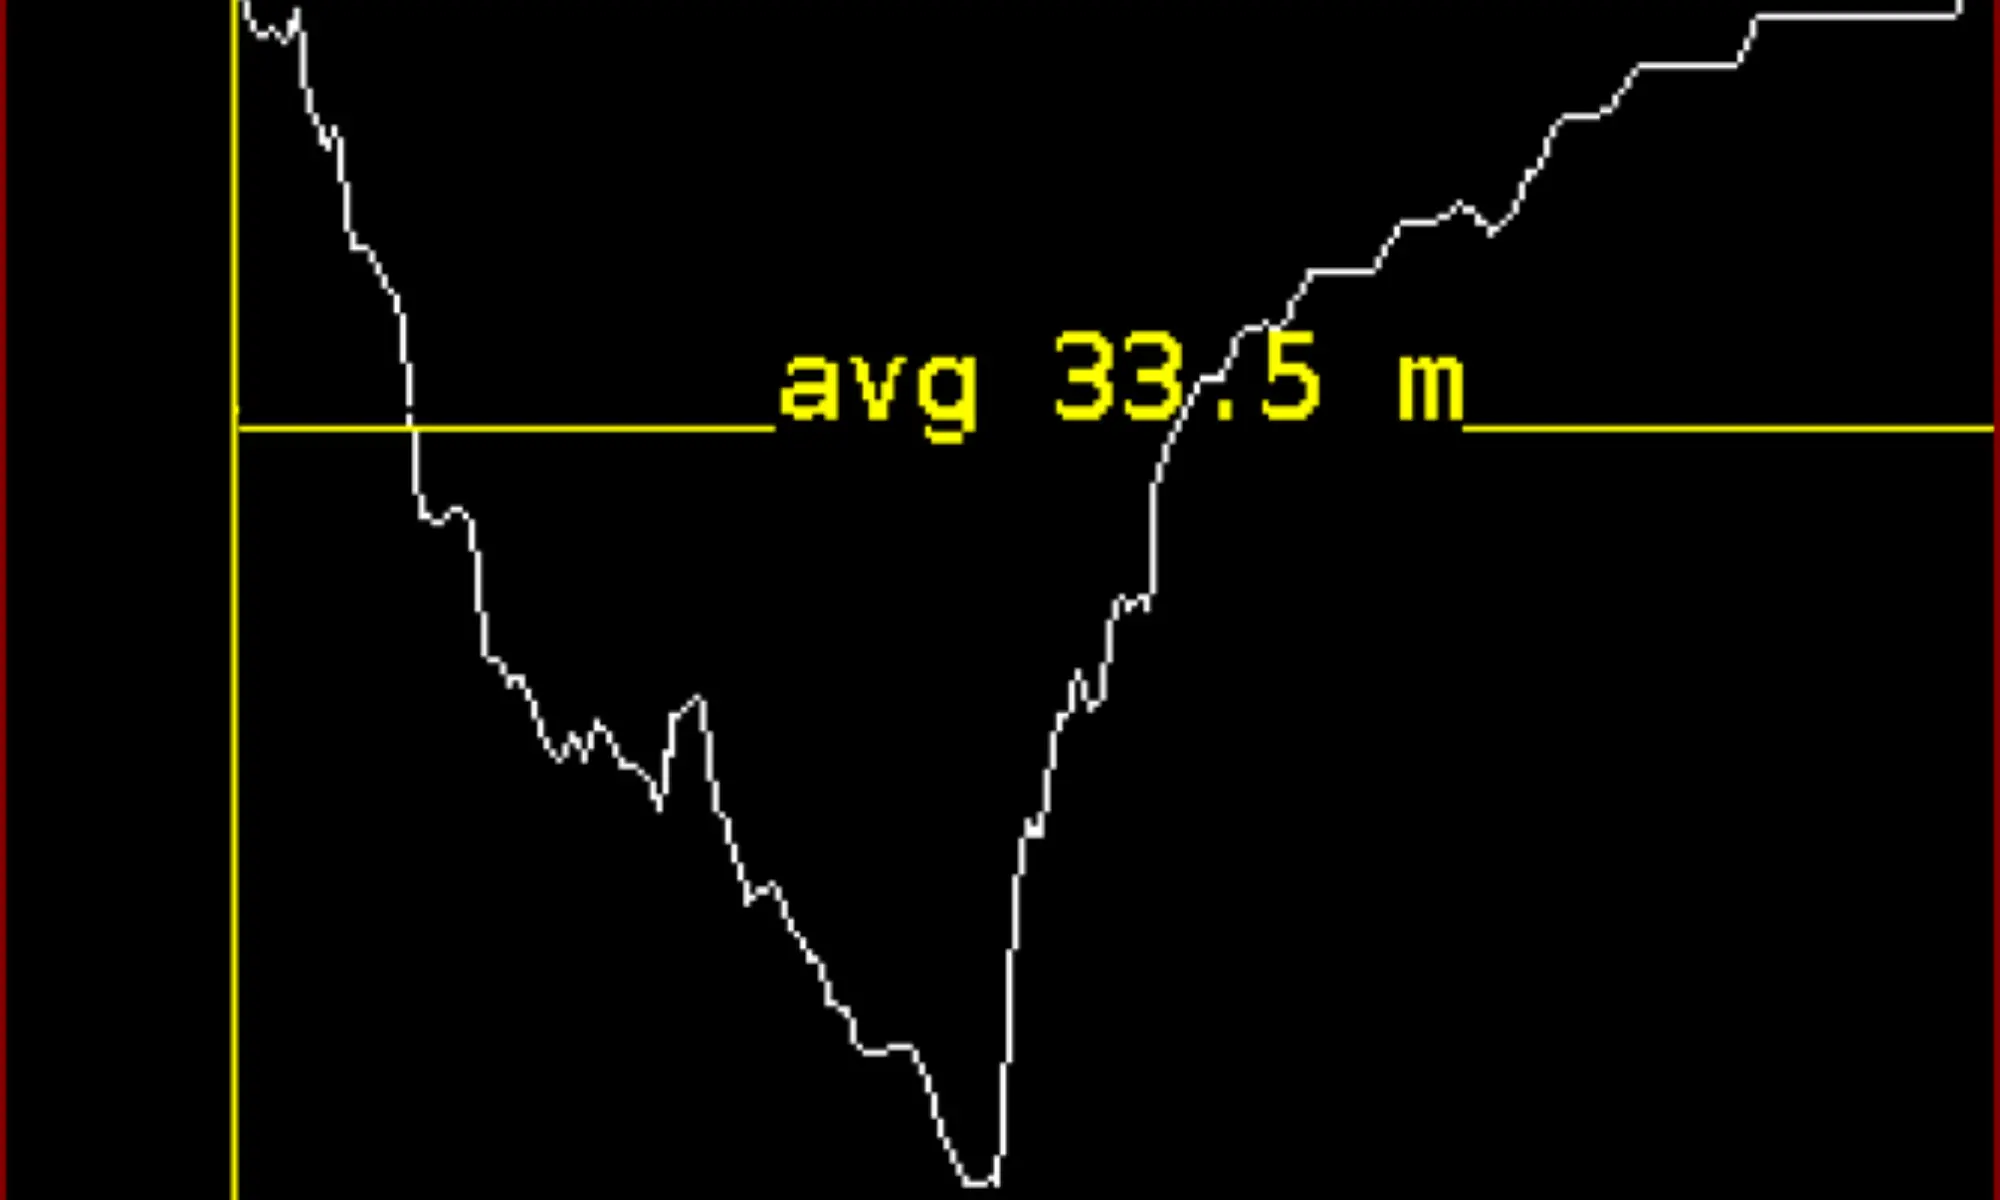
Avg
The average depth is indicated with the yellow horizontal line and
with the average depth displayed in yellow.
A new start point for depth averaging can be created (in dive menu
select Settings → Reset average). This point is indicated by the
yellow vertical line and the horizontal average depth line starts from
there.
Current depth
See lower left corner.
Dive time
Runtime of current dive is placed in lower right corner.
Max
Maximum depth reached during the dive. Field with this value is
placed in the middle of bottom line.

03.2.6 Dive menu
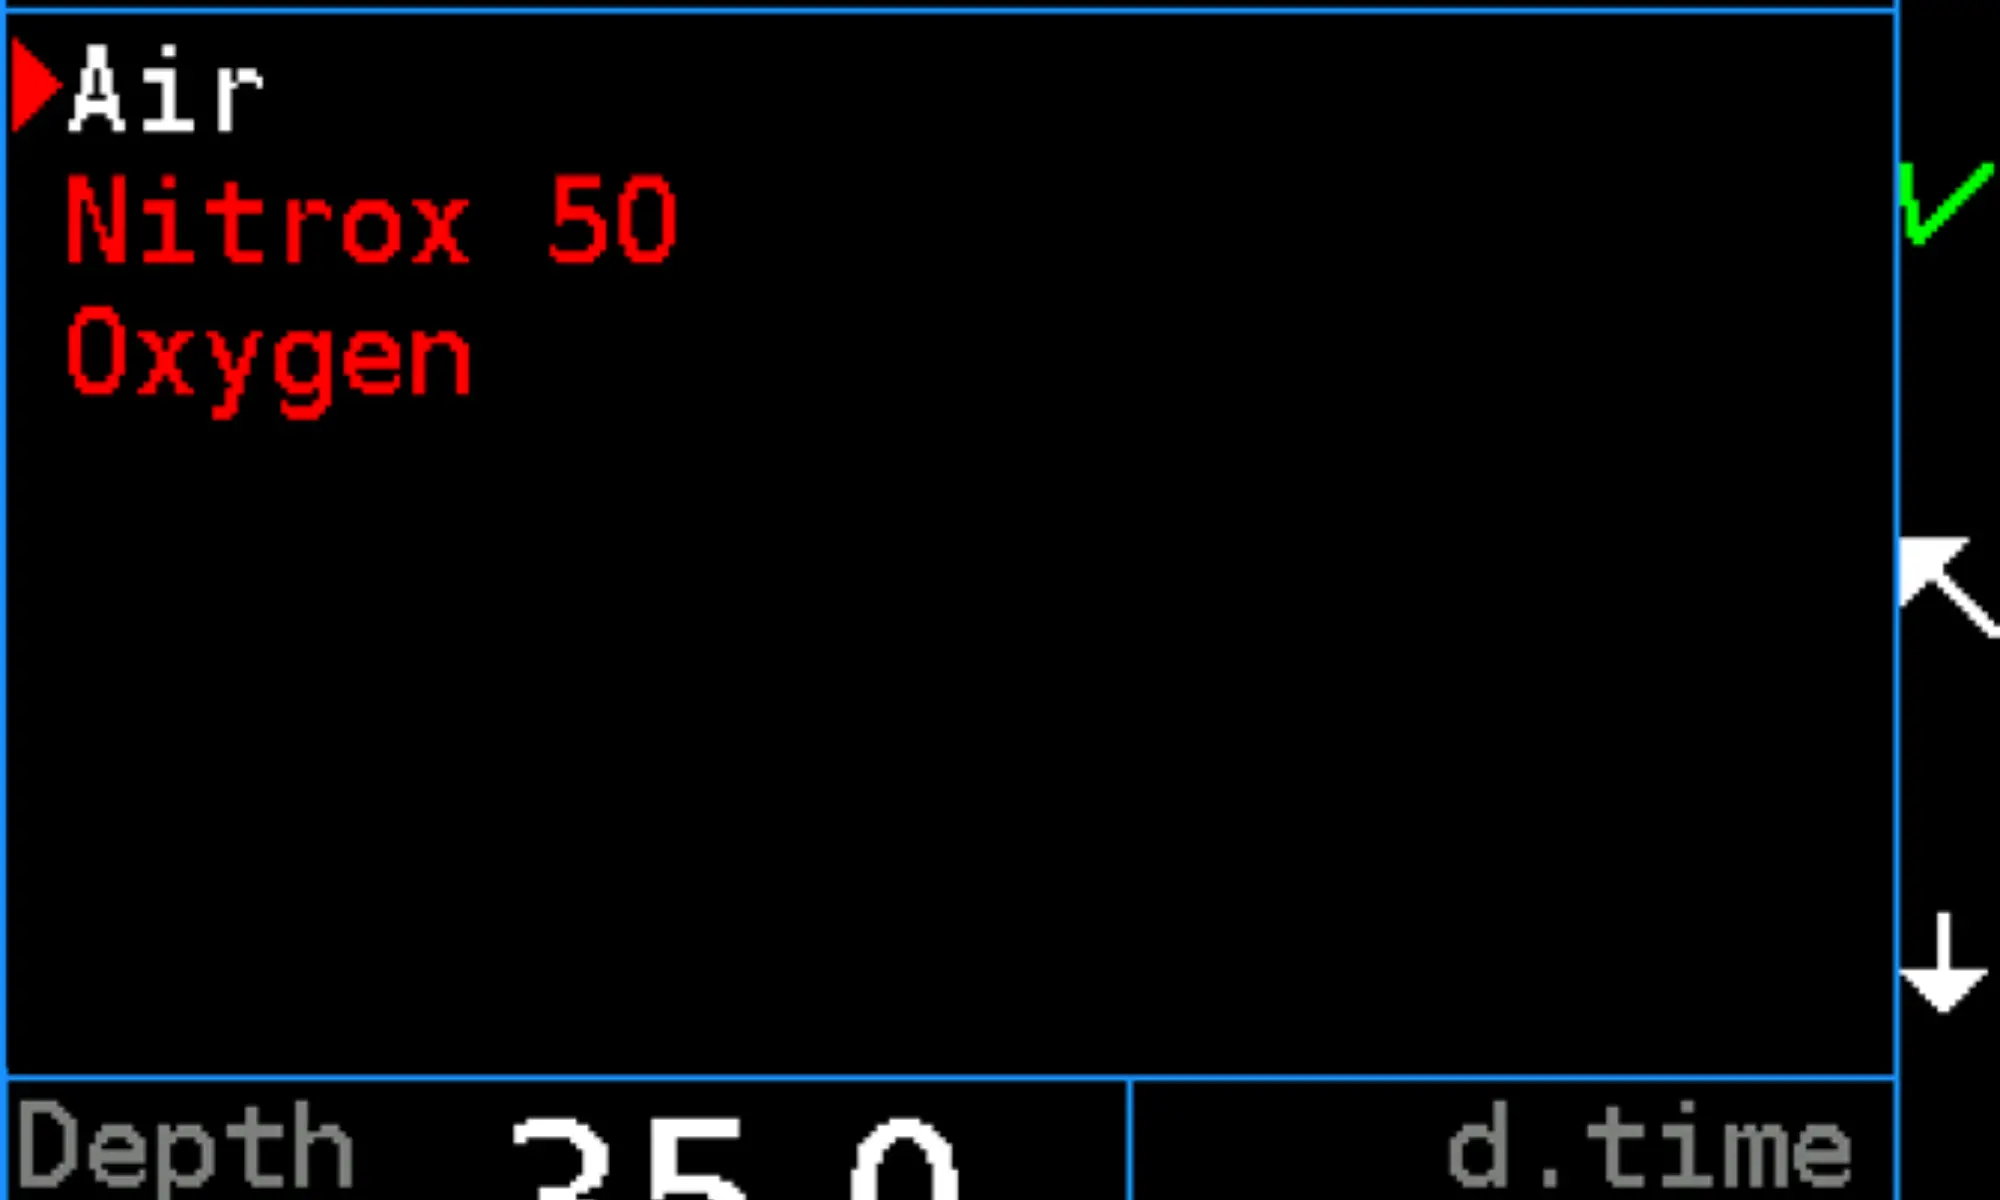
During a dive, in any dive mode, press both keys simultaneously to show the dive menu. There is current depth, partial pressure of oxygen and dive time on the bottom of the screen.

Mix
Mixture selection. Only active mixtures are listed and can be
selected.
Mixtures with pO2
outside breathable range are displayed in red
(if pO2
is too high) or blue (if pO2
is too low). This does not prevent
selection of this mixture. An alarm will be activated after this kind
of switch.
Limits of breathable range are set in Setup → Mixtures.
End dive
End dive and switch to surface mode. This menu item is enabled only
on the surface (at depth < 0.5 m).
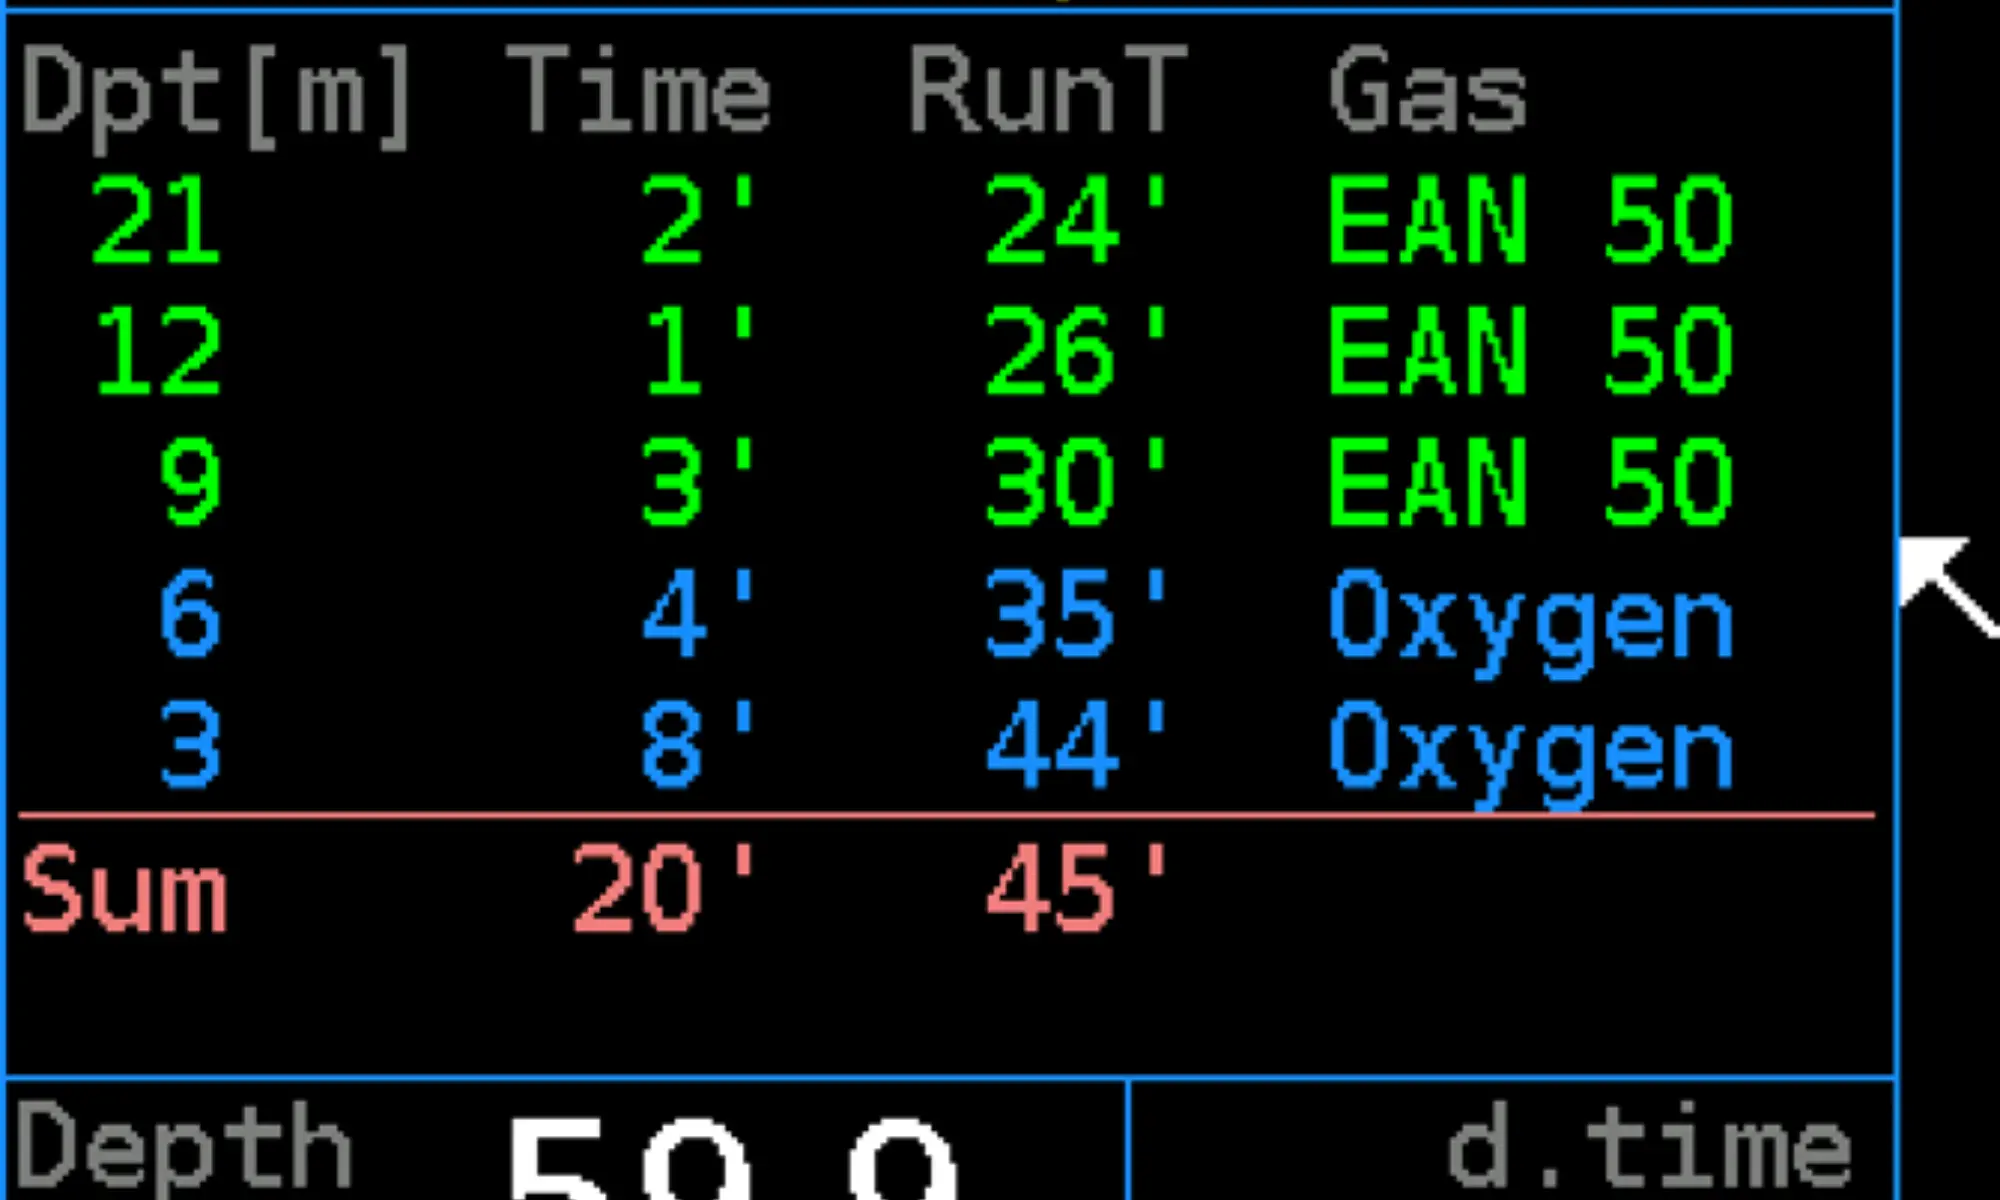
Ascent plan
By default the plan includes all gas switches during the
decompression, including gas switch stop duration. If ascent gas is
set to current in decompression setting, then no gas switches are
included in the plan.
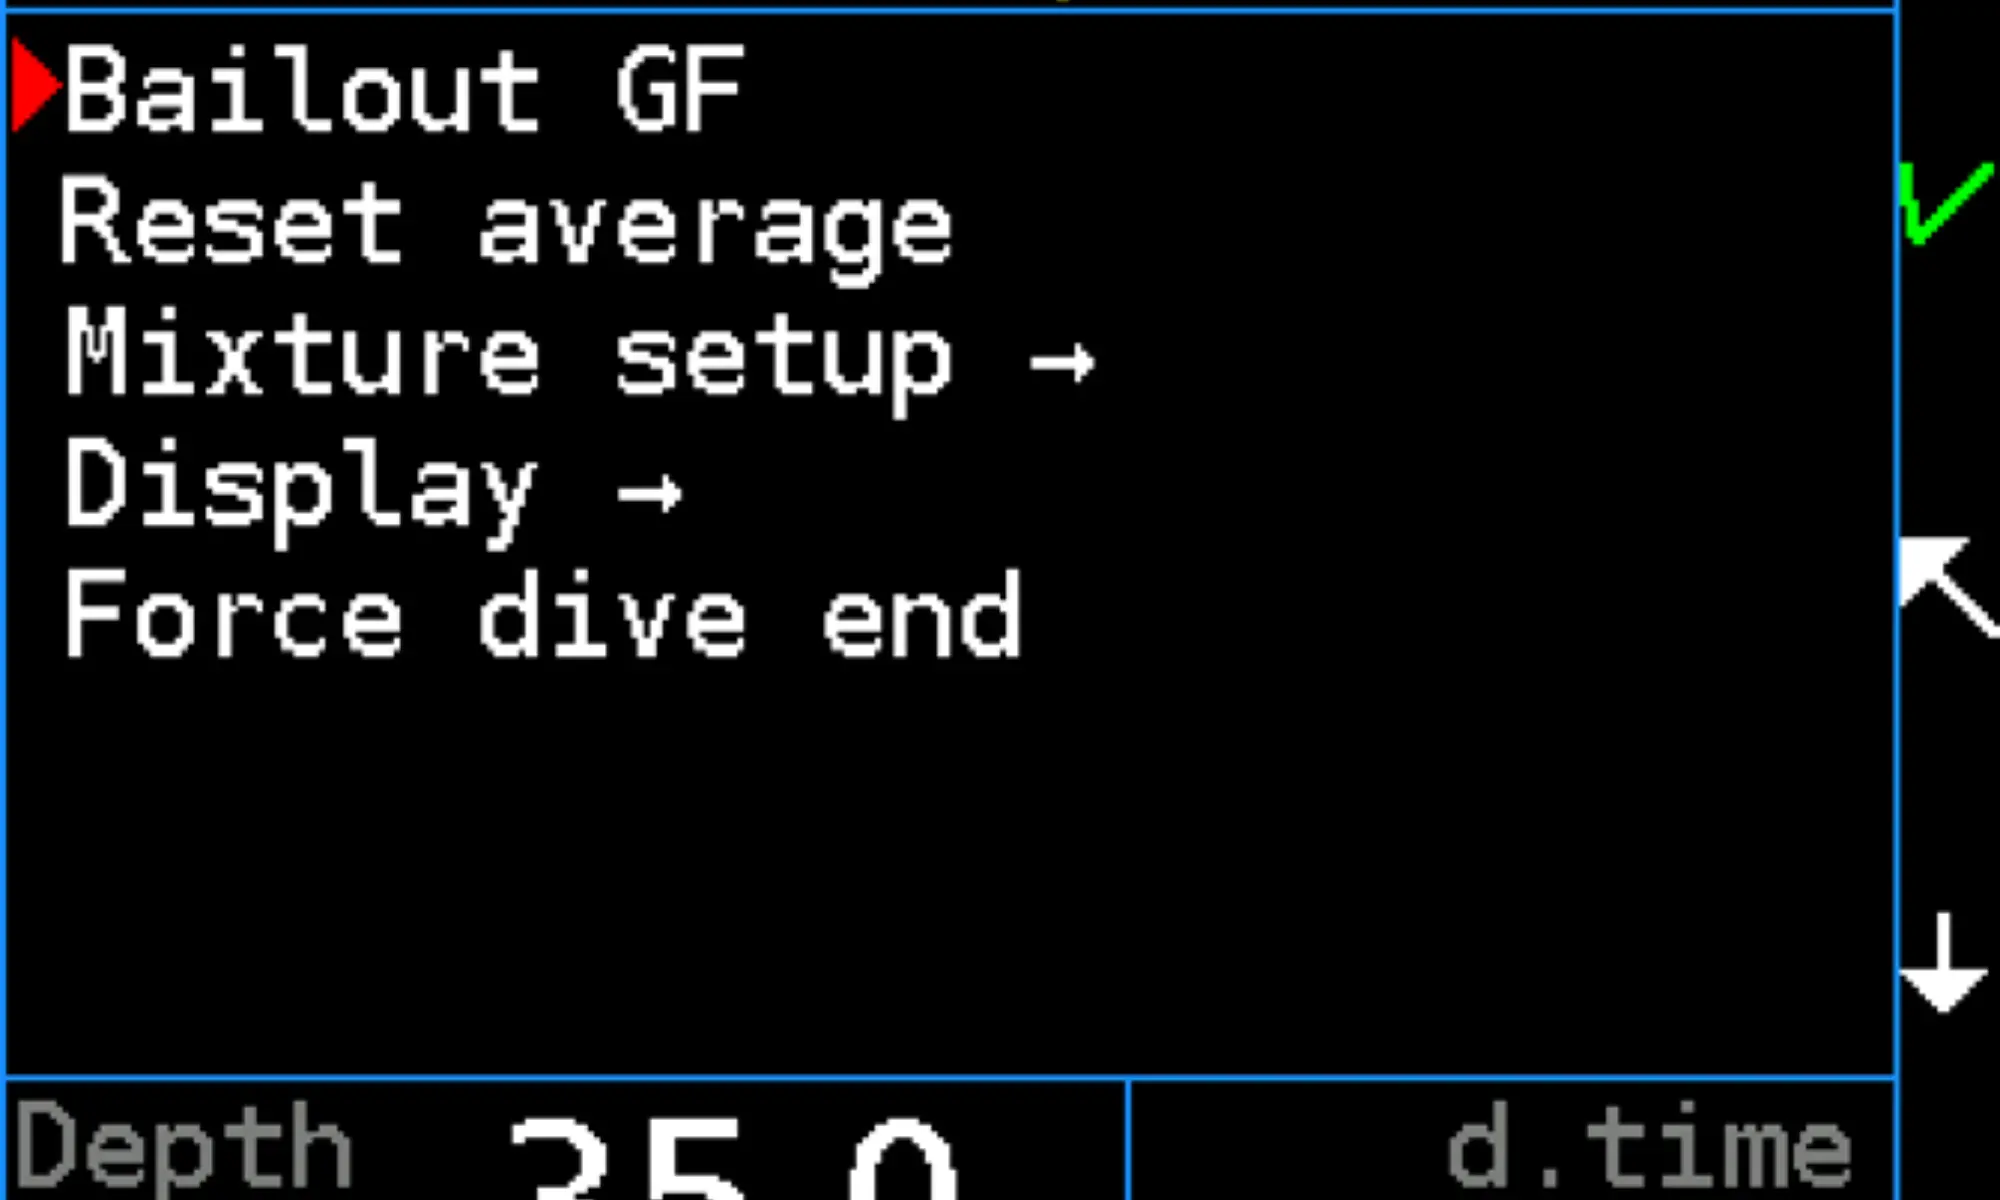
Setup – Bailout GF Switch to gradient factor pair for bailout (BoGF) and vice versa. You can switch between standard and bailout GF anytime during a dive. See also Setup → Decompression → Gradient factor (See section 4.2.2).
Setup – Reset average
It restarts calculation of average depth. The restart point is indicated
by the vertical line on the dive profile screen.
Setup – Mixture setup
Corresponds to mixture setup in Setup → Mixtures → Mixture setup.
This feature is intended only for emergency situations. Do not use
this setup on a regular basis.
Setup – Display
This setting corresponds to Setup → Preferences → Display.
Setup – Force dive end
If the surface pressure (zero depth) was incorrectly detected and the computer “dives” while on the surface
then the dive can be forced to stop with this function.
Warning: Do not force dive end underwater!
Apps
There are several items in the apps folder
Apps - Add bookmark - marks the current moment in the dive log
Apps - Events - allows you to view computer-issued warnings and pop-up messages
Apps - Emergency torch - brightens the entire display to the maximum and emits the maximum amount of light possible. Can be used as an emergency torch in certain conditions when all other torches have failed.
Apps - Inclinometer - a tool to measure the slope of a slope. Can be used for mapping caves and wrecks.
Apps - Sokoban Game - a puzzle game for distraction on long decompression. For more information on games, see section 9 of this manual.
Apps - Snake - a game for distraction on a long decompression. See section 9 of this manual for more about the games.
03.2.7 Gas switch shortcut
Long press of the upper key selects previous gas mixture. Long press of the lower key selects next gas mixture. This list is cyclic. What mixtures can be switched depends on the setting in Setup → Preferences → User interface → Gas shortc. The default setting for gas shortcuts is off. If Breathable is selected, then mixes with pO2 inside the breathable range with regard to the current depth are switched. The limits of the breathable range are set in Setup → Mixtures. If All is selected, then all active gas mixes are switched, regardless of breathability. An alarm could be activated after this kind of switch. The computer will wait five seconds before generating an alarm. The user can choose the correct gas mixture during this interval.
03.3 Fixed setpoint CCR
The rebreather dive modes are only available in the Closed Circuit version of the Divesoft Freedom. It is strongly recommended to familiarize yourself with open circuit (OC) diving using the Divesoft Freedom before using for rebreather diving. This chapter of User manual describes only the differences from OC diving. First you will have to study the OC mode. If the Freedom is used as a backup computer for an eCCR then the proper setting corresponding to the setting of the eCCR electronic is crucial. If a manual CCR (mCCR) is used then maintain the pO2 in the breathing loop on the value equivalent to the Feeedom setpoint (SP). If a SCR is used then select the correct type of SCR and adjust its parameters in setup. See Setup → Rebreather. Don’t forget to set up the OC bailout too, especially the default mix. The fixed setpoint CCR mode is indicated by the cyan table gridlines.
03.3.1 Predive and submersion
Switch the Freedom on before entering a water. Check the Freedom settings as part of a predive check. The first screen is a summary of rebreather specific parameters, the second screen is the summary of the decompression settings and the OC (bailout) parameters. If submersion to a depth greater than 1.5 m occurs, the computer switches to the default mode. Set default mode to the CCR fixed during dive preparation in Setup → Preferences. Do not intentionally use this switching method; it is intended only for emergency situations.
03.3.2 Setpoint
The SP low is set after switching to the fixed setpoint CCR dive mode on the surface. It can be switched to the SP high manually (via the shortcut or via the menu) or automatically at a set depth during a descent or at a set runtime.
SP reading (eCCR)
The current setpoint value is located where the pO2 is situated on the display in OC dive mode on both the detailed and synoptic screen.
pO2 reading (SCR)
The calculated pO2
value is shown instead of the setpoint if you dive
with the SCR. See CCR/SCR Setup (See section 4.5).
Shortcut
With the CCR the long press of the upper key selects the high setpoint. The long press of the lower key selects the low setpoint. The shortcut is by default off but it can be enabled in Setup → Rebreather → Const CCR Setup → SP shortcuts If the semi-closed rebreather (SCR) is used, then the gas mixture is switched with this shortcut (similar to OC mode).
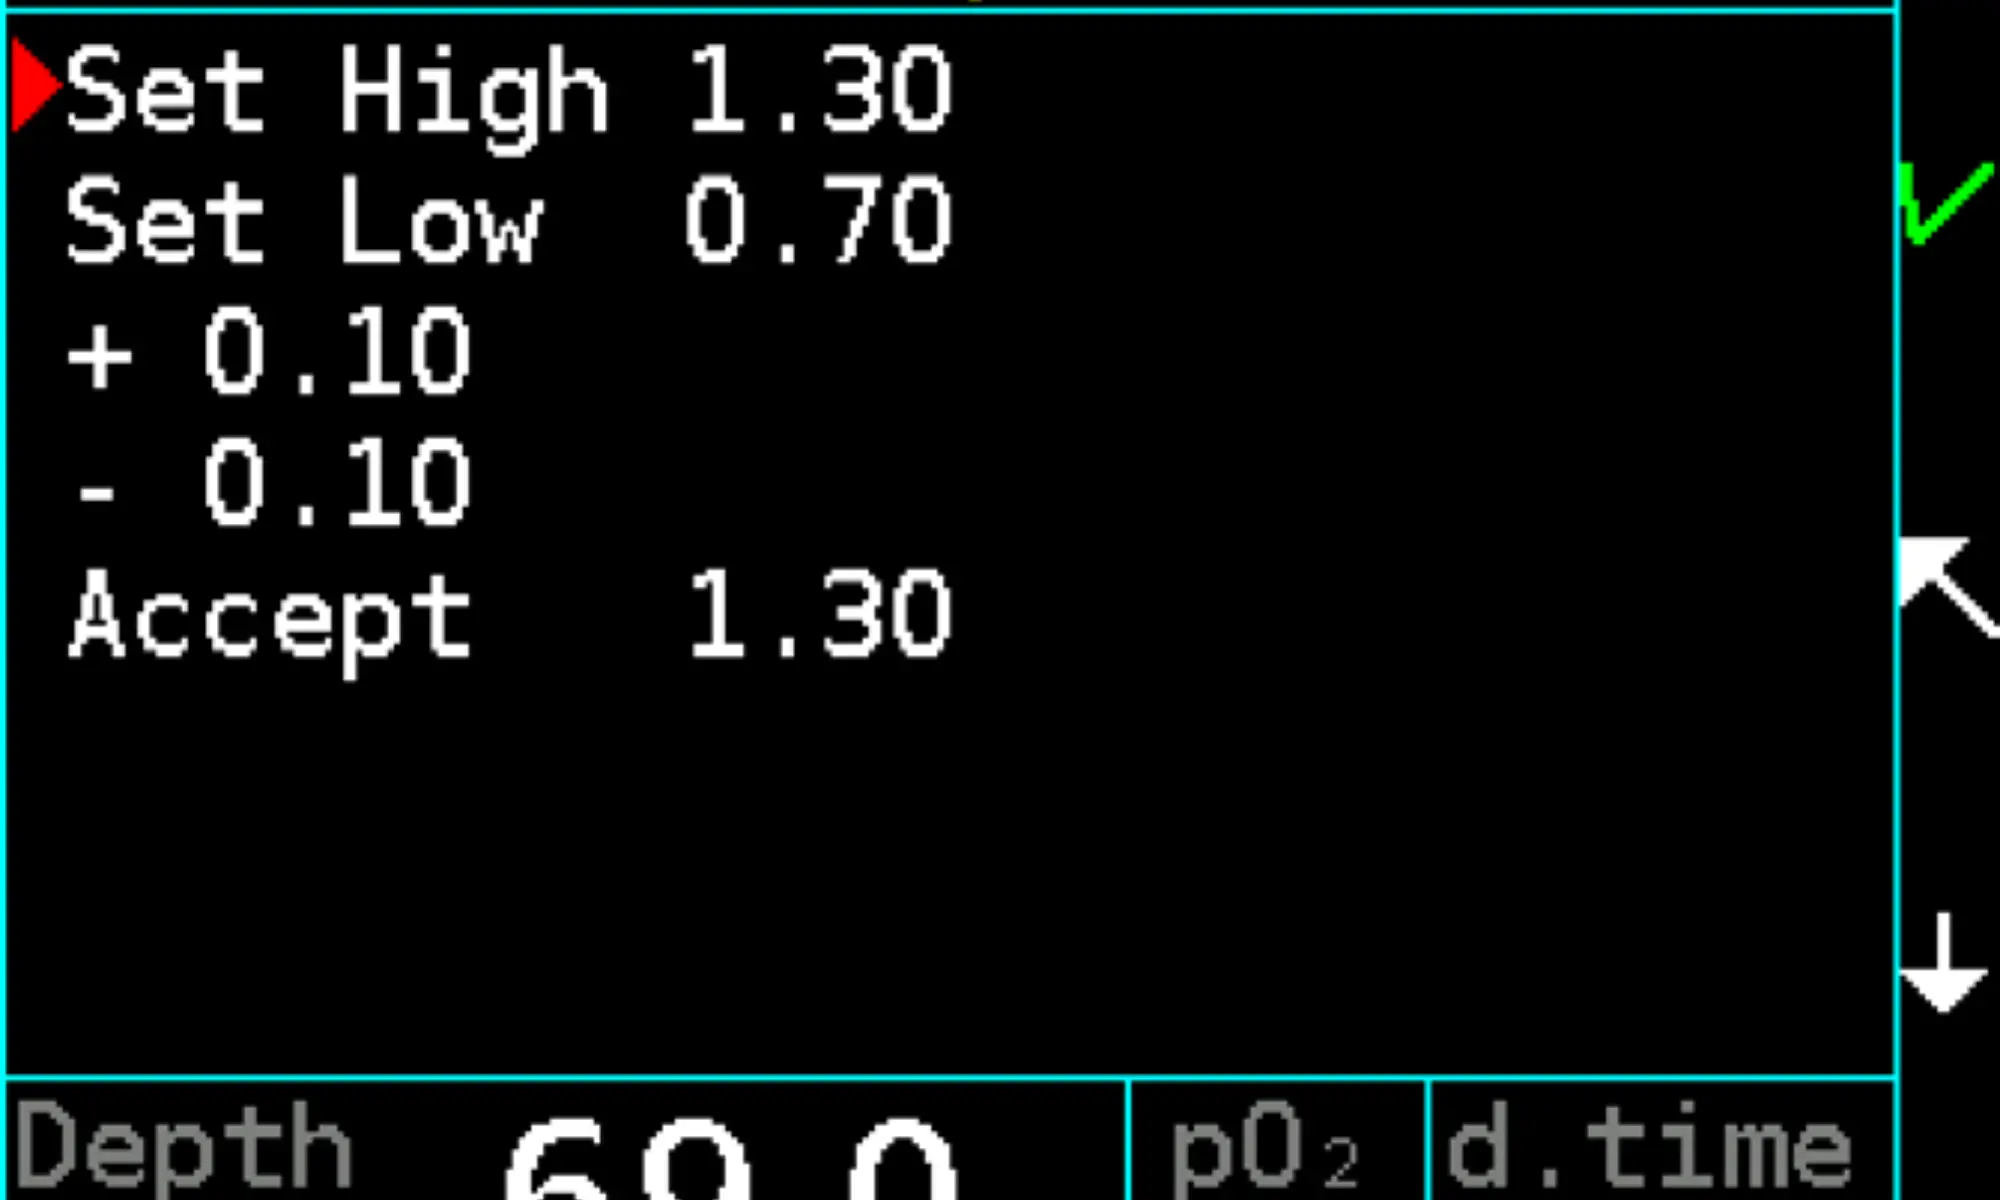
Manual SP setting
Select Setpoint from the dive menu. The high and low setpoint can be chosen directly from the menu. For the current setpoint adjustment use the +0.10 and -0.10 menu items for the SP value change (can be used repeatedly; the final value is displayed) and then select Accept for the change.
03.3.3 Dive menu

Bailout mode (OC)
It is assumed that the diver will not breathe from the rebreather’s breathing loop but will rather use a separate opencircuit bailout apparatus. After switching to the bailout OC mode, the default OC mixture will be used and the safety level will be automatically set using the bailout gradient factors. The BoGF tag appears on the detailed and synoptic screen. It is possible to switch between the standard and bailout GF sets in the menu without affecting the mode in which the Freedom is operating.
Measured mode (CCR)
Use for switching to rebreather dive mode with the measured pO2
. See next chapter.
Setpoint
Use to switch the low/high setpoint and the manual setting of the setpoint of the CCR. See the Setpoint
chapter on previous page.
Mix
Use for gas mixture switching for SCR. This is similar to the OC mixture selection.
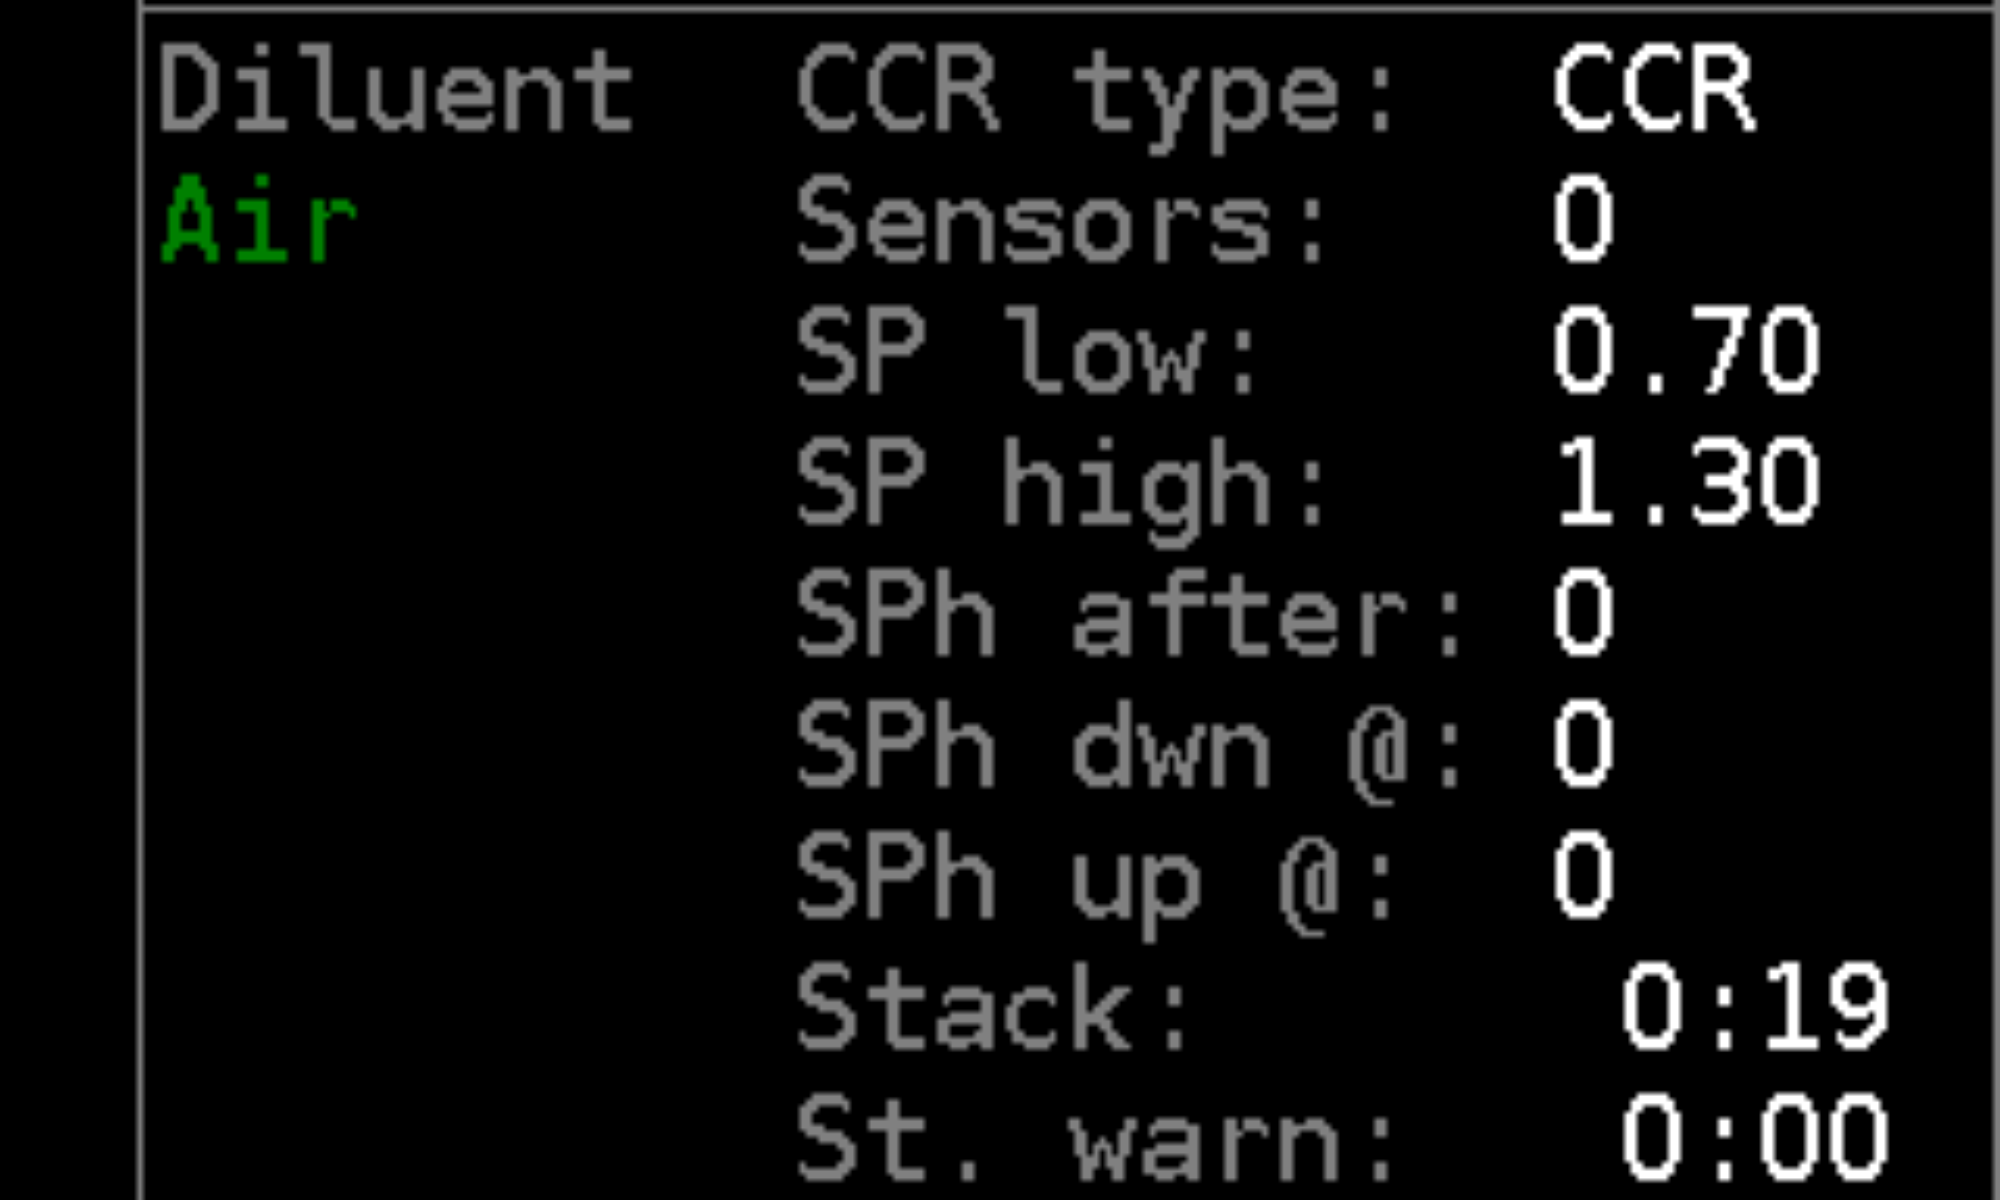
Diluent
Use this menu item for the diluent gas switch.
Setup – Diluents
This (the CCR only) menu item corresponds to the mixture setup in Setup → SCR/CCR Setup → Const CCR
setup → Diluents.
Setup – Mixture setup
This (the SCR only) menu item corresponds to the OC mixture setup in Setup → Mixtures → Mixture setup.
03.3.4 Stack time
The scrubber stack timer runs all the time in any rebreather mode regardless of depth, even on the surface. If you spend a long time in dive mode while not breathing from the rebreather’s loop, then increase the time for the stack time warning. Don’t forget to reset the timer when you refill the scrubber (Dive → Stack time reset). You can find the stack time on the O2 sensors screen.
03.4 Measured CCR
The rebreather dive modes are available in the Closed Circuit version of the Divesoft Freedom only. This chapter of the user manual describes only the differences from the fixed setpoint CCR diving. First you will have to study OC mode and fixed setpoint CCR mode.

03.4.1 O2 sensors connection
The measured CCR dive mode requires a connection to the O2 sensors of a rebreather. One, two or three sensors can be connected. The cable equipped with the Molex connectors is included in the Closed Circuit version of the Divesoft Freedom distribution package or can be ordered separately. See also O2 sensor cable (See section 10.5).
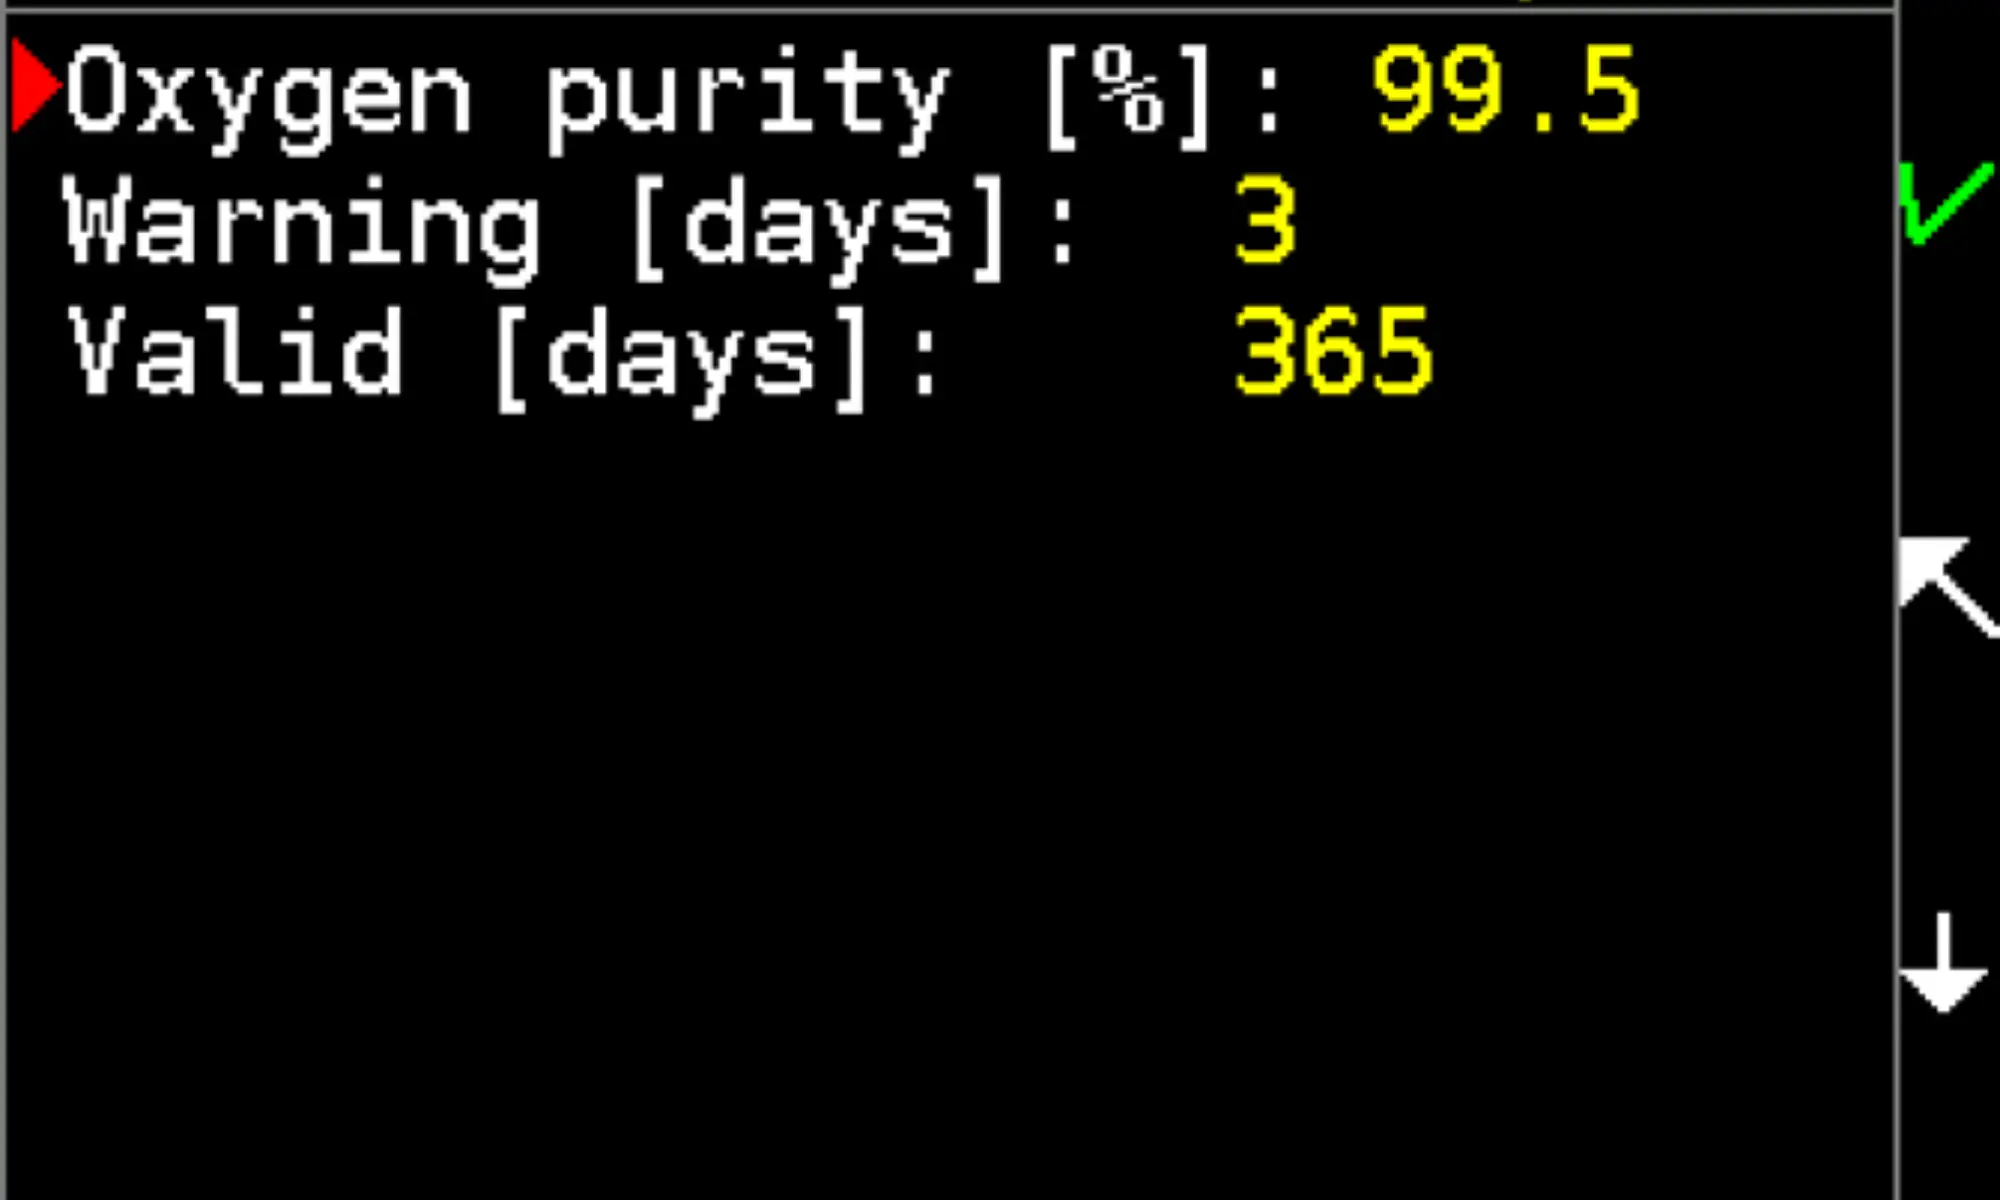
03.4.2 O2 sensors calibration
If possible, use oxygen with purity of at least 99.5% for calibration.
Do not use air for calibration. The partial pressure of oxygen in air at
atmospheric pressure significantly differs from the partial pressures
determined by the setpoints. At the end of its service life, an oxygen
sensor can successfully undergo calibration to 21% (air), but will no
longer be capable of measuring pO2
of 1 bar or higher.
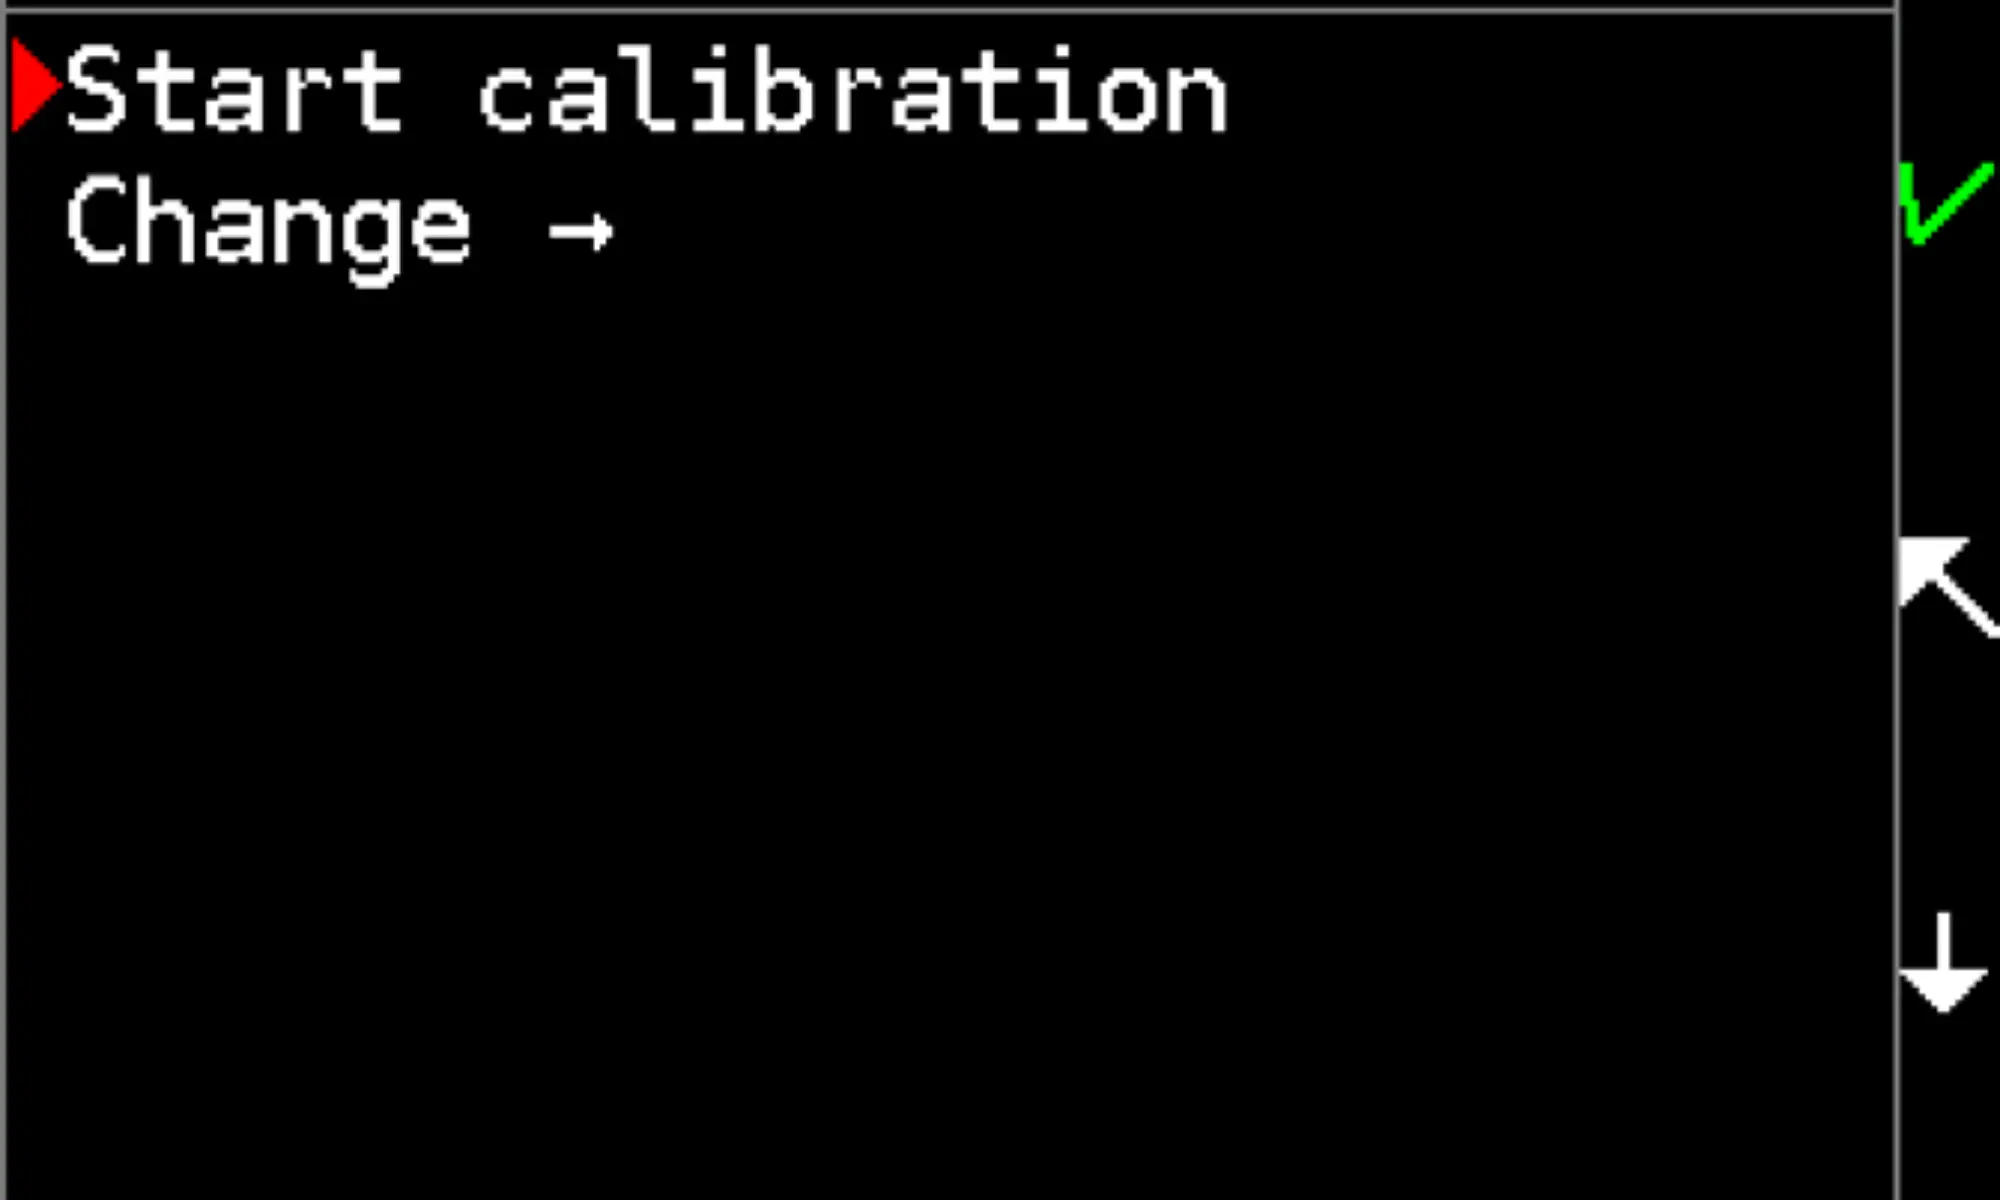
Procedure:
1. Dive → Calibration O2→ Start calibration
2. Check the calibration gas
3. Wait for stable values
4. Start and wait for calibration process to end
5. Confirm the save
Whether or not a sensor is already at the end of its service life is also
determined during calibration.
At higher altitudes above sea level, the partial pressure of oxygen in
the calibration mixture decreases in proportion to lower atmospheric
pressure. The Freedom measures atmospheric pressure and takes
it into account during calibration. Therefore, do not perform any
corrections at higher altitudes above sea level.
It is preferred to calibrate O2
sensors prior each dive. Do not use
sensor reading from sensors calibrated more than three days ago.
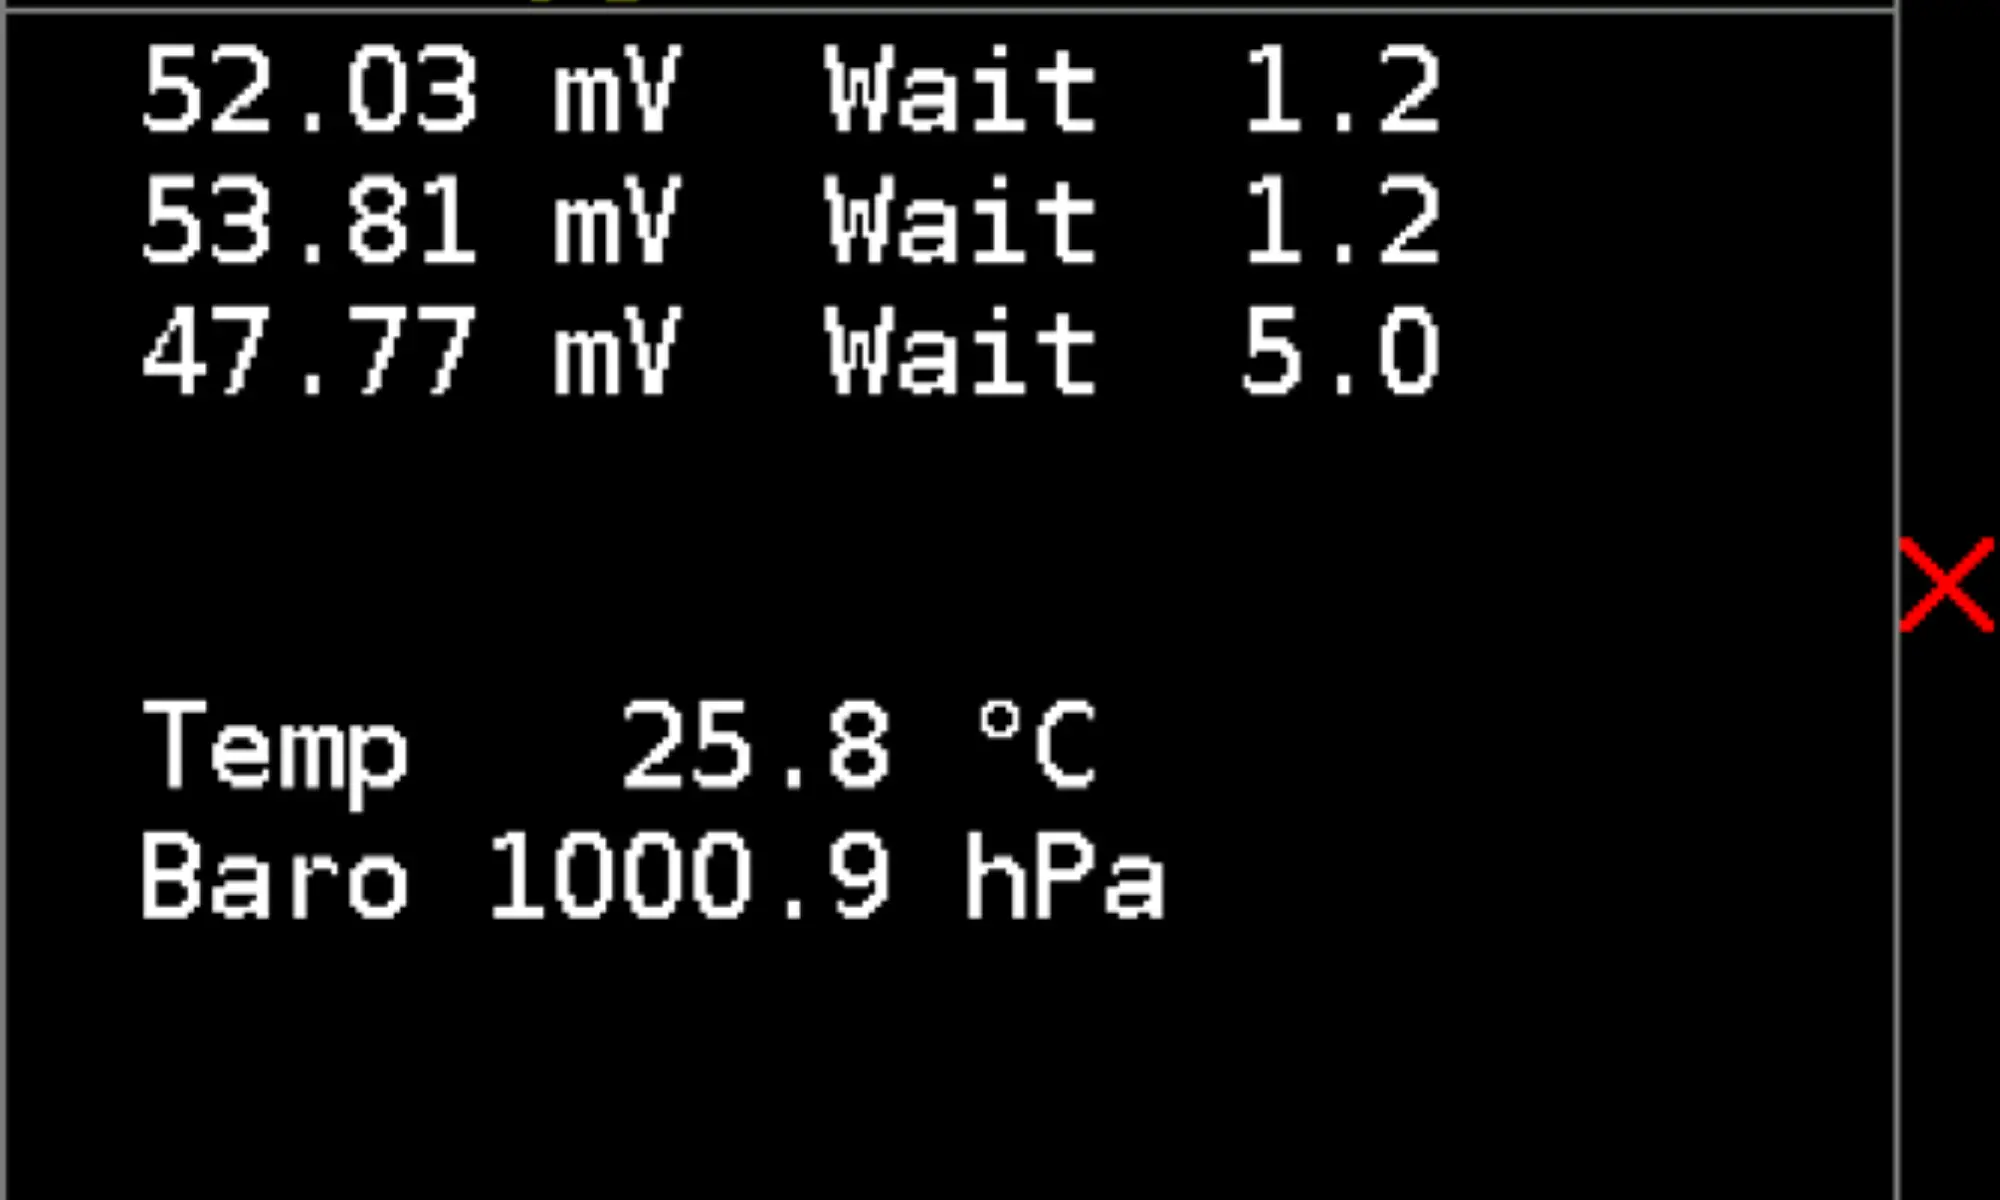
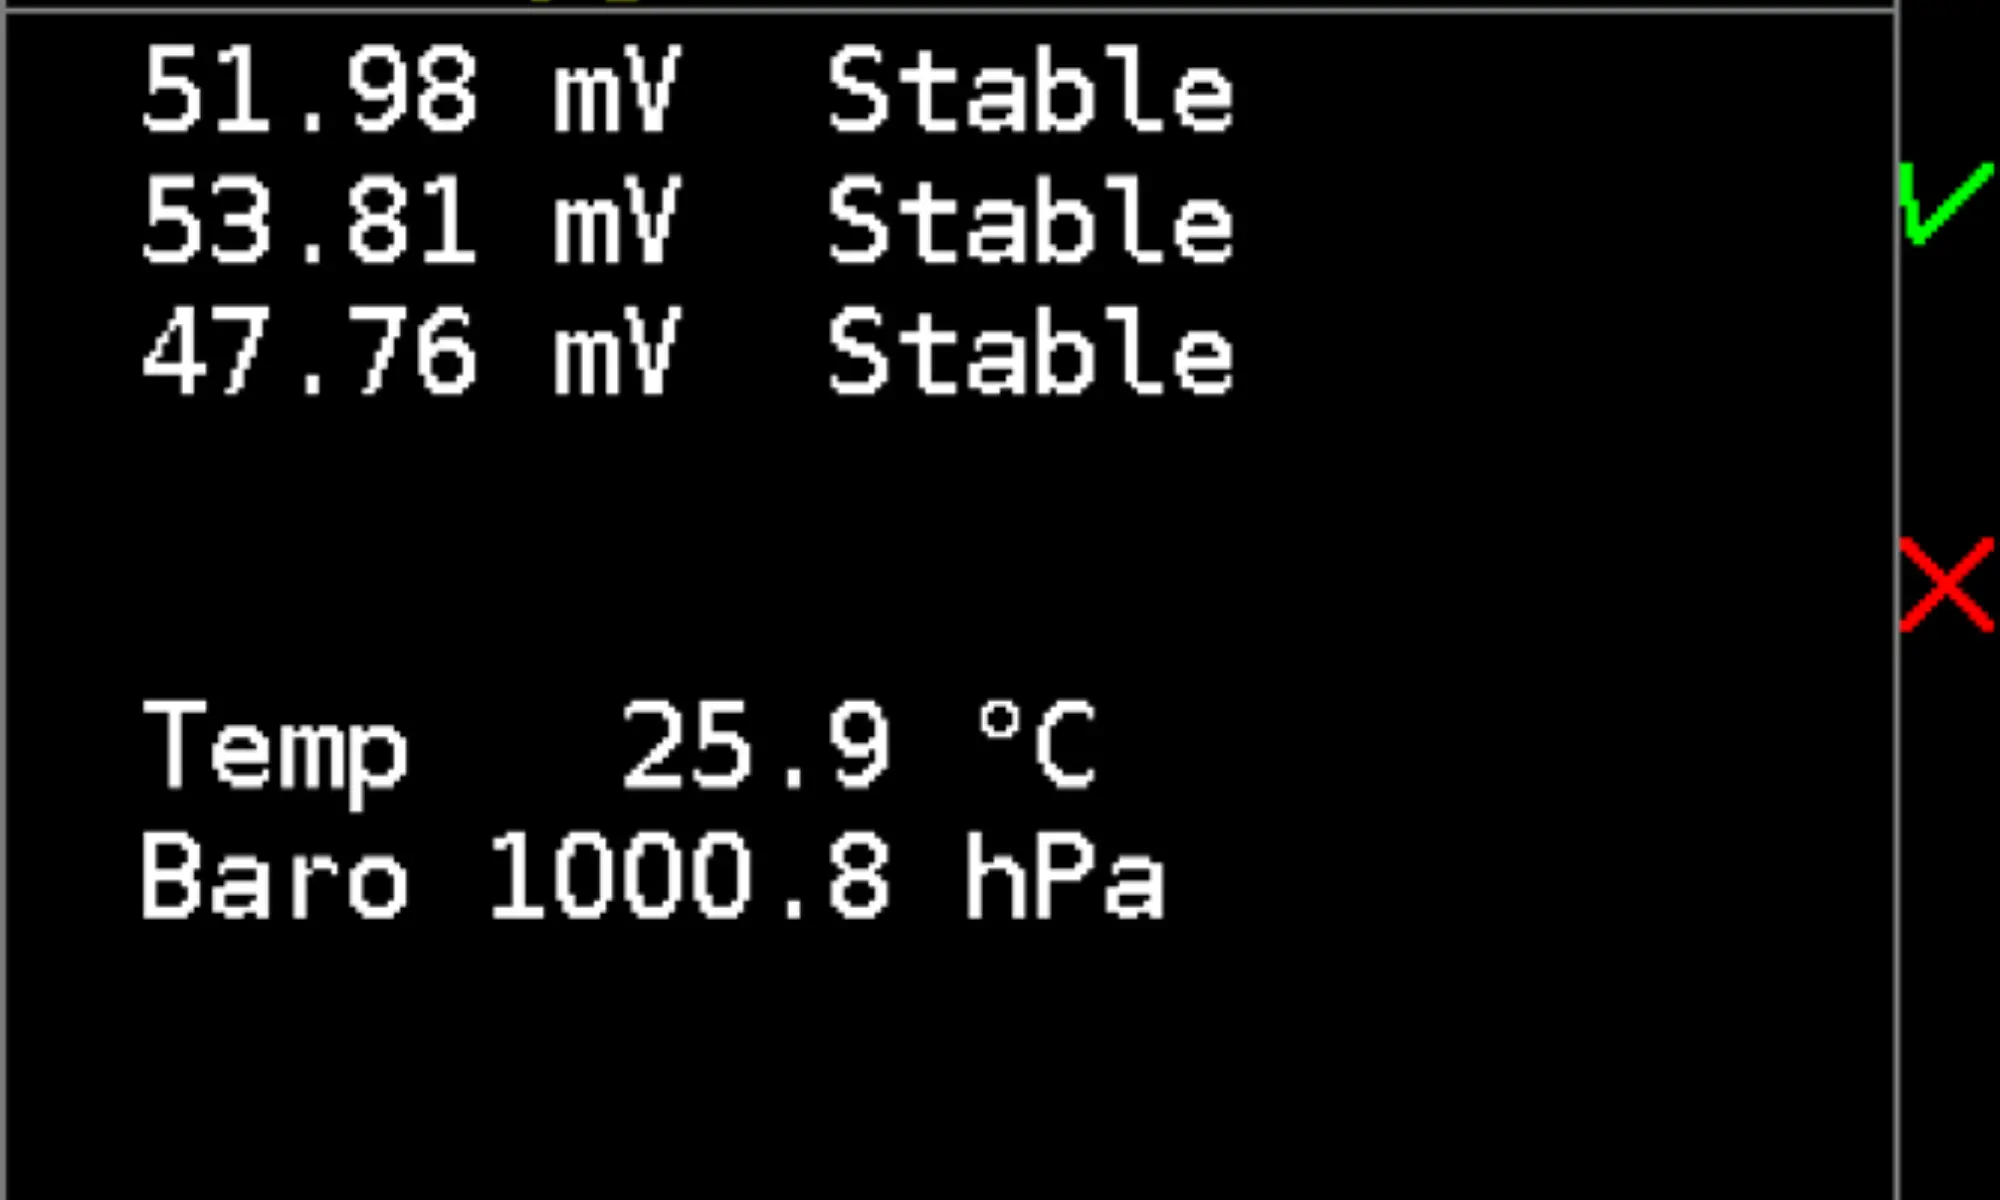
03.4.3 pO2 reading
There is a separate O2 sensor screen in both the surface and dive mode. Not only the pO2 but also the voltage on sensors can be read. If the state of a sensor is not in operational mode (not connected, error, excluded, disabled, uncalibrated), the appropriate tag appears instead of the pO2 value. On the detailed and synoptic screen there is only one reading of the pO2 value; the arithmetic average of active sensors is used. You can mark any sensor as faulty during a dive in dive menu Setup → Faulty sensors.
03.5 Gauge
The gauge mode is indicated by the dark red table gridlines.
There are two forms of the gauge mode – with and without rebreather O2
sensor reading. The rebreather
gauge mode is only available in the Closed Circuit version with at last one connected O2
sensor
Note: Gauge screen can be enabled in any mode (OC, CCR). Setup -> Preferences -> Display -> Screens -> Gauge
03.5.1 Synoptic screen
Stopwatch
Operate the stopwatch via the menu. See Stopwatch (See section 3.5.4).
Battery symbol A graphical indication shows the remaining battery capacity. See Battery symbol (See section 3.1.2).
Dive time
The timer starts after submersion (depth > 1.5 m) and halts after
surfacing (depth < 0.5 m). If stay on the surface (or at very shallow
depth) is followed by a second submersion (during a time set in the dive termination timeout), then the dive
time indicated will be the time from the first submersion including the surface time.
Local Time
The local time is shown on the display in the top left corner of the middle section.
Vertical speed
The ascent and descent rate indication can be set to a relative (%) or absolute (m/min or ft/min) reading.
The relative reading is based on the maximum ascent or descent rate.
Set in:
BottomTimer: "Setup -> Preferences -> Vert. rate"
Other licences: "Setup -> Preferences -> User interface -> Vert. rate"
Depth
The depth reading can be set to m or ft in the setup. Depth is calculated from measured hydrostatic
pressure. For calculation fresh water (default), seawater or universal EN13319 density can be set in Setup → Preferences.
The universal density EN13319 is closer to salt water and not very suitable for pure fresh water.
Max Depth
The maximum depth reached during the dive.
Avg depth The average depth of the dive. A new start point for depth averaging can be created via the dive menu. This point is indicated by the yellow vertical line on the profile screen.
Temp
Water temperature is measured inside the computer case. After a temperature change wait about 1-2
minutes until the temperature reading reaches a stable value. The temperature in air is affected by many
factors and is only an indication.
A temperature correction can be set in Setup → Calibration for better accuracy.
03.5.2 Big Screen
The most important information is written in really big characters.
This screen is useful in very bad visibility. Many divers can read the
numbers even without a mask.
The meaning of all values is identical to the synoptic screen.
On the "Big Screen" you can customize the bottom line in Gauge mode.
BottomTimer: "Setup -> Preferences -> Big depth"
Other linces:"Setup -> Preferences -> User interface -> Big depth"
- "Avg" displays average depth
- "Max" displays maximum depth
- "Only" displays current depth ONLY, nothing else.
03.5.3 Dive profile screen
Start
The time of submersion is useful for checking compliance with the
schedule.
Avg
The average depth is indicated in yellow by a horizontal line and
a numerical value.
A new start point for depth averaging can be created in the dive
menu. This point is indicated by the yellow vertical line and the
horizontal average depth line starts from there.
Current depth
See lower left corner.
Dive time
The runtime of the current dive is placed in lower right corner.
Max
The maximum depth reached during the dive. The field with this value
is placed in the middle of bottom line.
03.5.4 Dive menu
During a dive, in any dive mode, press both keys simultaneously to show the dive menu. This shows current depth, partial pressure of oxygen (rebreather only) and dive time on the bottom of the screen.
Stopwatch
The elapsed time is written in white while the stopwatch is running or
in gray when the stopwatch is not running.
Start stopwatch
This starts the timer.
If the stopwatch was previously halted then the count
continues from the indicated time.
The stopwatch can be set to the bottom button control, short press to pause/start, long press to reset and straight start.
BottomTimer: Setup -> Preferences -> Stopw. btn.
Other licenses: Setup -> Preferences -> User
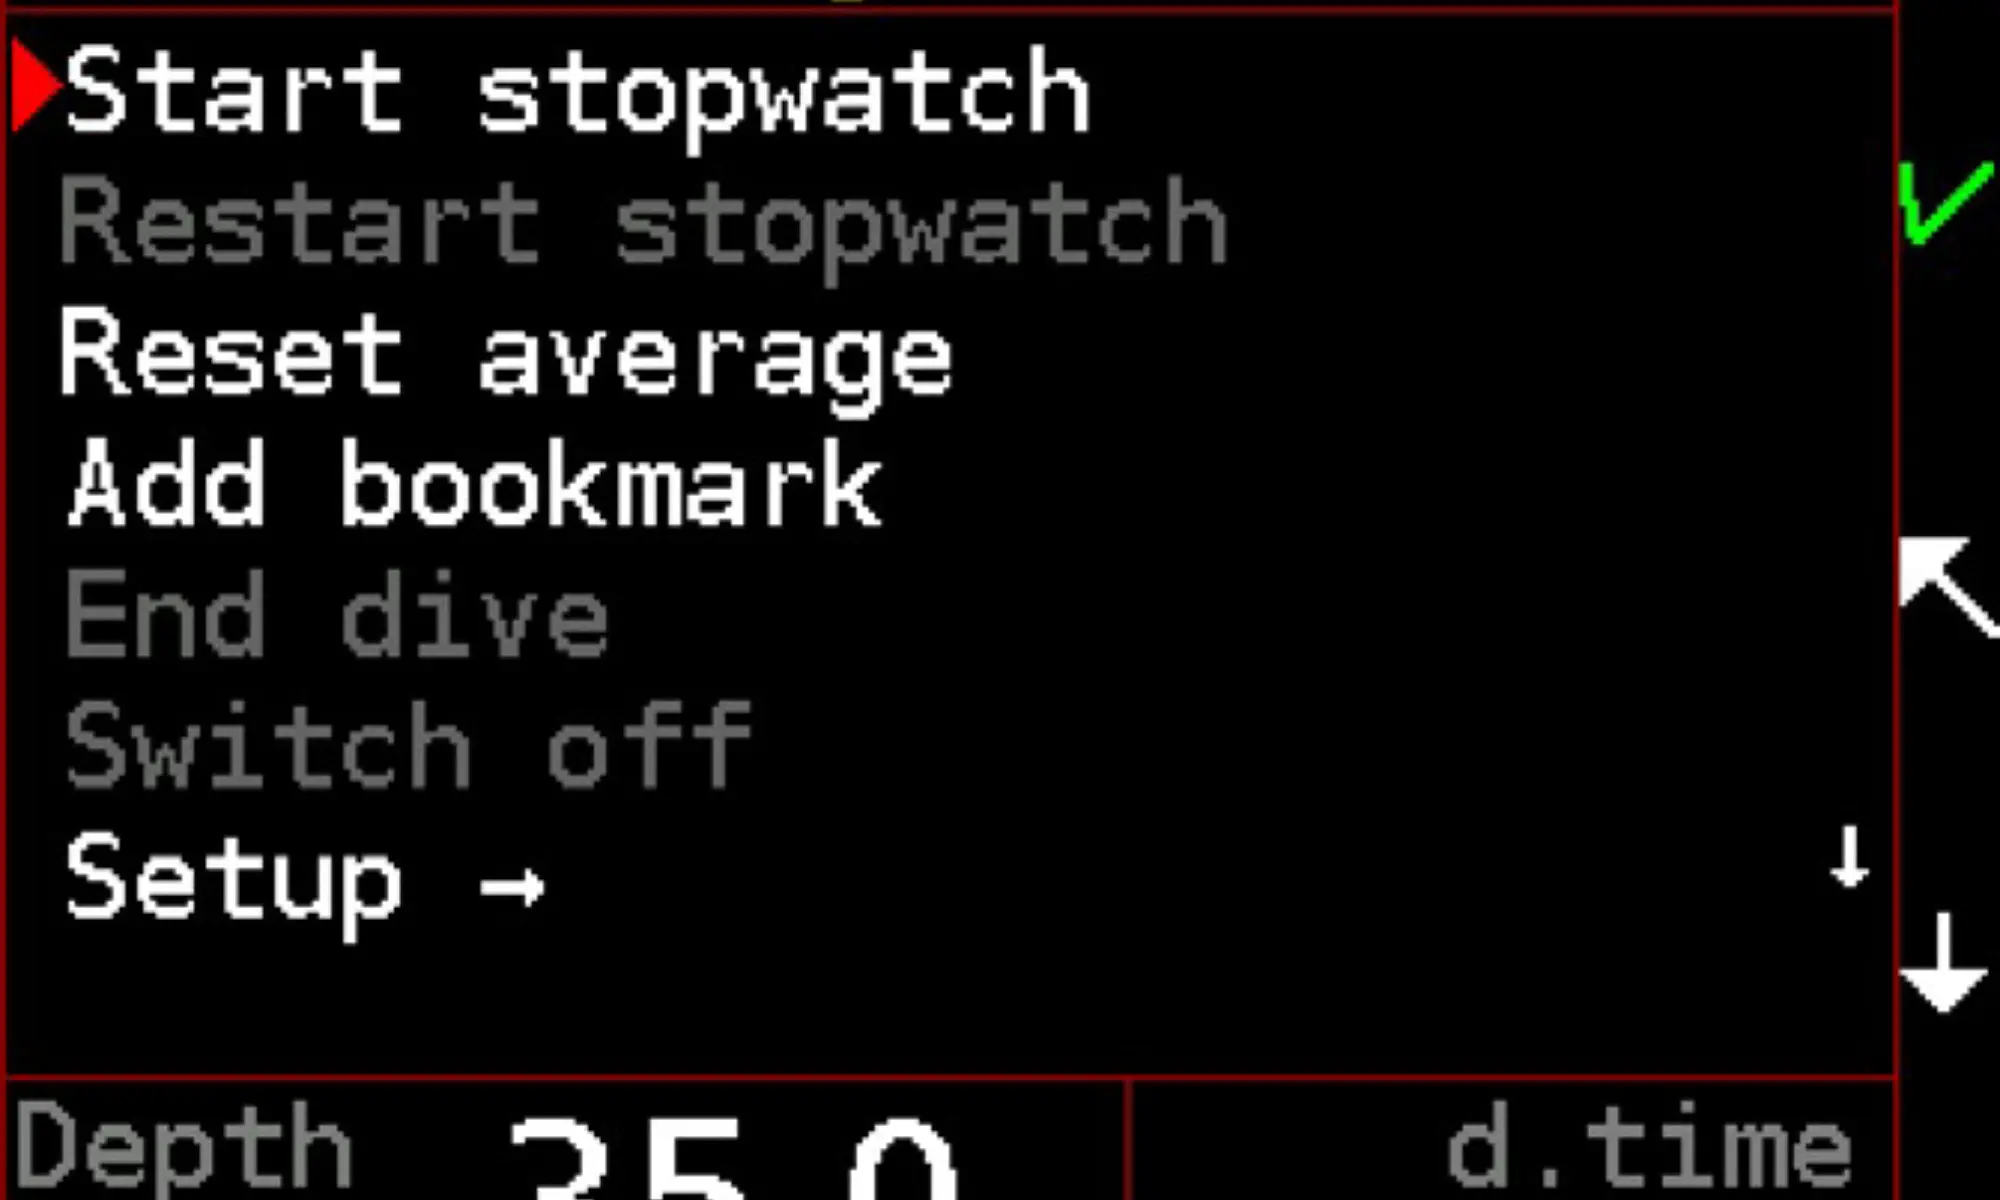
Stop stopwatch
This stops the timer, leaving the elapsed time displayed in gray.
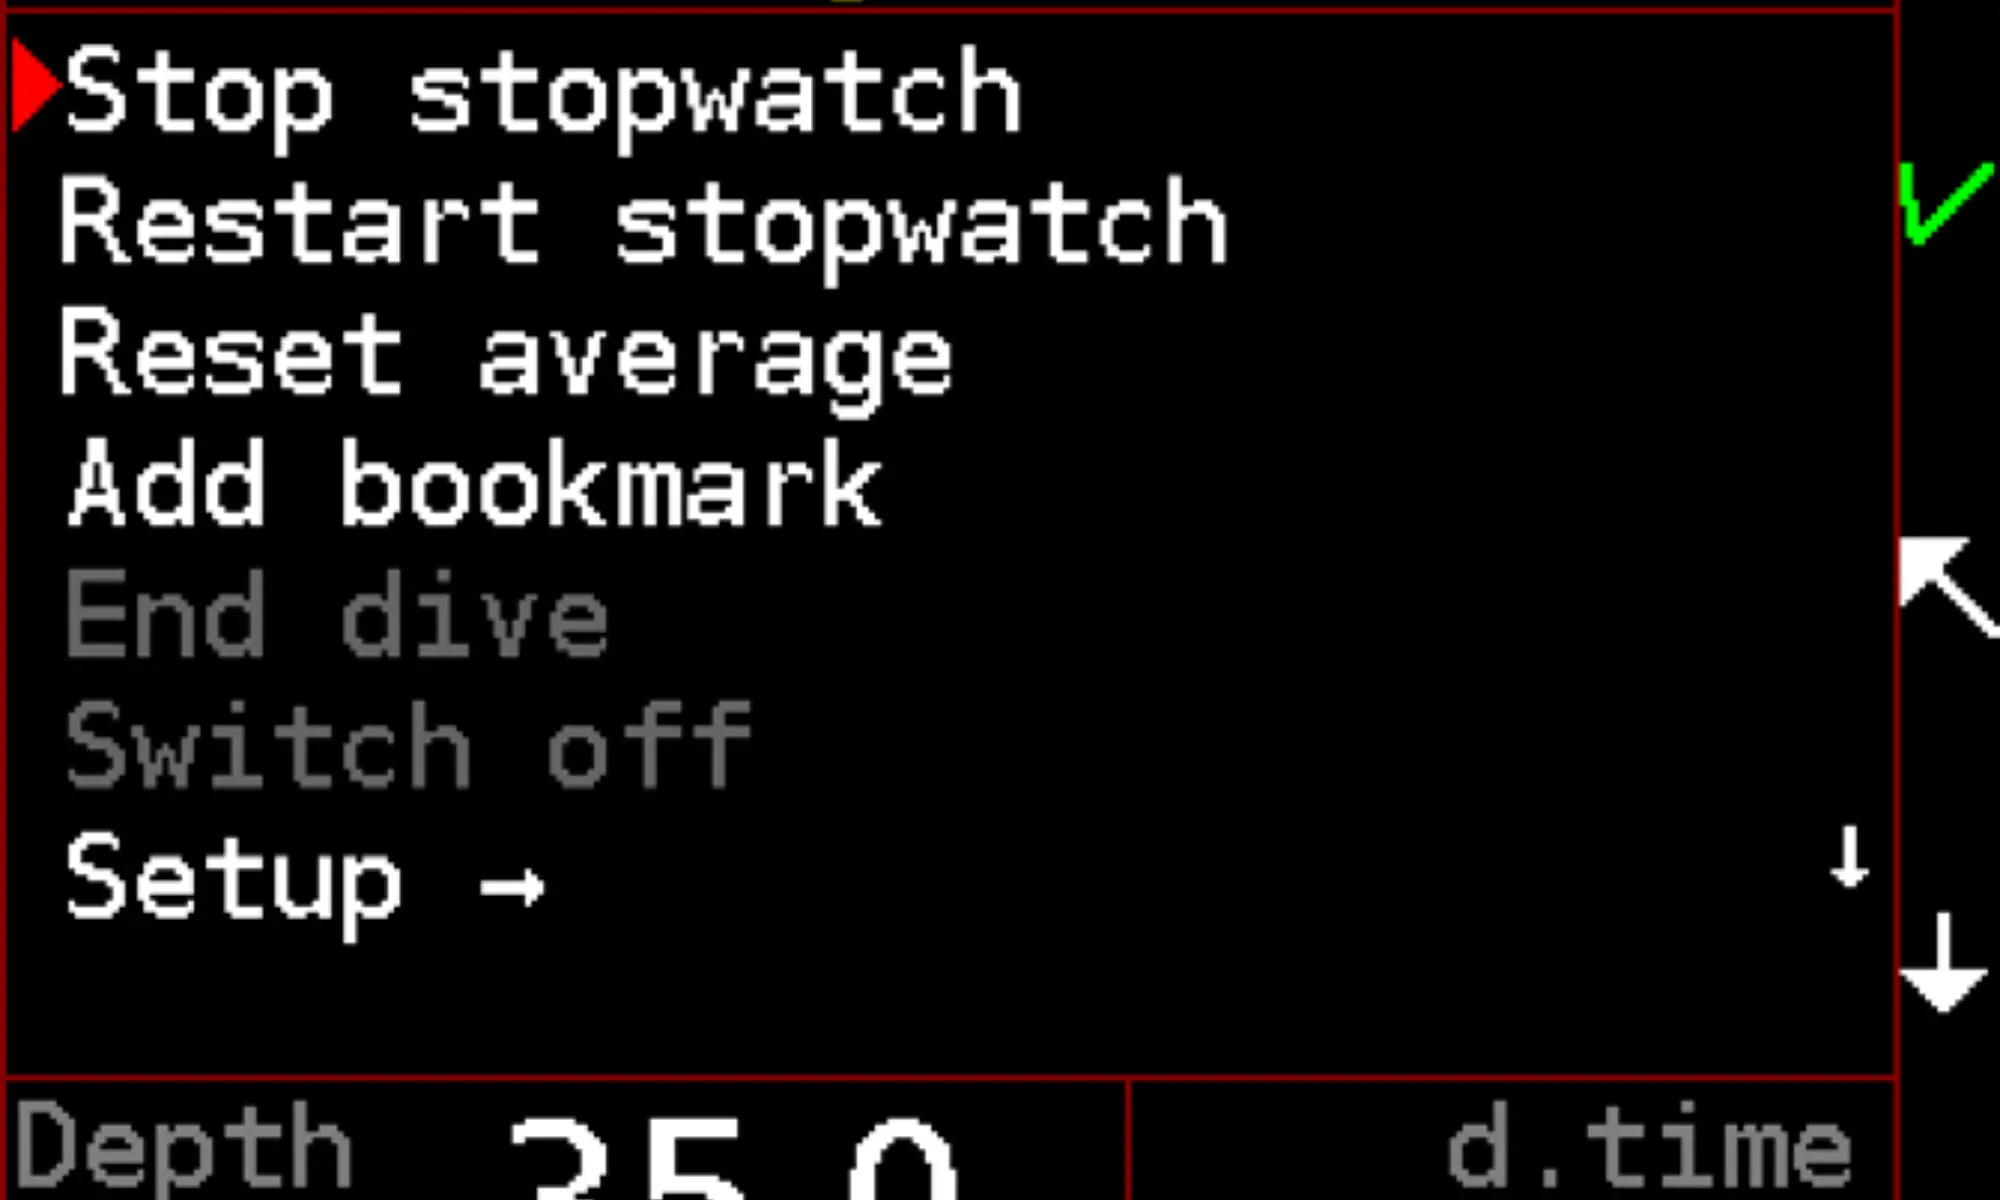
Restart stopwatch
This restarts the timer from zero.
This function is especially useful for decompression stops.
Reset average
A new start point for depth averaging will be created. The restart point is indicated by the vertical line on
the dive profile screen.
Add bookmark
A bookmark will be created in the dive log. The bookmark number is displayed in the notification that
follows.
End dive
End dive and switch to surface mode. This menu item is enabled only on the surface.
Switch off
End dive and switch directly to standby mode. This menu item is enabled only on the surface.
Setup
Brightness
The display backlight brightness level can be set from 1 to
9. The change in brightness is immediately reflected while
adjusting.
Orientation
The left hand, right hand and auto orientation can be selected.
Auto orientation selects the left or right hand position
automatically during the start. It will not switch the display
orientation when the diver changes position (i.e. during a head
down descent).
Screens
Any of the dive mode screen can be disabled.
Apps
There are several items in the apps folder
Apps - Add bookmark - marks the current moment in the dive log
Apps - Events - allows you to view computer-issued warnings and pop-up messages
Apps - Emergency torch - brightens the entire display to the maximum and emits the maximum amount of light possible. Can be used as an emergency torch in certain conditions when all other torches have failed.
Apps - Inclinometer - a tool to measure the slope of a slope. Can be used for mapping caves and wrecks.
Apps - Sokoban Game - a puzzle game for distraction on long decompression. For more information on games, see section 9 of this manual.
Apps - Snake - a game for distraction on a long decompression. See section 9 of this manual for more about the games.
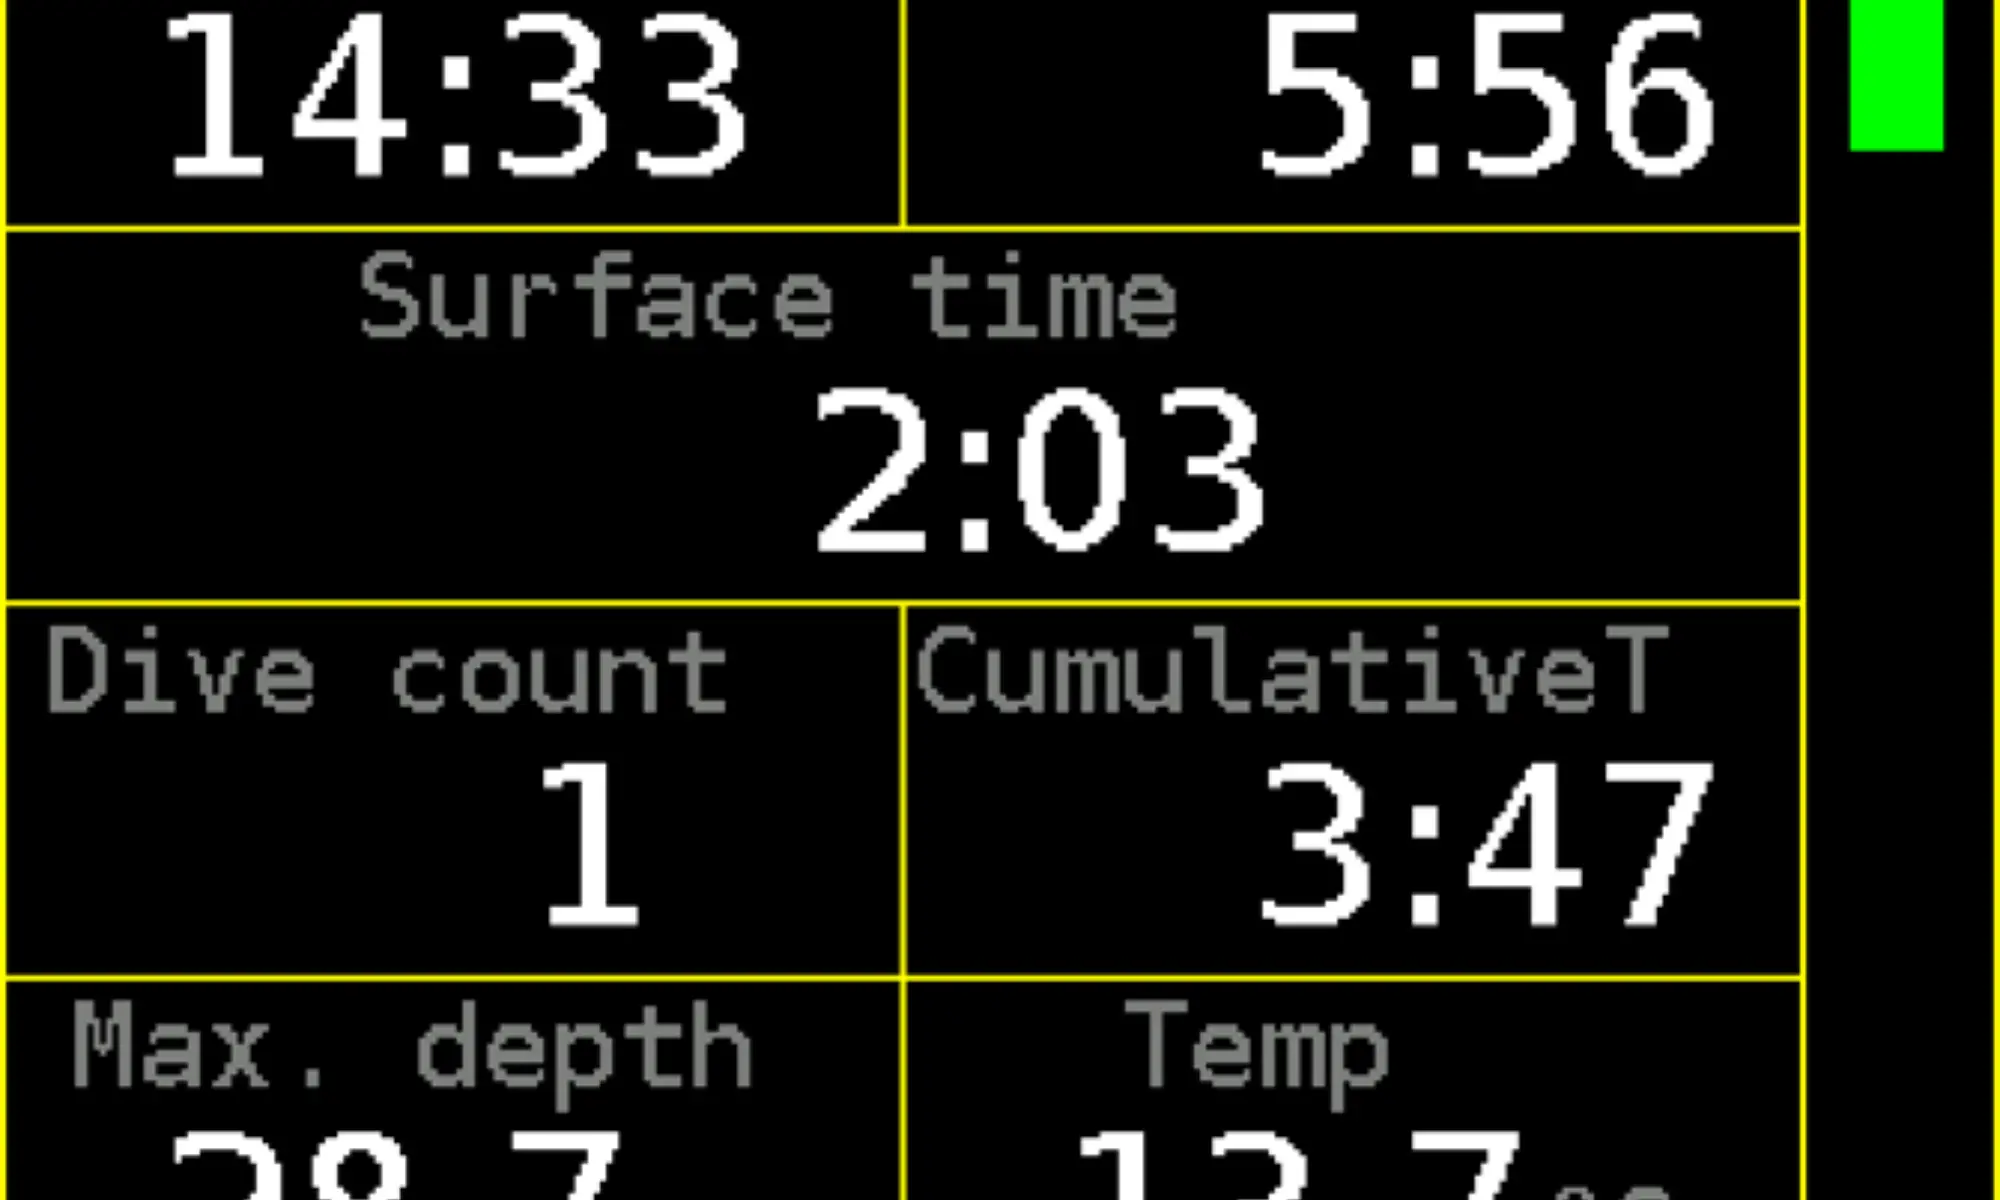
Time
The local time is shown on the display in the top left corner.
Duration
The timer starts after entering the Free mode. Duration of a freediving session includes the time on the
surface and the time spent underwater.
Surface time
This timer is triggered by surfacing.
Dive count
Number of dives during a freediving session.
CumulativeT
The cumulative time is the sum of the time spent underwater.
Max. depth
This is the maximum depth reached during a freediving session.
Temp
Water temperature is measured inside the computer case. After temperature change wait about 1-2
minutes until the temperature reading reaches a stable value. The temperature in air is affected by many
factors and is only an indication.
A temperature correction can be set in Setup → Calibration for better accuracy.
03.6 Free
The freediving mode is indicated by the yellow table gridlines.
03.6.1 Surface screen
The freediving surface screen is shown during a freediving session while on the surface.
03.6.2 Dive screen
The freediving dive screen is shown during a dive (after the descent to the On depth and before the ascent above Off depth). Both depths can be set in Setup → Freediving. The dive screen with the maximum depth and the dive time of the last dive is accessible after surfacing with a short press of the upper button from the surface screen.
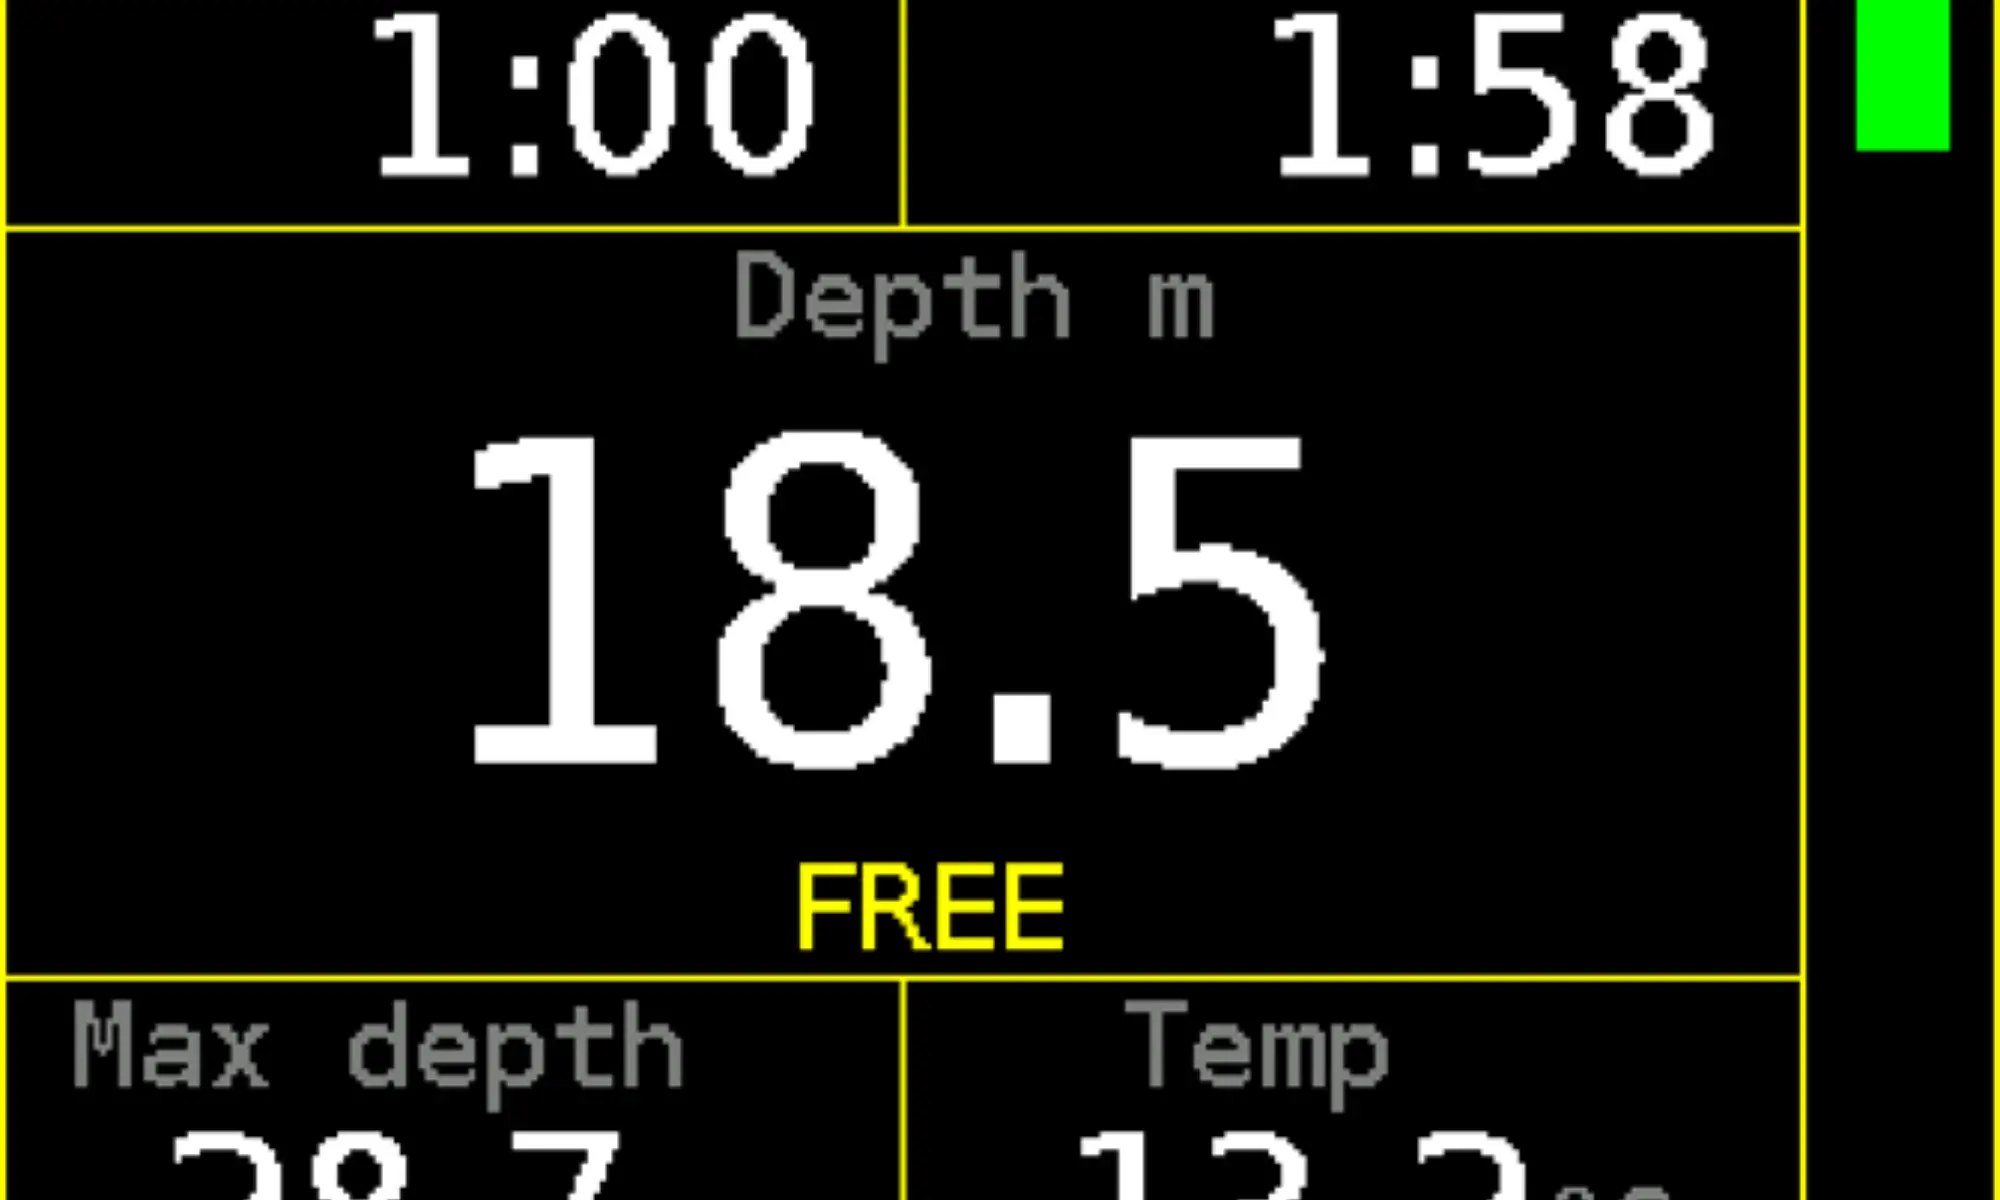
Stopwatch
Operate the stopwatch by the lower button:
Short press: start/stop
Long press: reset
Dive time
The timer starts after submersion to the On depth and stops after ascending above the Off depth.
Depth
The depth can be read in the units set in the setup (m or ft). Depth is calculated from measured hydrostatic
pressure. For calculation fresh water (default) or seawater density can be set.
Max Depth
The maximum depth reached during the dive.
Temp
Water temperature is measured inside the computer case. Because the system is slow, it provides only an
indication during short dives.
03.7 Advised strategies
03.7.1 Diving in darkness
High brightness all the time
This is the preferred option for a simple dive with a high power diving light (torch) used by all team
members. Brightness level 6 to 8 is recommended.
Don’t use this option if light coming from the Freedom display and light coming from your diving
partner’s torch can’t be clearly distinguished in the peripheral vision. Otherwise it may lead to the
separation of the team members.
WARNING: Brightness higher than 7 will significantly reduce battery life per charge. A value of 9 will reduce battery life by up to 50%.
Switching on-off
This option is typical for cave diving. Set brightness to a high level (6 to 9) and a short screensaver timeout
(15 s is more than enough).
Preferably activate the display by light during a dive. Move the Freedom to the light beam instead of moving
the beam to prevent confusion with a light signal.
Low brightness
For diving with eyes accommodated to darkness use the lowest brightness setting (level 1). Your night
vision will not be disturbed. It is preferred to have the display on all the time (i.e. screensaver timeout set
to 0). This option is typical for night dives in clear water.
Dive with slightly brighter display while using a low power torch. Balance the power of the backlight to the
power of your torch to find the optimal setting – no glare but good readability.
The display can’t shine through disturbed silt or mud on low brightness. If it is necessary to switch to
maximal brightness just short press the lower key repeatedly.
Note: Adjusting the function of the lower button may override the brightness control.
"Lower bttn." to ""Prev Scr"
"Stopw btn." to "Base" or "Always".
The setting is placed in the same place as the Lower bttn. BottomTimer: Setup -> Preferences -> Lower bttn.
Other licences: Setup -> Preferences -> User interface -> Lower bttn.
03.7.2 Decompression
Gradient factors
Experienced divers usually set GF regarding to planned dive profile and after dive activity.
GF low 0.30 is default value suitable for an average healthy diver and dive profiles within recreational
range. Lower values are more suitable for deeper dives including extended range air dives and use of
helium rich mixtures. 0 is not uncommon. Use lower value if any risk factor is present. Higher value can
be used for relatively shallow dives, but influence of GF Low on these dives is small (zero on so called
non-decompression dives).
Default GF high 0.80 increases the time at the shallow stops relatively slightly compared to the bare
Bühlmann’s decompression algorithm ZHL. If any risk factor is present, lower value is more appropriate. This
also applies if another dive is planned in a short time or physical activity cannot be avoided shortly after
the dive. Low value of GF high also shortens so called no-deco limits. GF high 0.50 can be considered as very
conservative. For an even smaller value is not usually the reason.
Risk factors
Use a more conservative setting and make only dives with short or no decompression if any risk factor is
present.
The major risk factors for decompression sickness (DCS) are:
• Dehydration
• Heart disease, especially PFO (patent foramen ovale) or ASD (atrial septal defect)
• Previous DCS
• Older age
• Overweight or obesity
• Exercise during a dive or post dive
• Fatigue
• Irresponsibility or inability to follow proper decompression procedures
If excessive fatigue or any other subclinical form of DCS occurs after a dive during which a proper decompression was performed then the presence of one or more risk factors can be assumed.
Diving with air or one nitrox mixture
Confirm the following settings:
• The default OC mix is set to air or nitrox, whichever one you plan to use (Setup → Mixtures)
• All other gas mixtures are disabled (no checkbox checked on the list Setup → Mixtures → Mixture
setup)
Warning: if the ascent gas is set to Optimal (Setup → Decompression) and multiple gas mixtures are enabled then the decompression plan expects their use.
This may lead to indication of shorter time to surface (TTS) and shorter decompression stops. Improper settings like this can’t affect the safety of the decompression if you strictly follow the computer; it only affects the calculation of the plan. This is not applicable to the Basic nitrox version of the Freedom.
Multi-day repetitive dives
It is advised to use a slightly more conservative setting for diving holidays. Do not disable or omit the safety
stop. Use nitrox if available and if you are qualified.
Remember that the diving computer does not know diver’s physical shape. Maintain a high level of hydration
during diving holidays. Do not dive drunken or hungover. Do not dive ill.
Long decompression safety
Preferably, control the decompression safety with the GF high setting and disable the safety stop if the
decompression obligation is longer than 20 minutes. A smaller value of the GF high setting can be used
additionally for increasing safety on the shallow end of decompression, if required.
Switch to bailout gradient factors if you wish to reduce the decompression time (while increasing the risk
of DCS). Bailout GF’s shall be properly set before dive.
Multiple gas usage
This is not applicable to the Basic nitrox version of the Freedom.
Multiple gas usage requires appropriate qualification from a recognized training agency.
Confirm the following settings:
• The ascent gas is set to Optimal (Setup → Decompression)
• All gas mixtures, which you plan to use are properly set and active; and other gas mixtures are
inactive (Setup → Mixtures → Mixture setup)
• The default OC mix is set to the gas you plan to descend with (Setup → Mixtures)
• The gas switch time is set to your preferred time (commonly 2 or 3 minutes)
Never switch the computer to another gas before you start breathing it. Make sure that you breathe the right gas with the MOD greater than your current depth.
Extreme deep diving
Every technical diver who dives to depths greater than 100 m/330 ft has to develop his or her own
decompression strategy. It is necessary to increase the personal limit gradually, step by step. The maximum
operating depth of the Freedom is 300 m/1000 ft. This is probably a much greater depth than you and your
body could handle.
For extreme depth, short bottom-time decompression strategies are common:
• Dive only if in really good physical shape; get your heart examined for PFO
• Use the computer only as a backup for the plan based on your previous experience
• Use a very low value of the GF low; 0 is not uncommon
• Use a high value of the GF high; 1 is not uncommon and even >1 is not uncommon (requires the
special, personally granted license)
• Use optimal gas mixtures
• Stay in the water for minimum 15 minutes after surfacing
• Avoid post-dive exercise; take advantage of the support team
• Maintain thermal comfort during a dive; avoid a hot shower after the dive
• Avoid diving or any other pressure change in the following 48 h
The Divesoft Freedom is not intended for long bottom-time extreme deep diving in any mode other than the gauge mode.
The Full trimix or the CCR version of the Divesoft Freedom is required for trimix decompression calculation.