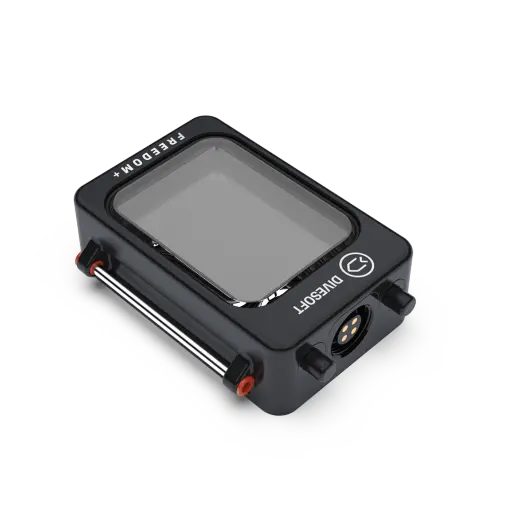
Freedom and Freedom+
User manual / Nitrox, Trimix & CCR dive computers
HW rev. 4.0, FW 1.21.0
Contents
Introduction
Section 02: Operation
02.1 Control elements
02.1.1 Meanings of inputs in surface modes
02.1.2 Meanings of inputs in dive modes
02.1.3 Language
02.2 Brightness control
02.3 Switching on the unit
02.4 Switching off the unit
Section 03: Diving
03.1 Surface mode
03.1.1 Entering surface mode
03.1.2 Surface mode screen
03.1.3 Switching to other modes
03.2 Open Circuit
03.2.1 Entering open circuit mode
03.2.2 Detailed screen
03.2.3 Synoptic screen
03.2.4 Big Screen
03.2.5 Dive profile screen
03.2.6 Dive menu
03.2.7 Gas switch shortcut
03.3 Fixed setpoint CCR
03.3.1 Predive and submersion
03.3.2 Setpoint
03.3.3 Dive menu
03.3.4 Stack time
03.4 Measured CCR
03.4.1 O2 sensors connection
03.4.2 O2 sensors calibration
03.4.3 pO2 reading
03.5 Gauge
03.5.1 Synoptic screen
03.5.2 Big Screen
03.5.3 Dive profile screen
03.5.4 Dive menu
03.6 Free
03.6.1 Surface screen
03.6.2 Dive screen
03.7 Advised strategies
03.7.1 Diving in darkness
03.7.2 Decompression
Section 04: Setup
04.1 Editor use
04.2 Decompression
04.2.1 Gradient factor
04.2.2 Safety stop |On|
04.2.3 Ascent gas |Optimal|
04.2.4 Deco stops
04.2.5 Deep stops
04.2.6 Ascent rate
04.2.7 Descent rate
04.3 Mixtures
04.3.1 Mixture setup
04.3.2 Def. OC mix
04.3.3 End pressure 50 bar
04.3.4 SAC ǀ25 l/minǀ
04.3.5 Gas switch 2 min
04.3.6 Min pO2 |0.18 ba|
04.3.7 Max pO2 |1.60 bar|
04.4 Alarms
04.4.1 Alarm sources
04.4.2 Notifications
04.5 Rebreather
04.5.1 Const pO2
04.5.2 aSCR
04.5.3 pSCR
04.5.4 Common settings
04.6 Freediving Setup
04.7 Preferences
04.7.1 Display
04.7.2 Timeouts
04.7.3 User interface
04.7.4.Metric
04.7.5 Salinity |Fresh|
04.7.6 Default mode |OC|
04.7.7 Full log Off
04.8 Calibration
04.9 Miscellaneus
04.10 Factory defaults
Section 05: Log book
05.1 Last dive
05.2 Dive list
05.3 Summary
Section 06: Dive planner
06.1 The dive parameters
06.2 Dive plan
06.2.1 Summary
06.2.2 Deco stops
Section 07: Log download
07.1 Log processing in cloud
07.2 Divesoft App
07.3 Off-line log processing
Section 08: System
08.1 System check
08.2 Service functions
08.2.1 Debug
08.2.2 Test
08.2.3 Demo dive
08.2.4 Syslog
08.2.5 Miscellaneous
Section 09: Apps
09.1 Analyzer
09.1.1 Measuring
09.1.2 Calibration
09.2 USB connection
09.3 Emergency torch
09.4 Inclinometr
09.5 Games
09.5.1 Sokoban
09.5.2 Snake
Section 10: Hardware
10.1 Charging
10.1.1 Powering in hyperbaric environment
10.2 Wrist mount
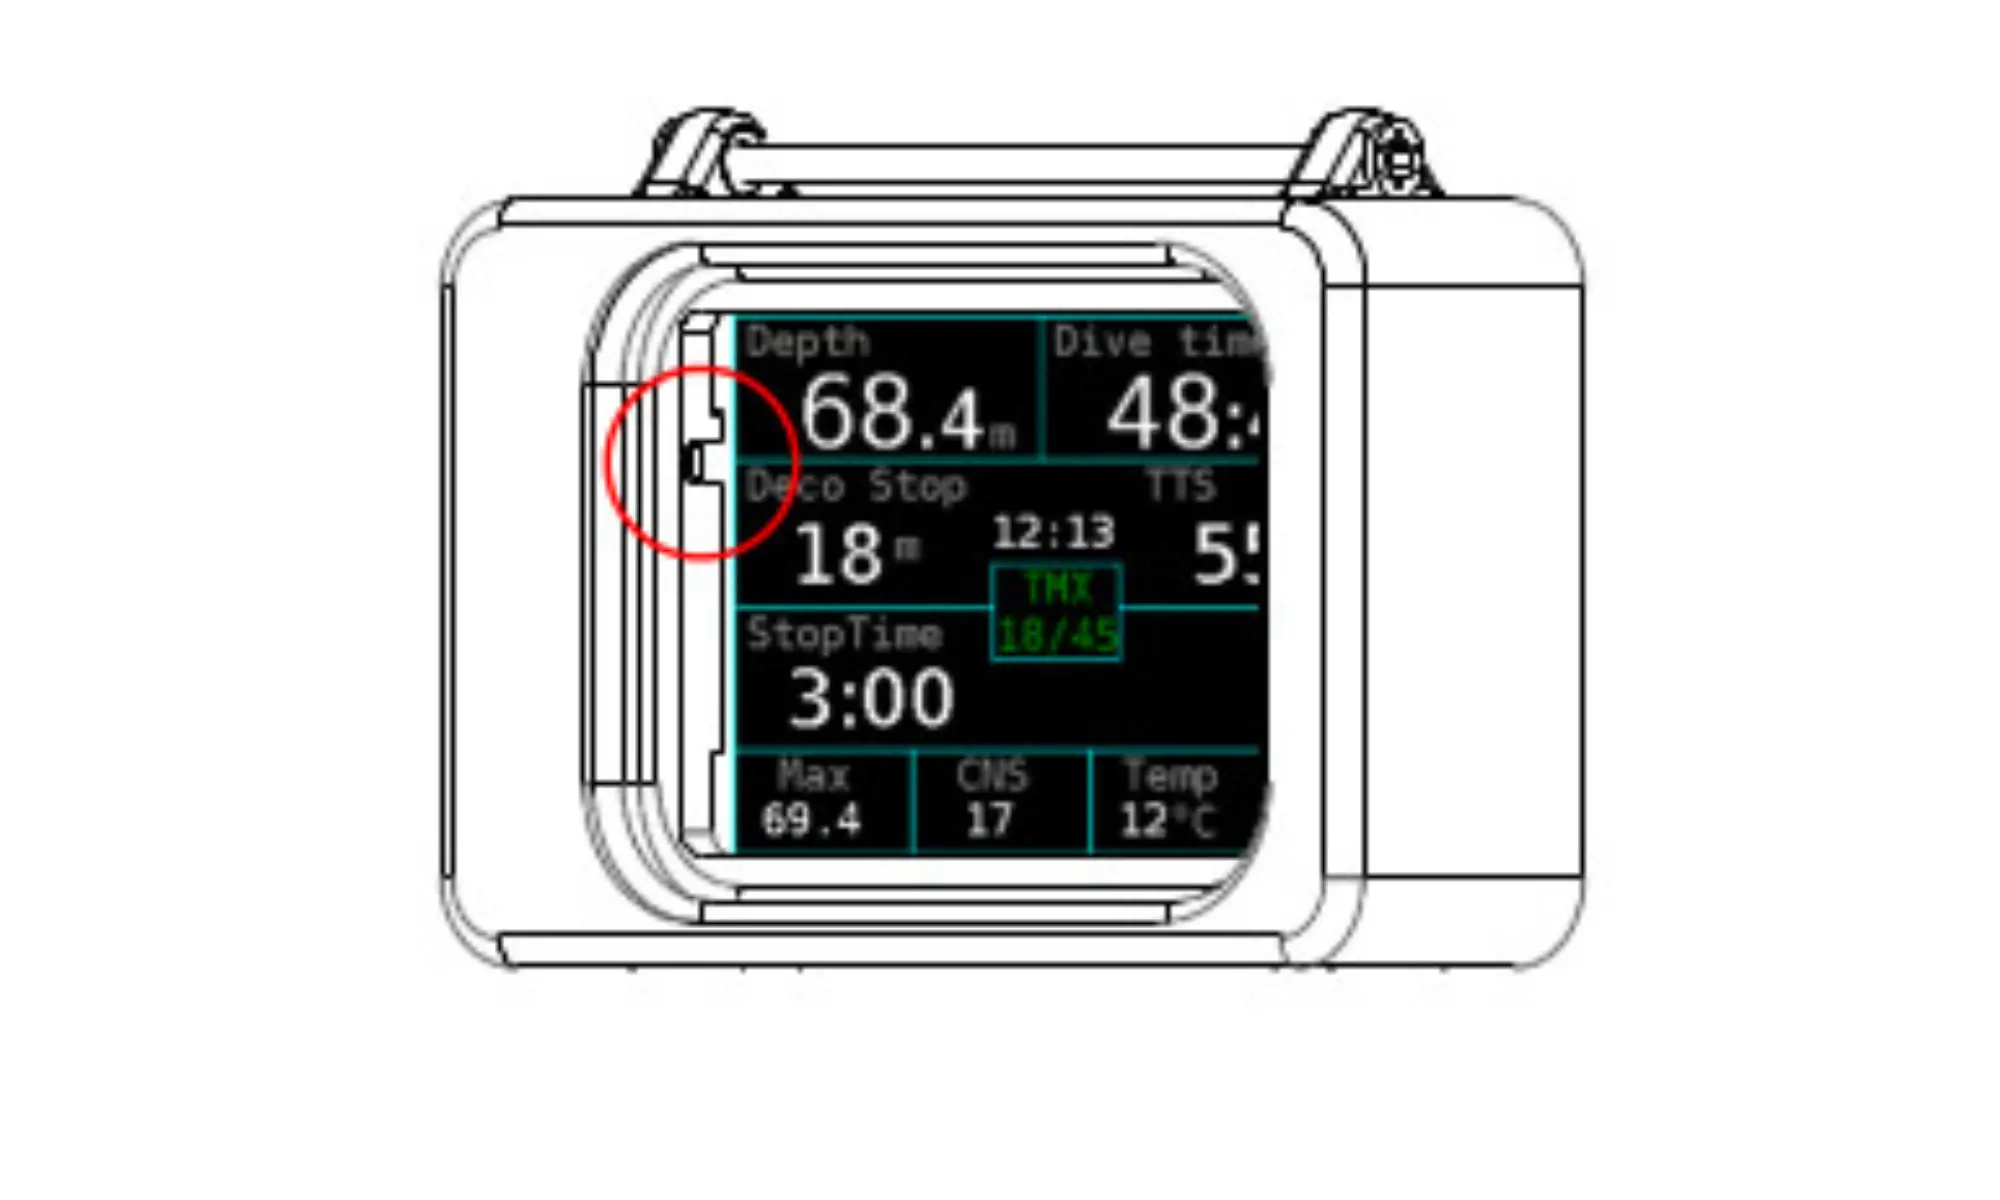
10.3 Control elements
10.4 Physical dimensions
10.5 O2 sensor cable
10.6 Environmental specifications
10.7 Compliance
10.7.1 CE marking
10.7.2 EN 13319
10.7.3 FCC compliance
10.7.4 Industry Canada (IC) Compliance Notice
10.8 Disposal of waste equipment
Introduction
Use of this manual
The Divesoft Freedom is intended for use exclusively by a trained person who is capable of fully understanding the instructions contained in this manual. The technical documentation is subjected to a process of continual development and improvement. Therefore, please regularly check the website at www.divesoft.com for updates. This manual provides operating instructions for the hardware and software (firmware) version of the Divesoft Freedom written on the tittle page.
Safety
Warning: This computer calculates a decompression profile using a mathematical model. It does not know
your specific physiological decompression requirements.
There is always a risk of decompression sickness (DCS) for any dive profile even if you follow the dive plan
prescribed by dive computer. No procedure, dive computer or dive table will prevent the possibility of DCS or
oxygen toxicity!
Warning: Use backup instruments! Ensure that you have access to backup instruments to measure depth
and time. Ensure that you have access to a backup method of decompression profile calculation. Never risk
your life on only one source of information.
Warning: Always check the device before diving in order to ensure that the display works, the device has not
run out of battery power and all settings are correct.
Warning: All software contains bugs and the firmware of the Divesoft Freedom is no exception. The
computer can probably do unintended things.
Warning: This computer may malfunction at any time. The question is not whether it will fail but when it will
fail. Always have a plan on how to handle failures.
Responsibility of the Divesoft Freedom user
A Divesoft Freedom user must accept the fact that diving involves risk. Adherence to everything that the
user has learned in the Divesoft Freedom’s technical documentation and in training can reduce the risk but
cannot eliminate it. Safety when diving is further enhanced by regular training, methodical education and
adherence to good diving practices. Technical diving requires a far higher degree of care and discipline than
recreational diving.
If you do not accept the risk and you are not a trained, careful and disciplined diver, do not dive with the
Divesoft Freedom.
Upgradable computer
The following table is valid only for the original version of Freedom. The Freedom+ is only available in the version corresponding to the Full Trimix license and can be upgraded to the Closed Circuit version.
Features of the Freedom versions
Version                 Mixtures  Air  Nitrox  Oxygen  Trimix  Rebreather

Advanced Bottom Timer   -         -    -       -       -       NO
CCR Bottom Timer        -         -    -       -       -       Yes
Basic Nitrox            1         Yes  max40%  No      No      No
Advanced Nitrox         3         Yes  Yes     Yes     No      No
Full Trimix             9         Yes  Yes     Yes     Yes     No
Closed Circuit          9+8 dil.  Yes  Yes     Yes     Yes     Yes
Hardware of all versions of the Divesoft Freedom computer is the same1 . Only the software differs. The software version can be upgraded.
Pictures in this manual are based on the Closed Circuit version of the Divesoft Freedom. Limitation of other versions are mentioned in the text.
Section 01: Quick start guide
1. Recharge battery
Use the charger that you find in the package or another suitable USB charger or a computer USB port. See "10.1 Charging" for detailed information.
2. Switch on
Hold both buttons until you feel a vibration and the display starts. The computer will be in surface mode in a few seconds.
3. Reset to factory defaults if necessary
It is not necessary to reset a new computer. If you are in doubt about the correct setting, perform the reset to factory default.
Shortly press both buttons to enter the menu. Move the cursor to Setup with the lower button and select with the upper button. Then proceed in the same way to Miscellaneous -> Factory Defaults. Then move the cursor to Factory defaults, select and confirm. Horizontal calibration
starts automatically after the reset. Place the computer on a table and press any key. You will then be asked to place the computer vertically. Place the computer on the only straight side of the device and press the button again.
4. Adjust to right hand if required
Adjust display orientation to your preference. Shortly press both buttons to enter the menu. Move the cursor to Setup with the lower button and select with the upper button. Then select Setup → Preferences → Display → Orientation. (Bottom timer licence: Setup → Orientation)
5. Switch to imperial units if required
Adjust the units to your preference. Shortly press both buttons to enter the menu. Move the cursor to Setup with the lower button and select with the upper button. Then select Preferences → Units.
6. Select wrist mount
If you prefer a strap, attach the strap to the computer. If you prefer a bungee, then remove the screws
holding the bars and pass the bungee through the threaded holes.
See "10.2 Wrist mount" for detailed information.
7. Switch to dive mode
In the menu select Dive → Default (OC). A brief overview of settings will appear. Verify settings and confirm with the lower button.
Now your Divesoft Freedom is prepared for simple dive with open circuit SCUBA using air.
Section 02: Operation
02.1 Control elements
For technical specification of inputs see "10.3 Control elements" in the Hardware section.
02.1.1 Meanings of inputs in surface modes
The keys and other inputs are assigned meanings in connection with the current navigation item in the menu. At the same time, however, general rules, which apply wherever possible, are determined for their use.
Press upper key – confirm the menu item just selected
Press lower key – cycle downward through the menu
Press both keys – exit the menu without performing any action
Long press upper key – page up
Long press lower key – page down
Long press both keys – return to main screen
Coded key press (press both keys, then release one key and press it again, then release both keys) – enter service functions menu
Wherever possible (menu, editing screen), helpful symbols relating to the keys are displayed. A symbol can be either next to a key, indicating the action executed during a short key press, or between the keys, indicating the action executed during a short press of both keys.
The |↓| symbol next to a key means move down one row in the menu. Moving in the menu is cyclical, so the first row appears again after the last row.
Use a long press lower key to move up in the menu.
The |↑| symbol means return one level without executing any action.
The |v| symbol represents confirmation of the action or selection.
The following control is only active if tilt is set in the editing menu (Menu\Setup\Preferences\User inetrface\Navigation\Tilt).
Tilt away from yourself – increase of the entered digit by one or check flag
Tilt toward yourself– decrease of the entered digit by one or uncheck flag
Tilt to the left – move the cursor to the left
Tilt to the right – move the cursor to the right
02.1.2 Meanings of inputs in dive modes
The meanings of inputs are the same as in surface modes. Other possibilities are:
Long press upper key – gas switch shortcut (previous mixture)
Long press lower key – gas switch shortcut (next mixture)
Tilting is expanded with movement in games; otherwise, entry of digits, for which tilting is used in surface modes, is limited during the dive to only special cases.
Tapping on the display glass – switch on the display if it is switched off.
Shining a light on the display – in the dark, illuminating the display with a dive light activates it similarly as when tapping on the glass. In the light, the display can be activated by covering and then uncovering it.
02.1.3 Language
All textual information on the Divesoft Freedom is in English. Controlling the apparatus requires knowledge of the English language minimally at a level that allows the user to thoroughly understand this information.
The language setting can be changed in Menu\Setup\Preferences\Language. Czech, German, Italian, Croatian, French and Spanish are available.
02.2 Brightness control
The 3 levels of the display backlight brightness can be switched by the lower key; the display off, the level set in the Setup → Preferences → Display → Brightness and the maximum brightness (equivalent to
level 9).
If the display is off, then use the short press to switch it on. The second and subsequent press with a short delay between presses (< 1 s) switches the brightness level.
The display can’t shine through disturbed silt or mud on low brightness. If it is necessary to switch to the maximal brightness just short press the lower key repeatedly. The maximum brightness will be set after two
button pushes (if the display was off in the beginning) or three pushes (if the display was on).
Adjusting the function of the lower button may override the brightness control.
"Lower bttn." to ""Prev Scr"
"Stopw btn." to "Base" or "Always".
The setting is placed in the same place as the Lower bttn.
BottomTimer: Setup -> Preferences -> Lower bttn.
Other licences: Setup -> Preferences -> User interface -> Lower bttn.
See also Advised strategies – "3.7.1 Diving in darkness". This way of brightness control works in all modes except gauge and free mode, where lower button is assigned to stopwatch.
02.3 Switching on the unit
The device is switched on by pressing both keys for three seconds.
Automatic activation occurs in the event of entering the water in standby mode. If submerged to a depth greater than 1.5 m, the computer switches to default mode (OC in the default setting, can be changed in Setup → Preferences).
Automatic activation is not immediate, it is necessary to wait a few seconds. The computer may be switched on automatically in higher depth if a descent is rapid. It does not affect the decompression calculation but the first few seconds of the dive profile record will be lost.
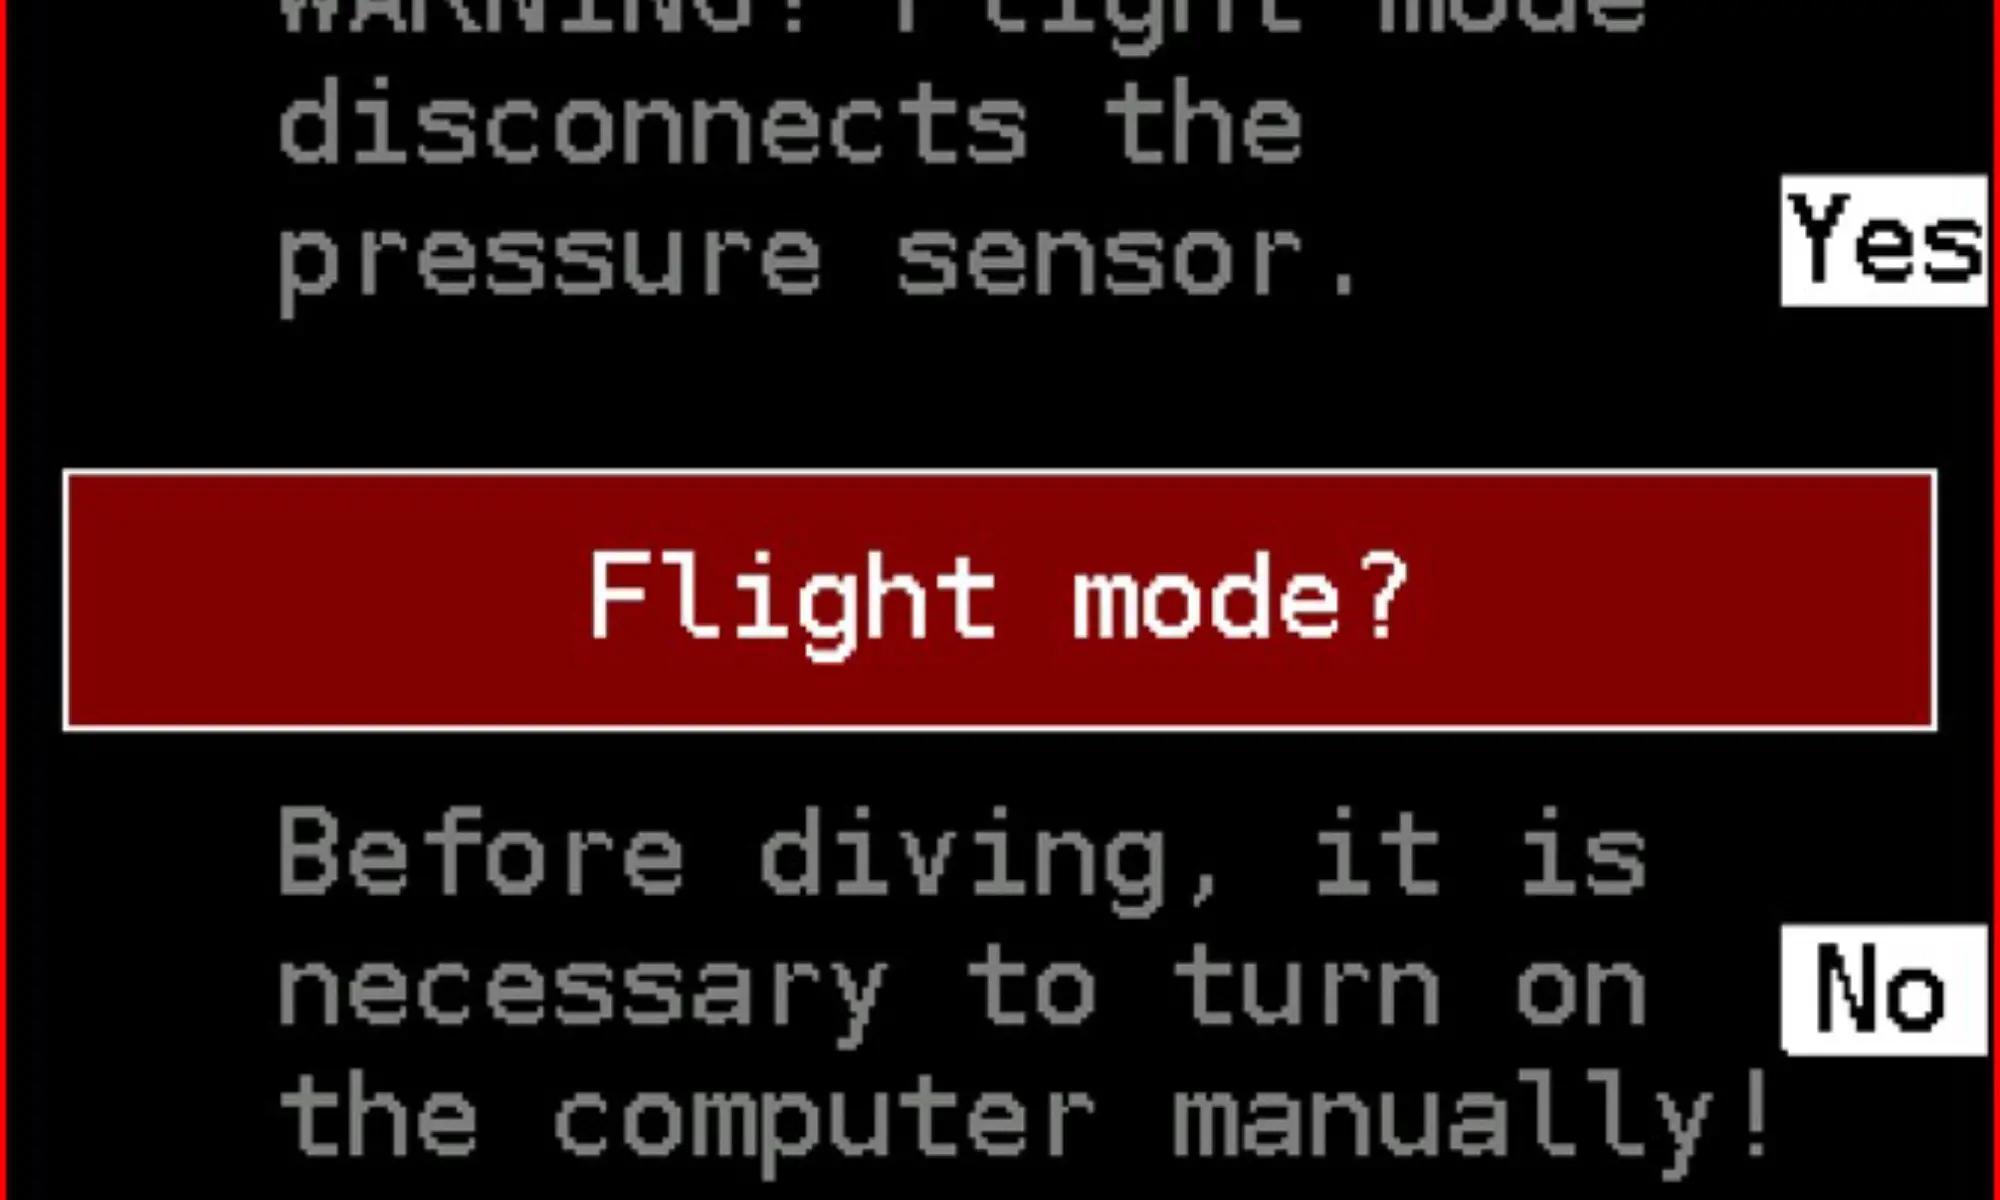
The automatic activation on submersion is disabled when switched to the flight mode.
In case the diver forgets to switch on the computer after a flight the computer will switch on at 5 m depth within 1 minute.
02.4 Switching off the unit
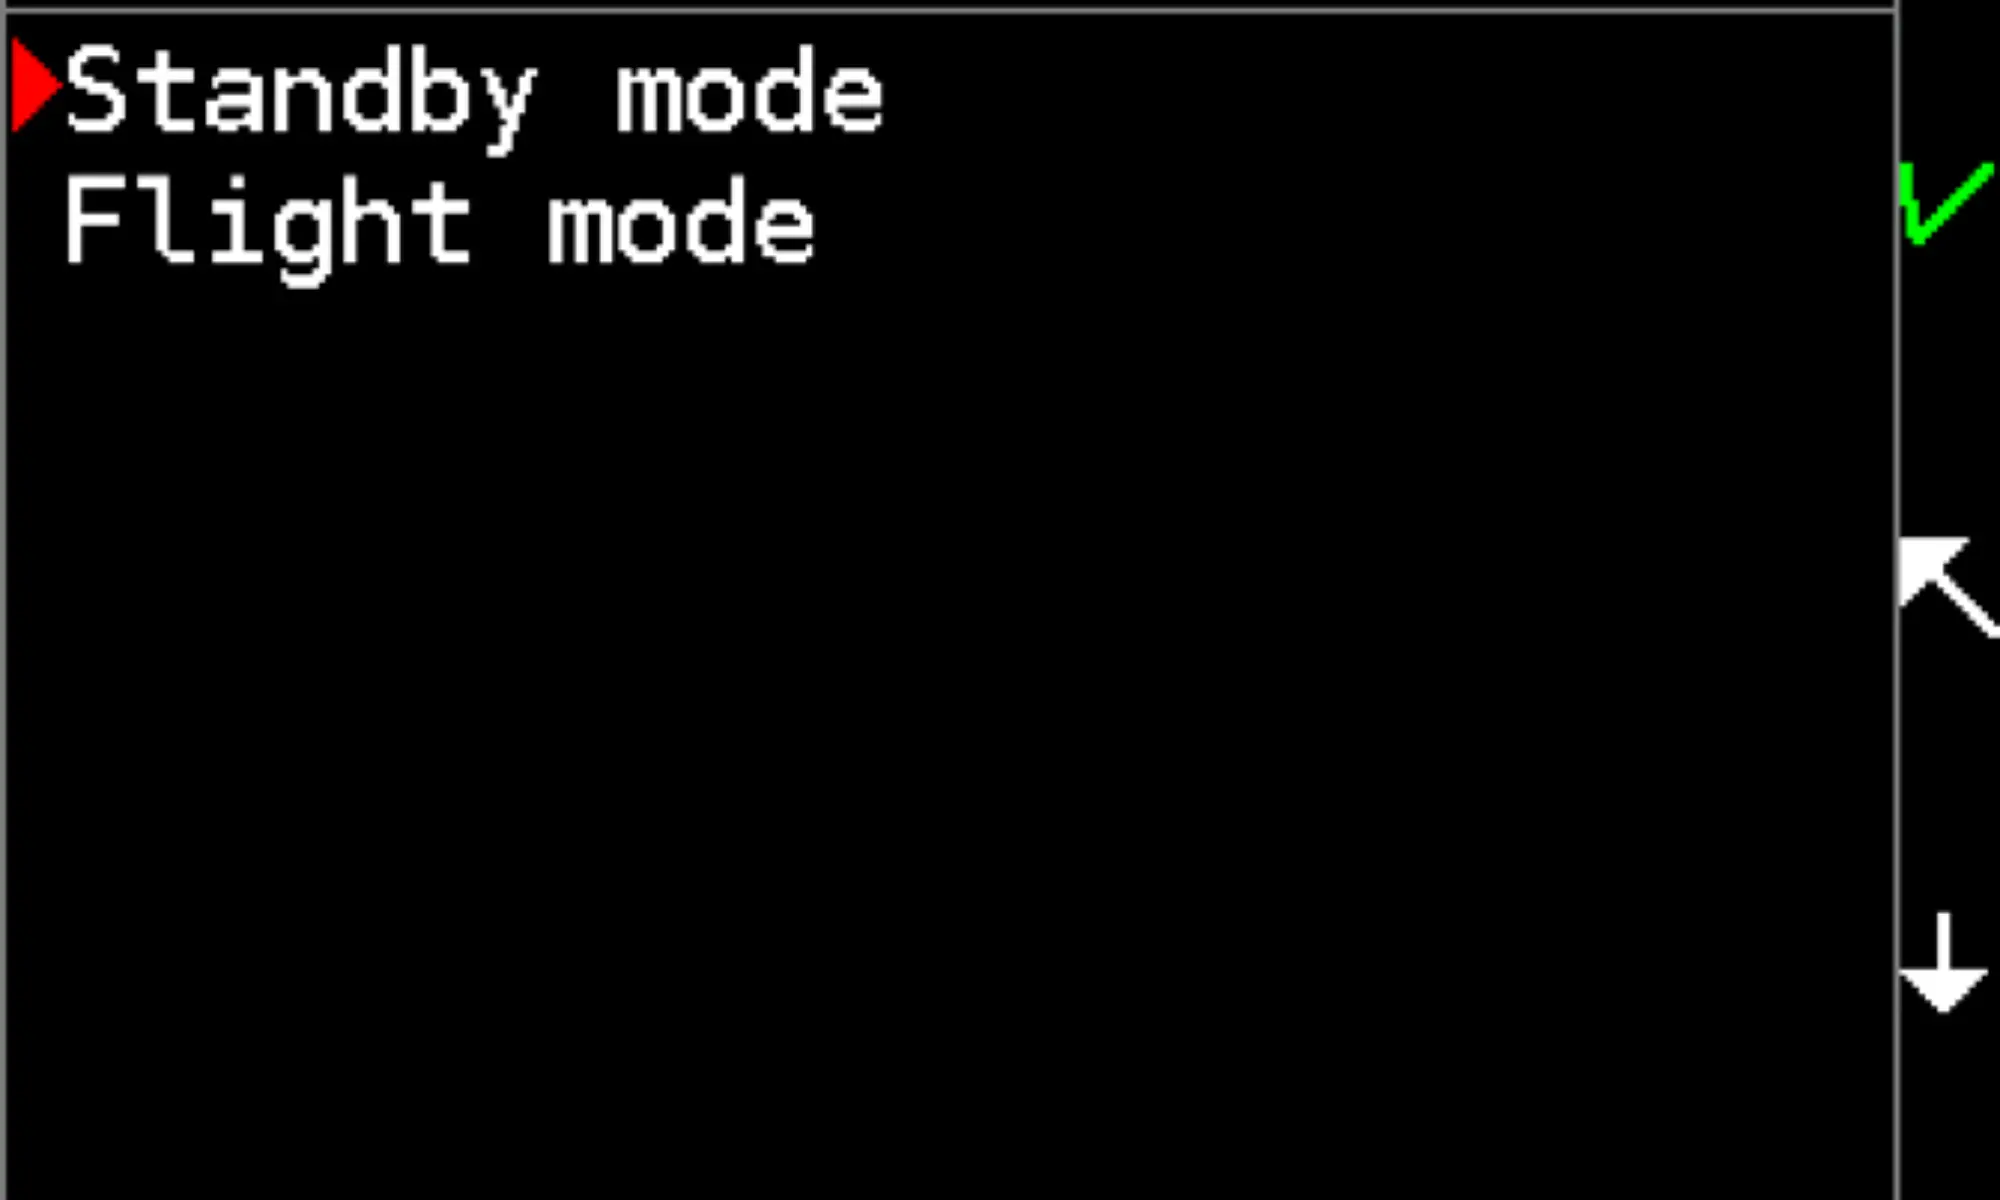
Enter the menu from surface mode, select Switch off and Standby mode in the second menu.
Or you can select Flight mode in the second menu. This prevents an automatic activation due to a rapid pressure change and confusion of the surface level detection algorithm.
You can switch off directly from dive mode while on the surface. This way the unit will be switched to standby mode, so automatic activation by submersion is enabled.
The other way to switch off is by waiting for a timeout.
Upon surfacing the Freedom will switch to surface mode after time set in the dive termination timeout. Then it will switch to standby mode after time set in the surface idle timeout. Pushing any button restarts the idle timer in the surface mode.
Section 03: Diving
03.1 Surface mode
The surface mode is indicated by the gray table gridlines.
03.1.1 Entering surface mode
The Divesoft Freedom switches to surface mode upon being switched on.
03.1.2 Surface mode screen
Date and Time
Maintain correct local time setting. It will be used for log recording.
The date format can be set in
Setup -> Miscellaneous -> Date format
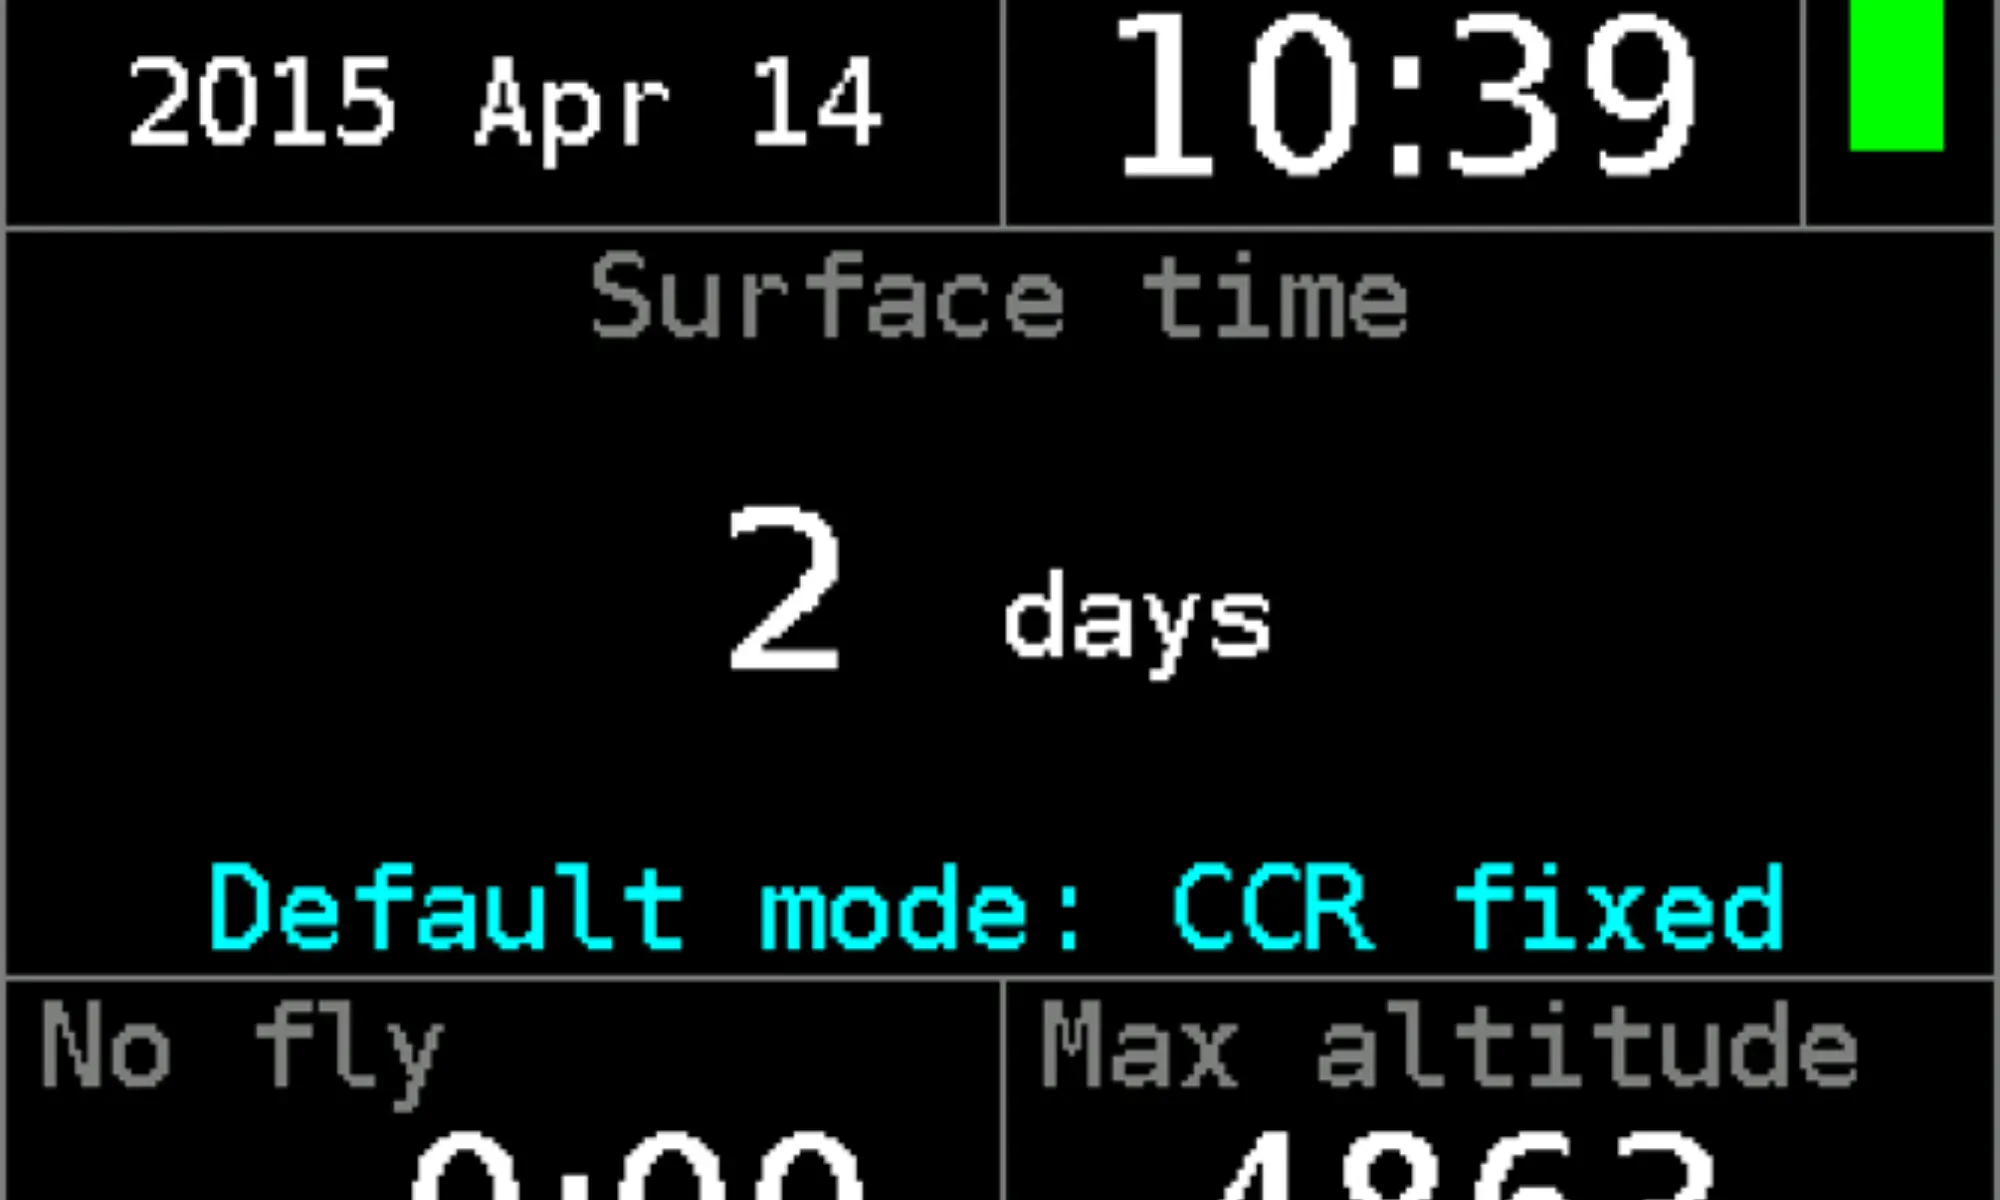
Surface time
The time from a previous dive. If it was 99 days ago or more, then FREEDOM banner appears instead of the time.
Default mode
The dive mode, to which the Freedom will be switched if submerged to a depth greater than 1.5 m.
No fly
The calculation of the no fly time is based on the maximum allowed altitude according to the Bühlmann’s decompression algorithm ZHL. The air pressure in the cabin of a commercial aircraft is maintained at a level corresponding to air pressure at 1800–2400 m (6000–8000 feet) above sea level while cruising altitude falls in the range 11 000–12 200 m (36 000–40 000 feet).
The no fly time calculation uses the decisive altitude 4464 m (14 646 ft). At this altitude compartments containing the oxygen masks will be opened automatically and the oxygen masks will drop down in front of the aircraft passengers.
Max altitude
The maximum allowed altitude calculation is based on the ZHL decompression algorithm with an additional safety margin (GF = 0.80).

Battery symbol
A graphical indication of remaining battery capacity. The estimated capacity of full battery is about
20 hours.
For detailed information see the battery screen in the system check.
03.1.3 Switching to other modes
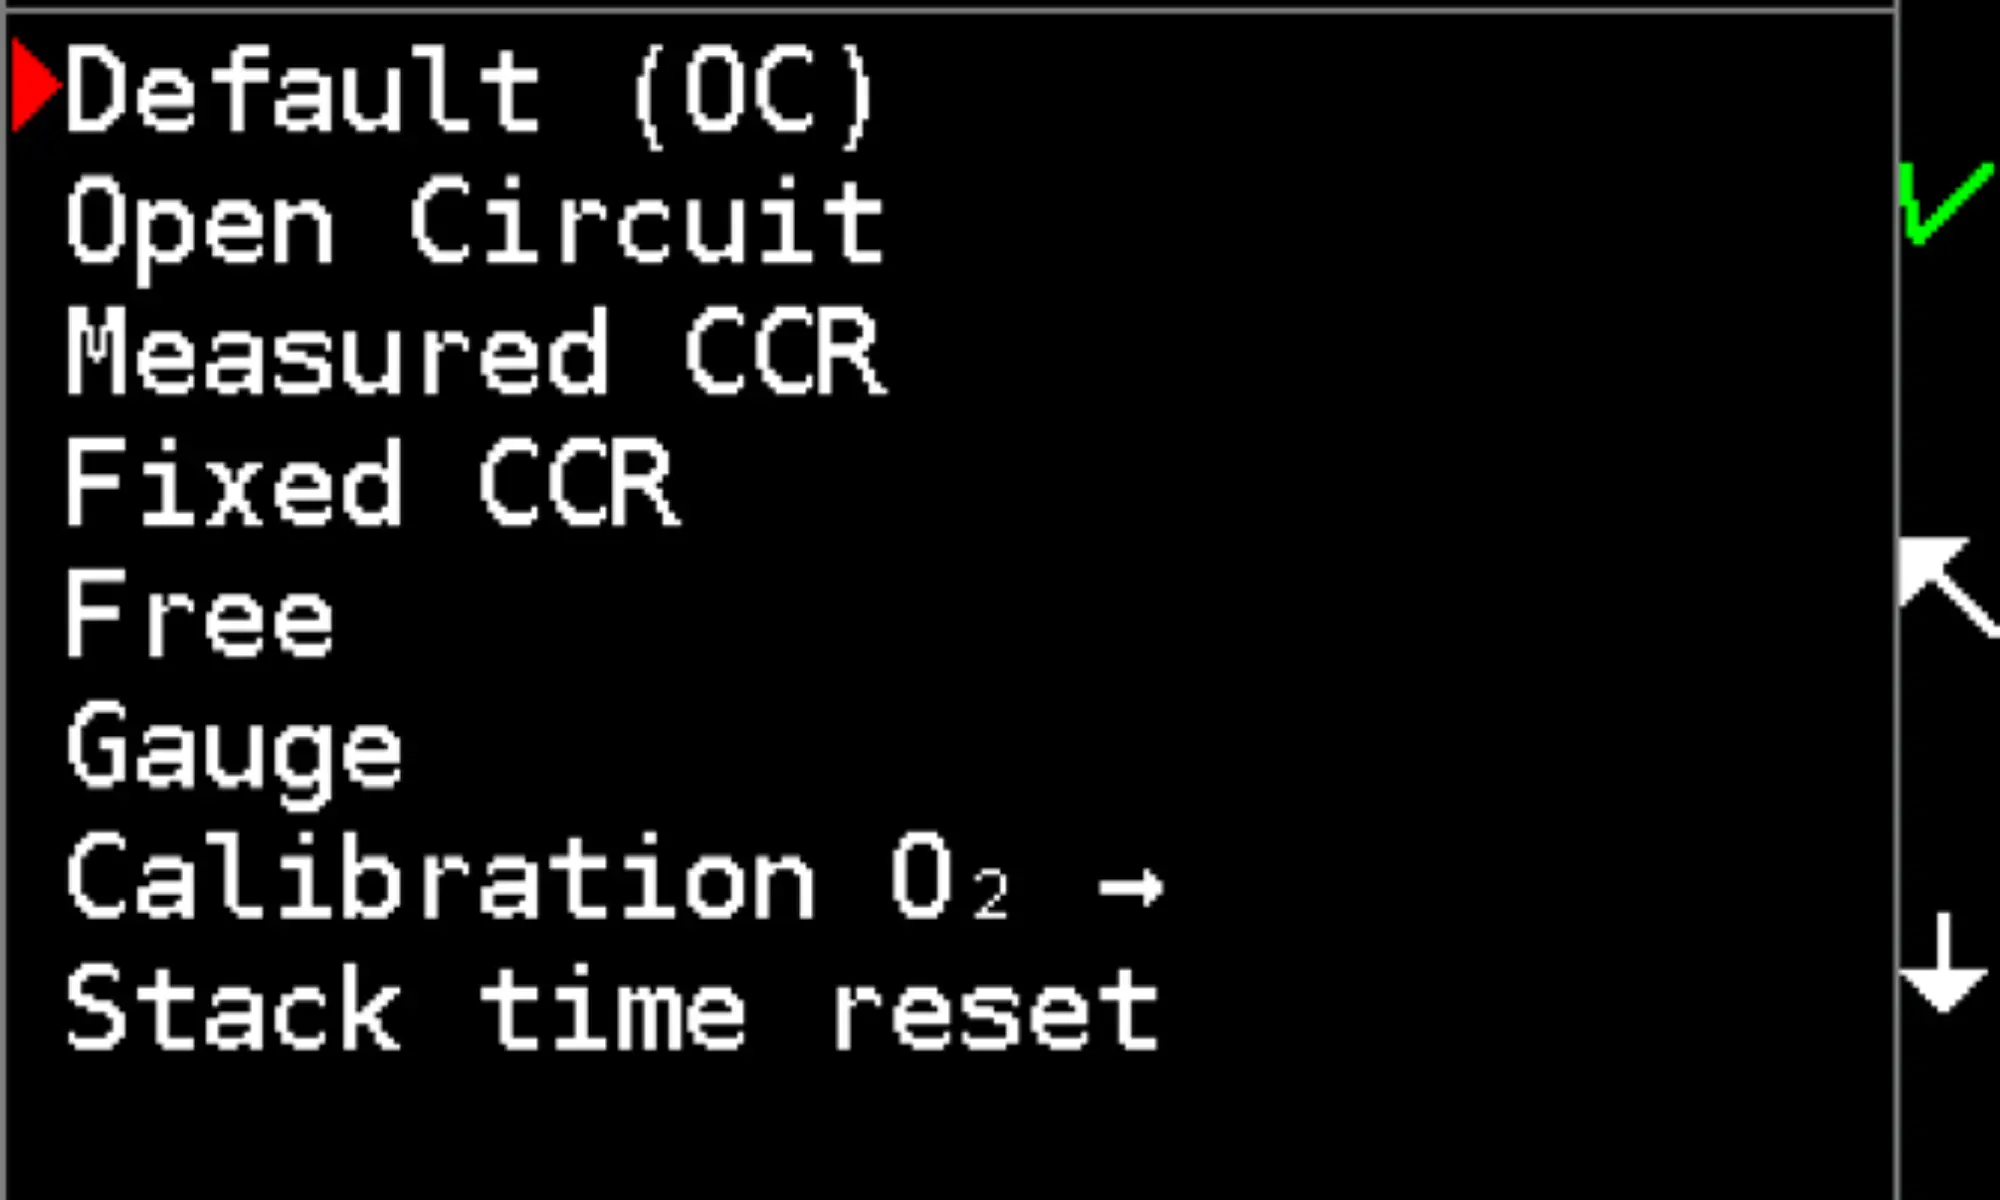
In the menu → Dive, the user can switch from surface mode to open
circuit, rebreather, gauge and freediving modes.
A dive mode cannot start while the Divesoft Freedom is connected
to USB port or charger. See also Powering in hyperbaric environment
(See section 10.1.1).
The Freedom computer can also be switched to the service menu.
See chapter "8.2 Service functions".
03.2 Open Circuit
The open circuit mode is indicated by the blue table gridlines.
03.2.1 Entering open circuit mode
Open circuit mode can be entered from the menu in surface mode, by automatic activation after submersion (if set as the default mode) or as a bailout from CCR mode (the Close Circuit version only).
03.2.2 Detailed screen
The primary screen displays all necessary information during a dive.
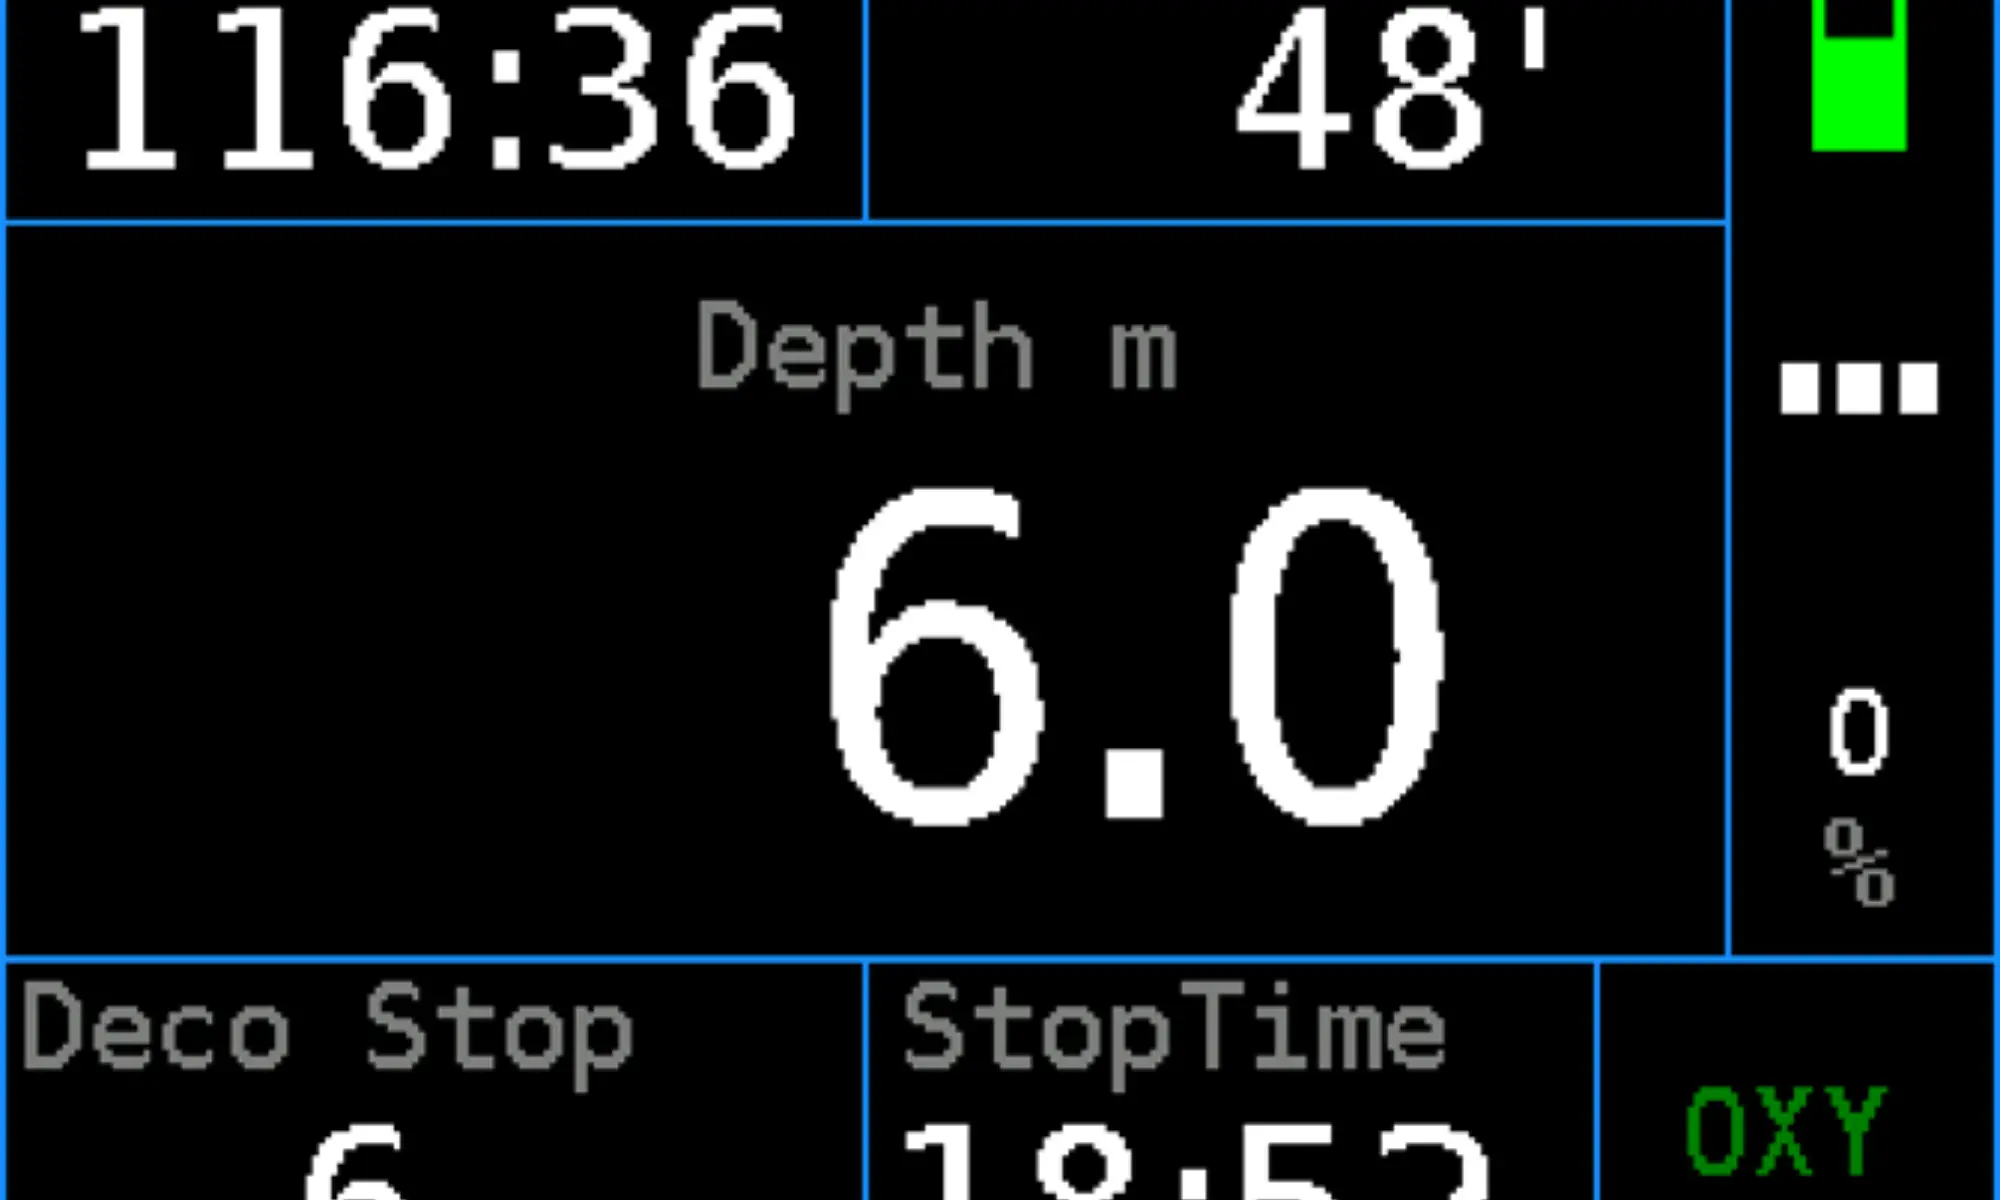
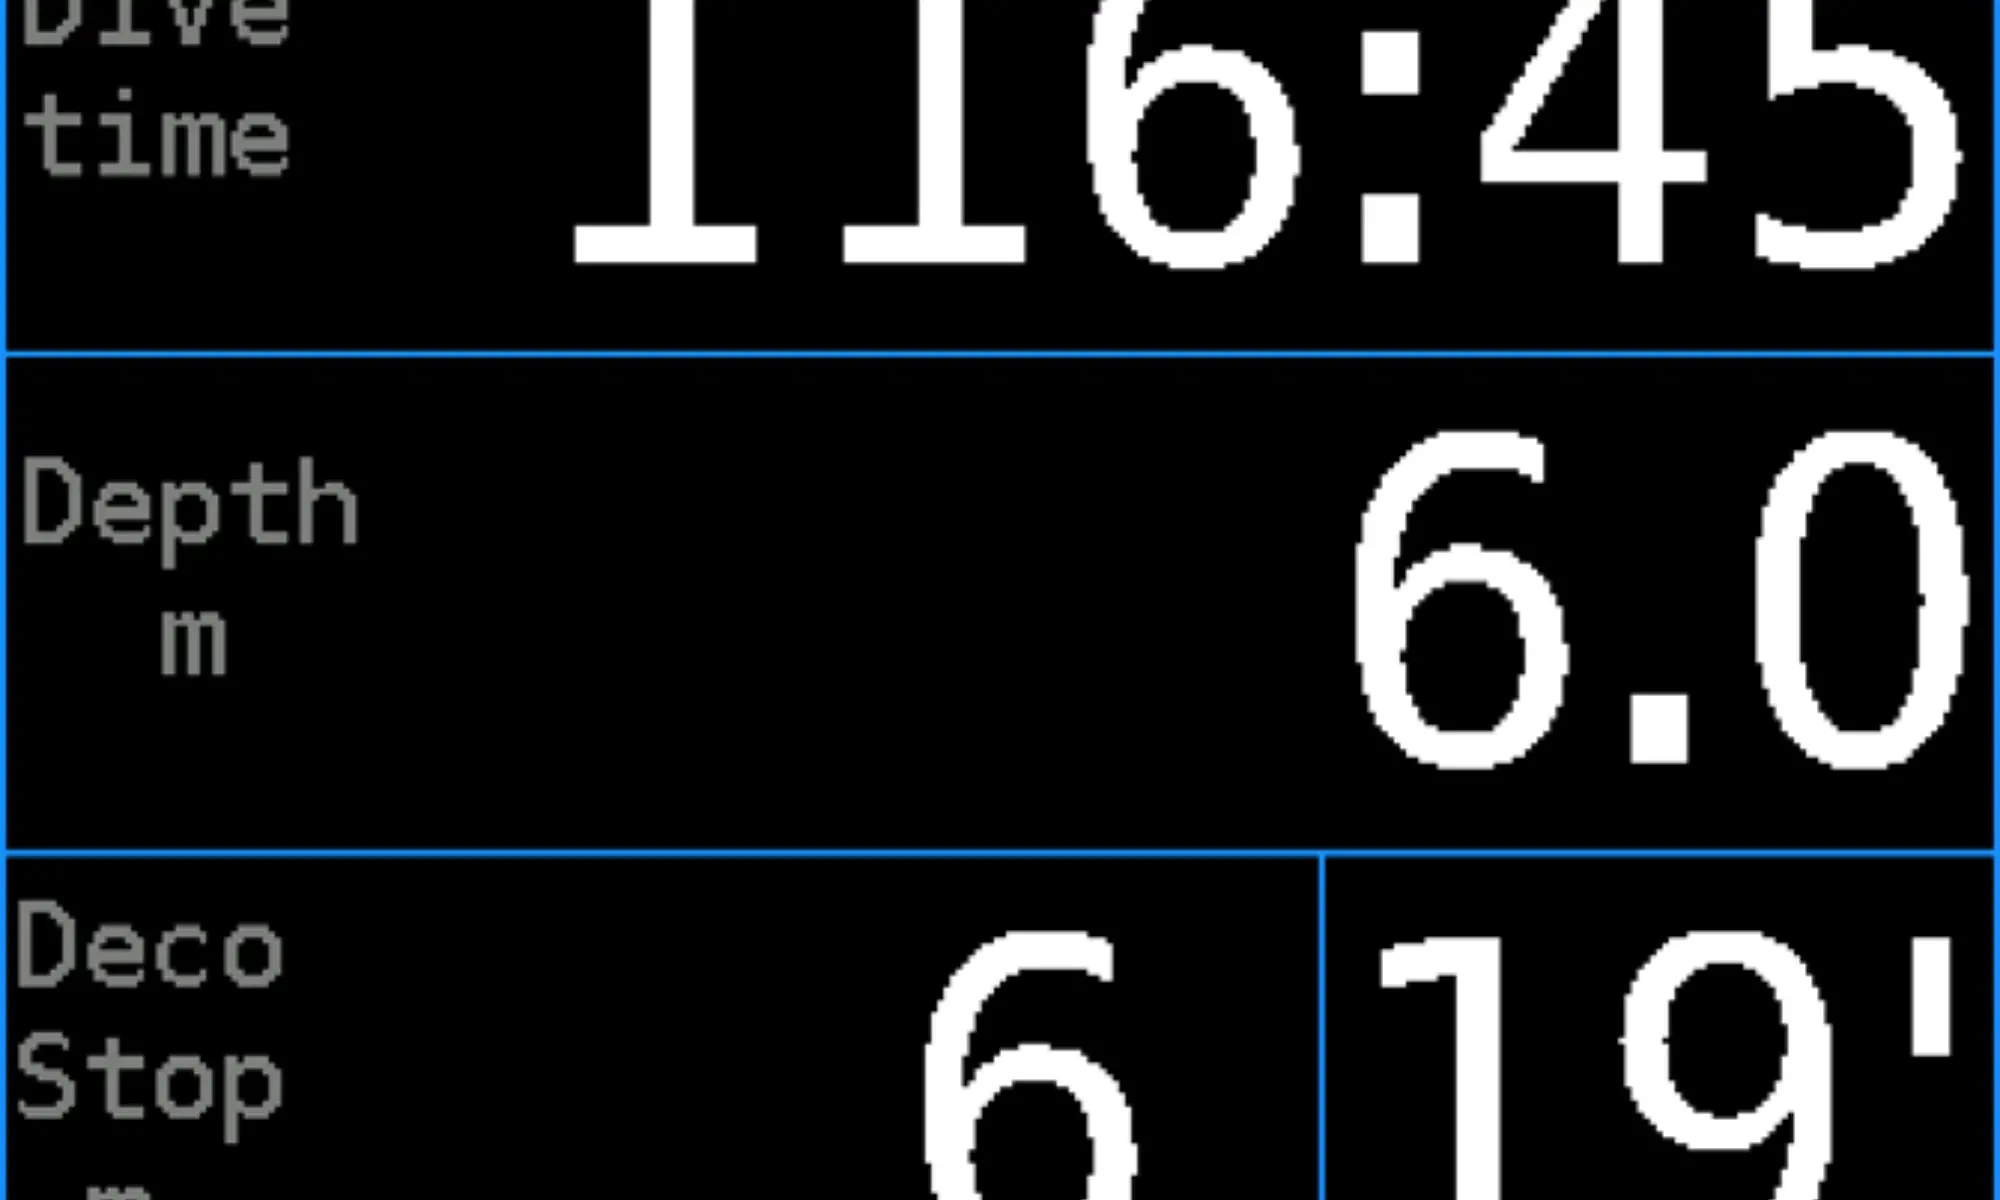
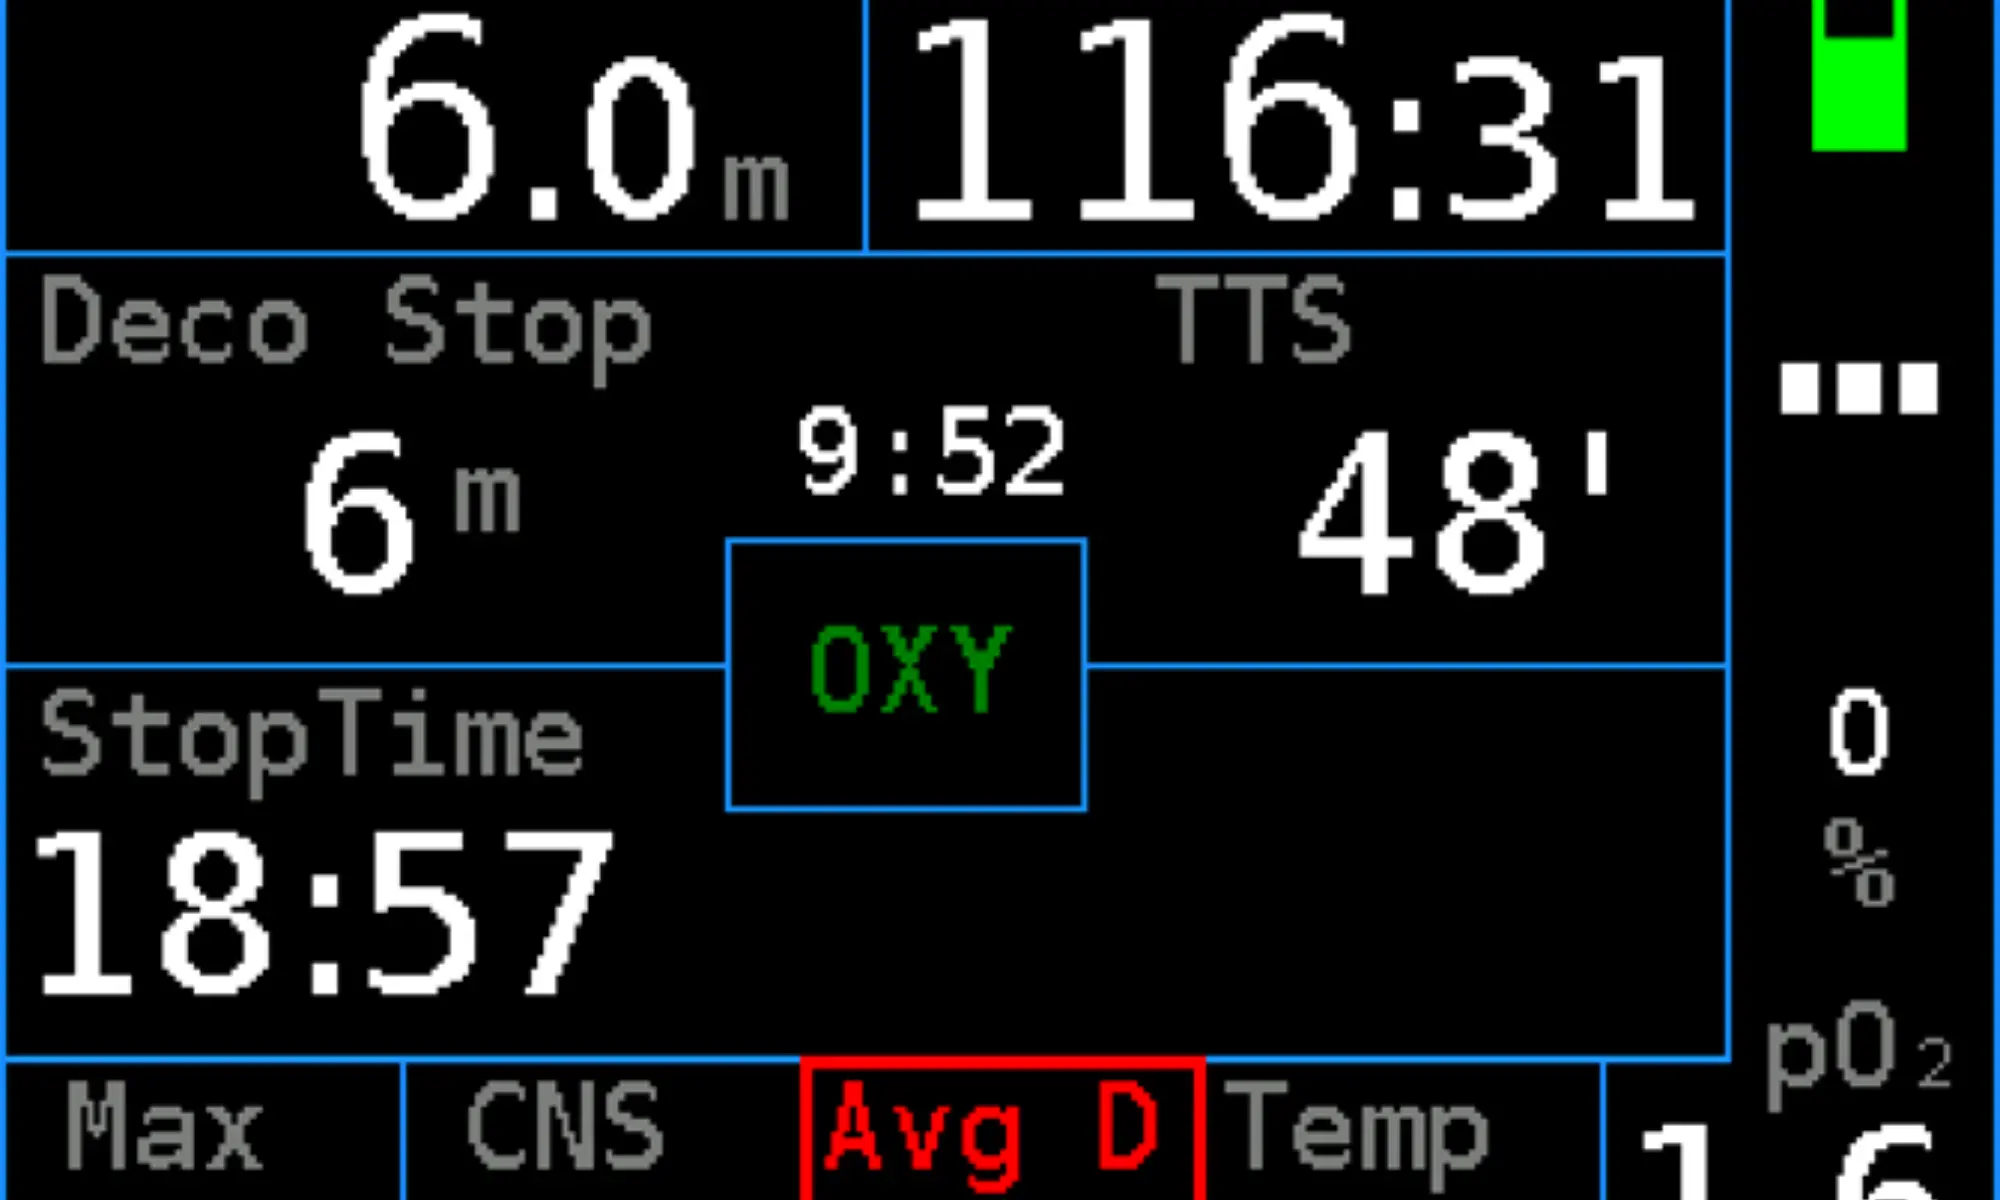
Depth
The depth can be read in the units set in the setup (m or ft). Depth
is calculated from measured hydrostatic pressure. Fresh water
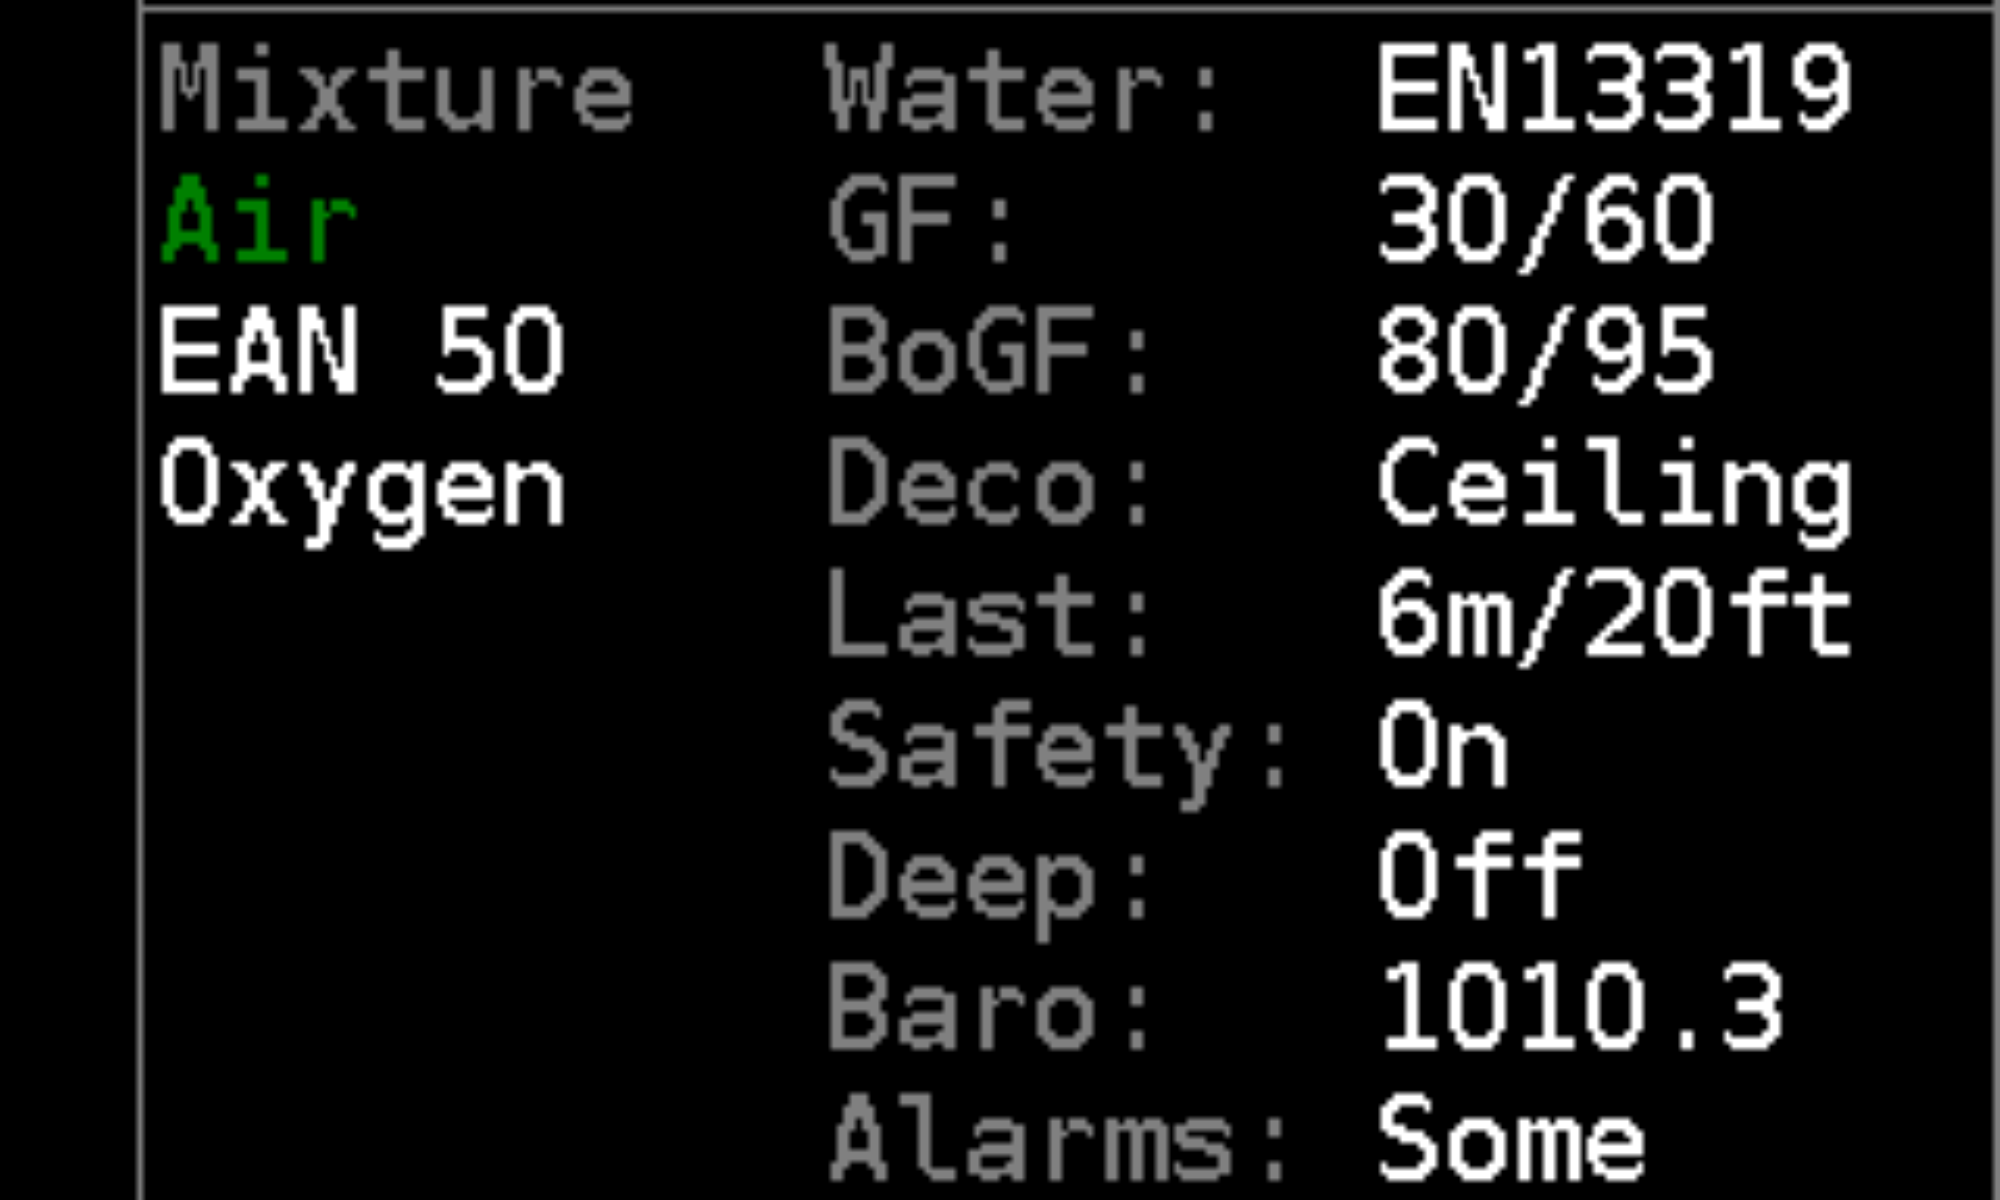
(default) or seawater density can be set for the depth calculation. In the salinity setting you can select fresh water, salt water and EN13319. The salinity EN13319 is a value between fresh and salt water and can be set universally for all water types.
Water density:
Fresh water 1.000 g/ml
EN13319 1.020 g/ml
Seawater 1.028 g/ml
Setting of fresh/sea water doesn’t affect decompression calculations. Decompression is based on ambient pressure and is independent of displayed depth. Only depth of decompression stops is rounded up to usual values according to settings of fresh/sea water and metric/imperial units.
Dive time
The timer starts after submersion (depth > 1.5 m) and halts after surfacing (depth < 0.5 m). In case of
stay on the surface (or at very shallow depth) followed by a second submersion (during a time set in the
dive termination timeout) the dive time indicated will be the time from the first submersion including the
surface time.
However, if the Dive time setting is set to CAVE, the time does not stop even when surfacing. This setting takes into account crossing the dry parts of the cave behind the siphon. Setup/Preferences/Timeouts/Dive time -> CAVE
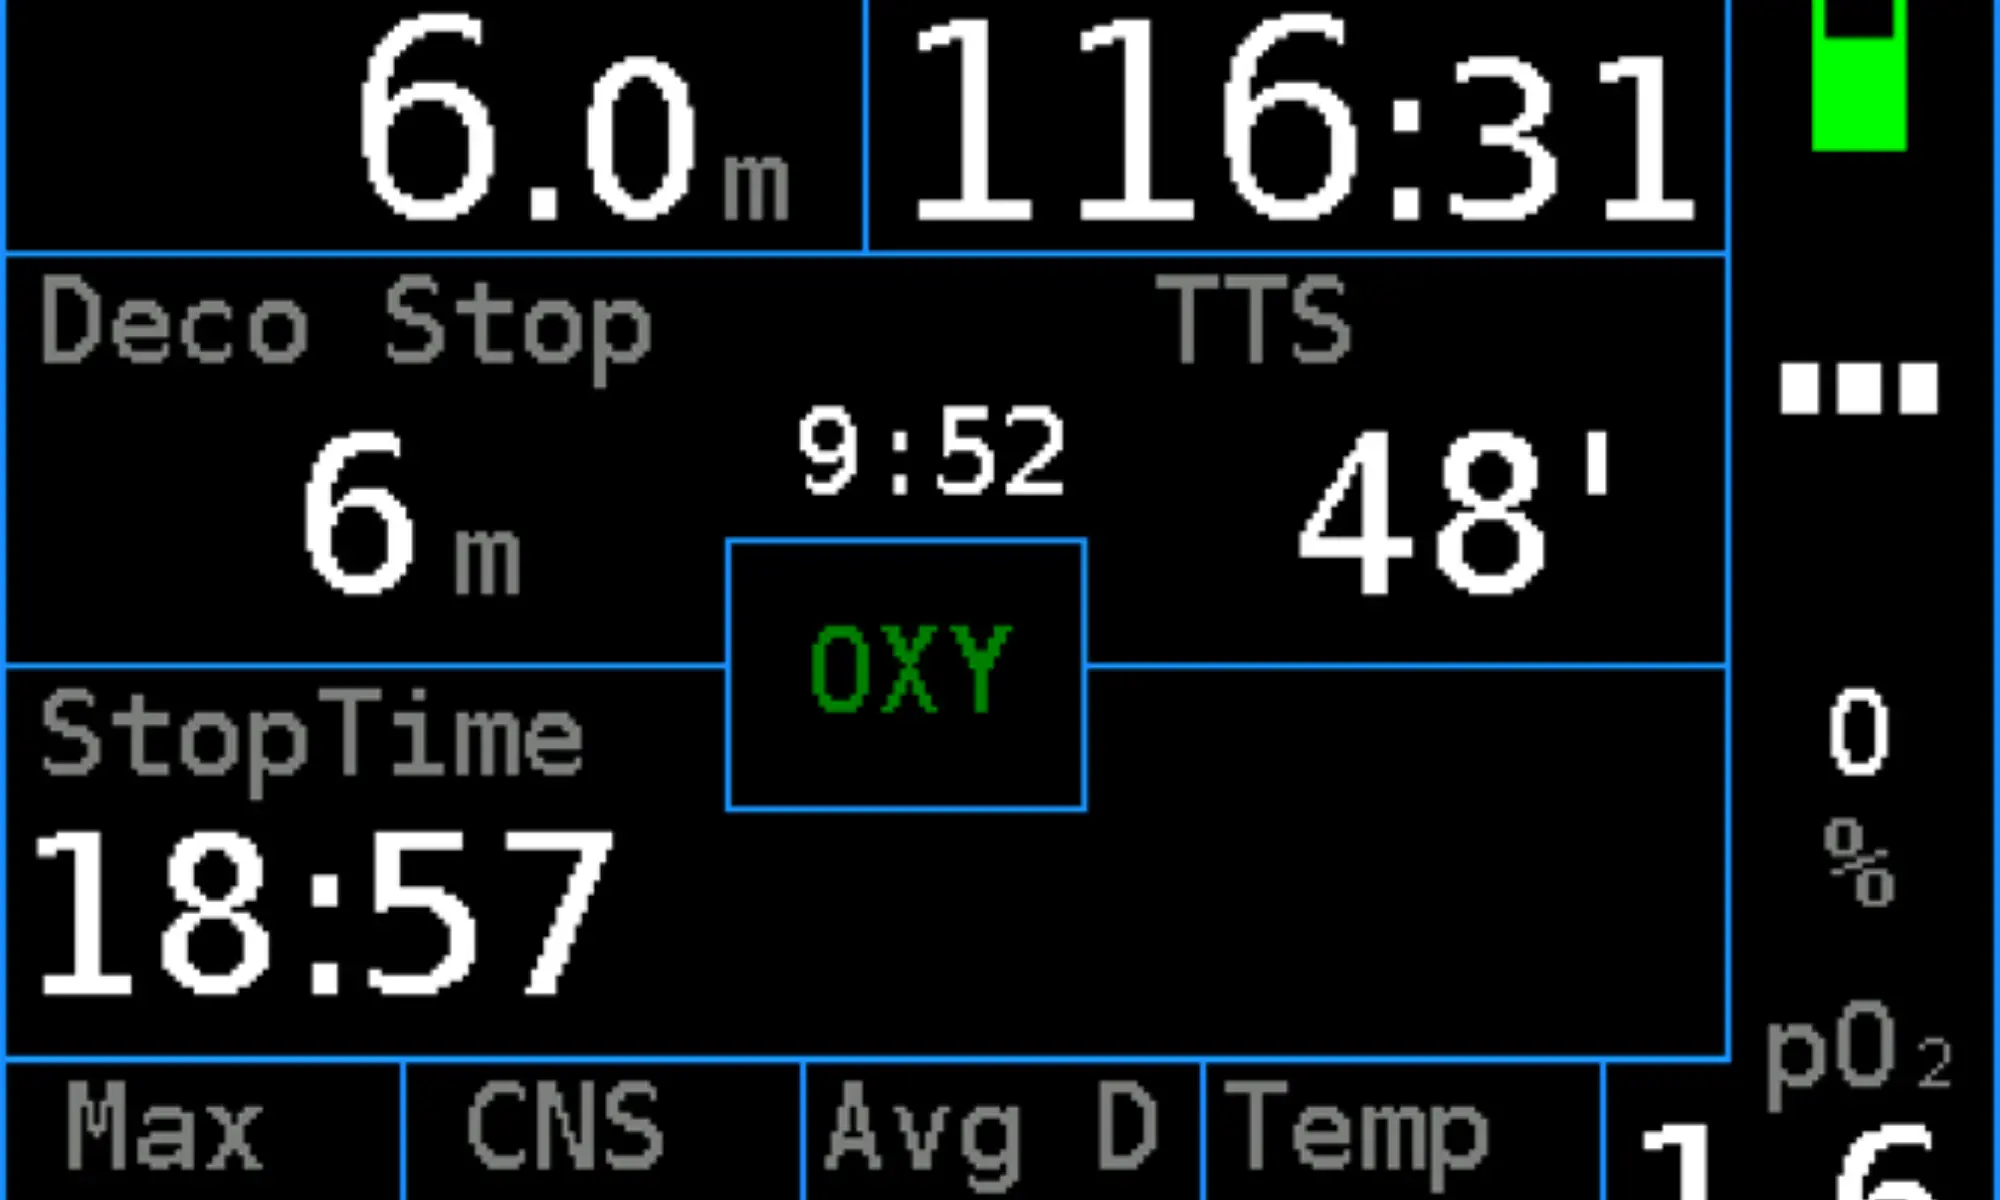
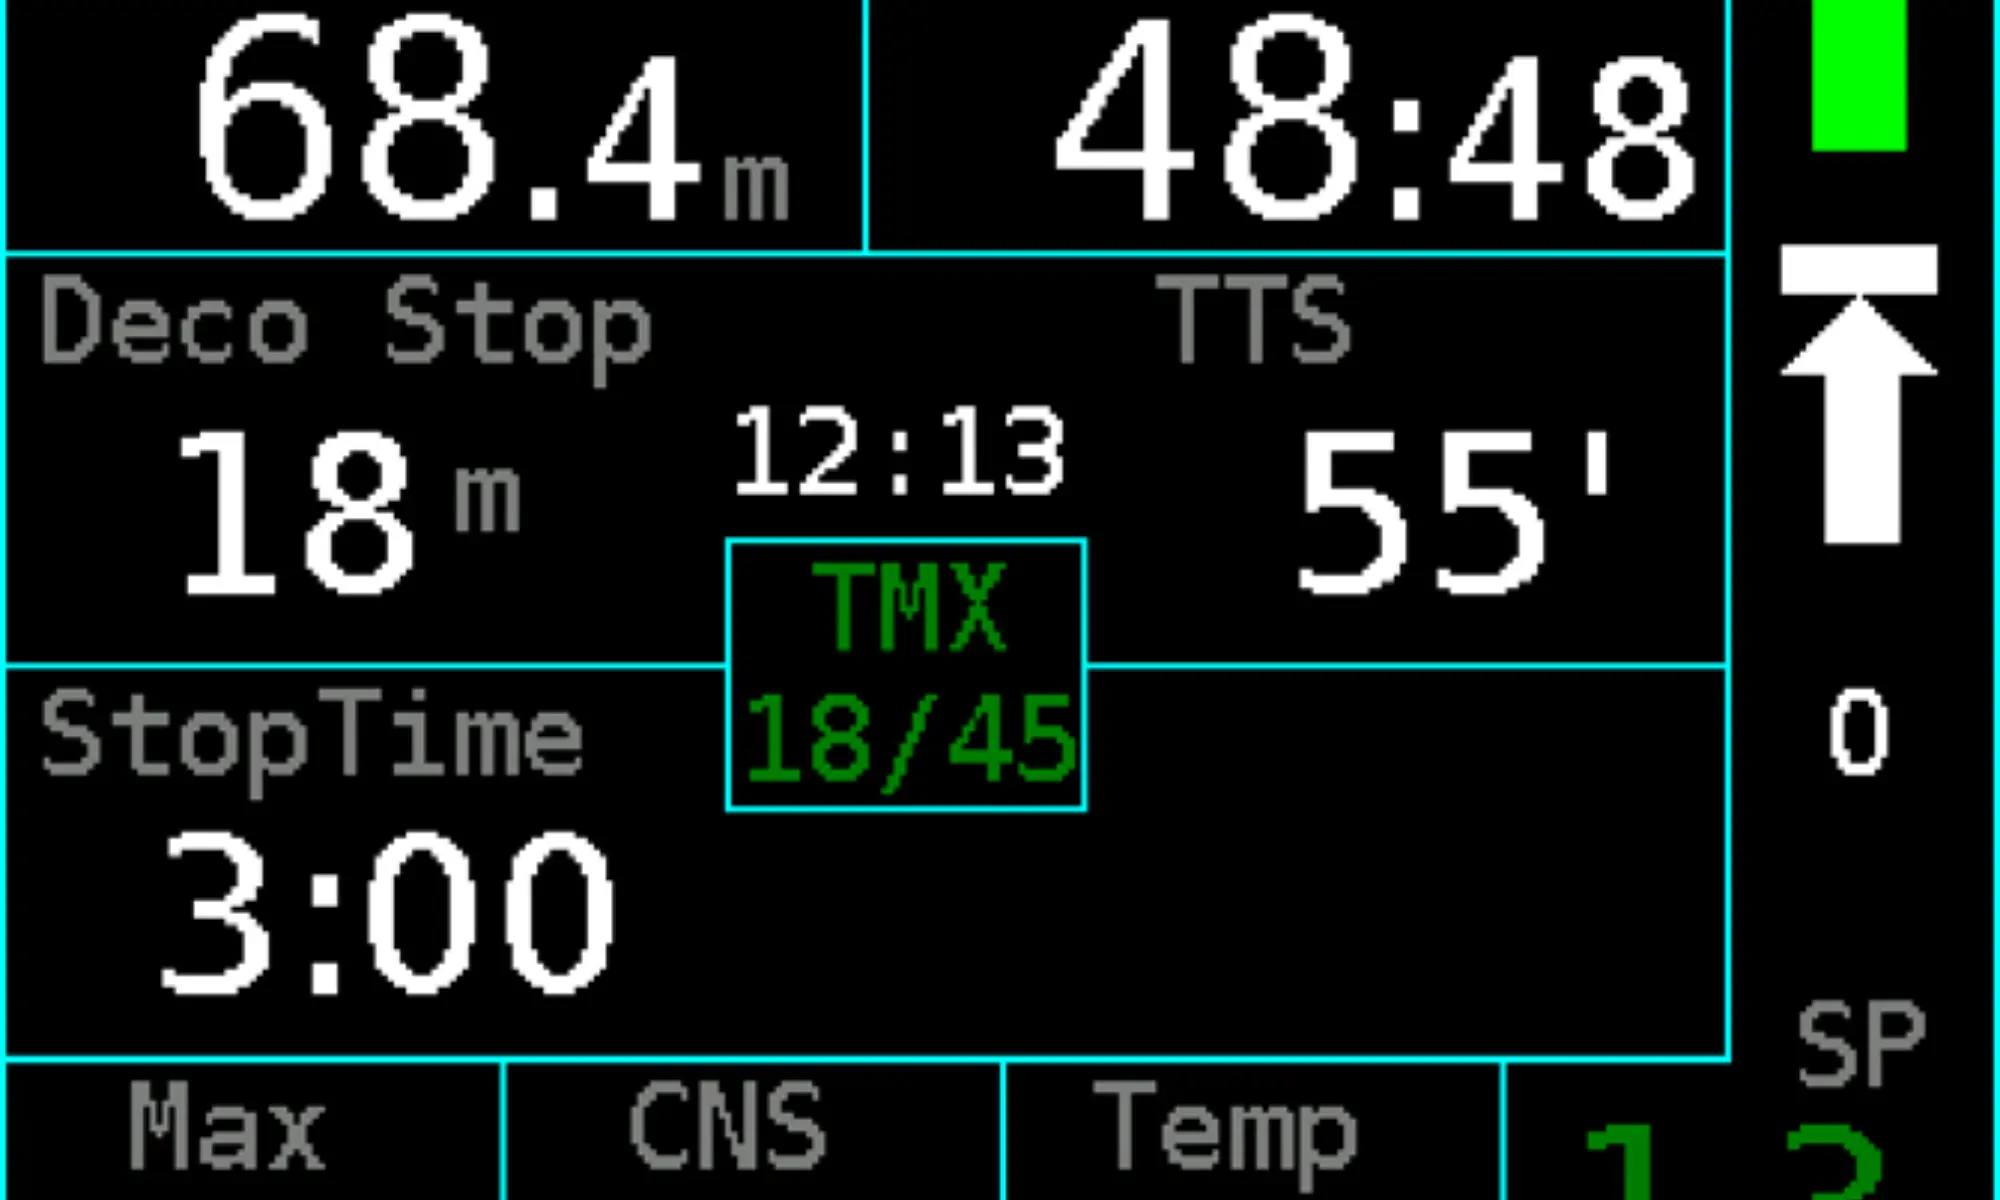
Deco Stop
Alternatively, "Gas switch" will be displayed if it is a gas switch stop
The depth of the decompression stop can be read in the units set in the setup (m or ft). Last stop depth
depends on settings.
The Deco Stop value is shown only if the stops decompression regimen is set. See Setup → Decompression
→ Deco stops (See section 4.2.4).
Stop Time
Length of the decompression stop at the Deco Stop depth. While on stop, there is a countdown timer here.
Rounding of the decompression stop length depends on setting.
The Stop Time value is shown only if the stops decompression regimen is set. See Setup → Decompression
→ Deco stops (See section 4.2.4).
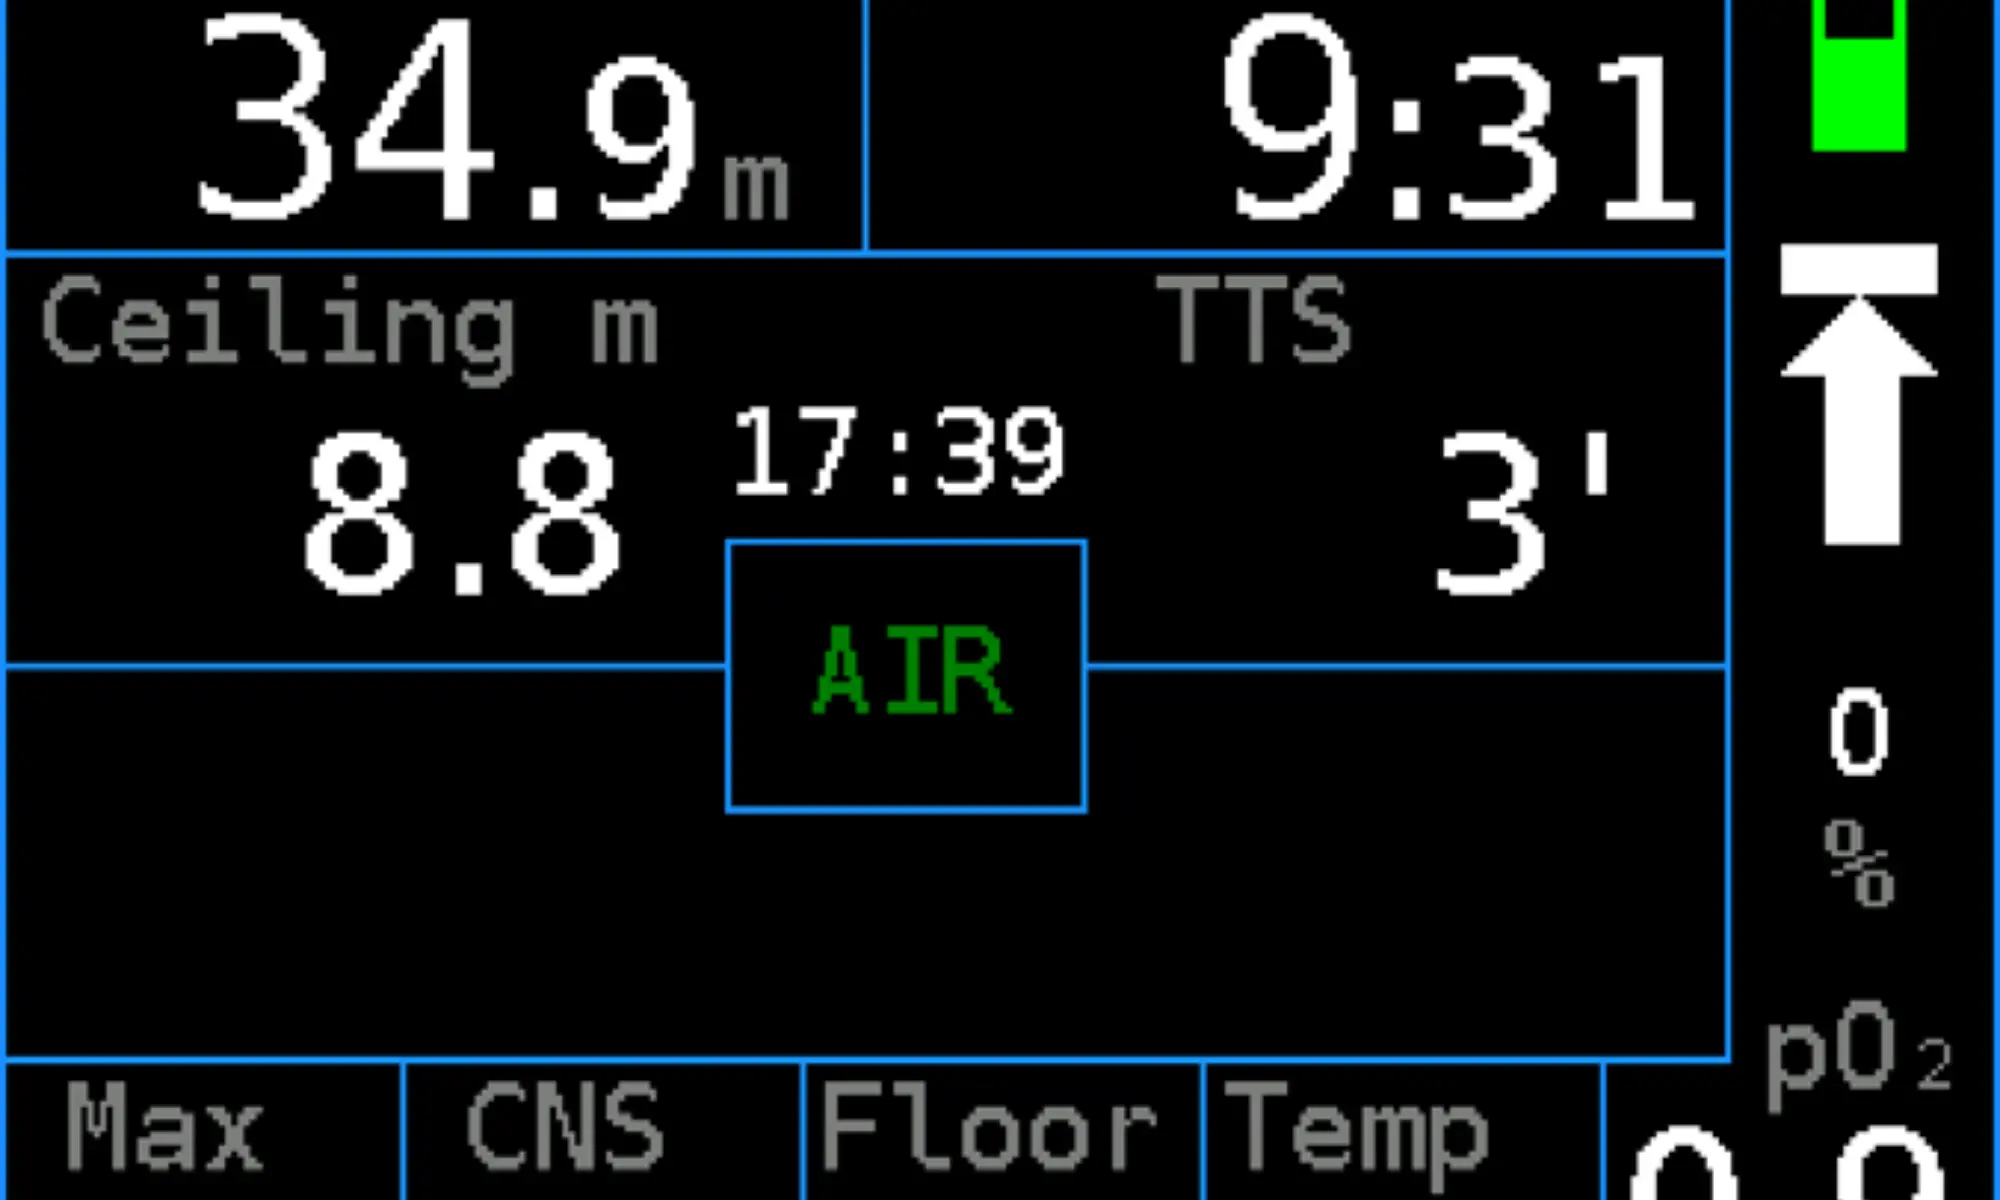
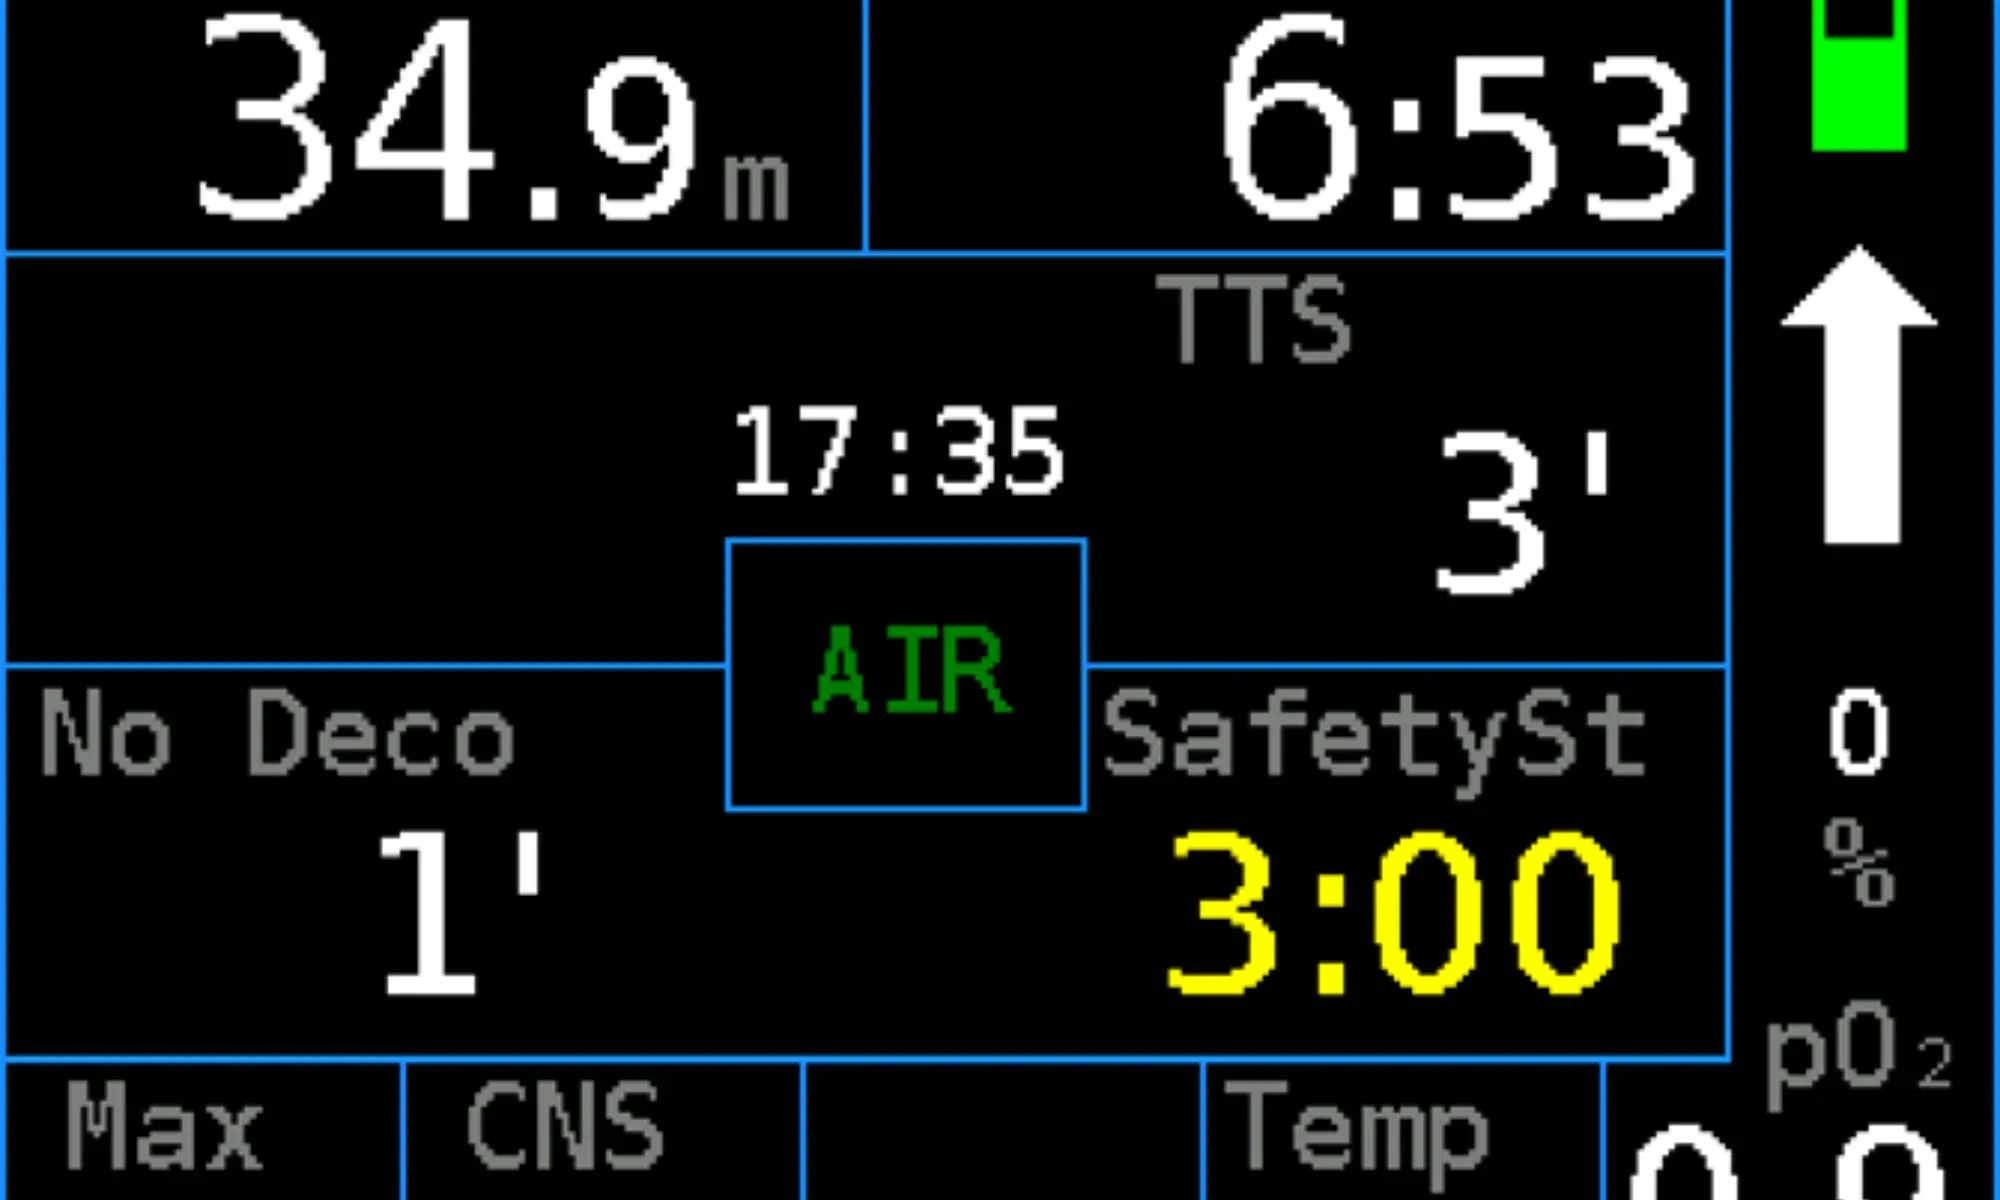
TTS
The time to surface (TTS) includes the complete decompression profile. If optimal gas is selected in the
decompression settings, then the TTS considers changing of gases from the list of active mixtures; the gas
switch time is included.
If the current gas setting is selected in the decompression settings, then only the actual gas is used for
a TTS calculation.
Ceiling
The ceiling value is shown only if the ceiling decompression regimen
is set. See Setup → Decompression → Deco stops (04.2.4).
The depth of the decompression ceiling decreases continuously up to
the surface. The reading is not artificially stopped anywhere during
the ascent. Always stay below the depth of the ceiling, even if the
ceiling depth is very shallow.
Ascent above the ceiling generates a warning. Further violation,
more than 1 m (3 ft), leads to an additional alarm. Both alarms are
logged. The Freedom will continue in open circuit dive mode. It will
not switch to a gauge mode or even an SOS mode. Diver should make
responsible decision in order to minimize the probability of severe
consequences.
No deco
You can stay for the indicated time at the current depth, breathing the current mixture, to avoid
a decompression obligation.
SafetySt
Length of the safety stop is 3 min. The safety stop can be carried out within depth from 6 to 3 m (20 to
10 ft). The safety stop is indicated if the maximum depth of a dive was greater than 10 m (30 ft).
Countdown of the safety stop is interrupted at depths greater than 6 m. Descent to depths greater than 10 m resets the time of the safety stop back to 3 min. A violation of the 3 m ceiling is logged (silently). Ascent above 1.8 m generates an alarm and leads to the end of the safety stop regimen for a current dive. The safety stop can be switched off. See Setup → Decompression → Safety stop [On] (See section 4.2.2).
DeepStop
The depth of the upcoming deep stop is based on Richard
Pyle’s algorithm. A timer countdown starts here after arriving to the
displayed deep stop depth.
Violation of the deep stop is logged but no alarm is generated
because deep stops are considered as an additional safety factor
only.
These Pyle deep stops are shown only if switched on. See Setup →
Decompression → Deep stops (See section 4.2.4).
Local Time
The local time is shown on the display directly above the mixture
indication.
Mixture
The center of the display indicates the current gas mixture.
Warning: If the breathing mixture is not identical to the indicated mixture, then the calculated
decompression profile will be wrong and may be dangerous to follow. In that case you must use a backup
method of the decompression profile calculation.
Max
This shows the maximum depth reached during a dive.
CNS
Exposure to high oxygen partial pressure may under certain circumstances cause acute (CNS) oxygen
poisoning. This may cause the affected person to drown.
The so called “oxygen clock” is a percentage of consumption of CNS toxicity limit. Calculation is based on
NOAA oxygen exposure limits.
PO2          Max. Single Exposure       Maximum per 24 h

1.60              45 min                  150 min
1.55              83 min                  165 min
1.50              120 min                 180 min
1.45              135 min                 180 min
1.40              150 min                 180 min
1.35              165 min                 195 min
1.30              180 min                 210 min
1.25              195 min                 225 min
1.20              210 min                 240 min
1.10              240 min                 270 min
1.00              300 min                 300 min
0.90              360 min                 360 min
0.80              450 min                 450 min
0.70              570 min                 570 min
0.60              720 min                 720 min
CNS oxygen clock value does not take chronic (pulmonary) oxygen poisoning into account. For exposures common to technical diving, chronic toxicity manifestations are not significant. For very long dives it is necessary to calculate with long-term exposure limits and to limit the overall exposure. When pO2 ≥ 1.4 bar then the CNS toxicity limit is always shorter than the pulmonary toxicity limit. For calculations related to chronic toxicity use the REPEX method that you know from the nitrox diving course. The Divesoft Freedom does not perform calculations associated with chronic oxygen toxicity.
Avg D
Average depth. It is possible to create a new start point for depth averaging; in dive menu select Settings →
Reset average.
BottomTimer: Reset average
Floor
Decompression floor is the depth at which the time to surface (TTS) does not increase.
Calculation of the decompression floor is approximate. Staying at the exact depth of the indicated floor
leads to a modest decrease in the upcoming decompression time.
This position on the detailed screen is customizable. You can alter the decompression floor, average
depth or TTS2 in Setup → Preferences → Display → OC Row4/Col3.
TTS2 is Time to surface calculated with current OC mixture only.
Temp
Water temperature is measured inside the computer case. After temperature change wait about
1–2 minutes until the temperature reading reaches a stable value. The temperature in air is affected by
many factors and is only an indication.
A temperature correction can be set in Setup → Calibration for better accuracy.
pO2
The calculation is based on depth and O2
fraction in breathing mixture.
Combined graphic symbol
The combined graphic symbol on the detailed screen is intended for rapid orientation. It tells the diver what
must be done. The color of the warning symbols changes from yellow to red according to the degree of
importance.
Permitted to ascend to the surface.
Permitted to ascend to the depth of the decompression stop or decompression ceiling.
The depth of the decompression ceiling or decompression stop has been reached; do not change depth.
The depth of the safety stop has been reached; do not change depth.
The ascent rate has been exceeded; slow down your ascent.
The current depth is less than the depth of the decompression ceiling; descend.
Vertical speed
There is an indication of the ascent or descent rate below the combined graphical symbol. Can be set to
a relative (%) or absolute (m/min or ft/min) reading. The relative reading is based on the maximum ascent
or descent rate.
BottomTimer setting: "Setup → Preferences → Vert. rate"
Other licences: "Setup → Preferences → User interface → Vert. rate"
Battery symbol
A graphical indication of the remaining battery capacity. See chapter Surface mode – Battery symbol
(See section 3.1.2).
03.2.3 Synoptic screen
The depth value is easy to read. It is accompanied by other important information. The meaning of all values is identical to the detailed screen.
03.2.4 Big Screen
The most important information is written in really big characters.
This screen is useful in very bad visibility. Many divers can read
numbers even without a mask.
The meaning of all values is identical to the detailed screen.
On the "Big Screen" you can customize the bottom line in Gauge mode.
BottomTimer: "Setup -> Preferences -> Big depth"
Other linces:"Setup -> Preferences -> User interface -> Big depth"
- "Avg" displays average depth
- "Max" displays maximum depth
- "Only" displays current depth ONLY, nothing else.
03.2.5 Dive profile screen
Start
The time of submersion is useful for checking compliance with the
schedule.
Avg
The average depth is indicated with the yellow horizontal line and
with the average depth displayed in yellow.
A new start point for depth averaging can be created (in dive menu
select Settings → Reset average). This point is indicated by the
yellow vertical line and the horizontal average depth line starts from
there.
Current depth
See lower left corner.
Dive time
Runtime of current dive is placed in lower right corner.
Max
Maximum depth reached during the dive. Field with this value is
placed in the middle of bottom line.

03.2.6 Dive menu
During a dive, in any dive mode, press both keys simultaneously to show the dive menu. There is current depth, partial pressure of oxygen and dive time on the bottom of the screen.

Mix
Mixture selection. Only active mixtures are listed and can be
selected.
Mixtures with pO2
outside breathable range are displayed in red
(if pO2
is too high) or blue (if pO2
is too low). This does not prevent
selection of this mixture. An alarm will be activated after this kind
of switch.
Limits of breathable range are set in Setup → Mixtures.
End dive
End dive and switch to surface mode. This menu item is enabled only
on the surface (at depth < 0.5 m).
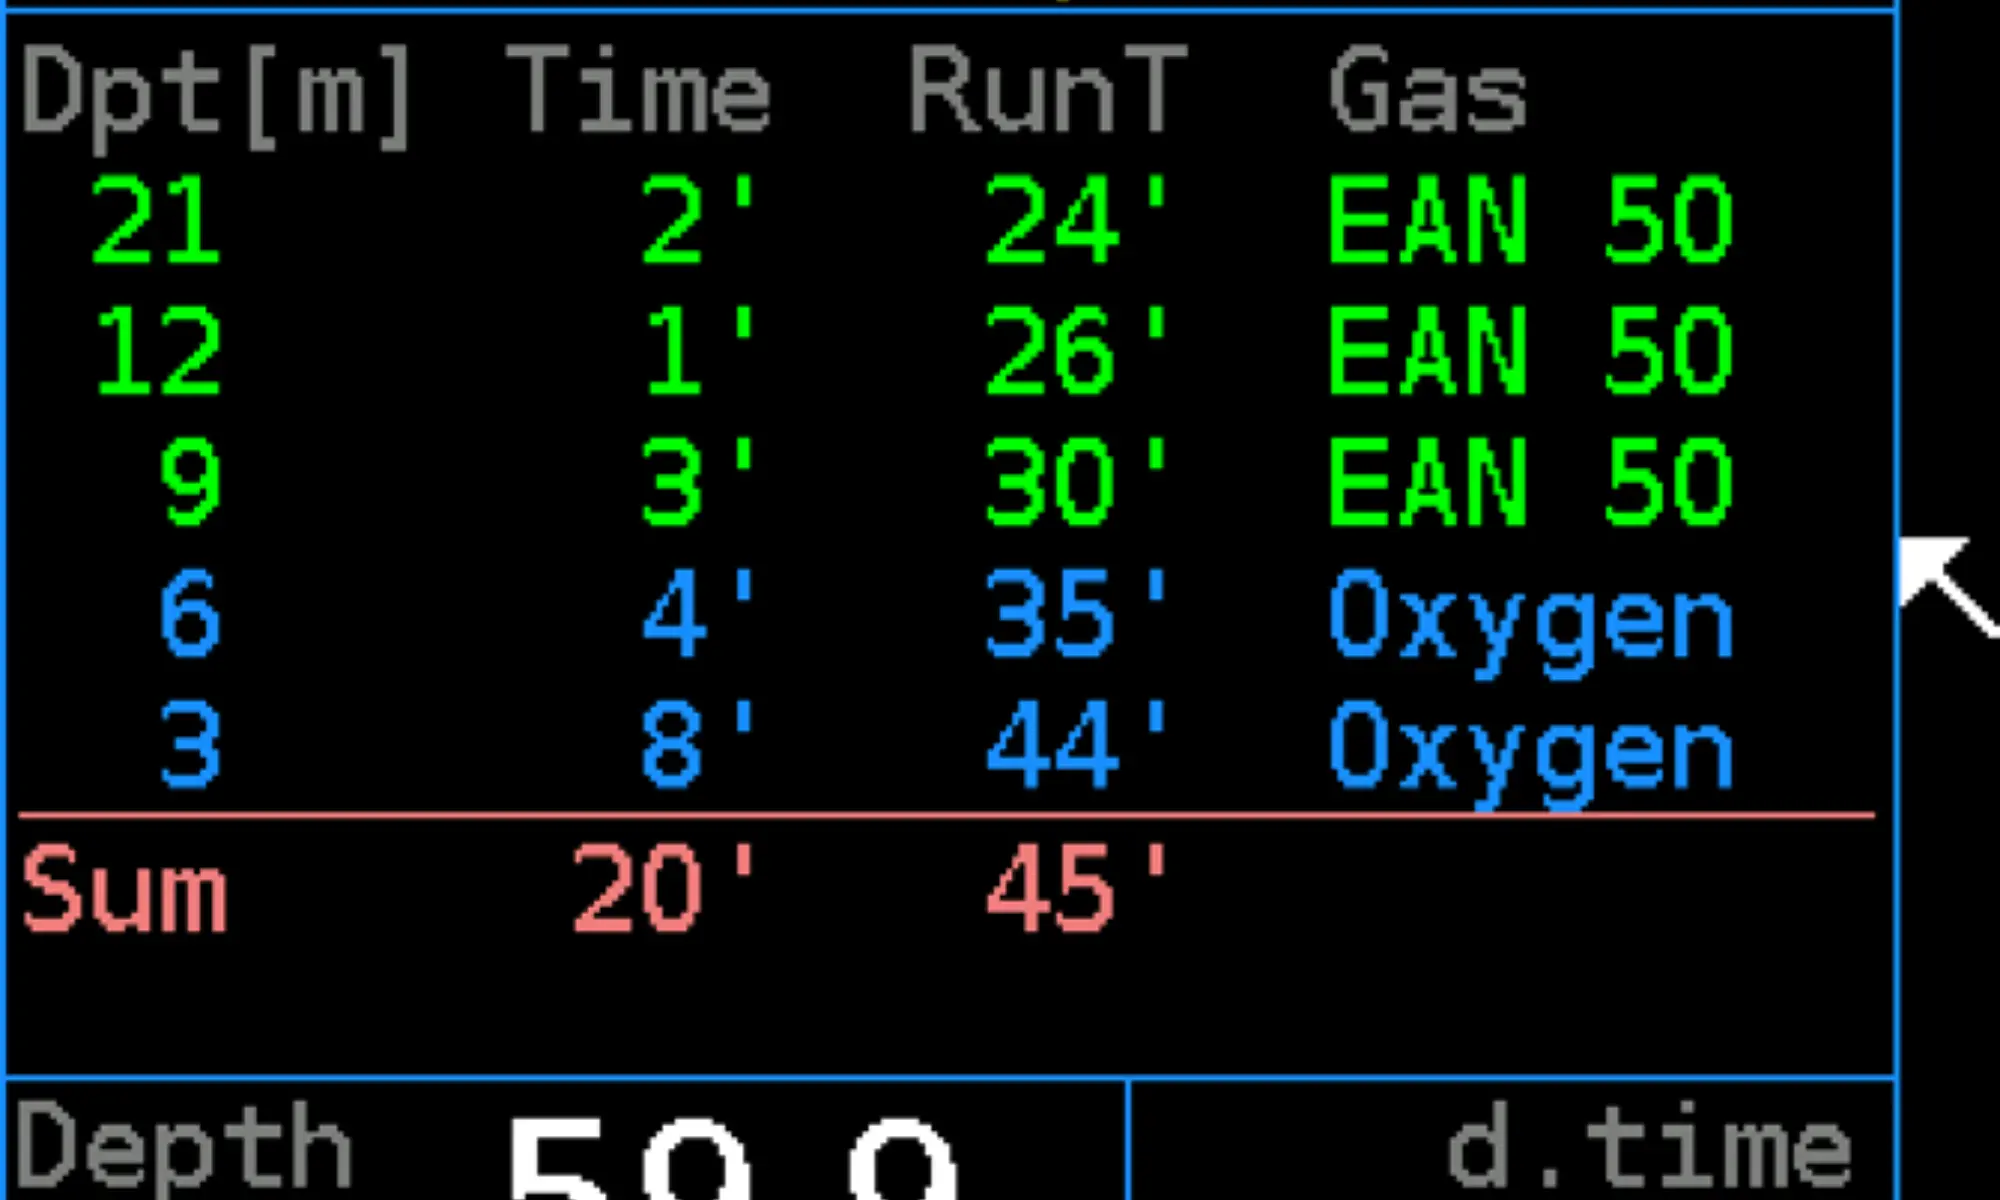
Ascent plan
By default the plan includes all gas switches during the
decompression, including gas switch stop duration. If ascent gas is
set to current in decompression setting, then no gas switches are
included in the plan.
Setup – Bailout GF Switch to gradient factor pair for bailout (BoGF) and vice versa. You can switch between standard and bailout GF anytime during a dive. See also Setup → Decompression → Gradient factor (See section 4.2.2).
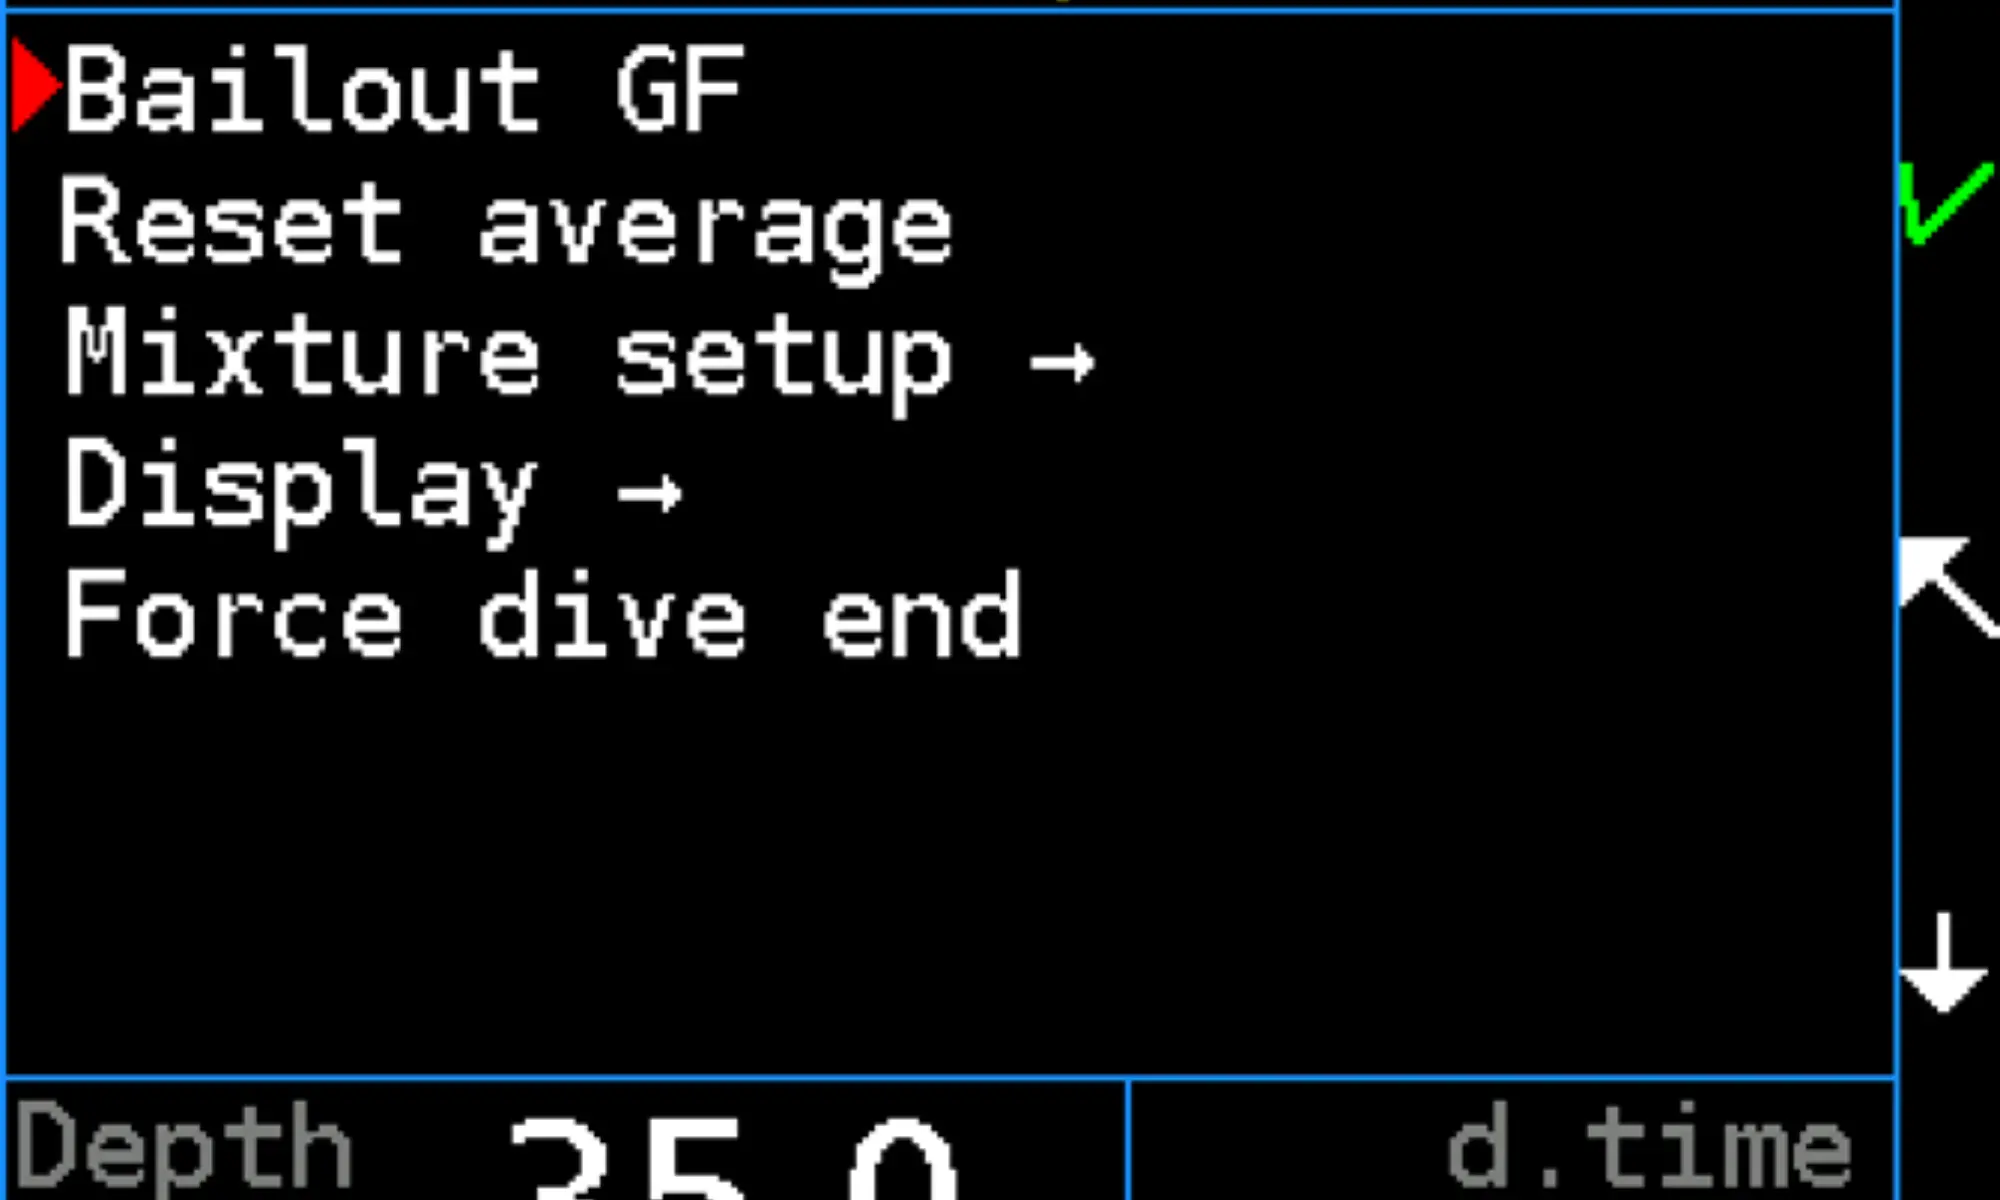
Setup – Reset average
It restarts calculation of average depth. The restart point is indicated
by the vertical line on the dive profile screen.
Setup – Mixture setup
Corresponds to mixture setup in Setup → Mixtures → Mixture setup.
This feature is intended only for emergency situations. Do not use
this setup on a regular basis.
Setup – Display
This setting corresponds to Setup → Preferences → Display.
Setup – Force dive end
If the surface pressure (zero depth) was incorrectly detected and the computer “dives” while on the surface
then the dive can be forced to stop with this function.
Warning: Do not force dive end underwater!
Apps
There are several items in the apps folder
Apps - Add bookmark - marks the current moment in the dive log
Apps - Events - allows you to view computer-issued warnings and pop-up messages
Apps - Emergency torch - brightens the entire display to the maximum and emits the maximum amount of light possible. Can be used as an emergency torch in certain conditions when all other torches have failed.
Apps - Inclinometer - a tool to measure the slope of a slope. Can be used for mapping caves and wrecks.
Apps - Sokoban Game - a puzzle game for distraction on long decompression. For more information on games, see section 9 of this manual.
Apps - Snake - a game for distraction on a long decompression. See section 9 of this manual for more about the games.
03.2.7 Gas switch shortcut
Long press of the upper key selects previous gas mixture. Long press of the lower key selects next gas mixture. This list is cyclic. What mixtures can be switched depends on the setting in Setup → Preferences → User interface → Gas shortc. The default setting for gas shortcuts is off. If Breathable is selected, then mixes with pO2 inside the breathable range with regard to the current depth are switched. The limits of the breathable range are set in Setup → Mixtures. If All is selected, then all active gas mixes are switched, regardless of breathability. An alarm could be activated after this kind of switch. The computer will wait five seconds before generating an alarm. The user can choose the correct gas mixture during this interval.
03.3 Fixed setpoint CCR
The rebreather dive modes are only available in the Closed Circuit version of the Divesoft Freedom. It is strongly recommended to familiarize yourself with open circuit (OC) diving using the Divesoft Freedom before using for rebreather diving. This chapter of User manual describes only the differences from OC diving. First you will have to study the OC mode. If the Freedom is used as a backup computer for an eCCR then the proper setting corresponding to the setting of the eCCR electronic is crucial. If a manual CCR (mCCR) is used then maintain the pO2 in the breathing loop on the value equivalent to the Feeedom setpoint (SP). If a SCR is used then select the correct type of SCR and adjust its parameters in setup. See Setup → Rebreather. Don’t forget to set up the OC bailout too, especially the default mix. The fixed setpoint CCR mode is indicated by the cyan table gridlines.
03.3.1 Predive and submersion
Switch the Freedom on before entering a water. Check the Freedom settings as part of a predive check. The first screen is a summary of rebreather specific parameters, the second screen is the summary of the decompression settings and the OC (bailout) parameters. If submersion to a depth greater than 1.5 m occurs, the computer switches to the default mode. Set default mode to the CCR fixed during dive preparation in Setup → Preferences. Do not intentionally use this switching method; it is intended only for emergency situations.
03.3.2 Setpoint
The SP low is set after switching to the fixed setpoint CCR dive mode on the surface. It can be switched to the SP high manually (via the shortcut or via the menu) or automatically at a set depth during a descent or at a set runtime.
SP reading (eCCR)
The current setpoint value is located where the pO2 is situated on the display in OC dive mode on both the detailed and synoptic screen.
pO2 reading (SCR)
The calculated pO2
value is shown instead of the setpoint if you dive
with the SCR. See CCR/SCR Setup (See section 4.5).
Shortcut
With the CCR the long press of the upper key selects the high setpoint. The long press of the lower key selects the low setpoint. The shortcut is by default off but it can be enabled in Setup → Rebreather → Const CCR Setup → SP shortcuts If the semi-closed rebreather (SCR) is used, then the gas mixture is switched with this shortcut (similar to OC mode).
Manual SP setting
Select Setpoint from the dive menu. The high and low setpoint can be chosen directly from the menu. For the current setpoint adjustment use the +0.10 and -0.10 menu items for the SP value change (can be used repeatedly; the final value is displayed) and then select Accept for the change.
03.3.3 Dive menu

Bailout mode (OC)
It is assumed that the diver will not breathe from the rebreather’s breathing loop but will rather use a separate opencircuit bailout apparatus. After switching to the bailout OC mode, the default OC mixture will be used and the safety level will be automatically set using the bailout gradient factors. The BoGF tag appears on the detailed and synoptic screen. It is possible to switch between the standard and bailout GF sets in the menu without affecting the mode in which the Freedom is operating.
Measured mode (CCR)
Use for switching to rebreather dive mode with the measured pO2
. See next chapter.
Setpoint
Use to switch the low/high setpoint and the manual setting of the setpoint of the CCR. See the Setpoint
chapter on previous page.
Mix
Use for gas mixture switching for SCR. This is similar to the OC mixture selection.
Diluent
Use this menu item for the diluent gas switch.
Setup – Diluents
This (the CCR only) menu item corresponds to the mixture setup in Setup → SCR/CCR Setup → Const CCR
setup → Diluents.
Setup – Mixture setup
This (the SCR only) menu item corresponds to the OC mixture setup in Setup → Mixtures → Mixture setup.
03.3.4 Stack time
The scrubber stack timer runs all the time in any rebreather mode regardless of depth, even on the surface. If you spend a long time in dive mode while not breathing from the rebreather’s loop, then increase the time for the stack time warning. Don’t forget to reset the timer when you refill the scrubber (Dive → Stack time reset). You can find the stack time on the O2 sensors screen.
03.4 Measured CCR
!! The production of cables to connect the Freedom and Freedom+ computers has been discontinued. Currently it is no longer possible to order the cable to the sensors.!!
The rebreather dive modes are available in the Closed Circuit version of the Divesoft Freedom only. This chapter of the user manual describes only the differences from the fixed setpoint CCR diving. First you will have to study OC mode and fixed setpoint CCR mode.

03.4.1 O2 sensors connection
The measured CCR dive mode requires a connection to the O2 sensors of a rebreather. One, two or three sensors can be connected. The cable equipped with the Molex connectors is included in the Cable is NOT includedin the Divesoft Freedom distribution package. This can be ordered from a third party dealer. . See also O2 sensor cable (See section 10.5).
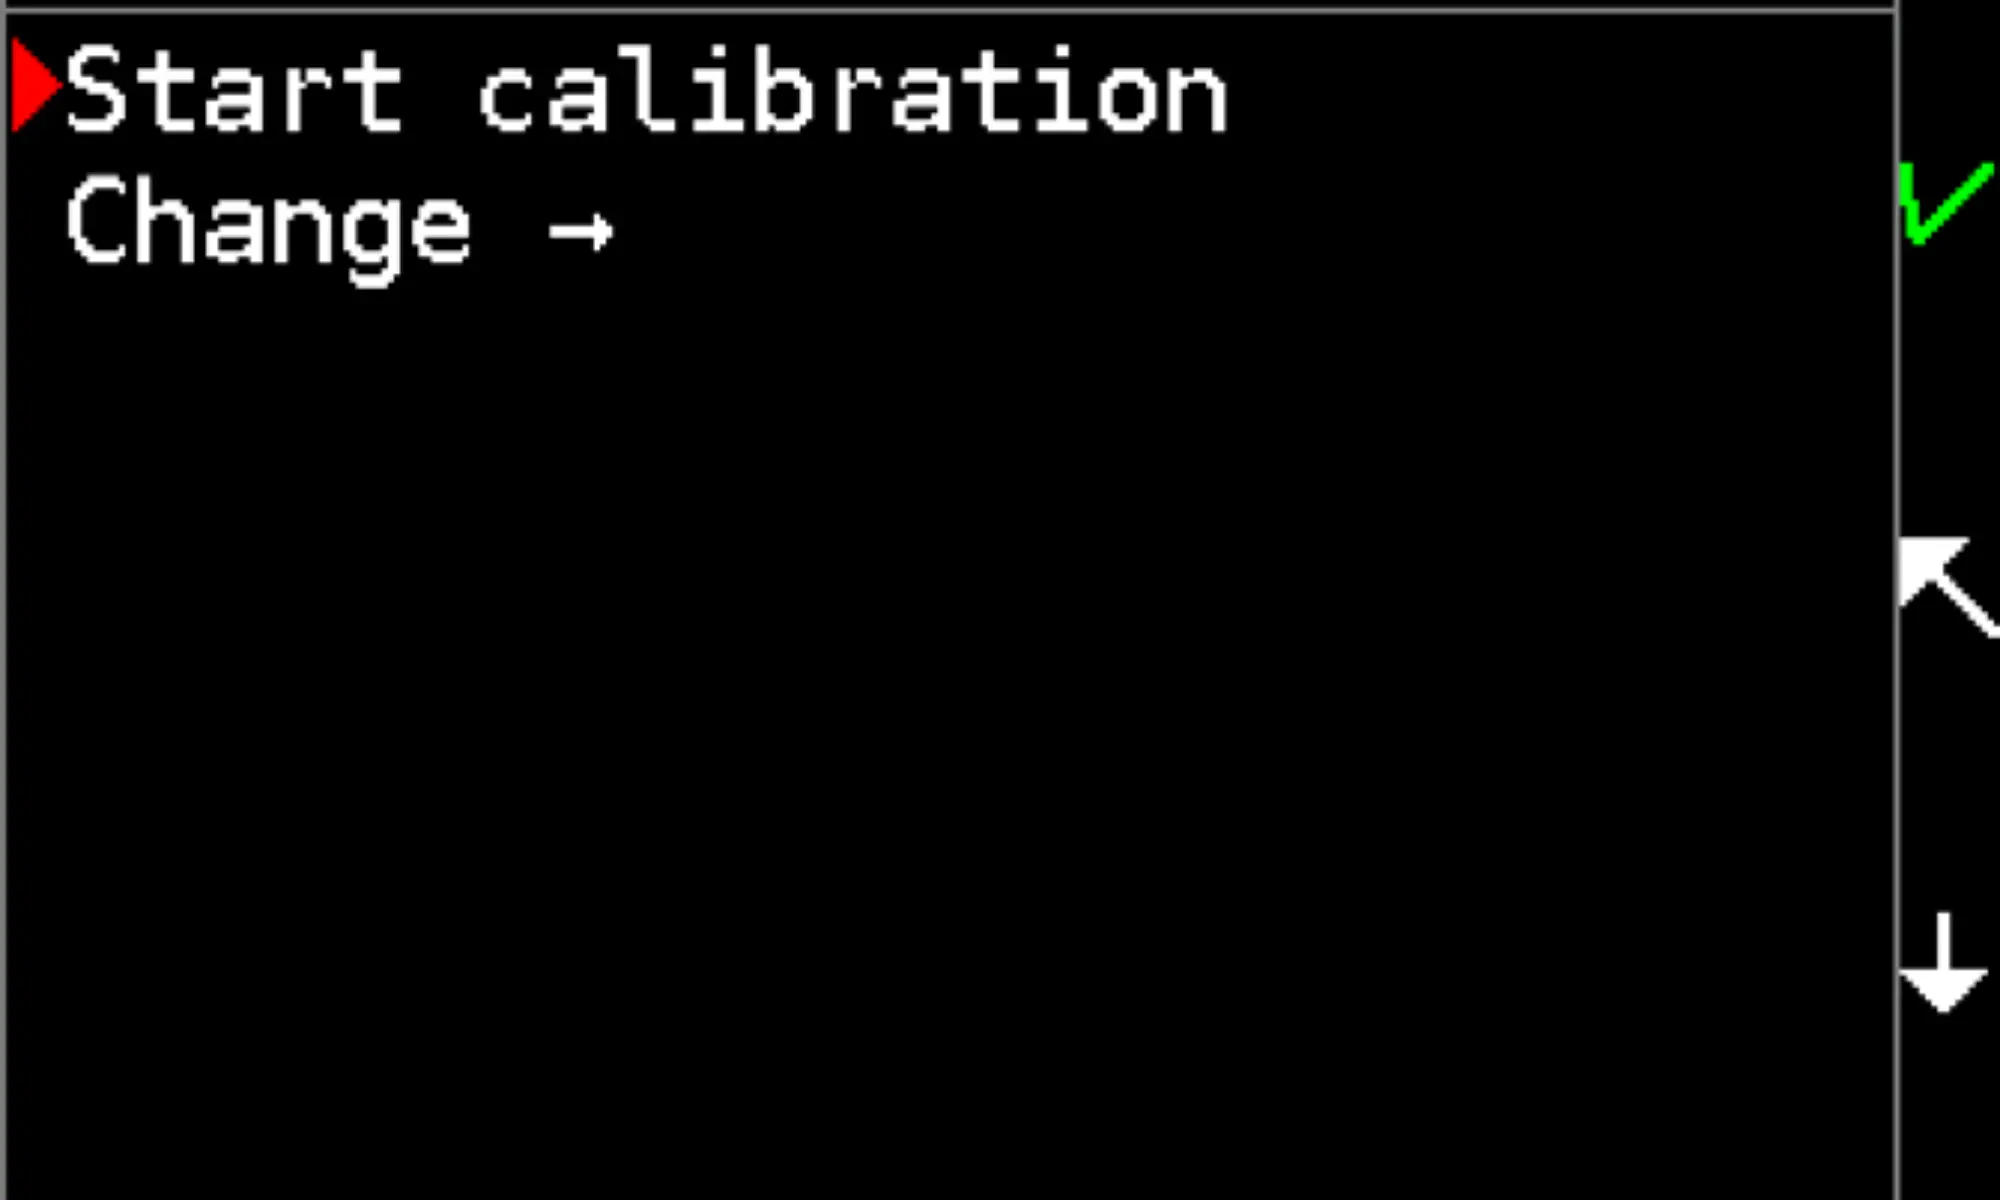
03.4.2 O2 sensors calibration
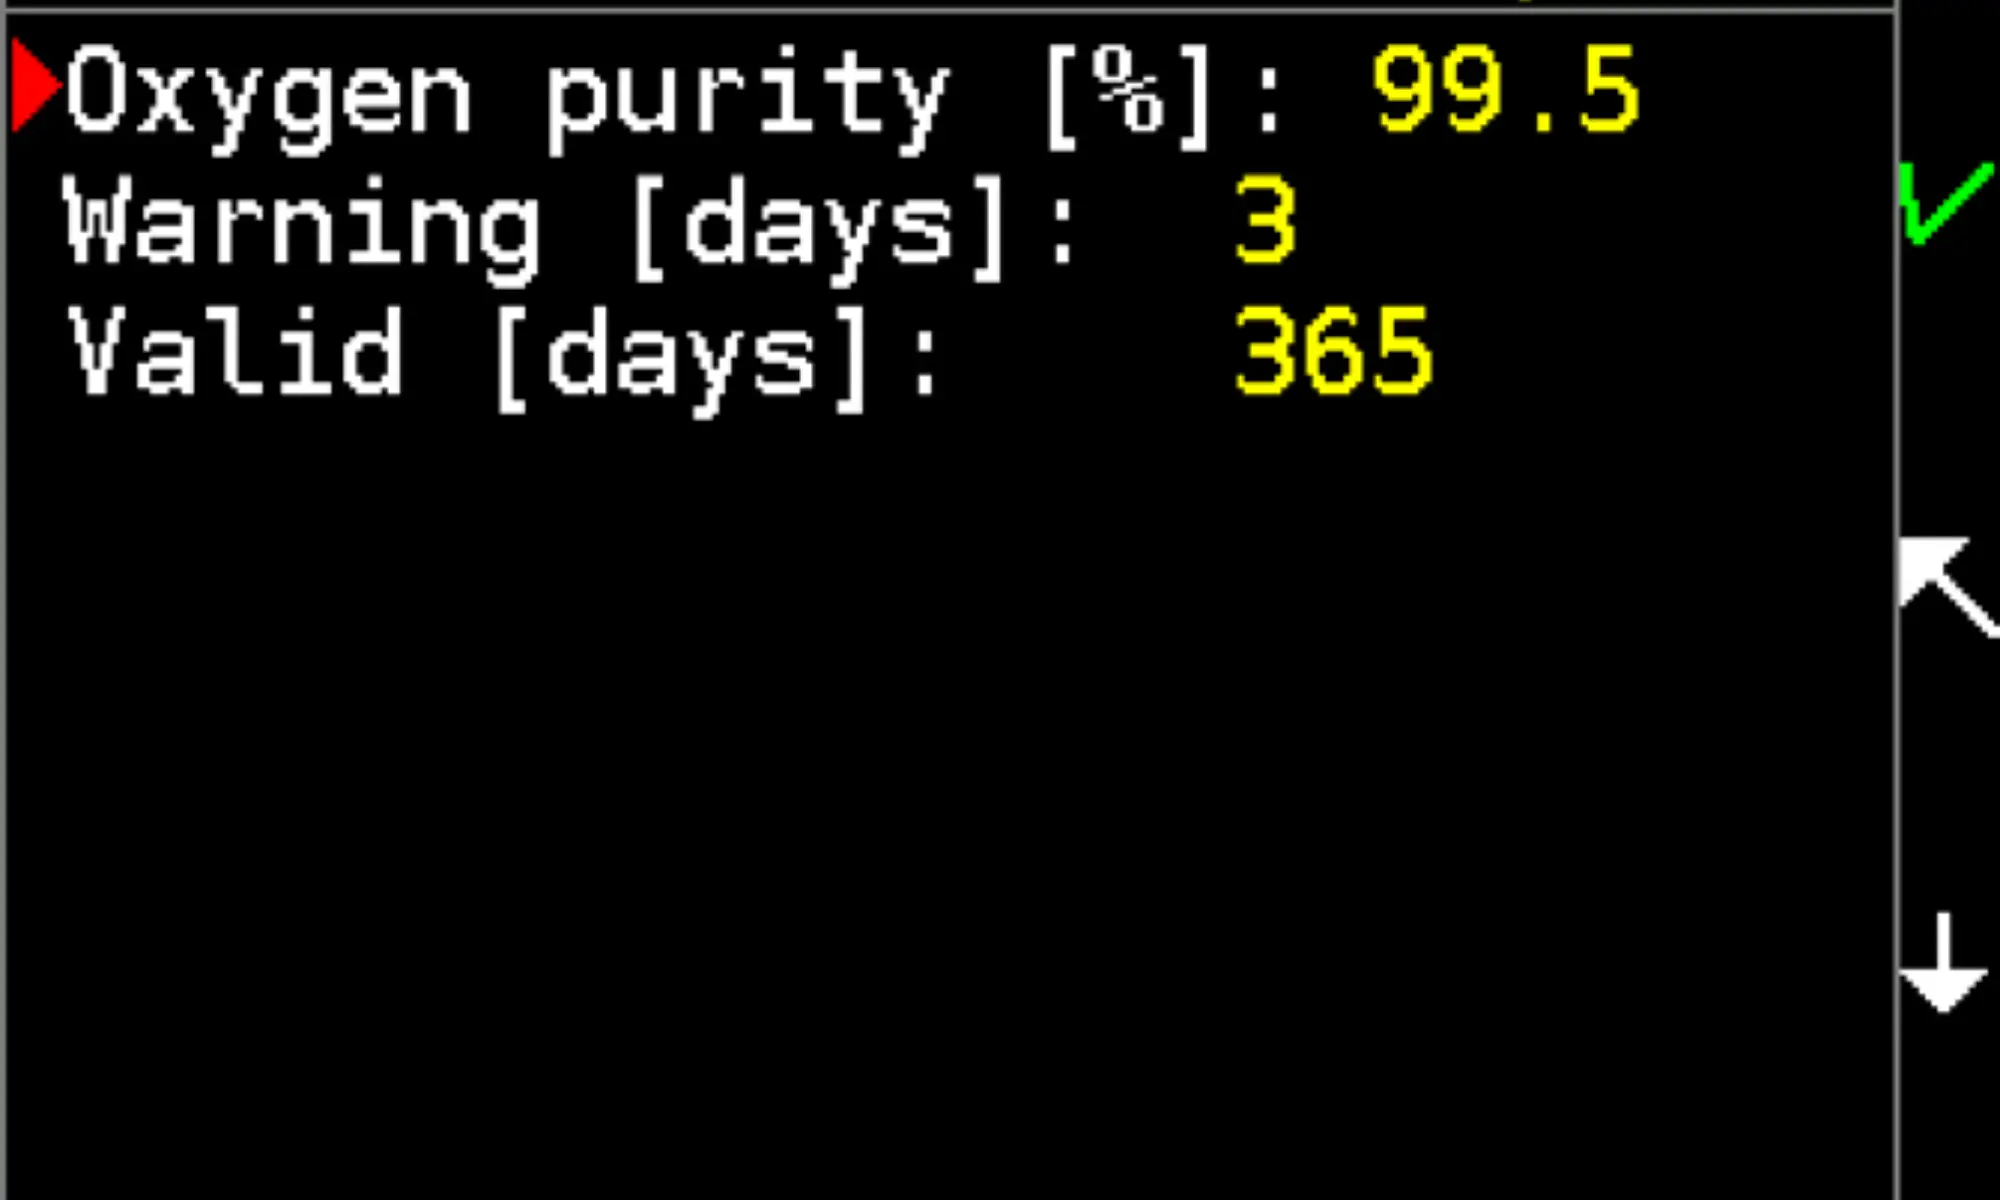
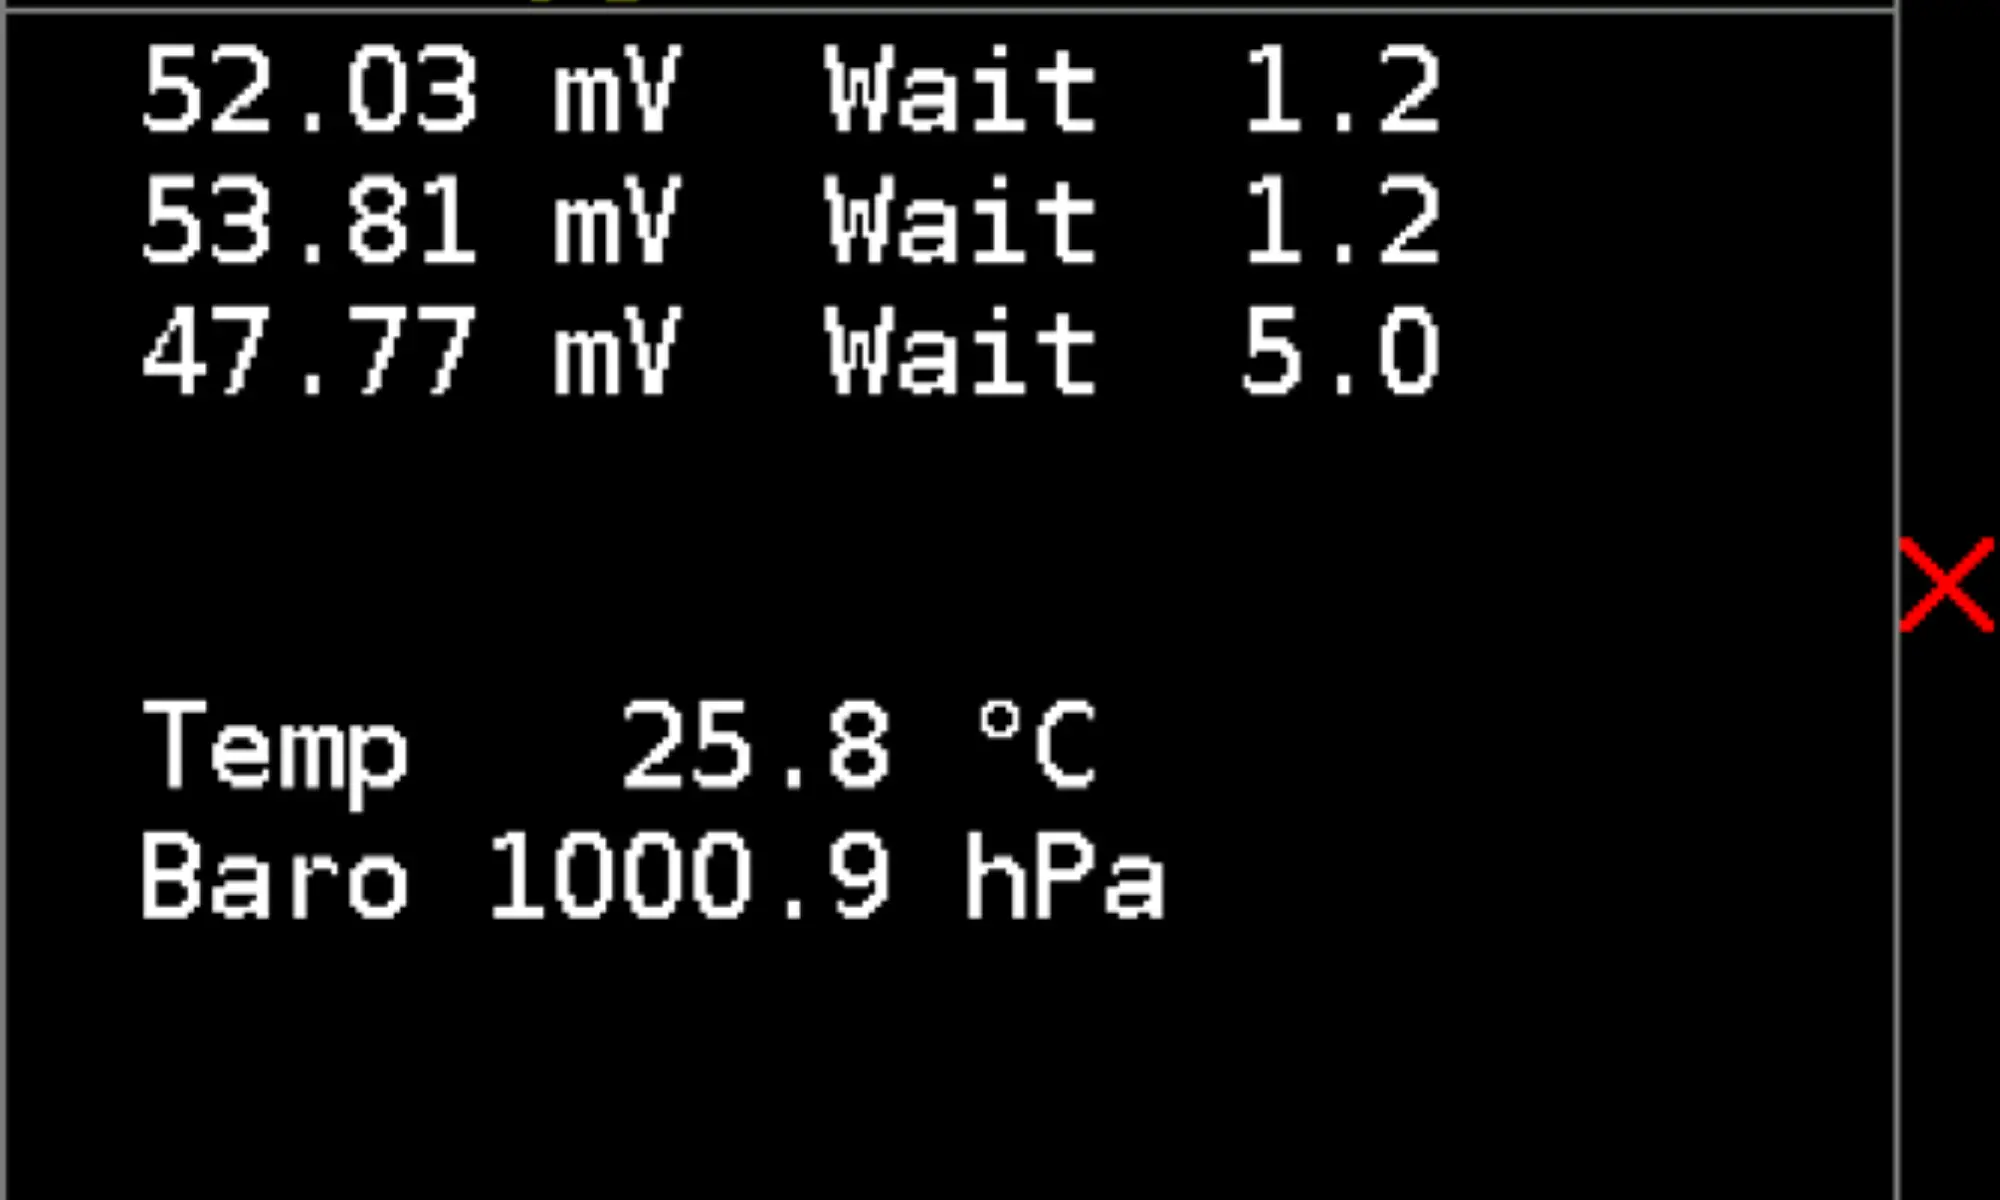
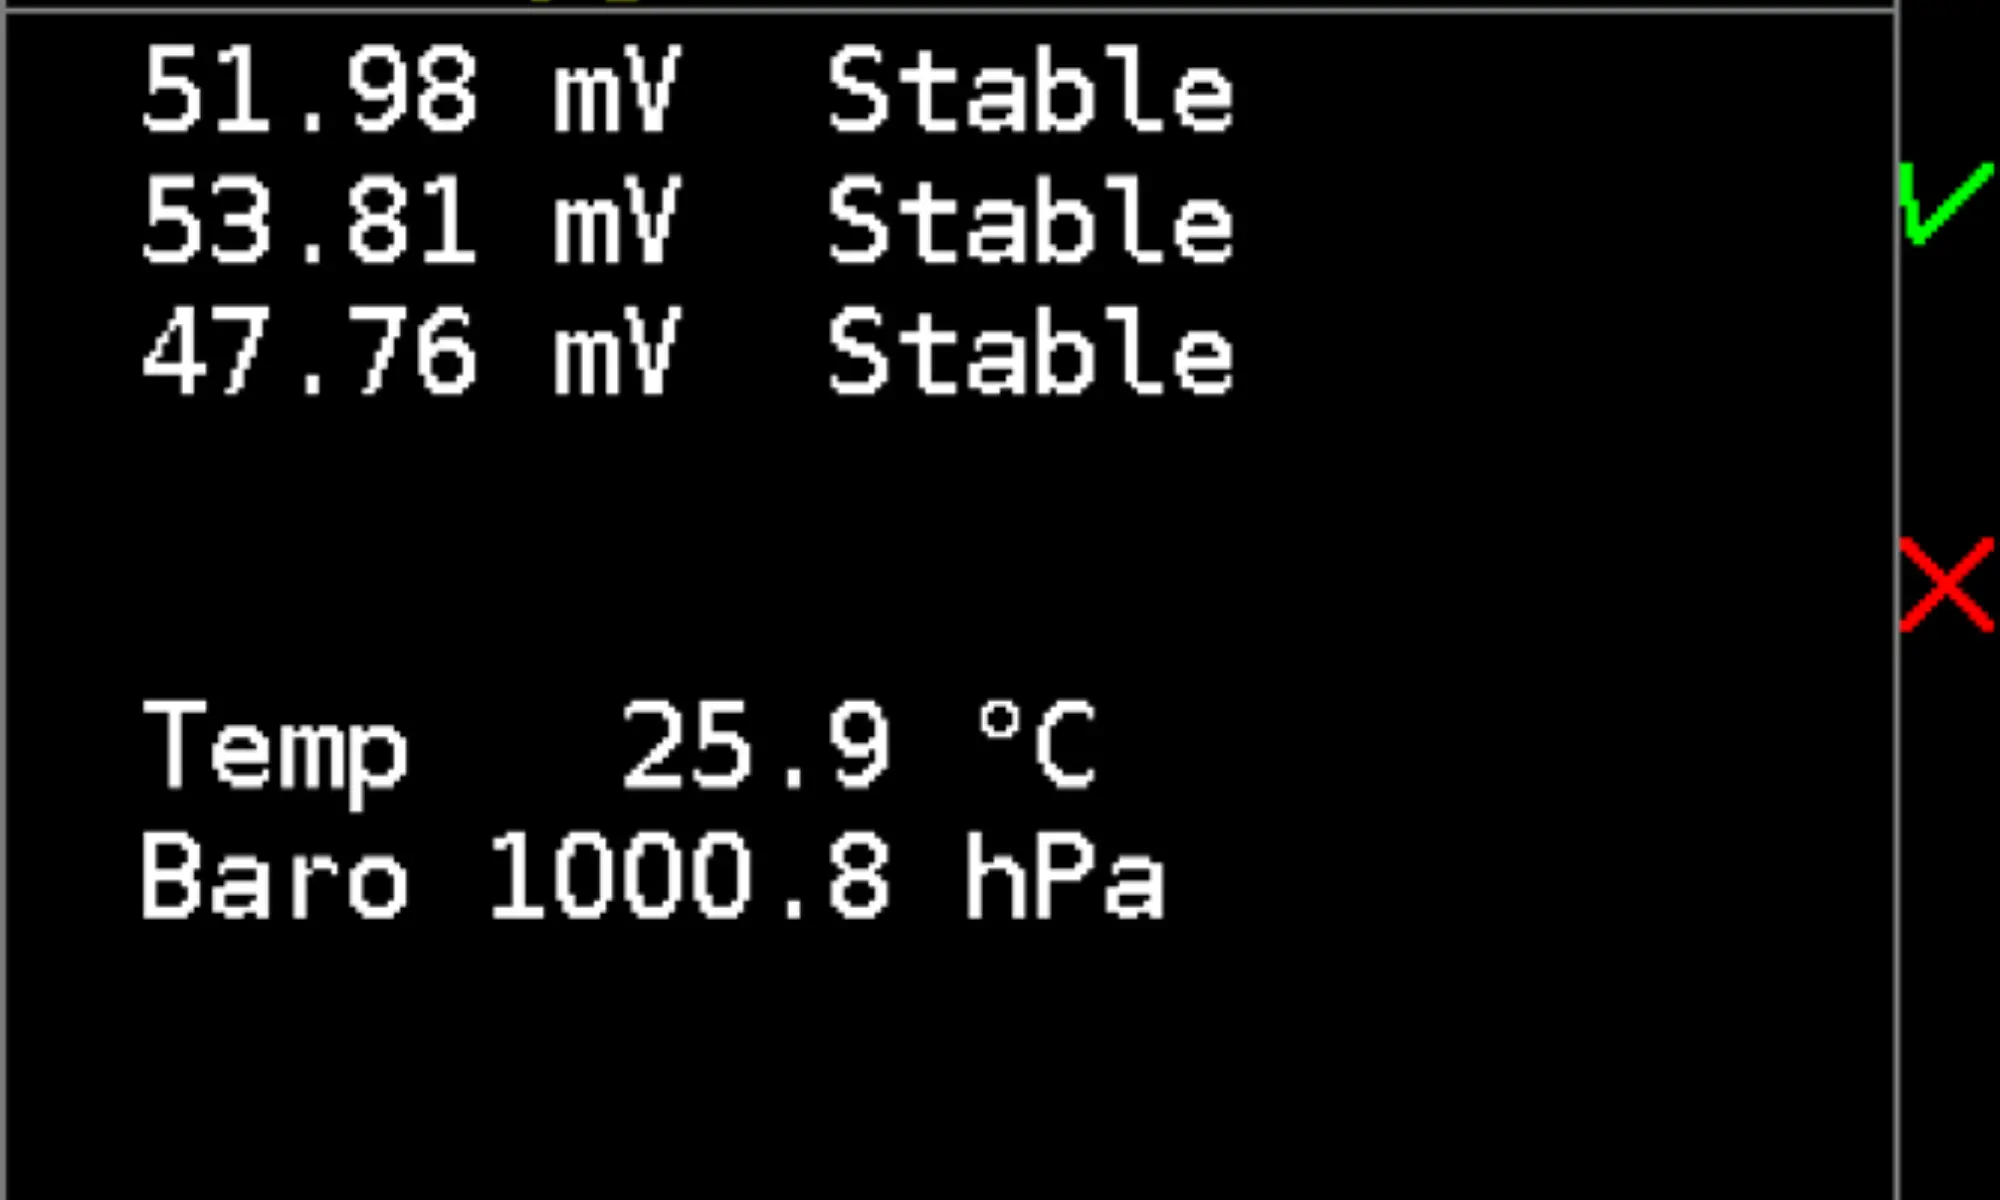
If possible, use oxygen with purity of at least 99.5% for calibration.
Do not use air for calibration. The partial pressure of oxygen in air at
atmospheric pressure significantly differs from the partial pressures
determined by the setpoints. At the end of its service life, an oxygen
sensor can successfully undergo calibration to 21% (air), but will no
longer be capable of measuring pO2
of 1 bar or higher.
Procedure:
1. Dive → Calibration O2→ Start calibration
2. Check the calibration gas
3. Wait for stable values
4. Start and wait for calibration process to end
5. Confirm the save
Whether or not a sensor is already at the end of its service life is also
determined during calibration.
At higher altitudes above sea level, the partial pressure of oxygen in
the calibration mixture decreases in proportion to lower atmospheric
pressure. The Freedom measures atmospheric pressure and takes
it into account during calibration. Therefore, do not perform any
corrections at higher altitudes above sea level.
It is preferred to calibrate O2
sensors prior each dive. Do not use
sensor reading from sensors calibrated more than three days ago.
03.4.3 pO2 reading
There is a separate O2 sensor screen in both the surface and dive mode. Not only the pO2 but also the voltage on sensors can be read. If the state of a sensor is not in operational mode (not connected, error, excluded, disabled, uncalibrated), the appropriate tag appears instead of the pO2 value. On the detailed and synoptic screen there is only one reading of the pO2 value; the arithmetic average of active sensors is used. You can mark any sensor as faulty during a dive in dive menu Setup → Faulty sensors.
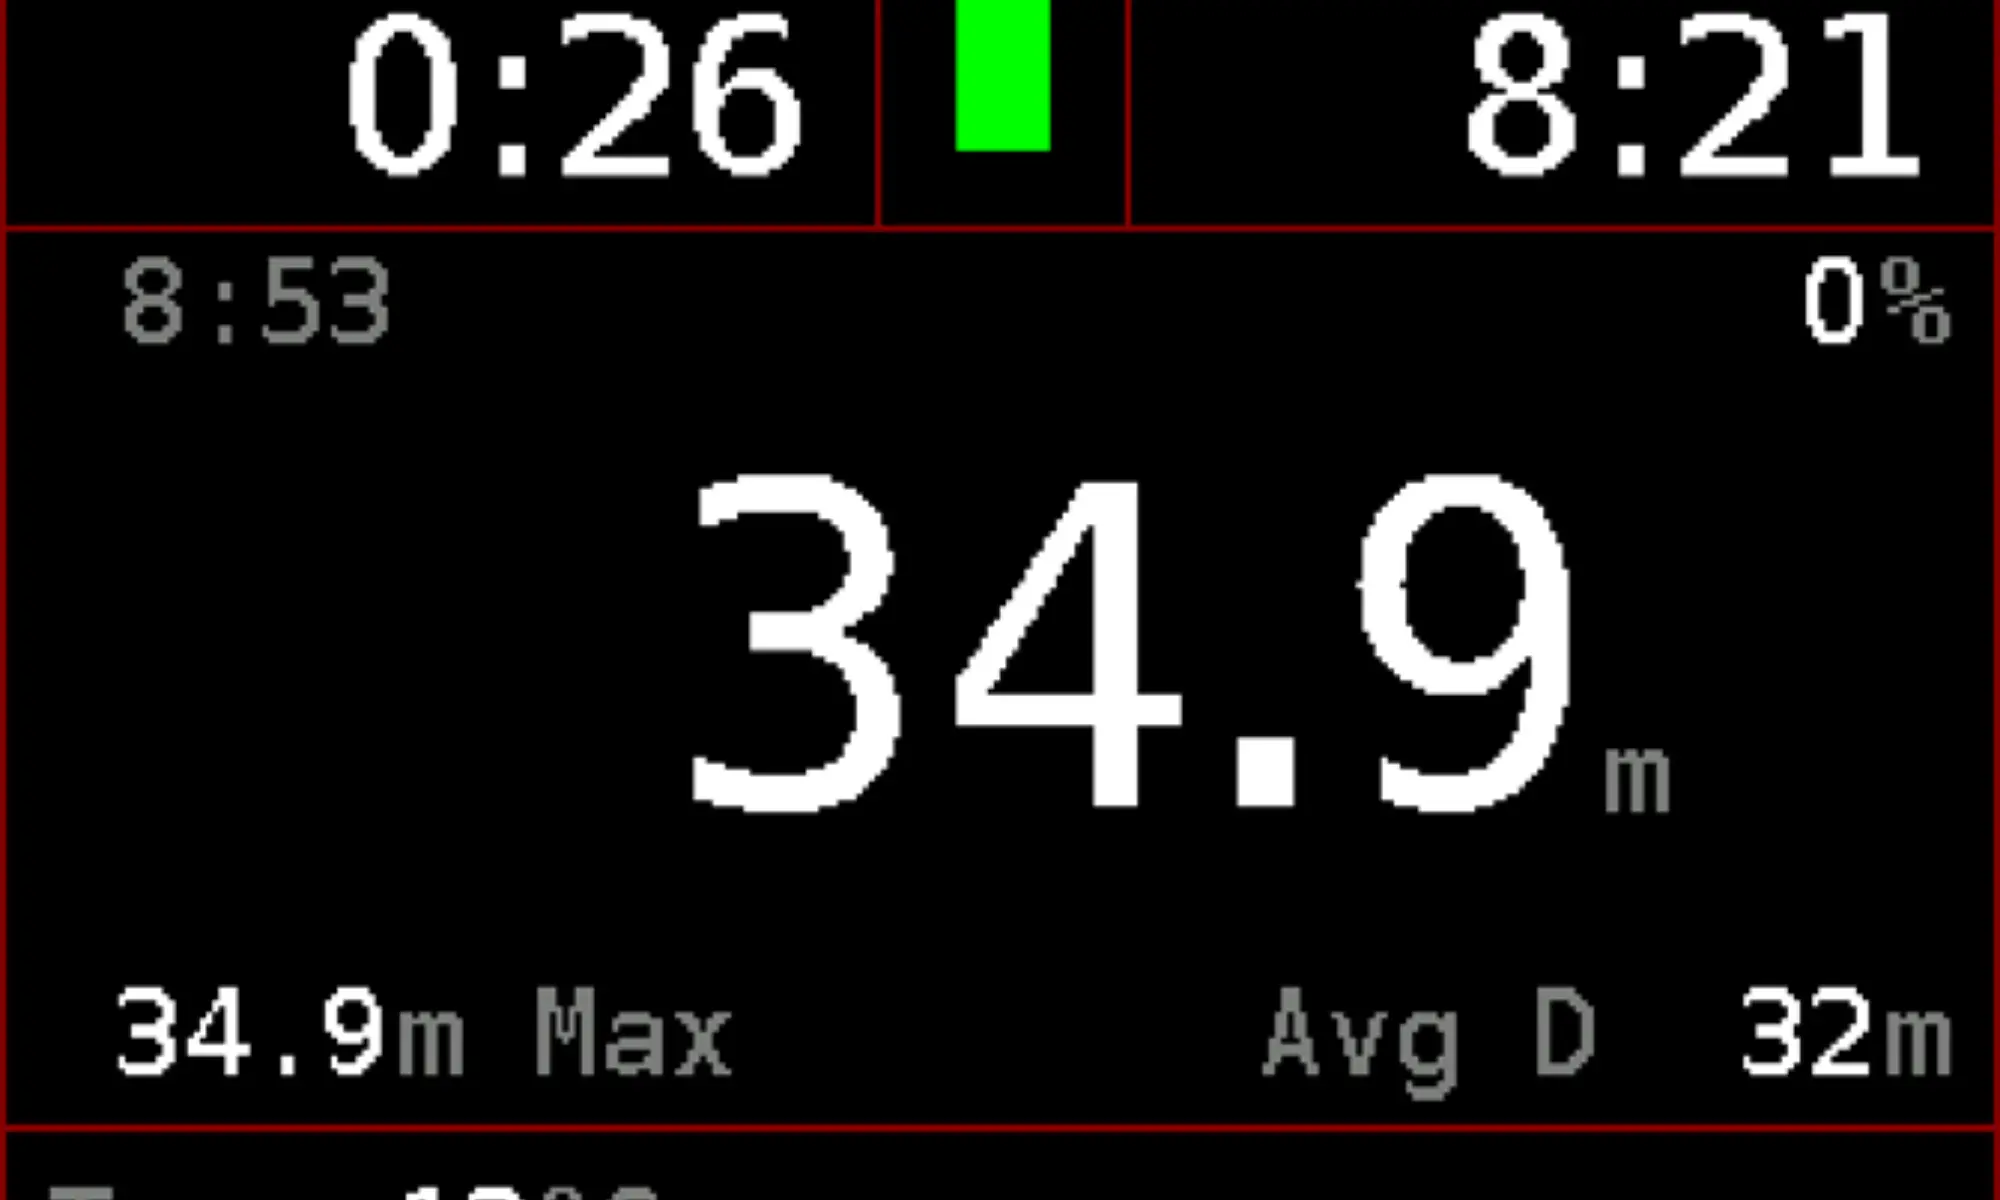
03.5 Gauge
The gauge mode is indicated by the dark red table gridlines.
There are two forms of the gauge mode – with and without rebreather O2
sensor reading. The rebreather
gauge mode is only available in the Closed Circuit version with at least one connected O2
sensor
Note: Gauge screen can be enabled in any mode (OC, CCR). Setup -> Preferences -> Display -> Screens -> Gauge
03.5.1 Synoptic screen
Stopwatch
Operate the stopwatch via the menu. See Stopwatch (See section 3.5.4).
Battery symbol A graphical indication shows the remaining battery capacity. See Battery symbol (See section 3.1.2).
Dive time
The timer starts after submersion (depth > 1.5 m) and halts after
surfacing (depth < 0.5 m). If stay on the surface (or at very shallow
depth) is followed by a second submersion (during a time set in the dive termination timeout), then the dive
time indicated will be the time from the first submersion including the surface time.
Local Time
The local time is shown on the display in the top left corner of the middle section.
Vertical speed
The ascent and descent rate indication can be set to a relative (%) or absolute (m/min or ft/min) reading.
The relative reading is based on the maximum ascent or descent rate.
Set in:
BottomTimer: "Setup -> Preferences -> Vert. rate"
Other licences: "Setup -> Preferences -> User interface -> Vert. rate"
Depth
The depth reading can be set to m or ft in the setup. Depth is calculated from measured hydrostatic
pressure. For calculation fresh water (default), seawater or universal EN13319 density can be set in Setup → Preferences.
The universal density EN13319 is closer to salt water and not very suitable for pure fresh water.
Max Depth
The maximum depth reached during the dive.
Avg depth The average depth of the dive. A new start point for depth averaging can be created via the dive menu. This point is indicated by the yellow vertical line on the profile screen.
Temp
Water temperature is measured inside the computer case. After a temperature change wait about 1-2
minutes until the temperature reading reaches a stable value. The temperature in air is affected by many
factors and is only an indication.
A temperature correction can be set in Setup → Calibration for better accuracy.
03.5.2 Big Screen
The most important information is written in really big characters.
This screen is useful in very bad visibility. Many divers can read the
numbers even without a mask.
The meaning of all values is identical to the synoptic screen.
On the "Big Screen" you can customize the bottom line in Gauge mode.
BottomTimer: "Setup -> Preferences -> Big depth"
Other linces:"Setup -> Preferences -> User interface -> Big depth"
- "Avg" displays average depth
- "Max" displays maximum depth
- "Only" displays current depth ONLY, nothing else.
03.5.3 Dive profile screen
Start
The time of submersion is useful for checking compliance with the
schedule.
Avg
The average depth is indicated in yellow by a horizontal line and
a numerical value.
A new start point for depth averaging can be created in the dive
menu. This point is indicated by the yellow vertical line and the
horizontal average depth line starts from there.
Current depth
See lower left corner.
Dive time
The runtime of the current dive is placed in lower right corner.
Max
The maximum depth reached during the dive. The field with this value
is placed in the middle of bottom line.
03.5.4 Dive menu
During a dive, in any dive mode, press both keys simultaneously to show the dive menu. This shows current depth, partial pressure of oxygen (rebreather only) and dive time on the bottom of the screen.
Stopwatch
The elapsed time is written in white while the stopwatch is running or
in gray when the stopwatch is not running.
Start stopwatch
This starts the timer.
If the stopwatch was previously halted then the count
continues from the indicated time.
The stopwatch can be set to the bottom button control, short press to pause/start, long press to reset and straight start.
BottomTimer: Setup -> Preferences -> Stopw. btn.
Other licenses: Setup -> Preferences -> User
Stop stopwatch
This stops the timer, leaving the elapsed time displayed in gray.
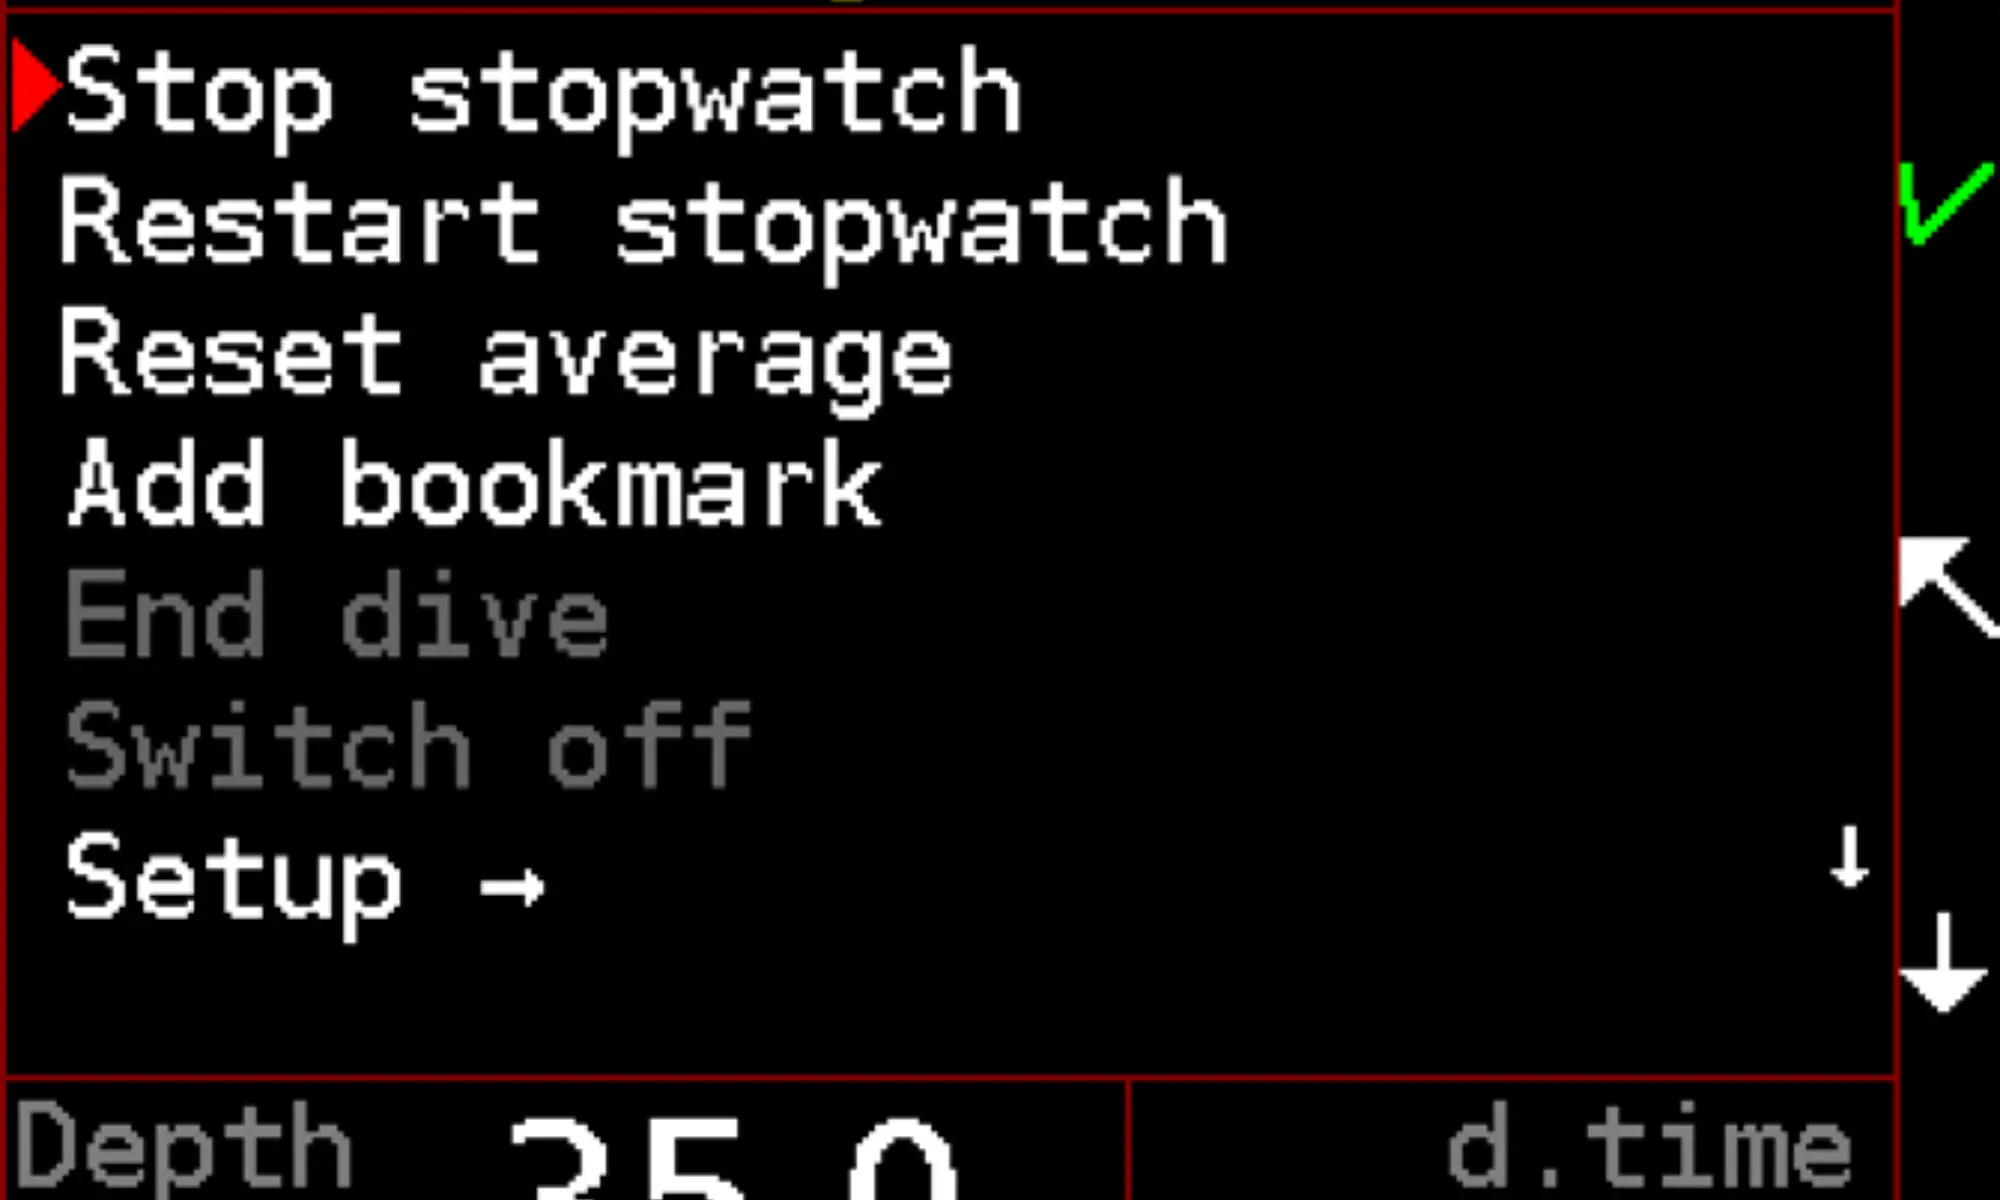
Restart stopwatch
This restarts the timer from zero.
This function is especially useful for decompression stops.
Reset average
A new start point for depth averaging will be created. The restart point is indicated by the vertical line on
the dive profile screen.
Add bookmark
A bookmark will be created in the dive log. The bookmark number is displayed in the notification that
follows.
End dive
End dive and switch to surface mode. This menu item is enabled only on the surface.
Switch off
End dive and switch directly to standby mode. This menu item is enabled only on the surface.
Setup
Brightness
The display backlight brightness level can be set from 1 to
9. The change in brightness is immediately reflected while
adjusting.
Orientation
The left hand, right hand and auto orientation can be selected.
Auto orientation selects the left or right hand position
automatically during the start. It will not switch the display
orientation when the diver changes position (i.e. during a head
down descent).
Screens
Any of the dive mode screen can be disabled.
Apps
There are several items in the apps folder
Apps - Add bookmark - marks the current moment in the dive log
Apps - Events - allows you to view computer-issued warnings and pop-up messages
Apps - Emergency torch - brightens the entire display to the maximum and emits the maximum amount of light possible. Can be used as an emergency torch in certain conditions when all other torches have failed.
Apps - Inclinometer - a tool to measure the slope of a slope. Can be used for mapping caves and wrecks.
Apps - Sokoban Game - a puzzle game for distraction on long decompression. For more information on games, see section 9 of this manual.
Apps - Snake - a game for distraction on a long decompression. See section 9 of this manual for more about the games.
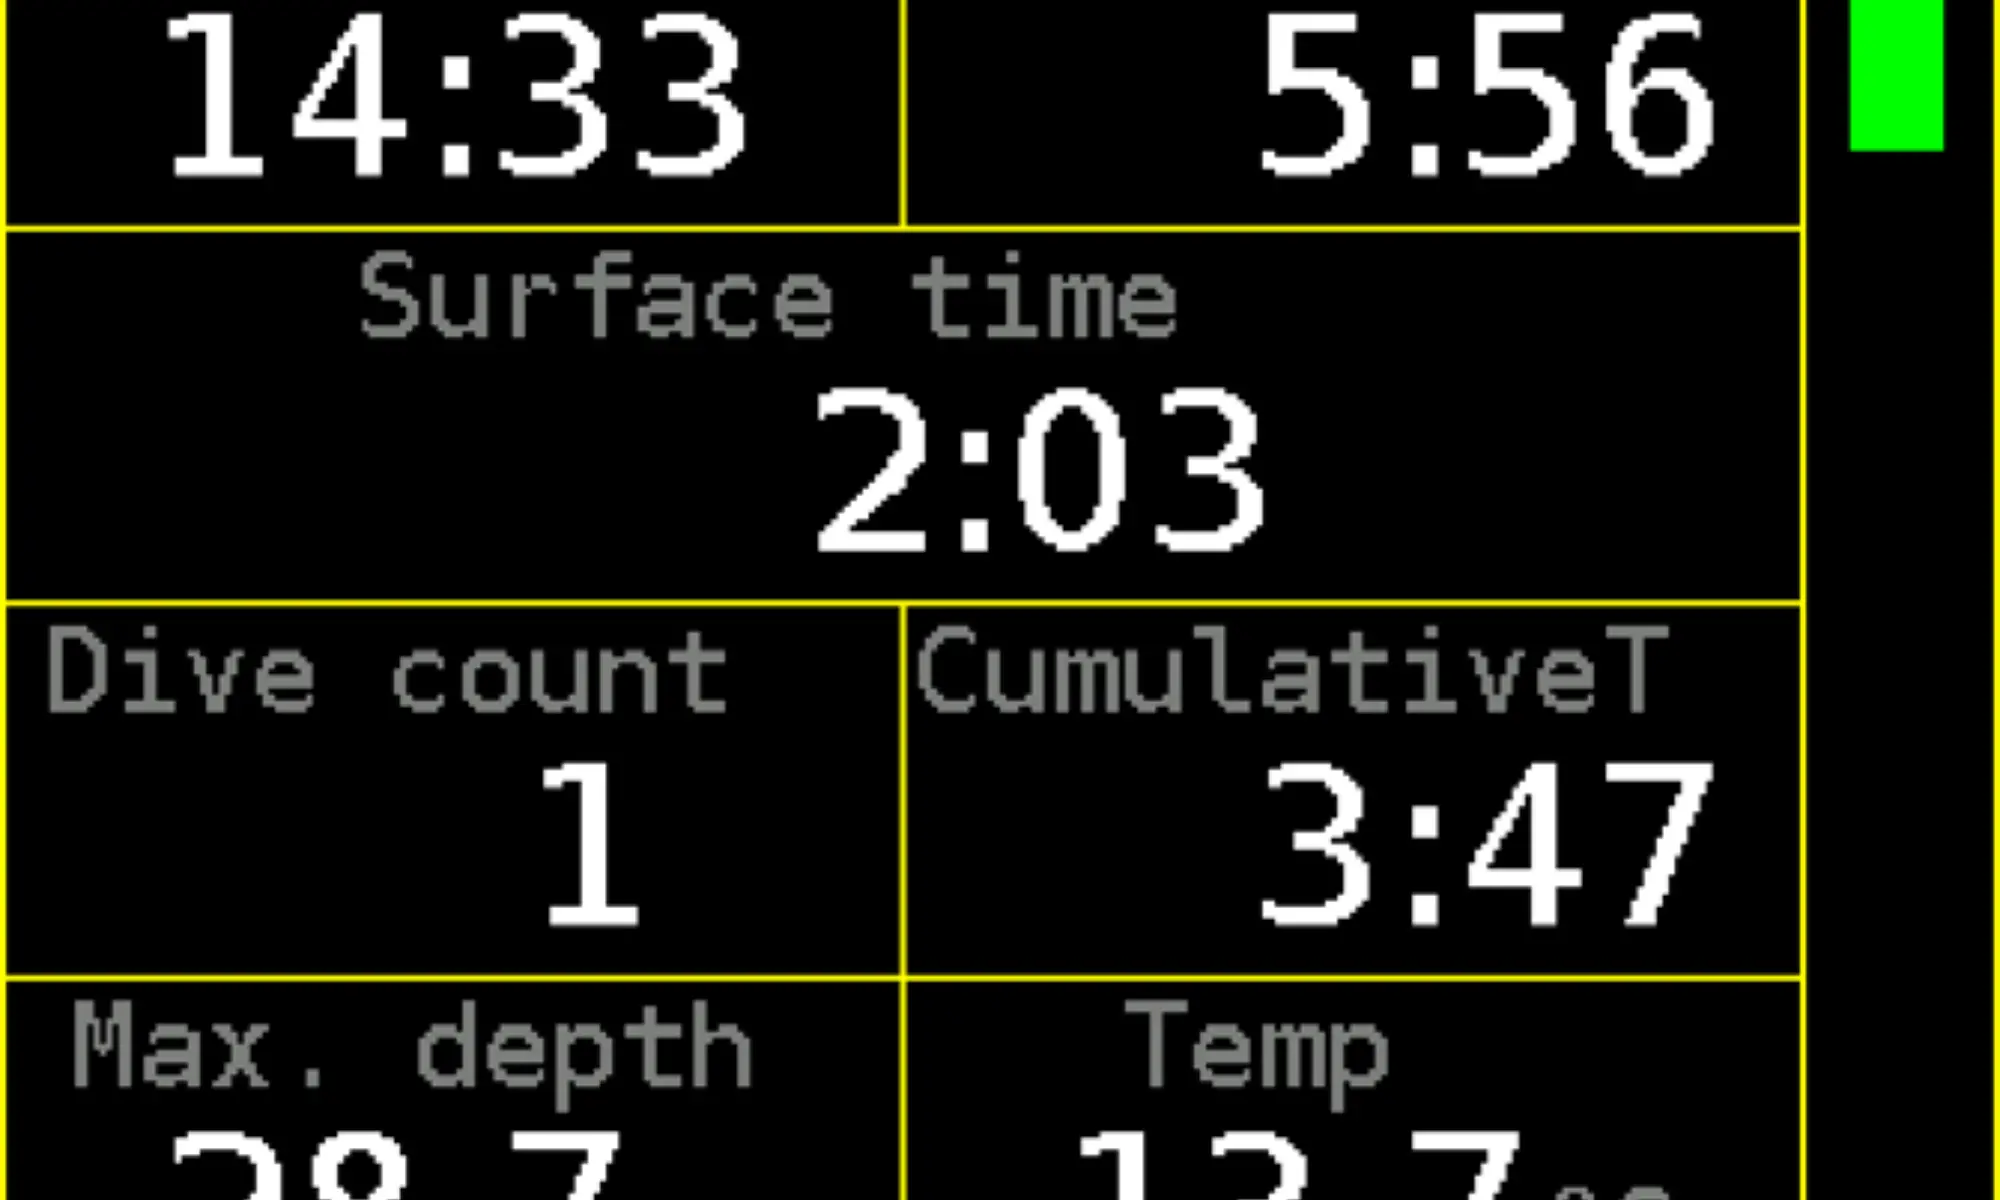
Time
The local time is shown on the display in the top left corner.
Duration
The timer starts after entering the Free mode. Duration of a freediving session includes the time on the
surface and the time spent underwater.
Surface time
This timer is triggered by surfacing.
Dive count
Number of dives during a freediving session.
CumulativeT
The cumulative time is the sum of the time spent underwater.
Max. depth
This is the maximum depth reached during a freediving session.
Temp
Water temperature is measured inside the computer case. After temperature change wait about 1-2
minutes until the temperature reading reaches a stable value. The temperature in air is affected by many
factors and is only an indication.
A temperature correction can be set in Setup → Calibration for better accuracy.
03.6 Free
The freediving mode is indicated by the yellow table gridlines.
03.6.1 Surface screen
The freediving surface screen is shown during a freediving session while on the surface.
03.6.2 Dive screen
The freediving dive screen is shown during a dive (after the descent to the On depth and before the ascent above Off depth). Both depths can be set in Setup → Freediving. The dive screen with the maximum depth and the dive time of the last dive is accessible after surfacing with a short press of the upper button from the surface screen.
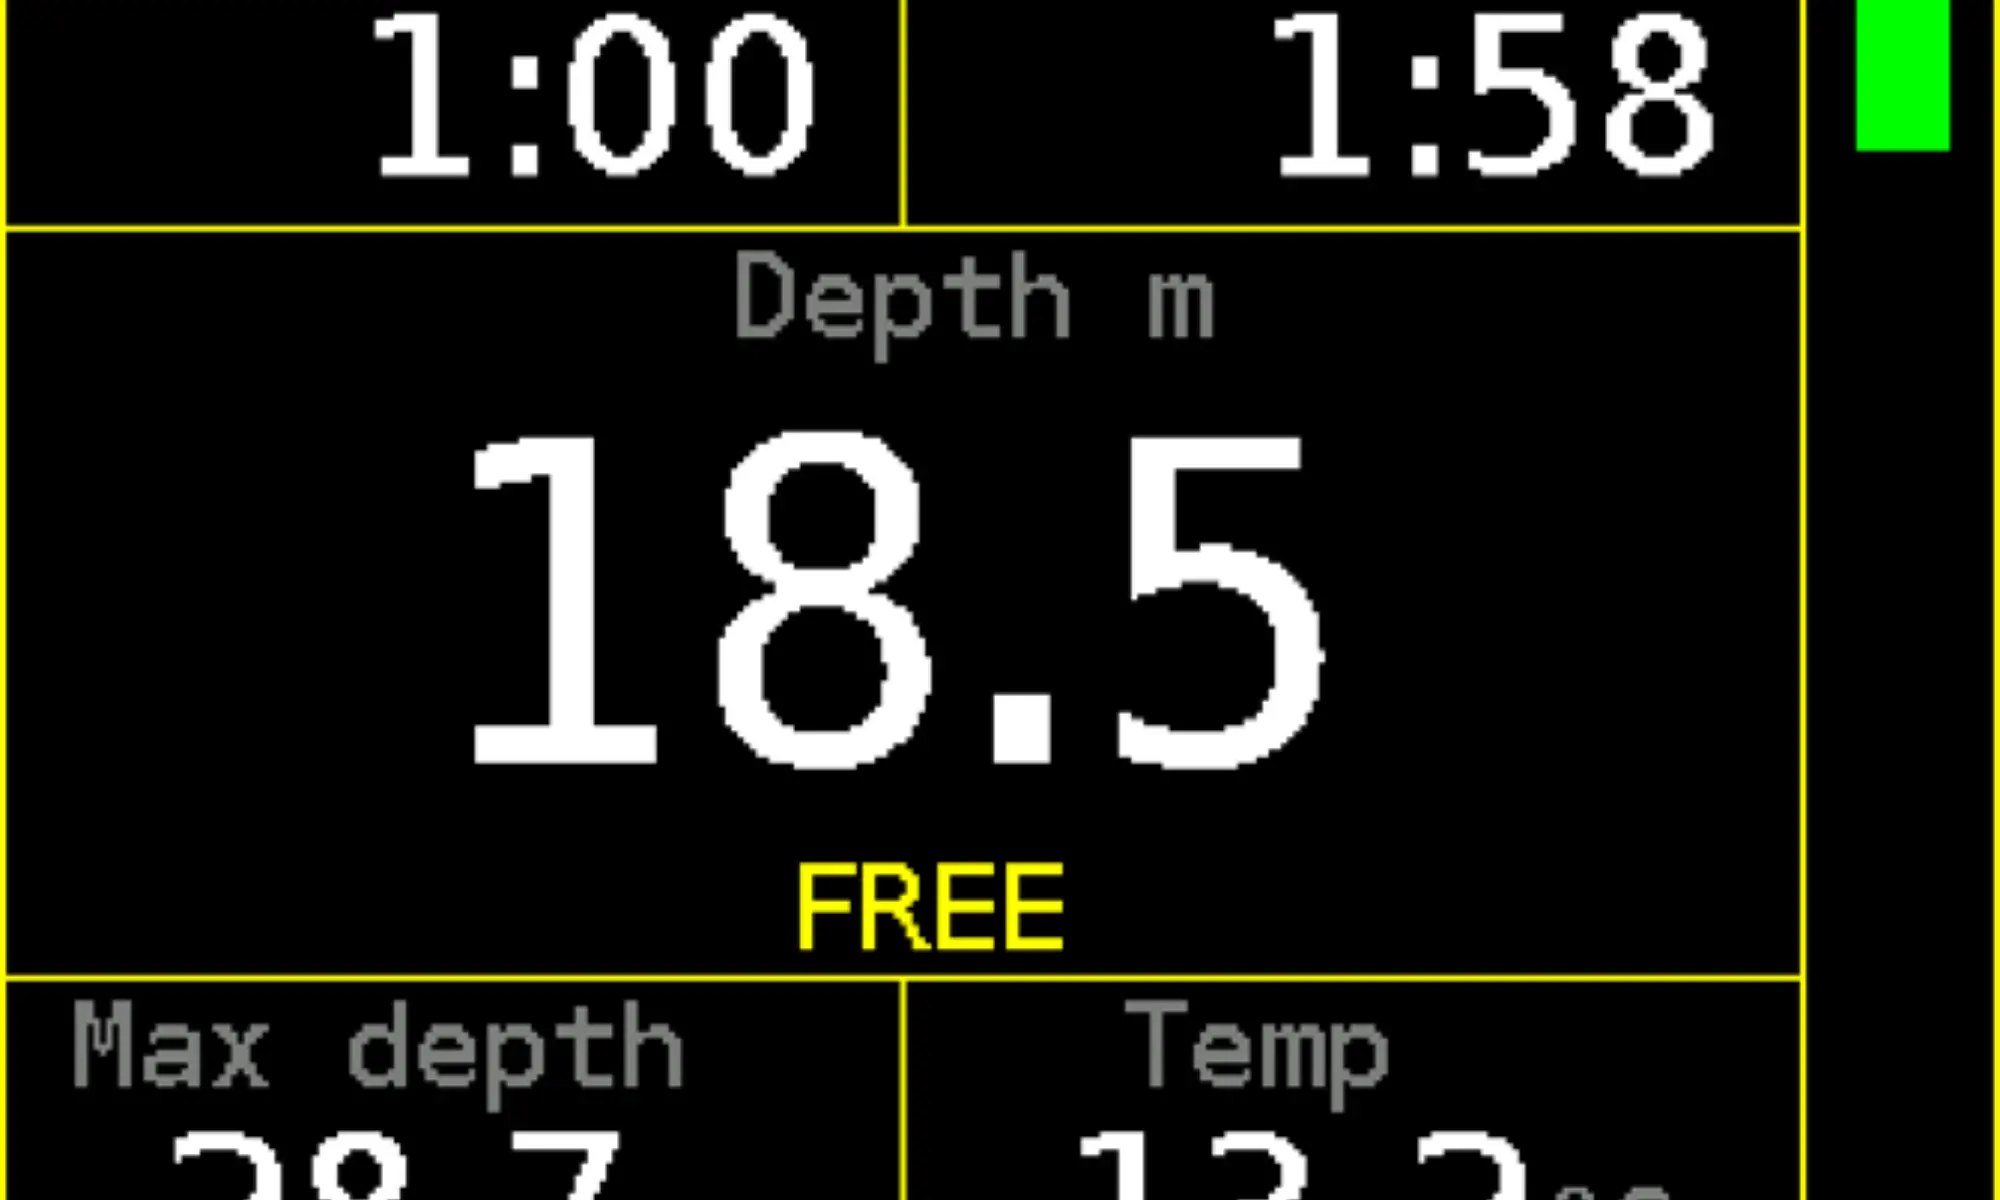
Stopwatch
Operate the stopwatch by the lower button:
Short press: start/stop
Long press: reset
Dive time
The timer starts after submersion to the On depth and stops after ascending above the Off depth.
Depth
The depth can be read in the units set in the setup (m or ft). Depth is calculated from measured hydrostatic
pressure. For calculation fresh water (default) or seawater density can be set.
Max Depth
The maximum depth reached during the dive.
Temp
Water temperature is measured inside the computer case. Because the system is slow, it provides only an
indication during short dives.
03.7 Advised strategies
03.7.1 Diving in darkness
High brightness all the time
This is the preferred option for a simple dive with a high power diving light (torch) used by all team
members. Brightness level 6 to 8 is recommended.
Don’t use this option if light coming from the Freedom display and light coming from your diving
partner’s torch can’t be clearly distinguished in the peripheral vision. Otherwise it may lead to the
separation of the team members.
WARNING: Brightness higher than 7 will significantly reduce battery life per charge. A value of 9 will reduce battery life by up to 50%.
Switching on-off
This option is typical for cave diving. Set brightness to a high level (6 to 9) and a short screensaver timeout
(15 s is more than enough).
Preferably activate the display by light during a dive. Move the Freedom to the light beam instead of moving
the beam to prevent confusion with a light signal.
Low brightness
For diving with eyes accommodated to darkness use the lowest brightness setting (level 1). Your night
vision will not be disturbed. It is preferred to have the display on all the time (i.e. screensaver timeout set
to 0). This option is typical for night dives in clear water.
Dive with slightly brighter display while using a low power torch. Balance the power of the backlight to the
power of your torch to find the optimal setting – no glare but good readability.
The display can’t shine through disturbed silt or mud on low brightness. If it is necessary to switch to
maximal brightness just short press the lower key repeatedly.
Note: Adjusting the function of the lower button may override the brightness control.
"Lower bttn." to ""Prev Scr"
"Stopw btn." to "Base" or "Always".
The setting is placed in the same place as the Lower bttn. BottomTimer: Setup -> Preferences -> Lower bttn.
Other licences: Setup -> Preferences -> User interface -> Lower bttn.
03.7.2 Decompression
Gradient factors
Experienced divers usually set GF regarding to planned dive profile and after dive activity.
GF low 0.30 is default value suitable for an average healthy diver and dive profiles within recreational
range. Lower values are more suitable for deeper dives including extended range air dives and use of
helium rich mixtures. 0 is not uncommon. Use lower value if any risk factor is present. Higher value can
be used for relatively shallow dives, but influence of GF Low on these dives is small (zero on so called
non-decompression dives).
Default GF high 0.80 increases the time at the shallow stops relatively slightly compared to the bare
Bühlmann’s decompression algorithm ZHL. If any risk factor is present, lower value is more appropriate. This
also applies if another dive is planned in a short time or physical activity cannot be avoided shortly after
the dive. Low value of GF high also shortens so called no-deco limits. GF high 0.50 can be considered as very
conservative. For an even smaller value is not usually the reason.
Risk factors
Use a more conservative setting and make only dives with short or no decompression if any risk factor is
present.
The major risk factors for decompression sickness (DCS) are:
• Dehydration
• Heart disease, especially PFO (patent foramen ovale) or ASD (atrial septal defect)
• Previous DCS
• Older age
• Overweight or obesity
• Exercise during a dive or post dive
• Fatigue
• Irresponsibility or inability to follow proper decompression procedures
If excessive fatigue or any other subclinical form of DCS occurs after a dive during which a proper decompression was performed then the presence of one or more risk factors can be assumed.
Diving with air or one nitrox mixture
Confirm the following settings:
• The default OC mix is set to air or nitrox, whichever one you plan to use (Setup → Mixtures)
• All other gas mixtures are disabled (no checkbox checked on the list Setup → Mixtures → Mixture
setup)
Warning: if the ascent gas is set to Optimal (Setup → Decompression) and multiple gas mixtures are enabled then the decompression plan expects their use.
This may lead to indication of shorter time to surface (TTS) and shorter decompression stops. Improper settings like this can’t affect the safety of the decompression if you strictly follow the computer; it only affects the calculation of the plan. This is not applicable to the Basic nitrox version of the Freedom.
Multi-day repetitive dives
It is advised to use a slightly more conservative setting for diving holidays. Do not disable or omit the safety
stop. Use nitrox if available and if you are qualified.
Remember that the diving computer does not know diver’s physical shape. Maintain a high level of hydration
during diving holidays. Do not dive drunken or hungover. Do not dive ill.
Long decompression safety
Preferably, control the decompression safety with the GF high setting and disable the safety stop if the
decompression obligation is longer than 20 minutes. A smaller value of the GF high setting can be used
additionally for increasing safety on the shallow end of decompression, if required.
Switch to bailout gradient factors if you wish to reduce the decompression time (while increasing the risk
of DCS). Bailout GF’s shall be properly set before dive.
Multiple gas usage
This is not applicable to the Basic nitrox version of the Freedom.
Multiple gas usage requires appropriate qualification from a recognized training agency.
Confirm the following settings:
• The ascent gas is set to Optimal (Setup → Decompression)
• All gas mixtures, which you plan to use are properly set and active; and other gas mixtures are
inactive (Setup → Mixtures → Mixture setup)
• The default OC mix is set to the gas you plan to descend with (Setup → Mixtures)
• The gas switch time is set to your preferred time (commonly 2 or 3 minutes)
Never switch the computer to another gas before you start breathing it. Make sure that you breathe the right gas with the MOD greater than your current depth.
Extreme deep diving
Every technical diver who dives to depths greater than 100 m/330 ft has to develop his or her own
decompression strategy. It is necessary to increase the personal limit gradually, step by step. The maximum
operating depth of the Freedom is 300 m/1000 ft. This is probably a much greater depth than you and your
body could handle.
For extreme depth, short bottom-time decompression strategies are common:
• Dive only if in really good physical shape; get your heart examined for PFO
• Use the computer only as a backup for the plan based on your previous experience
• Use a very low value of the GF low; 0 is not uncommon
• Use a high value of the GF high; 1 is not uncommon and even >1 is not uncommon (requires the
special, personally granted license)
• Use optimal gas mixtures
• Stay in the water for minimum 15 minutes after surfacing
• Avoid post-dive exercise; take advantage of the support team
• Maintain thermal comfort during a dive; avoid a hot shower after the dive
• Avoid diving or any other pressure change in the following 48 h
The Divesoft Freedom is not intended for long bottom-time extreme deep diving in any mode other than the gauge mode.
The Full trimix or the CCR version of the Divesoft Freedom is required for trimix decompression calculation.
Section 04: Setup
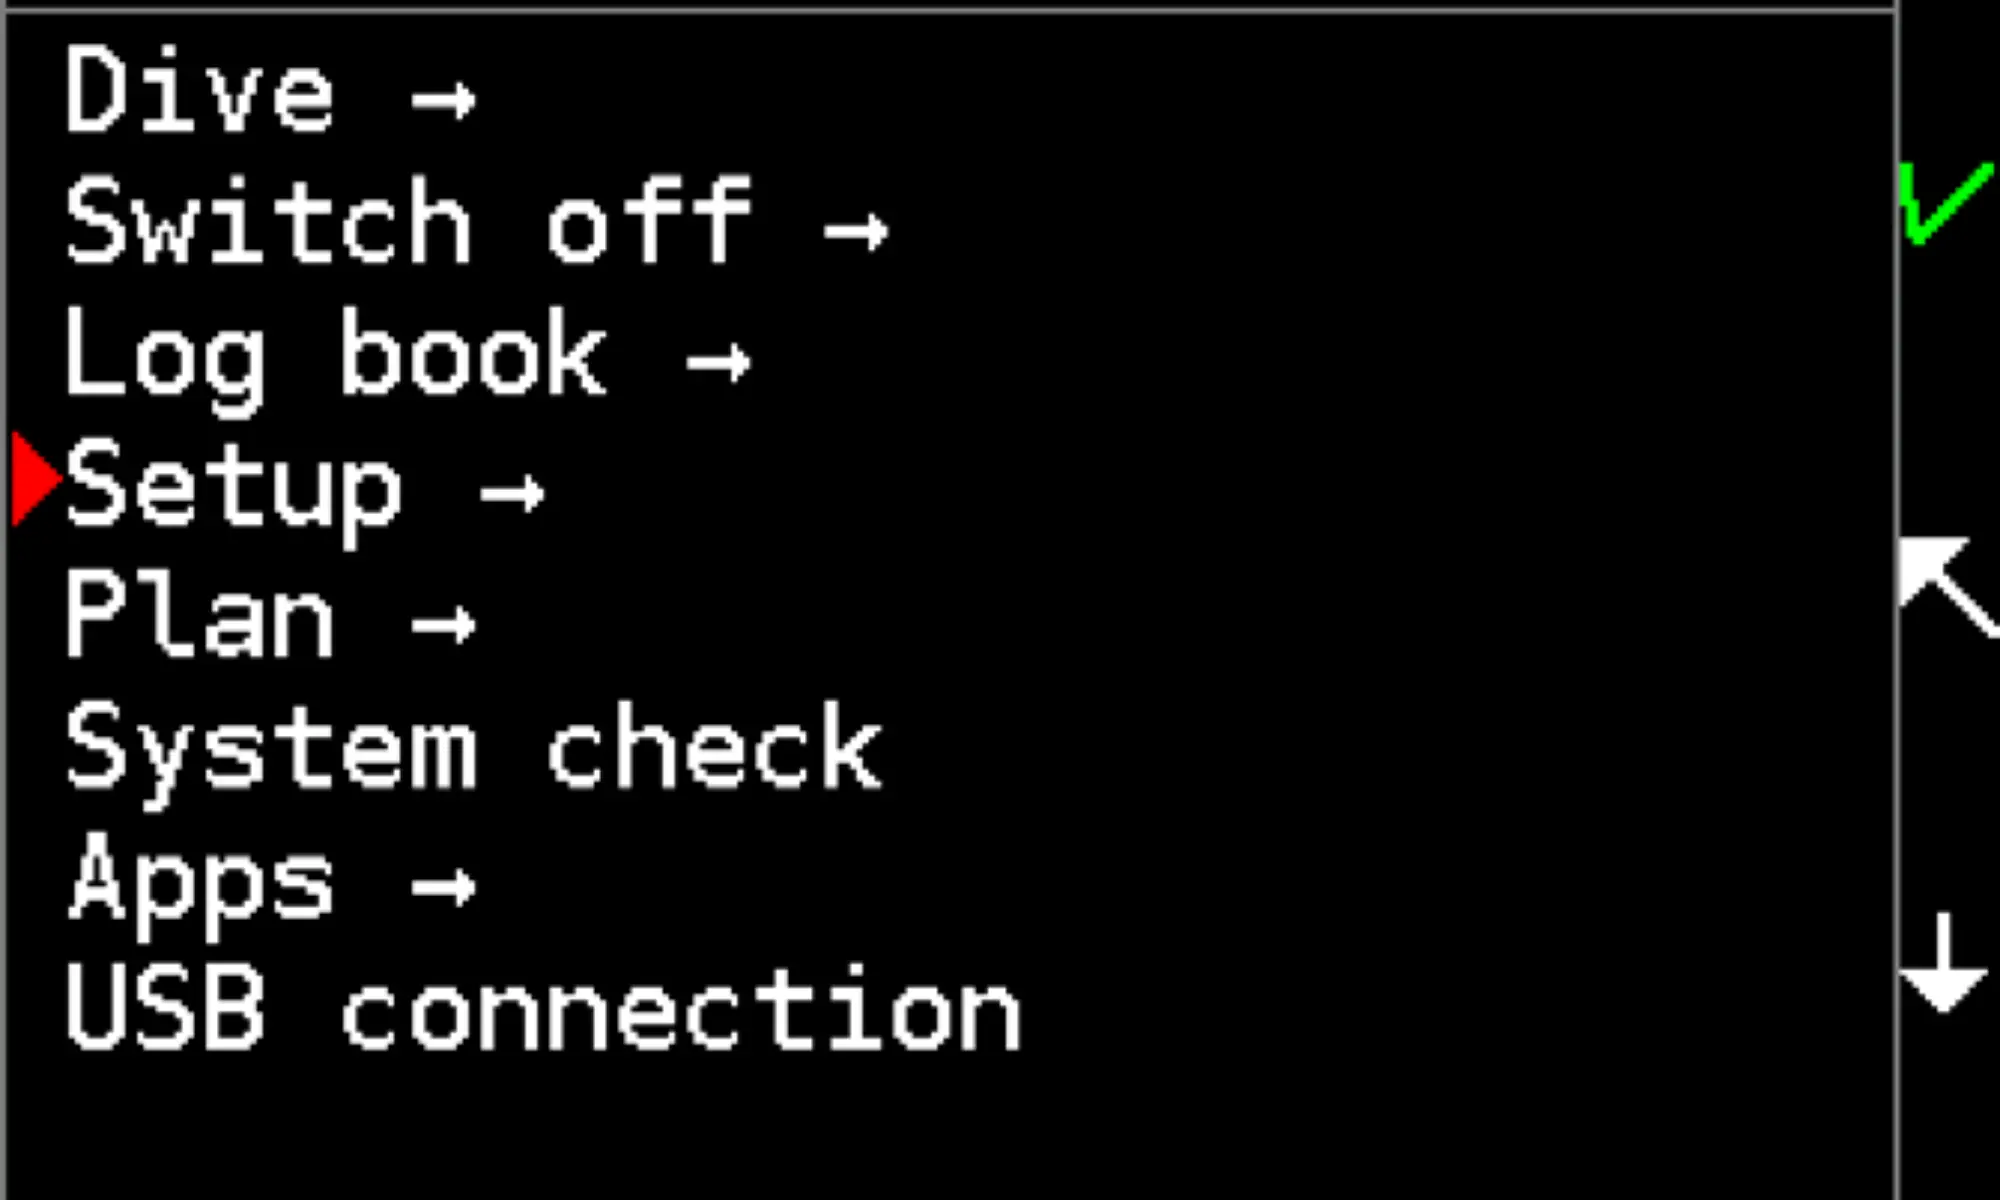
The Divesoft Freedom is configured in the surface mode. Activate the surface mode main menu with a short press of both keys and select Setup. Some values can be set during a dive; however, this possibility is reserved for resolving exceptional and emergency situations. The particular set values depend primarily on the user’s experience, physiology and personal preferences. The fact that Divesoft Freedom enables setting a certain value does not mean that this kind of setting is safe and suitable for you and for your planned dive. If you are not sure which value to set, leave the values of the default setting. The manufacturer does not provide a warranty for faulty operation of the Divesoft Freedom if this kind of faulty operation is the result of an improper setup. The factory default setting value is shown in square brackets in the following headlines.
04.1 Editor use
The majority of variable values is edited in a similar manner.
Tilt toward yourself– decrease the entered digit by one or uncheck
flag
Tilt to the left – move the cursor to the left
Tilt to the right – move the cursor to the right
Press upper key – discard editing (reset to previous value)
Long press upper key – reset to default value
Press both keys – exit without save
Press lower key – save and exit
Permissible range is indicated by <minimum ..[default] .. maximum> value.
The display shows a brief description below.
Note: Perform the Horizontal calibration (See section 4.8) if there is no valid response to tilting or tapping
An alternative method of input in the editor is the button method. This can be set in Setup -> Preferences -> User interface -> Navigation -> Bttn.
Upper button - moves the cursor over characters
Lower button - sets the value
Long press upper key - moves the cursor back one character
Long press lower key - resets the value to the default and moves the cursor to the beginning.
To save the value you must scroll through all characters to the end, the editor will exit after the last character.
04.2 Decompression
04.2.1 Gradient factor
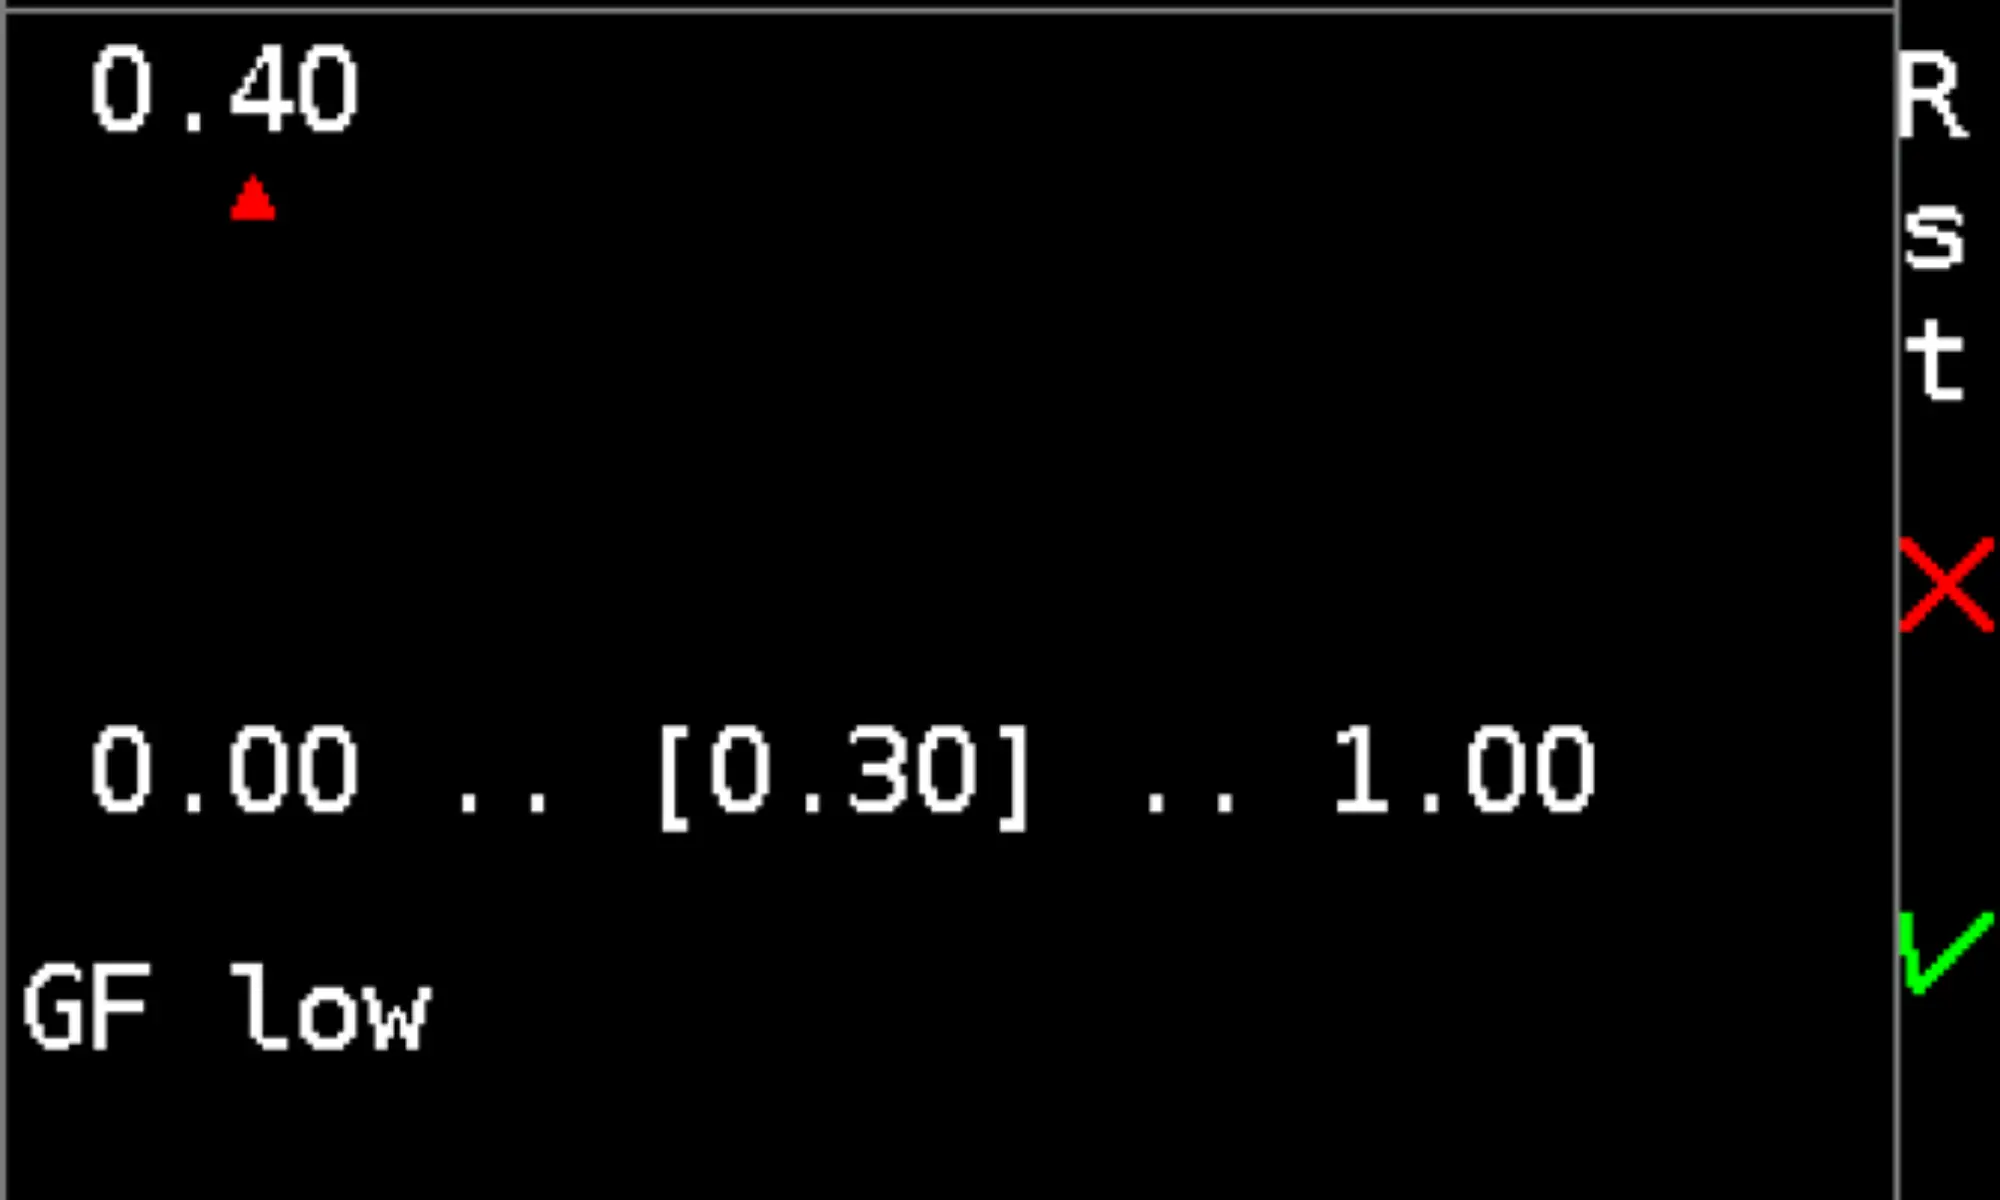
GF low [0.30]
The gradient factor at the start of decompression (range: 0.00–1.00).
GF low determines an additional increase of safety at the depth of
the first decompression stop or, as the case may be, at the depth of
the decompression ceiling at the start of decompression. Setting the
value of 1.00 corresponds to the Bühlmann decompression algorithm
without additional increase of safety using the gradient factors
method.
Setting low values leads to deeper and longer stops at the start of
decompression.
See also Advised strategies – Gradient factors (See section 3.7.2).
GF high [0.80]
The gradient factor at the end of decompression (range: 0.00–1.00).
GF high determines an additional increase of safety when ascending to the surface. Setting the value of
1.00 corresponds to the Bühlmann decompression algorithm without additional increase of safety using the
gradient factors method.
Setting low values leads to prolongation of shallow decompression stops.
For extreme dives a GF high greater than 1 is sometimes used (less safe than the standard Bühlmann
decompression algorithm). This requires the special, personally granted license.
See also Advised strategies – Gradient factors (See section 3.7.2).
Bailout GF low [0.80]
The gradient factor for bailout at the start of decompression (range: 0.00–1.00).
As a general rule, for bailout GF low a higher GF value (a lower additional increase of safety) is set than for
standard GF low.
Bailout GF high [0.95]
The gradient factor for bailout at the end of decompression (range: 0.00–1.00).
As a general rule, for bailout GF high a higher GF value (a lower additional increase of safety) is set than for
standard GF high.
04.2.2 Safety stop (On)
3 minute safety stop within depth 6 to 3 m (20 to 10 ft) is indicated after a dive to a depth greater than 10 m (30 ft).
04.2.3 Ascent gas (Optimal)
Specifies which mixture or set of mixtures will be used for ascent planning. If optimal gas is selected, then the time to surface (TTS) and the dive plan assume the changing of gases from the list of active mixtures. If current gas is selected, then only the gas currently breathed is used for TTS calculation and dive planning. This setting is preferred for dives that do not involve changing gas mixtures.
04.2.4 Deco stops
Stops/Ceil. [Stops]
The Divesoft Freedom can be used in the regimen of separate
decompression stops or in the regimen with only the decompression
ceiling depth indicated.
As a general rule, the stops regimen is more suitable for open water
diving and is easy to understand and follow. The ceiling regimen
is more suitable for cave and technical diving. The time spent on
decompression is slightly shorter if the ceiling regimen is used
for continuous decompression. Personal preference is the most
important.
Last stop [3 m/10 ft]
The depth of the shallowest decompression stop can be set to 3 m/10 ft or 6 m/20 ft. Choose the
depth according to the conditions on the surface and your preference. A deeper last stop extends the
decompression time slightly. Use the 6 m/20 ft last stop when using 100% oxygen for decompression.
Rounding [60 s]
You can choose the time on stop rounding (1s; 30s; 60s).
30 or 60s is a good choice for recreational dives. For deep dives, especially with a small value of the GF
low and resulting short stops on decompression start, it is better to choose the 1s rounding. Otherwise
a prolonged stay on the deco stop due to rounding may lead to the disappearance of the next short deco
stop and could negatively affect the decompression profile smoothness.
04.2.5 Deep stops
Pyle Deep stops (Off)
Empiric modification of decompression profile according to Richard Pyle’s algorithm.
The combination of Pyle stops and a small value of the GF low can result in a not so optimal decompression
profile. Please choose only one preferred method. As a general rule, use GF low 0.30 or less and switch (left
switched) Pyle Deep stops Off.
Stops duration (2 min) The value of the Pyle stops duration (range: 1–3 min).
04.2.6 Ascent rate
Rate is used for calculation of the ascent plan and indication of ascent rate, if relative measuring (percentage) is set in Setup → Preferences → User interface → Vertical speed
04.2.7 Descent rate
Rate is used for calculation of the descent plan and indication of descent rate, if relative measuring (percentage) is set in Setup → Preferences → User interface → Vertical speed.
Speed 1 ǀ10 m/min / 33 ft/minǀ
The anticipated ascent rate within small depths,
in zone 1 (range: 1–20 m/min).
The value is m/min in metric and ft/min in imperial units.
Depth zone 1 ǀ10 m / 3 ftǀ
The depth defining zone 1. This zone lies between the surface and the set depth (range: 0–300 m).
The value is m in metric and ft in imperial units.
Speed 2 ǀ10 m/min / 33 ft/minǀ
The anticipated ascent rate within medium depths, in zone 2 (range: 1–20 m/min).
Depth zone 2 ǀ80 m / 262 ftǀ
The depth defining zone 2. This zone lies between depth zone 1 and the set depth (range: 0–300 m).
Speed 3 ǀ18 m/min / 59 ft/minǀ
The anticipated ascent rate within large depths, in zone 3. (range: 1–20 m/min).
Warn under [80 m]
The threshold at which the alarm is activated to indicate exceeding
the descent rate. At smaller depths, exceeding the descent rate is
ignored.
The value is in m metric and ft in imperial units.
This alarm is disabled in factory default setting. It can be enabled in
Setup → Alarms → Alarm sources → Rates → Descent rate.
Max rate [20 m/min]
The anticipated descent rate (range: 1–40 m/min).
The set rate is also used for dive planning.
The value is m/min in metric and ft/min in imperial units.
Max rate 30 m/min is used to indicate a descent rate at a depth shallower than the warn-under depth.
04.3 Mixtures
04.3.1 Mixture setup
The number of available mixtures depends on the software version.
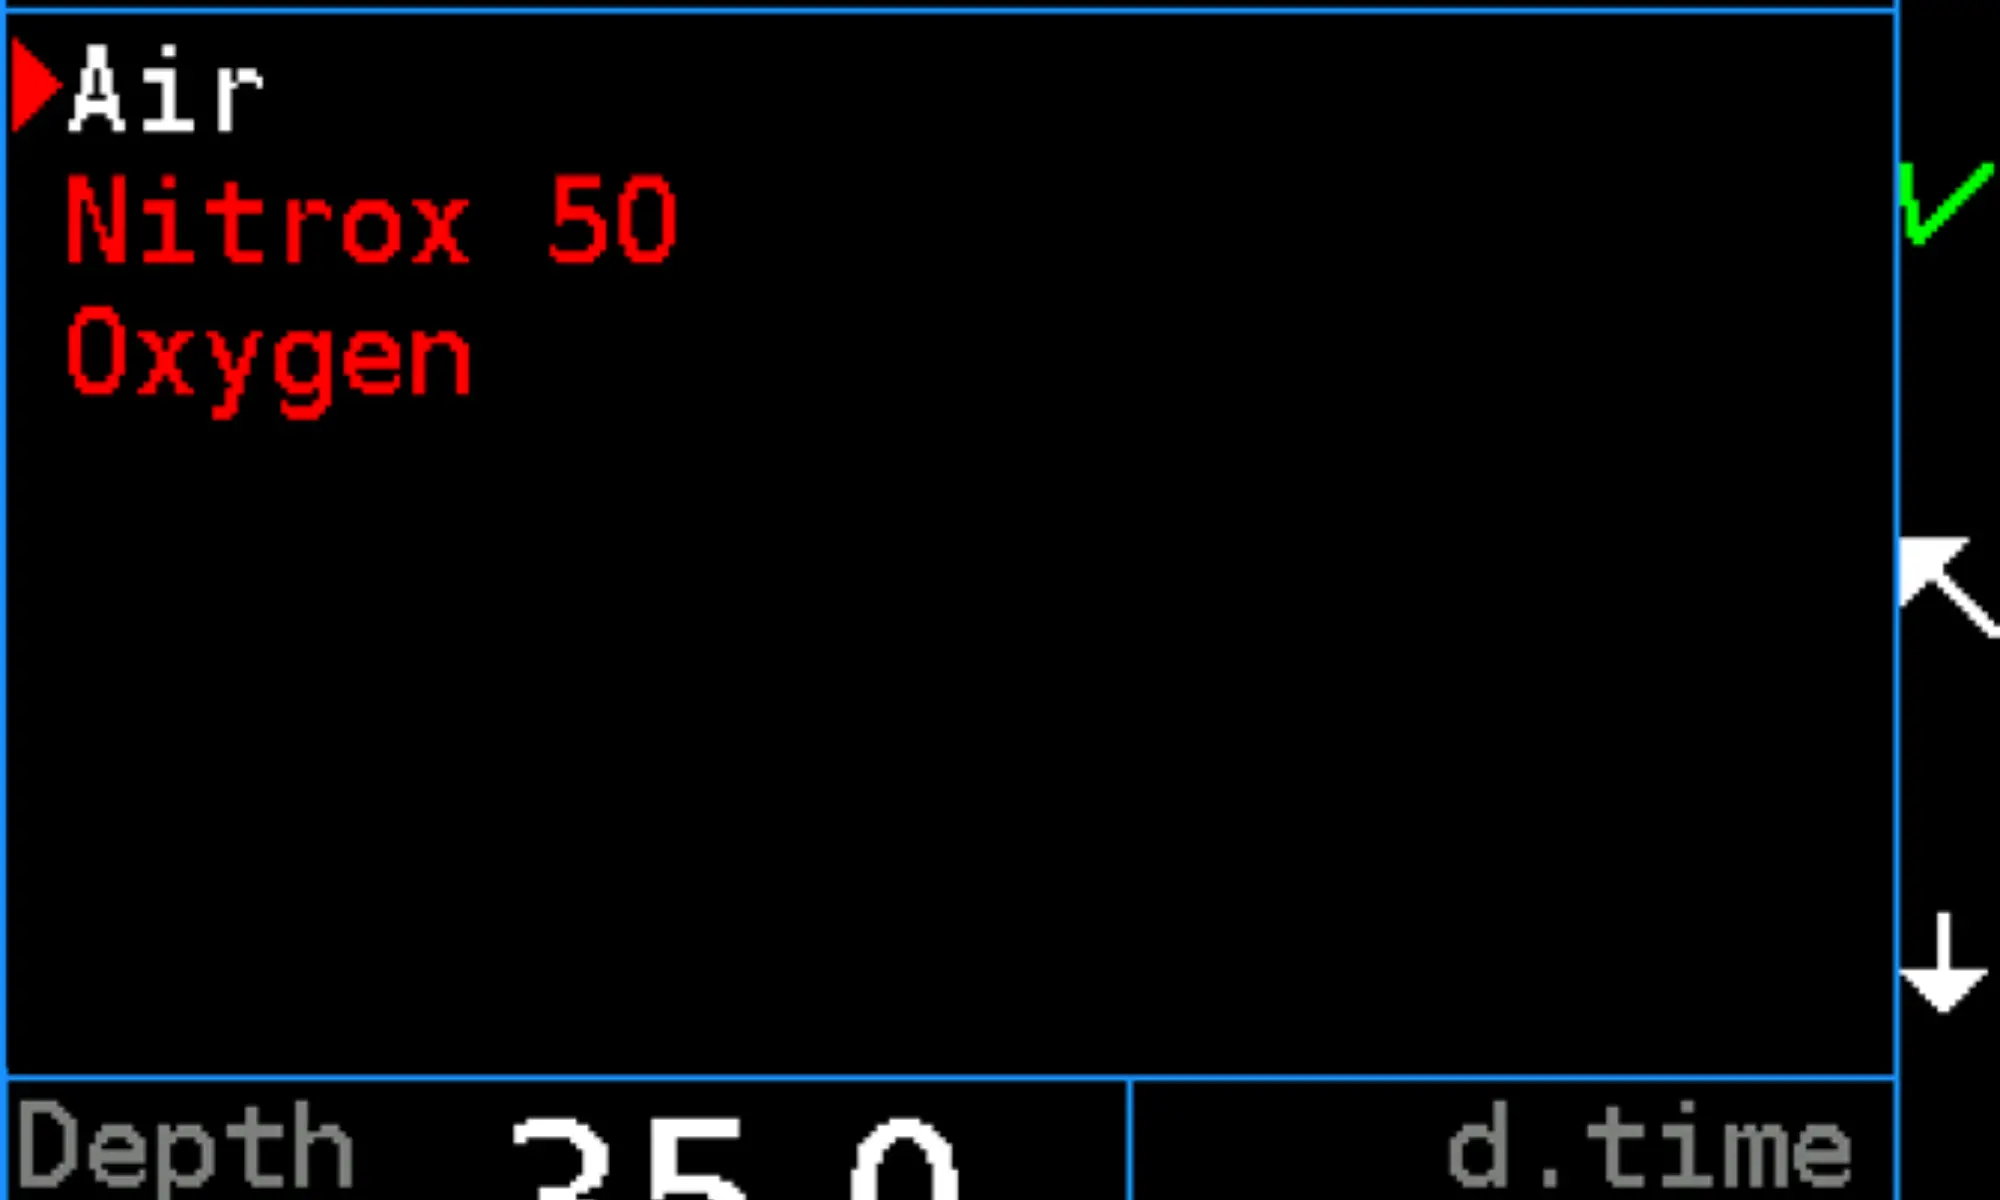
Each mixture can be set as active (marked checkbox) or inactive (clear box). It can be done in the editing screen or by a shortcut – long press of the upper key in the list of mixtures. Only active mixtures can be selected. The default mixture is always active. In an emergency, a mixture can be marked as active during a dive. Furthermore, a new mixture can be defined during a dive. These features are reserved for emergency situations.
04.3.2 Def. OC mix
A default mixture for an open circuit apparatus. A different default mixture can only be selected from mixtures that are marked as active.
04.3.3 End pressure ǀ50 barǀ
Determines the size of the tank's pressure safety margin. The value is reflected in the planner calculation.
04.3.4 SAC ǀ25 l/minǀ
Surface Air Consumption determines the diver's gas consumption value. The value is used to calculate gas management in the planner.
04.3.5 Gas switch ǀ2 minǀ
The gas switch duration may be set from 0 to 5 minutes. This time will be added to the dive plan and TTS calculation.
04.3.6 Min pO2 ǀ0.18 barǀ
The low pO2 alarm is activated if the current pO2 is less than the set value (range: 0.18–0.40 bar). The setting of minimum partial pressure of oxygen plays a role in gas switching calculations.
04.3.7 Max pO2 ǀ1.60 barǀ
The high pO2 alarm is activated if current pO2 is bigger than set value (range: 0.8–1.6 bar). The setting of maximum partial pressure of oxygen plays role in gas switching calculations.
04.4 Alarms
There are two kinds of messages, alarms and notifications. Alarm messages appears on red background, notifications on a blue background.
04.4.1 Alarm sources
Deco stop miss [On]
The alarm is activated if the decompression stop is violated (in the stops regimen).
CNS [On]
This alarm occurs when 75 %, 90 % and 100 % of CNS oxygen toxicity limit is reached.
Descent rate [Off]
A descent speed greater than set while deeper than set activates the alarm.
See descent rate setting in Setup → Descent rate (See section 4.2.7).
Ascent rate [On]
An ascent speed greater then set for the current deep interval activates the alarm.
See ascent rate setting in Setup → Ascent rate (See section 4.2.4).
Low battery [25 %]
The alarm is activated if the remaining battery capacity falls below this limit.
Range is 0–40%; 0 means that the alarm is disabled.
If set to a value greater than 10 %, then a second alarm on 10 % occurs.
04.4.2 Notifications
No deco end [On]
The end of the dive in zero time (in the terminology of the
Bühlmann decompression model), i.e. notification that there will be
a decompression obligation.
Deco stop end [On] The end of the decompression stop (in the stops regimen). You can ascend to the next stop or to the surface, as indicated on the display.
Gas switch reminder [Off]
A recommendation to switch to a different mix.
Gas switch done [On]
The change of mixture in OC mode or diluent in CCR mode has been executed.
This notification prevents accidental gas mix switch using a shortcut if any key is pressed unintentionally.
Depth & Time
A notification that the set time or depth during a descent or ascent has been reached. Up to three depth alerts can be set during descent, three time alerts, and three depth alerts during ascent.
The values are located on an imaginary dive profile in the editor. On the left are the values for descent depths (m, ft), on the "bottom" are the values for time (minutes), on the right are the values for ascent depths.
Lower key - moves the cursor to the next value
Upper key - enter to edit the value.
It is possible to set three separate
depths in the range of 0–300 m, where 0 means deactivation of the notification.
It is possible to set three separate times in the range
of 0–999 min., where 0 means deactivation of the notification.
Airbrake
Sets alerts for air breaks during decompression with high oxygen gases.
Break above % - above how much %O2 we consider the mixture to be oxygen/airbreak
Break after - after how many minutes on oxygen do we want to break
Break length - length of airbreak
The times are default 0 - off
04.5 Rebreather
Rebreather settings are available in the Closed Circuit version of the Divesoft Freedom only. There are four types of rebreather supported:
CCR Type
CCR Type - CCR
Constatnt pO2 CCR - Electronic or manual CCR (eCCR or mCCR), where pO2
is stable regardless of depth change, set by setpoint.
CCR Type - aSCR
The constant mass flow semi closed rebreather (active SCR).
CCR Type - pSCR
Respiratory minute volume keyed semi closed rebreather (passive SCR).
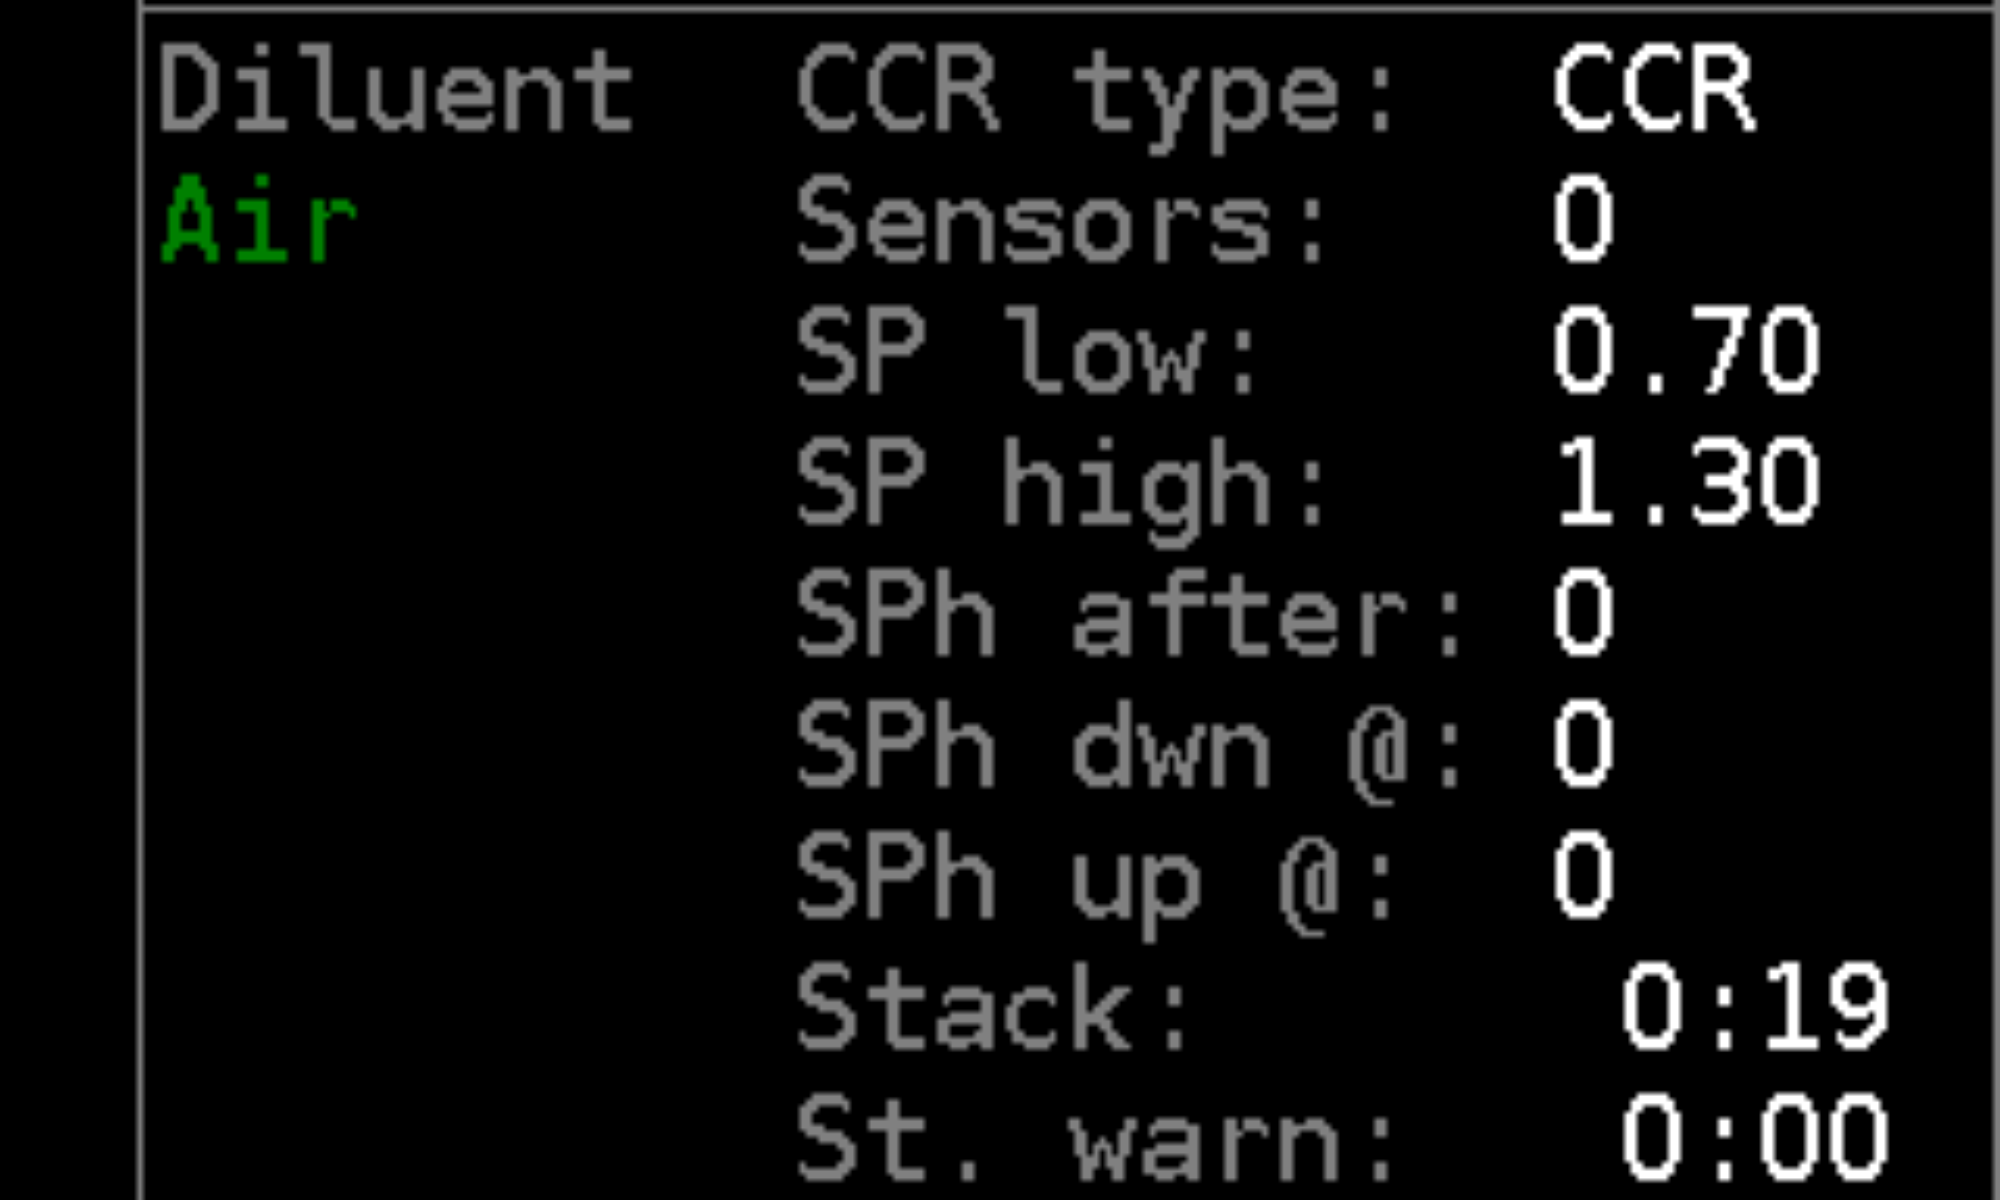
04.5.1 Const pO2
Diluents
8 mixtures with any content of oxygen, helium and nitrogen can be set. This setting is independent from the
OC mixture setting.
The control is the same as with OC mixtures.
Default diluent
A default diluent for a closed circuit rebreather.
SP Low [0.7]
The SP low is set after switching to the fixed setpoint CCR dive mode on the surface.
SP High [1.3]
The SP low can be switched to the SP high manually (via the shortcut or via the menu) or automatically at
a set depth during a descent or at a set runtime.
SPhigh auto [0 m/ft]
It is possible to set the automatic switching of the high setpoint during exceeding the depth during descent, time or depth during ascent. The editor shows an imaginary dive profile, where on the left side is the depth during descent, on the "bottom" is the time and on the right the depth during ascent.
Lower key - cursor movement
Upper key - enter the edit value
When the set limits are exceeded to this depth, the high setpoint is automatically set. Zero disables this feature.
SP shortcuts [Off]
Enables or disables the use of button for switching setpoints
SP ascent [High]
Specifies which setpoint will be used to calculate the TTS. Choice between current or high.
04.5.2 aSCR
VO2 [1.5 l/min]
The metabolic consumption of oxygen (VO2
) can be set in the range 0.5–3 l/min.
Constant flow [7.0 l/min]
The constant flow of premix can be set in the range 5–20 l/min.
04.5.3 pSCR
PA ratio [8.0]
The PA ratio can be set in the range 2–16. It is fixed by the design of the SCR.
Ventilatory coef O2 [20]
The ventilatory coefficient for oxygen is a constant that represents the fact that the harder one works, the
faster one breathes (= respiratory minute volume/metabolic consumption of oxygen, VO2
). Fit people have
a lower respiratory rate for equivalent amounts of work than unfit people, so the lower value represents
a physically fit individual (range: 14–28).
04.5.4 Common settings
Stack time [0 min]
Set the scrubber lifetime. The stack time warning will be generated after this time expires. Zero disables
this feature.
Number of sensors [0]
Enter the number of O2
chemical sensors connected to the Freedom using a cable. One, two or three sensors
can be connected.
The cable equipped with the Molex connectors is included in the Closed Circuit version of the Divesoft
Freedom distribution package or can be ordered separately.
Faulty sensors
You can mark any connected but untrusted sensor as disabled. By doing so, you will remove the these
sensors from the calculation of the average pO2
Cell -> 10k
When using the Freedom with external sensors, it is sometimes necessary to adjust the voltage of the sensors, which can be changed by wiring the sensor. This adjustment determines terminator setting. Normally ON. On CCR cables with insulators usually need to be turned off.
3rd sens. ratio
Coefficient for 3rd sensor ratio.
Coeficient for 3rd sensor voltage with disabled terminators, applies only on HW rev 3.0 and older.
04.6 Freediving Setup
On depth [1.0]
The descent to On depth triggers the start of a dive. Set value greater than Off depth.
Off depth [0.3]
The ascent above Off depth means the end of a dive. Set value smaller than On depth.
Left hand, right hand and the auto orientation can be selected. Auto orientation selects the left or right hand position automatically during the start. It will not switch the display orientation when the diver changes position (i.e. during a head down descent).
Brightness
The display backlight brightness level can be set from 1 to 9. The change of brightness is immediately reflected during a setting, so preferably change this setting in the shade or in the dark. For diving with eyes accommodated to darkness use the lowest brightness setting (level 1). Use high brightness (level 5 to 9) for diving with a high level of ambient light. Also see advised strategies for Diving in darkness (See section 3.7.2).
WARNING: Brightness higher than 7 will significantly reduce battery life per charge. A value of 9 will reduce battery life by up to 50%.
Example: normal battery life with setting 5 is 18h, with brightness set to 9 it is only 9h
Menu highlight
Increase the font of the selected menu line
Curr. - only the selected line is highlighted
All - whole menu in large font
None - all in small font
Screensaver [0 s]
The display will be switched off after the screensaver timeout
expires. Zero disables this feature (i.e. display is all the time on).
Screens
Any dive mode screen can be disabled.
OC row4/col3 custom field
The decompression floor or the average depth or TTS2 can be set for the
detailed OC screen.
TTS2 is Time to surface calculated with current OC mixture only.
04.7.2 Timeouts
Surface idle [10 min]
The Freedom will be switched off after this timeout expires (range: 1–120 min).
Before switching off, “Shutdown?” question is displayed for 30 s. Select No to restart this timer.
Prepared idle [15 min]
The manually activated dive mode will be switched back to surface mode if the dive does not start during
this timeout (range: 1–120 min).
Dive termination [10 min]
The dive will be terminated after surfacing and if no subsequent submersion starts during this timeout
(range: 0–30 min). Zero disables this feature (i.e. dive will not be terminated automatically).
Dive end Confirm [Off]
If the dive end confirmation is On then a confirmation dialog is displayed for 30 s before the dive ends.
Select No to restart the dive termination timer.
Dive time [Auto]
Auto - stop divetime on emergence
Cave - divetime stops after manual end of dive, for cave diving with more dry and wet (siphons/sumps) sections.
04.7.3 User interface
Checklist [Enabled]
If this is not disabled then the setting summary will be shown when the dive mode starts.
This is an essential part of a predive check especially for muti-gas and rebreather diving.
Plan order[Time]
The dive ascent plan can be sorted by time or by depth (i.e. in reverse order).
Key delay [0] If a greater value than 0 is set then a longer button press is needed to be recognized as valid user input. Use in case of troubles with unintended activation.
Navigation [Bttn]
The numbers in the editor can be increased or decreased by tilt, by buttons or by tap. To control with tapping it is
necessary to practice a little. Do not change the setting to tap unless you have a strong reason.
Gas shortc. [Off]
The default setting for gas shortcuts is off. If enabled then a long press of the upper key selects the
previous gas mixture and a long press of the lower key selects the next gas mixture. This list is cyclic.
If the “breathable” option is selected, then mixes with O2 inside the breathable range with regard to the current depth are switched. The limits of breathable range are set in Setup → Mixtures. If the “all” option is selected, then all mixes are switched, regardless breathability. Each gas switch produces an alert - both haptic and visual.
Vert. rate [Unit/min]
If percent is set then the ascent and descent rate are indicated relatively to the ascent and descent speed
limits. If unit/min is set then the ascent or descent rate are indicated in depth unit per minute.
Stopw. bttn.
Specifies under which conditions the bottom button functions as a stopwatch control in Gauge mode. You can choose between Disabled, Base scr only, or Always.
Big Depth
Specifies what to display on the bottom line of the Big screen.
Avg - displays average depth
Max - displays maximum depth
Only - displays current depth ONLY, nothing else.
Lower bttn.
Determines the behaviour of the bottom button. The button can be predefined to turn the display off and on for battery saving, or it can be used to reverse the scrolling direction between screens.
04.7.4 Units [Metric]
Imperial or metric units can be selected.
04.7.5 Salinity [Fresh]
Salinity Fresh, Salt or EN 13319 can be set according the water density. If changed to the Sea option then the density of seawater will be used for the depth calculation.
The majority of depth gauges is calibrated to fresh water. Do not change this setting unless a direct
comparison with a depth gauge calibrated to seawater is needed.
EN13319 which is the "universal" density according to the same standard - 1020 kg/m3, which is very close to salt water and quite far from fresh water.
Setting of fresh/sea water doesn’t affect decompression calculations. Decompression is based on ambient
pressure and is independent of displayed depth. Only depth of decompression stops is rounded up to usual
values according to settings of fresh/sea water and metric/imperial units.
04.7.6 Default mode [OC]
If submersion to a depth greater than 1.5 m occurs with the computer in surface mode or switched off, the computer switches to the selected default mode.
04.7.7 Full log [Off]
04.8 Calibration
Calibration O2
See O2
sensors calibration (See section 3.4.2).
Horizontal calibration
Calibration of accelerometers, which are used for control by tilt or tap. Place the computer horizontally
(display up) and press any key. It is preferred to use a steady horizontal ground (e.g. a table).
Pressure corr. [0.00 mbar]
Specify pressure sensor correction for more precise measurement of a barometric pressure or altitude. This
correction is not needed for general use.
Temperature corr. [0.0 °C/°F]
Specify temperature sensor correction for more precise measurement of temperature. This correction is not
needed for general use.
04.9 Miscellaneous
Date and Time
Sets the current time and date
Do not change local time between repetitive dives because the change of local time affects the calculation
of desaturation during a surface interval.
It is advised to set the local time of a destination prior to leaving for a diving vacation in a different time
zone.
Date format
You can choose between common time formats used in different parts of the world.
ISO YYYY-MM-DD 2021-10-18
EU DD.MM.YYYY 18.10.2021
US MM/DD/YYYY 10/18/2021
Set owner
The name of the owner can be set. The first line is displayed when the device is started.
Factory defaults
Reset all setting to default values (except date and time).
Computer will be restarted and the horizontal calibration starts automatically after the reset
04.10 Factory defaults
Reset all setting to default values (except date and time). Computer will be restarted and the horizontal calibration starts automatically after the reset
Section 05: Log book
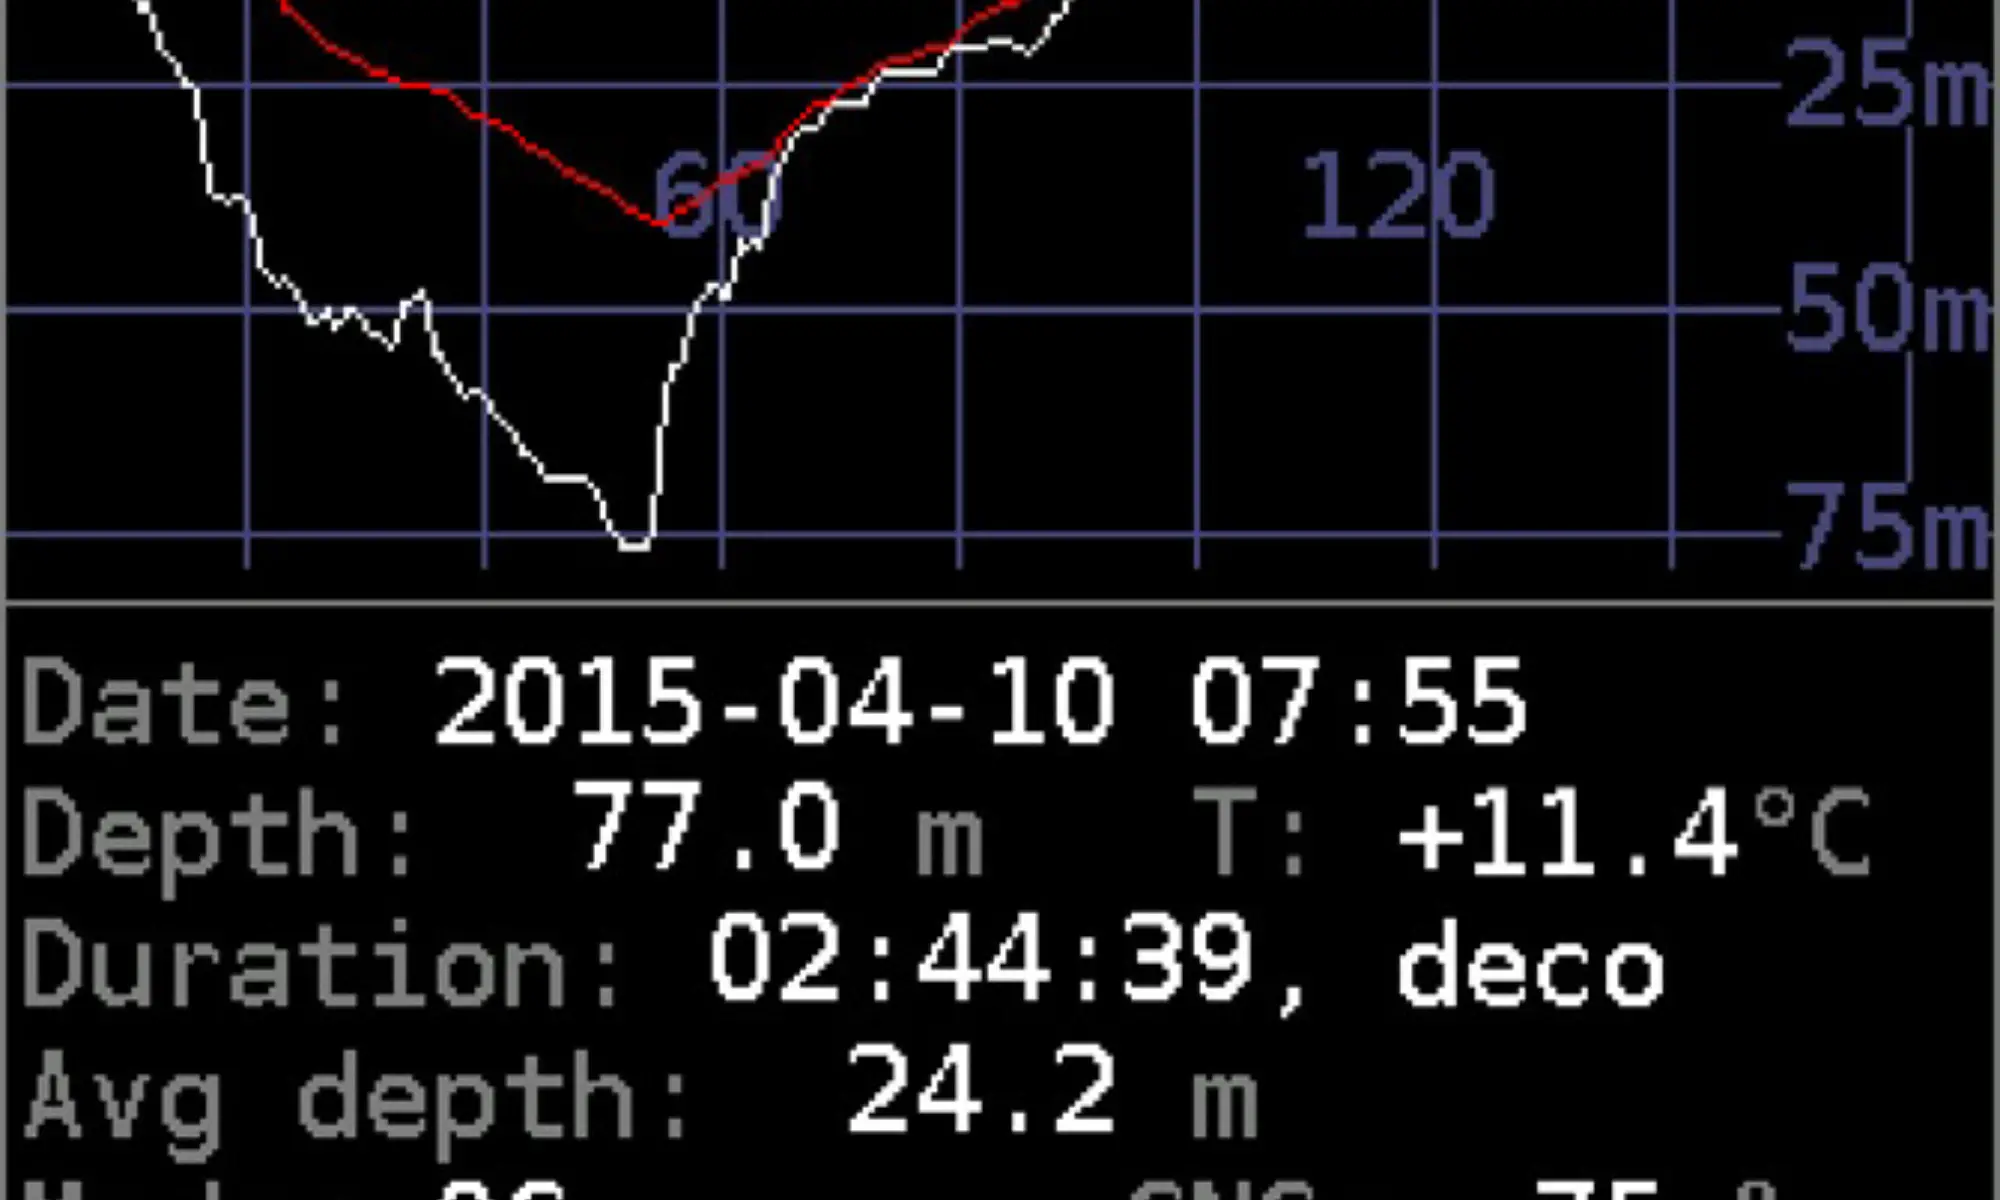
05.1 Last dive
Details from the last dive from list.
Dive profile
The graph is plotted within a white line.
Decompression ceiling
The graph is plotted within a red line; in deco dive only.
Date and time
The time of submersion.
Depth
The maximum depth of the dive.
T
The temperature at its coldest point of the dive (measured during the ascent).
Duration
This indicates time from submersion at the dive start to surfacing at the dive end. It includes all surface
stays, if part of the dive. Notice if the decompression obligation was present.
Avg depth
The average depth, calculated from the whole profile.
Mode
Original dive mode (at the dive start).
CNS
The CNS oxygen clock value after surfacing.
Zoomed view - Event list
The following context menu can be called up in the dive detail by pressing both buttons
Zoomed view -zooms the dive profile to detail for detailed viewing. The bottom button can be used to scroll the profile further, the top button to go back along the timeline. To return to the dive detail, press both buttons again and select Full view.
Event list - displays the events in the dive
Back to menu - return one level back
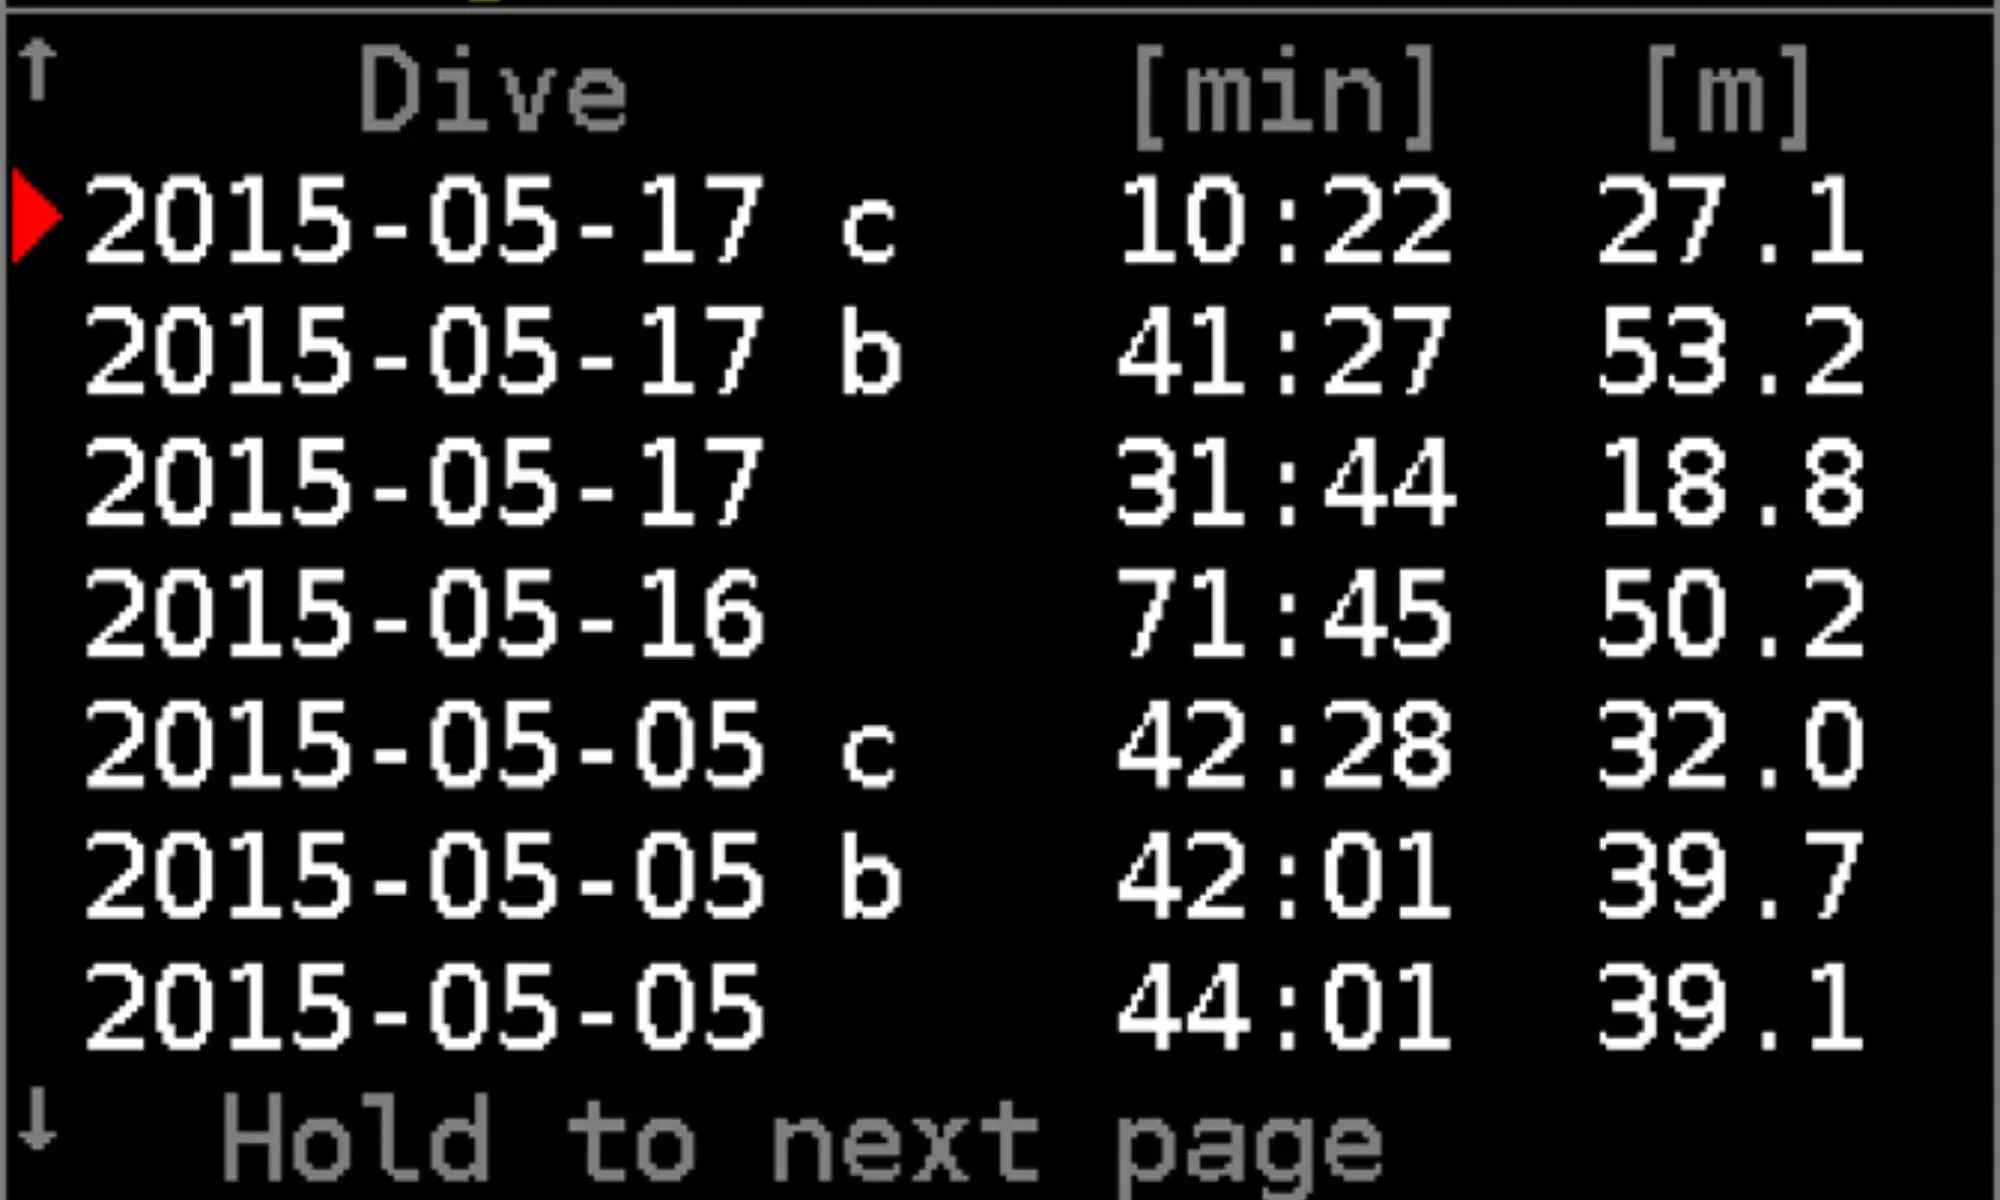
05.2 Dive list
Here all dives from the memory of the Divesoft Freedom are listed. The memory capacity is approximately 100 hours of typical dive profiles. When the memory is full, the oldest records are automatically deleted. Second and subsequent dives in one day are marked with corresponding letters. Demo dives (logs stored after the dive simulation) are marked with light blue characters. Test dives are marked with red characters (e.g. the first dive to approx. 350 m). Use upper button short press to open the screen with the dive details. Use long press to go through the pages.
05.3 Summary
A summary of all dives from the memory of the Divesoft Freedom is shown (test and demo dives excluded).
Section 06: Dive planner
06.1 The dive parameters
All non-listed parameters are taken from the respective setting.
Plan mode
Select the dive mode you are planning for.
OC – Open circuit SCUBA
S/CCR – SCR or CCR SCUBA
CCR+BO – SCR descent & bottom followed by OC bailout
Other than OC plan mode is available in the Closed Circuit version
only.
Surface interval
Enter the surface interval from now (in minutes).
Target depth
Enter the bottom depth (in m/ft). For a multilevel dive use an average depth.
Bottom time
Enter the dive runtime when the ascent starts, including descent.
Bottom mix
The gas mixture planned for a descent and the stay on the bottom.
Diluent
Diluent for the SCR/CCR dive (Closed Circuit version only).
Plan dive
The resulting dive plan consists of a summary and a detailed listing of deco stops.
Simulation
Start real-time simulation of the dive. The computer will switch to dive mode and will show all displays in
the same way as during a real dive.
Save as default
Save the parameter set as a default for the following plans, otherwise it is forgotten after switch off.
06.2 Dive plan
06.2.1 Summary
Nodeco
The runtime of the planned dive where the decompression obligation
starts.
TTS
The time to surface at the ascent start.
Total
The runtime when surfacing.
CNS
The percentage of consumption of CNS toxicity limit.
NoFly
The NoFly time after the planned dive.
06.2.2 Deco stops
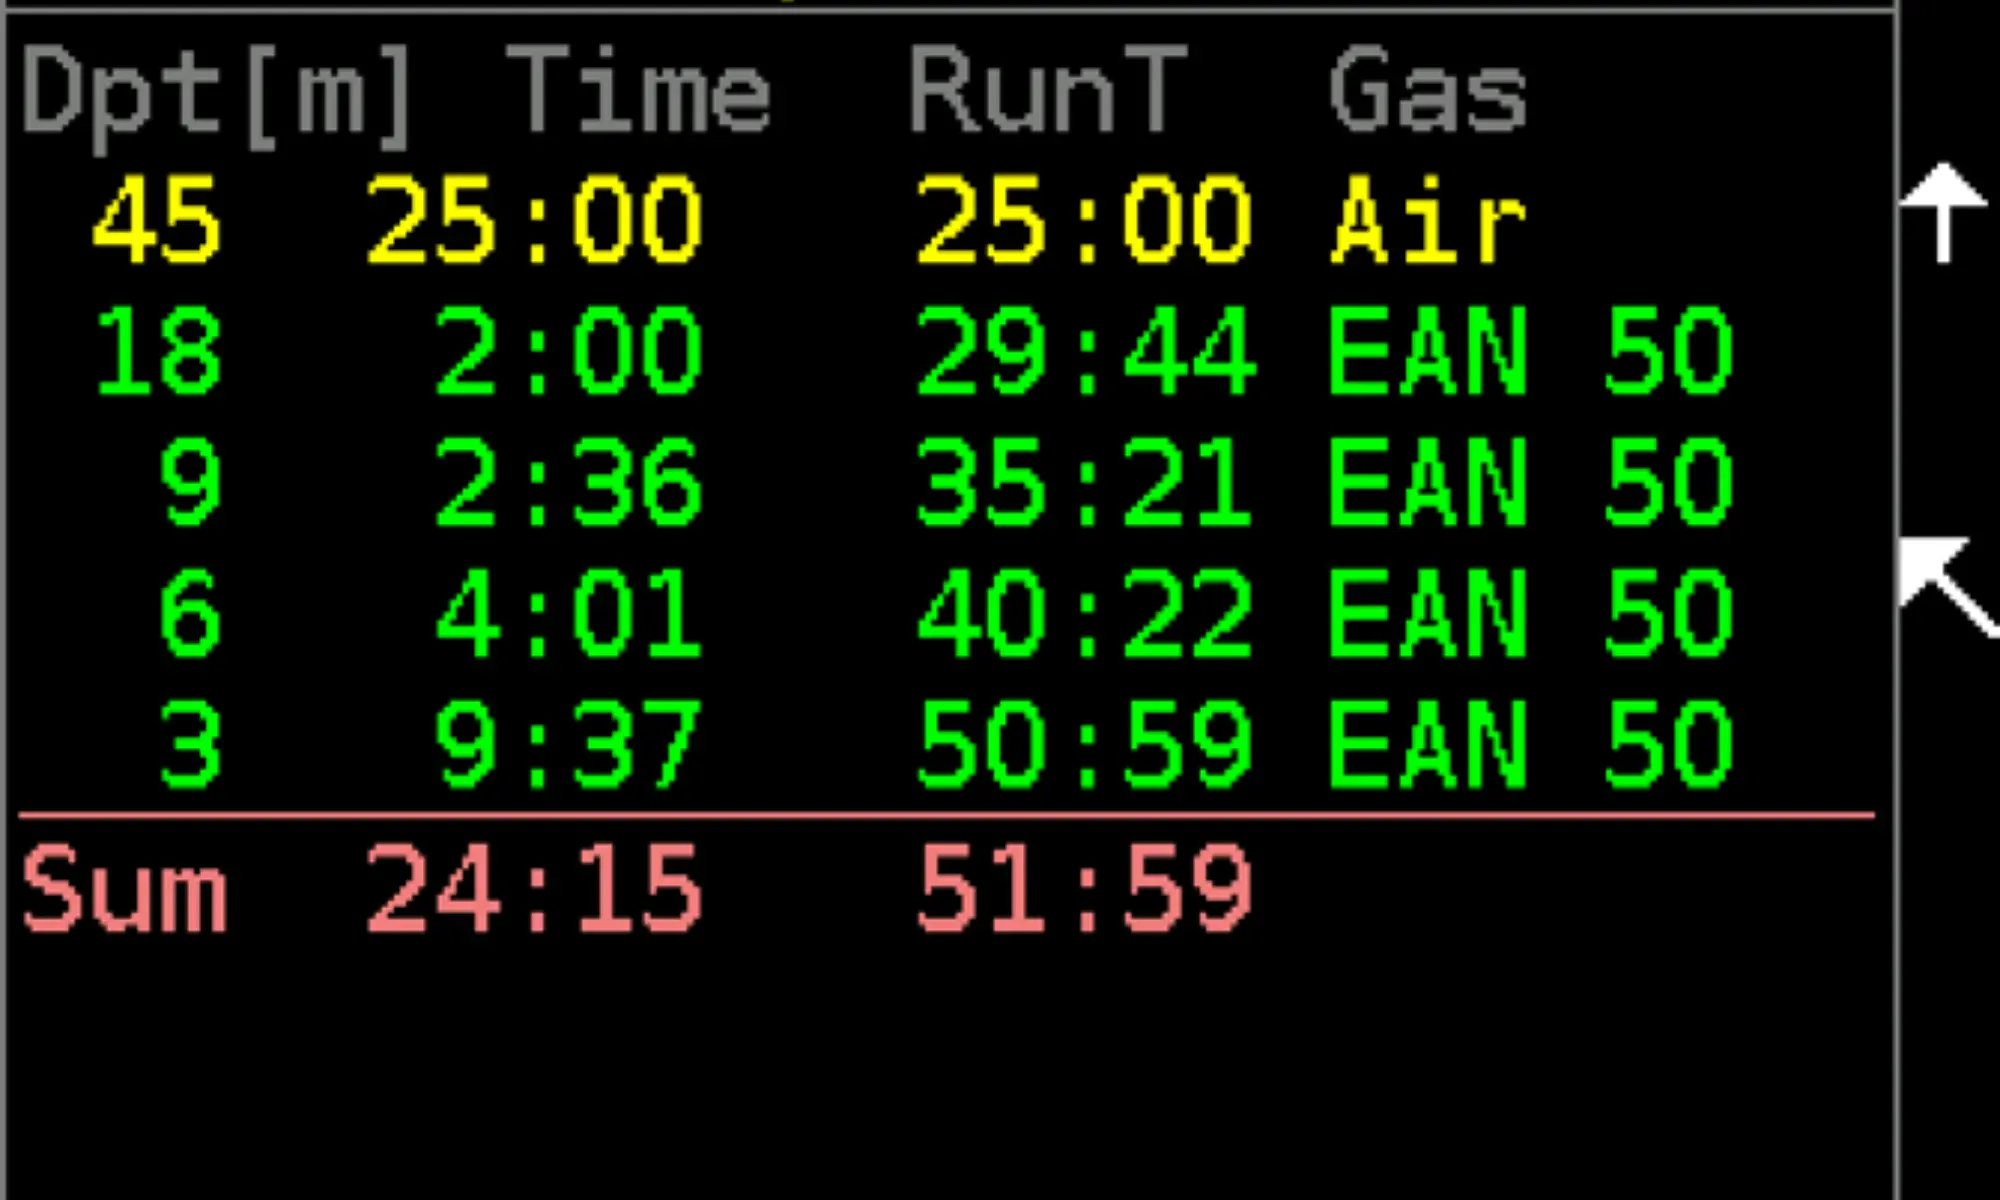
The description of the ascent profile and used gas mixtures. If optimal gas is selected in the decompression settings, then the plan considers changing of gases from the list of active mixtures; the gas switch time is included. If the current gas setting is selected in the decompression settings, then only the actual gas is used.
Section 07: Log download
Connect the USB cable included in distribution package to the Freedom connector and then to the USB
port of your computer, tablet or mobile phone. Attention, maintaining the connection order is very important. A USB adapter will
probably be necessary for mobile devices.
Select the USB connection item in the menu Apps -> USB connection. The Divesoft Freedom
memory can be connected as a mass storage device (like a flash
drive). The connection to Windows, Mac, Linux, Android and iOS was
tested, but there is no guarantee of compatibility with all operating
systems and all computers. Access to the internal memory is read
only.
Logs are stored in the DIVELOG folder; data from one dive is stored as
one *.DLF file.
WARNING: It is absolutely crucial to follow the cable connection procedure. The charging/data cable must be plugged into the Freedom first and then into the desktop, laptop or other devices. Failure to follow this procedure may cause irreversible damage to the device.
07.1 Log processing in cloud
Download files from the DIVELOG folder to your hard drive and then upload data to WETNOTES.COM. Here you can store and edit your dives, study graphs, details and much more. If you wish, you can share dives with your buddy or a group. Visit WETNOTES.COM and explore all the possibilities that it offers!
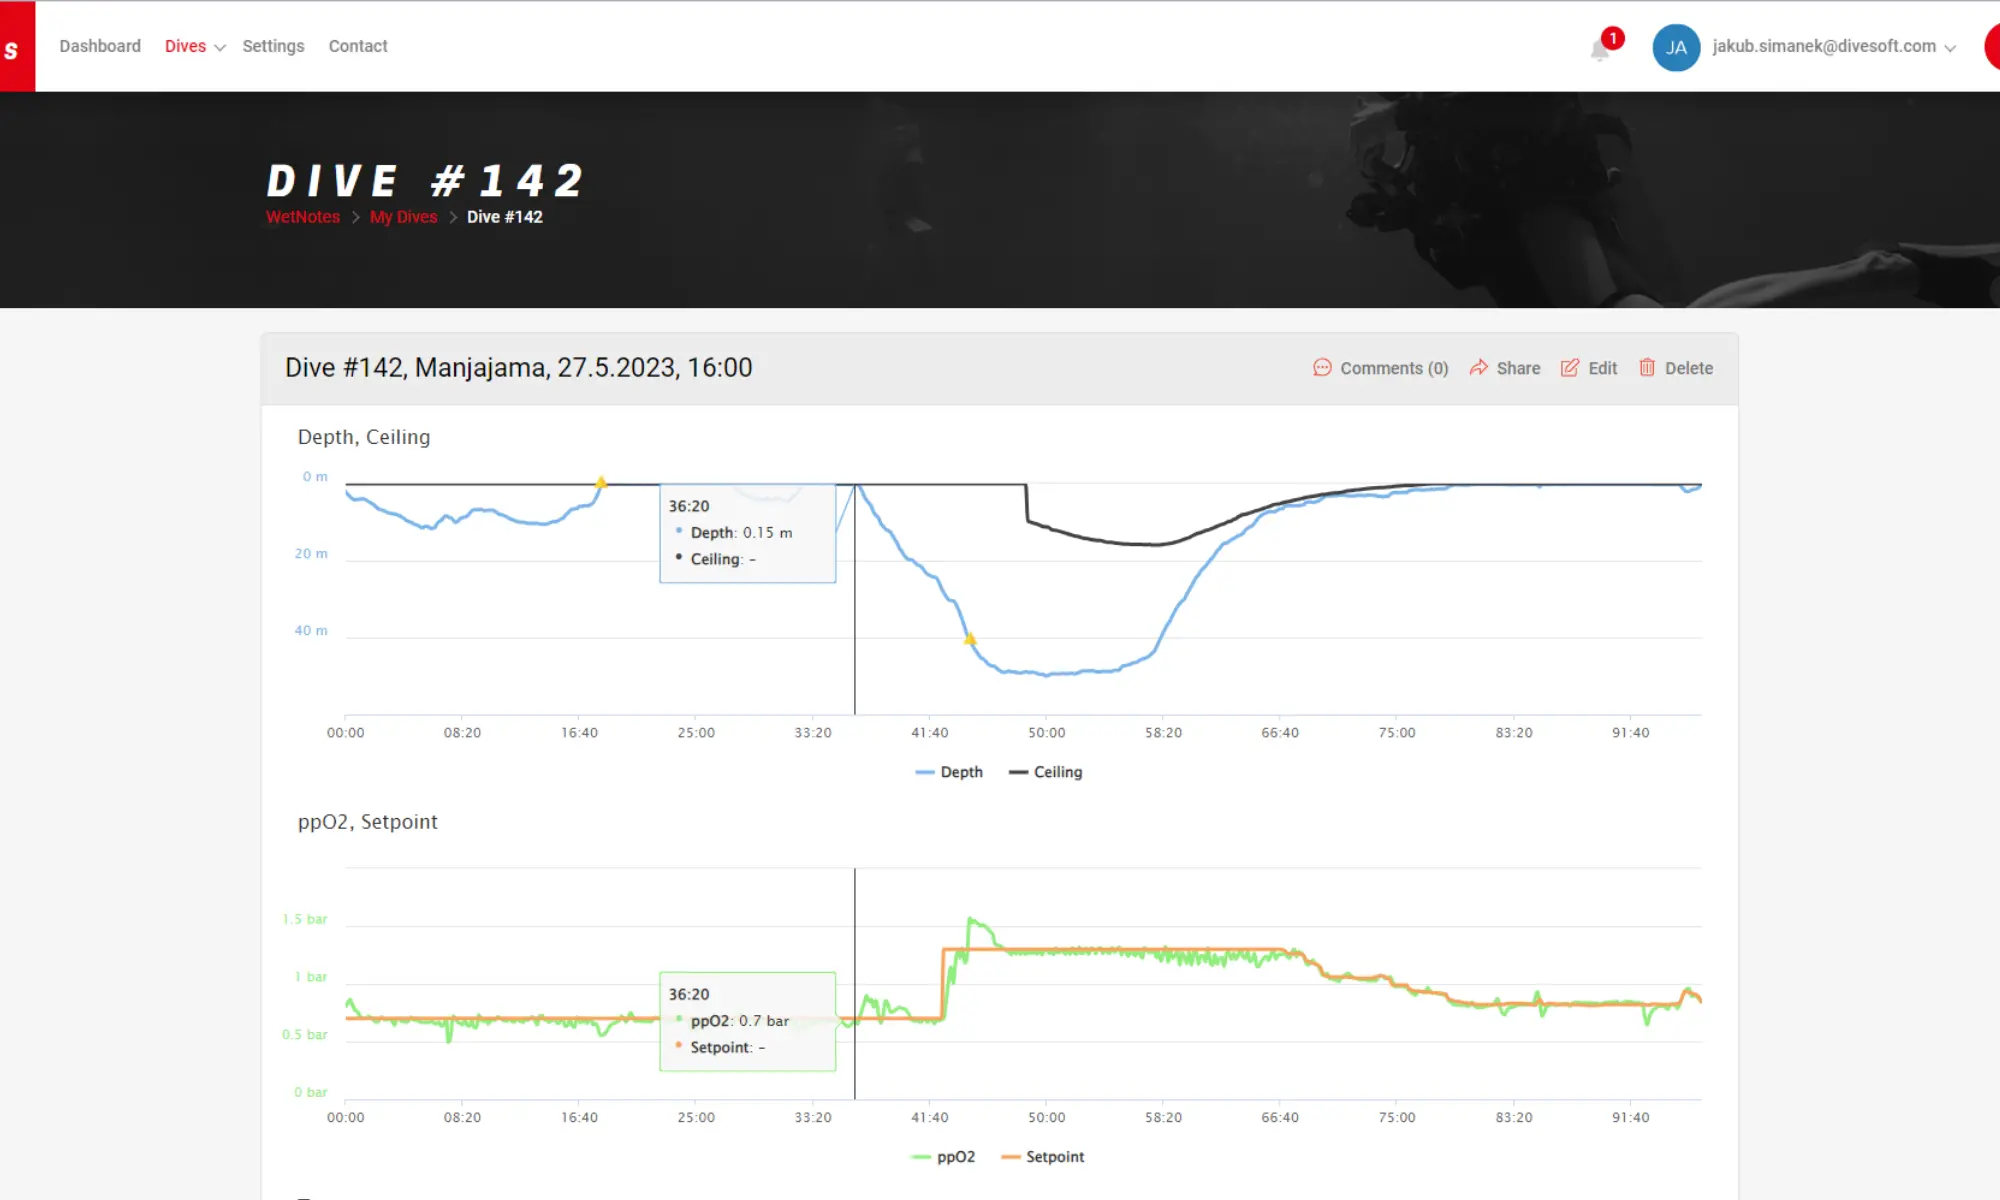
07.2 Divesoft App
Dive logs uploaded to Wetnotes.com can be viewed on mobile devices via the Divesoft.app Download the version for your mobile phone or tablet.
07.3 Off-line log processing
Offline storage of dive logs is not supported by Divesoft. Third party software such as Subsurface can be used
https://subsurface-divelog.org/
Section 08: System
08.1 System check
There is detailed version, license, settings, battery and pressure sensor information described on 5 screens (6 for CCR version).
08.2 Service functions
Service functions are primarily intended to support a qualified technician or to be performed with the recommendation of the manufacturer’s technical support. These functions are not blocked but no end user support is provided. A detailed description is beyond the scope of this manual. An IT specialist can understand most of them without further description. The service functions menu is accessible via the coded key press (press both keys; release one key and press it again; release both keys).
08.2.1 Debug
All debug information is read only. There is no risk associated with browsing them just for curiosity.
Devices
A detailed state of all sensors.
Deco model
The state of the decompression model is described in detail on 5 screens (including the compartment
saturation graph).
Scheduler The firmware task list with information specifying the system footprint.
Variables The values of some internal variables.
08.2.2 Test
There is no risk associated with performing these tests just for curiosity while on the surface.
Buttons
It runs a simple test of both buttons.
Vibration
It runs a short test of the vibration.
Display
A red, green and blue screen will be displayed for the display test.
Watchdog
Watchdog is a timer that is used to detect and recover from firmware malfunctions. You can intentionally
hang the computer with this test. Do not use underwater!
Test dive
The test dive is used by the manufacturer or an authorized service for the pressure sensor calibration and
tightness test. It is similar to the gauge mode. The test dive log will be stored, but clearly marked as a test
dive. The test dive is not included in the log summary.
08.2.3 Demo dive
The test dives are suitable for those interested in a demonstration of the Divesoft Freedom features. There is no risk associated with the demo dive performing. During a demo dive almost all functions can be tested on the surface. One exception is the pressure sensor reading. Also O2 sensors connected with a cable can’t be used for the measured CCR dive mode. The depth profile is provided and decompression gas mixtures are automatically switched. The Emergence du Ressel demo dive uses the authentic depth profile from the penetration through the first siphon of this French cave. Demo dive logs can be permanently stored into the log memory. The oldest dive logs will be replaced by the new demo dive log if the memory is full. Demo dive logs are clearly marked. A demo dive log, if this is the last dive, can be erased later using Demo dive → Erase demo log. The single bottom-level demo dive functionality is equivalent to the dive simulation in the dive planner. See also Dive planner (See section 6.1).
08.2.4 Syslog
The system events log list. All information is read only.
08.2.5 Miscellaneous
Warning: These functions can alter values of internal variables or/and the state of the Divesoft Freedom. Use them with caution and only if you understand the consequences.
Force Dive Start
It can be used for an extraordinary shallow dive in a place where initial submersion to a depth greater than
1.5 m is impossible. This also can be used if the automatic dive start failed for any reason (e.g. submersion
recognition algorithm is confused by previous pressure changes unrelated to diving).
Force Dive End
If the surface pressure (zero depth) was incorrectly detected and the computer “dives” while on the surface
then the dive can be forced to stop with this function.
Browse config
Every setting can be read and changed. The majority of settings can also be changed using an ordinary
setup; the equivalent minimum and maximum limits for every setting will be applied. There are only few
internal configuration parameters intended for special use.
Reset deco data
The residual inert gas saturation from previous dive(s) will be removed. Only use this function to give the
computer to another diver whose surface interval is sufficient for a complete desaturation.
Bootloader
Restart to the bootloader mode for the firmware update or the version upgrade.
Connect the USB cable included in distribution package to the USB port of your computer where the
Divesoft.center is properly installed. See Divesoft support for further information and for the
firmware download.
The version license is fixed to the unit’s serial number and non-transferable to the other Divesoft Freedom
computers.
Section 09: Apps
09.1 Analyzer
Warning: O2 sensor has to be calibrated before use!
Warning: do not use expired or malfunctioning sensors!
The Divesoft Freedom computer can be used as a nitrox analyzer if an oxygen sensor is attached. The O2 sensor housing can be ordered separately. O2 sensors previously used in rebreather can be used, if they are still able to measure full range of oxygen pressures in atmospheric pressure safely.
09.1.1 Measuring
Connect housing with O2 sensor, start the Analyzer application and use as any other nitrox analyzer. Use only barely audible stream of nitrox from SCUBA tank valve and be sure to press housing inlet tightly.
09.1.2 Calibration
Analyzer can be calibrated with air. Press lower key to start calibration. Confirm calibration with upper key press when mV reading is stable. Old sensor may but may not be detected by low voltage during calibration using air (see the sensor manufacturer’s datasheet). Reliable method is to calibrate the sensor with air and then check the maximum range with pure oxygen. Recalibrate analyzer sensor at least 24 h before measuring. Calibration process takes altitude (atmospheric pressure) and temperature into account. Rebreather sensor calibration has no connection with analyzer sensor calibration.
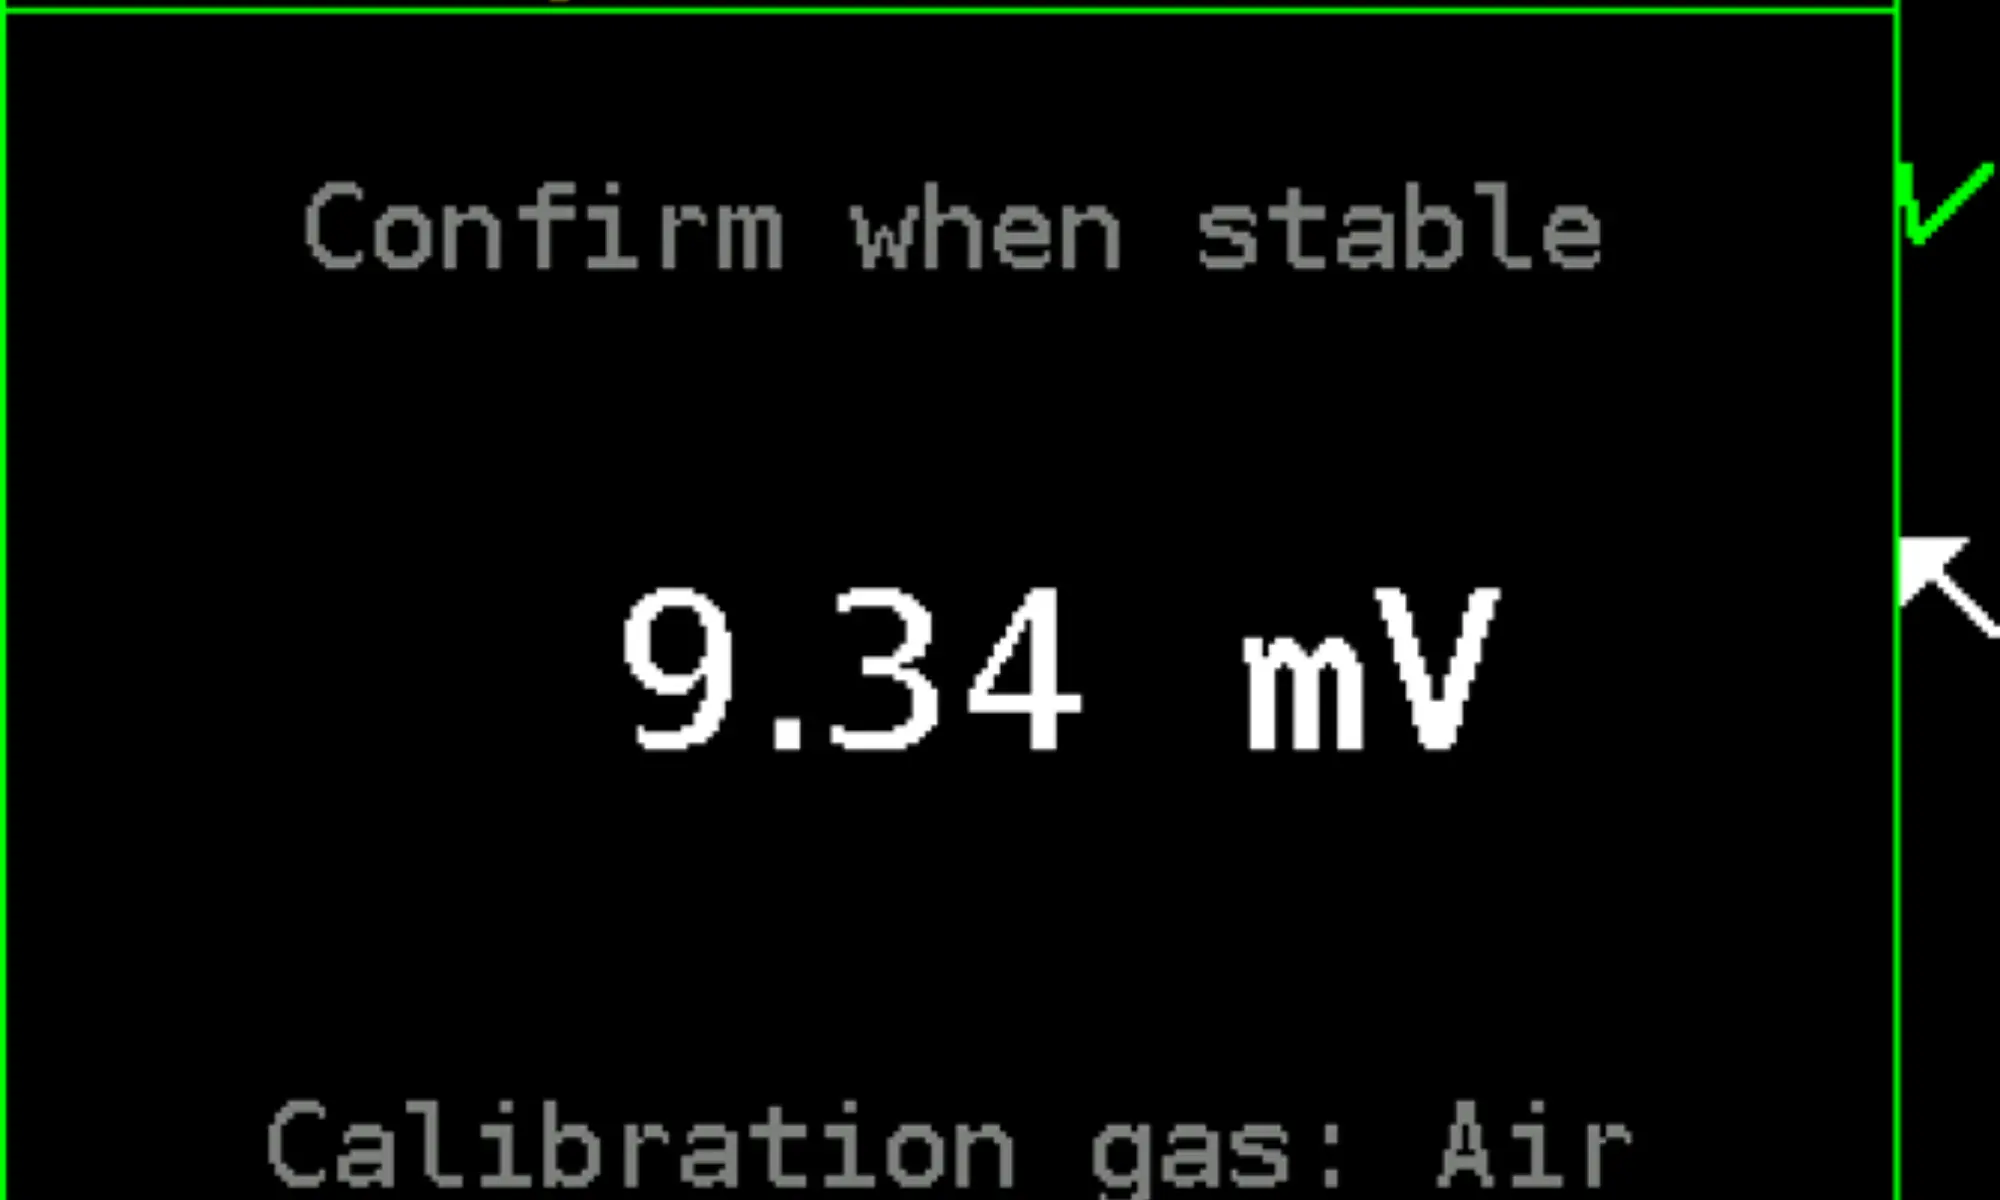
9.2 USB connection
Switches the computer into USB link mode for downloading dive logs. Freedom will report as a Mass storage device when connected by cable to a personal computer.

09.3 Emergency torch
brightens the entire display to the maximum and emits the maximum amount of light possible. Can be used as an emergency torch in certain conditions when all other torches have failed.
09.4 Inclinometr
An inclinometer is a tool for measuring the steepness of a slope. It can be used in mapping caves and wrecks. For correct and accurate operation, the computer must be well calibrated with horizontal calibration.
Games
Do not disable error messages and notifications related to decompression if the games are played during a deco stop. Ensure to not accidentally reposition while playing during a dive. Check the pressure gauges on a regular basis. Playing a game will reduce your attention. Remember: you want to decompress safely, not just achieve a higher level in the game! The games were tested on children. Nobody was hurt.
09.5 Games
09.5.1 Sokoban
Sokoban is a type of transport puzzle, in which the player (a diving mask with snorkel) pushes tanks or crates around in a warehouse, trying to get them to storage locations (red dots). The game is played on a board of squares, where each square is either a floor or a wall. Some floor squares contain tanks, and some floor squares are marked as storage locations. The player is confined to the board, and may move horizontally or vertically onto empty squares (never through walls or boxes). The player can also move into a tank, which pushes it into the square beyond. Tanks may not be pushed into other tanks or walls, and they cannot be pulled. The puzzle is solved when all tanks are in the storage locations.
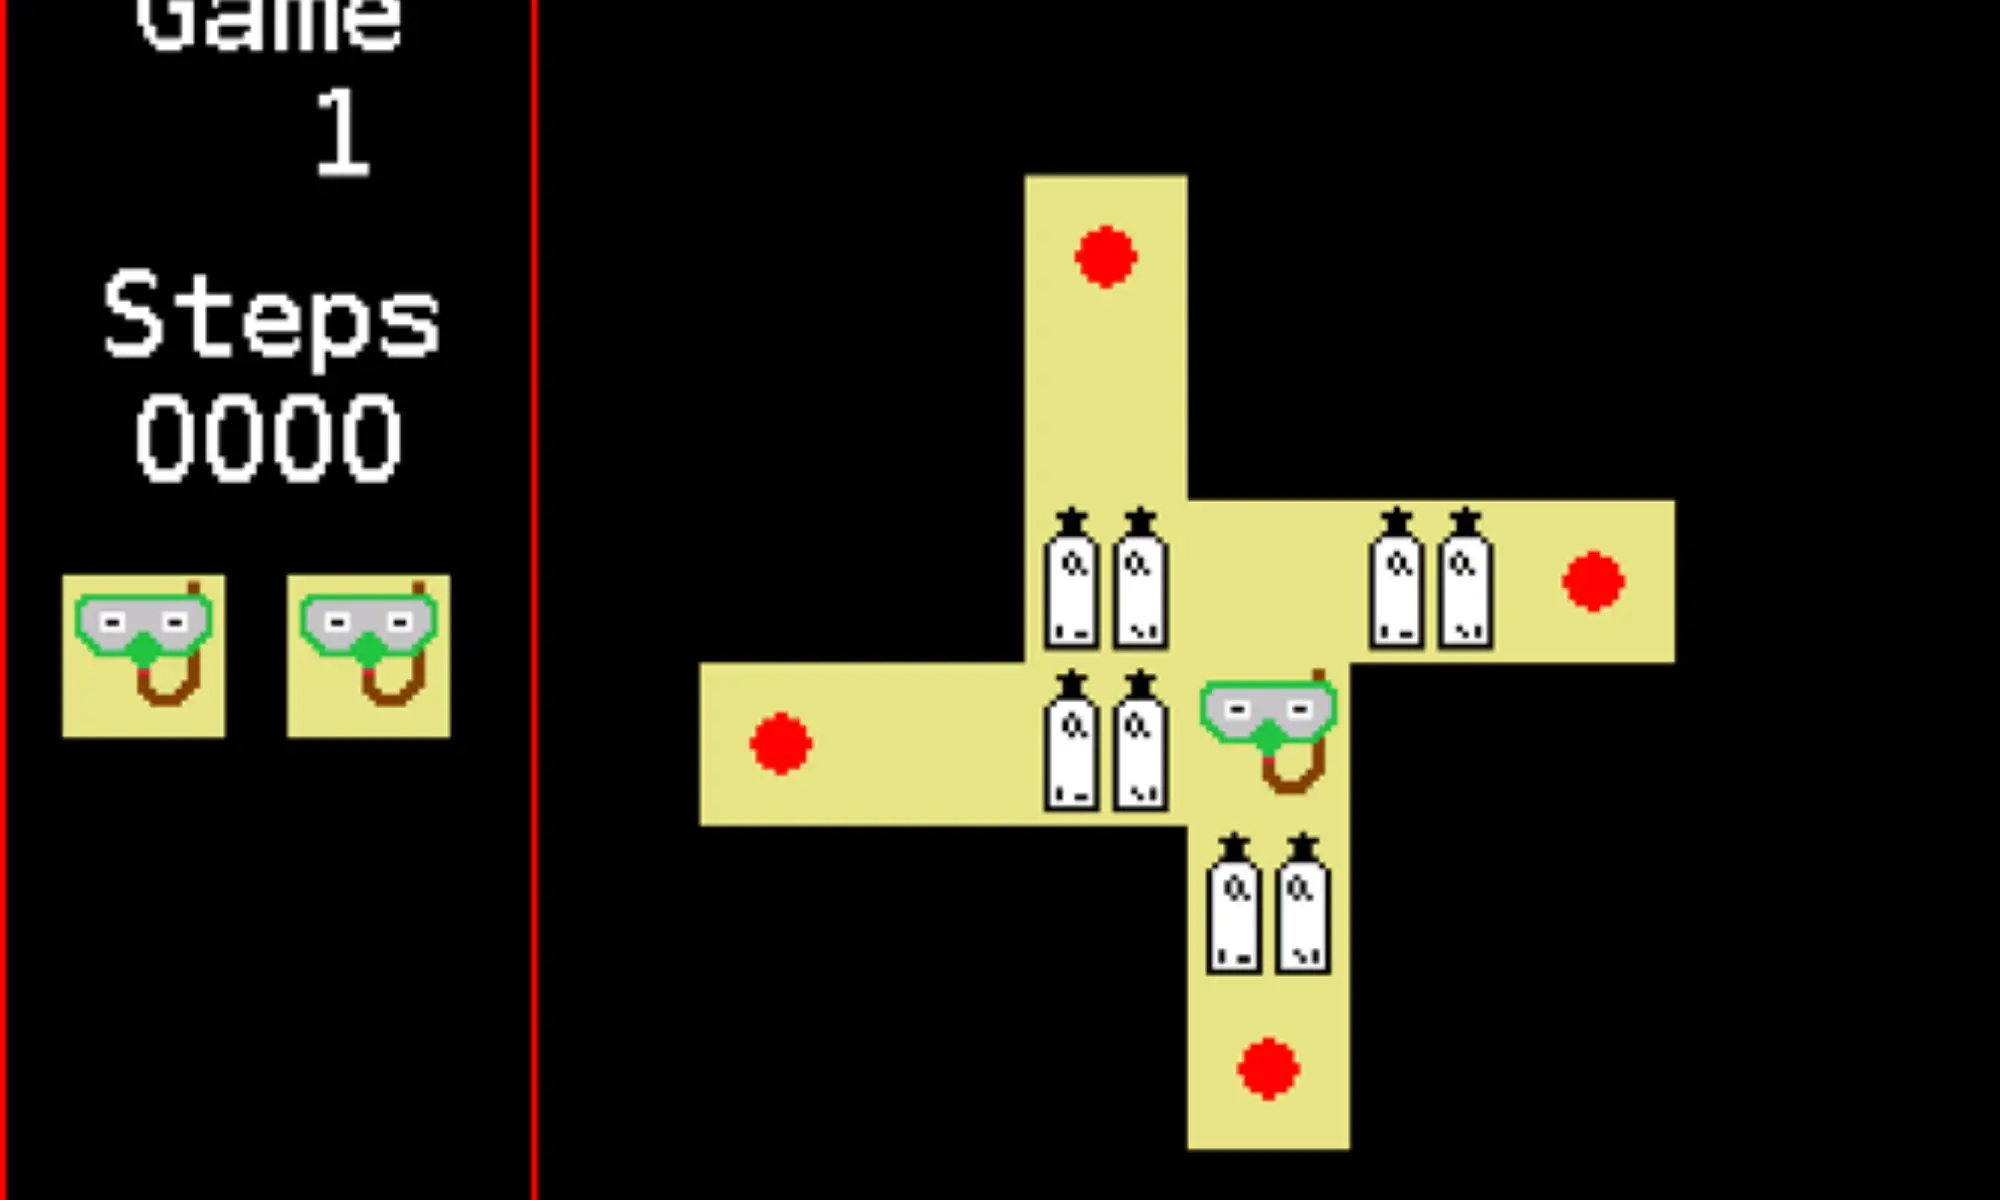
09.5.2 Snake
Snake is a game where the player maneuvers a line which grows in length, with the line itself being a primary obstacle. The player controls the head of the snake. As it moves forward, it leaves a trail behind, resembling a moving snake. The snake has a specific length. The player loses when the snake runs into the screen border, a trail or another obstacle, or eats poison (skull), or starves to death. The snake lose its length slowly (every 30 steps), and when it is too short, it dies from starvation. The player attempts to eat fish by running into them with the head of the snake. Each fish eaten makes the snake longer, so maneuvering becomes progressively more difficult.
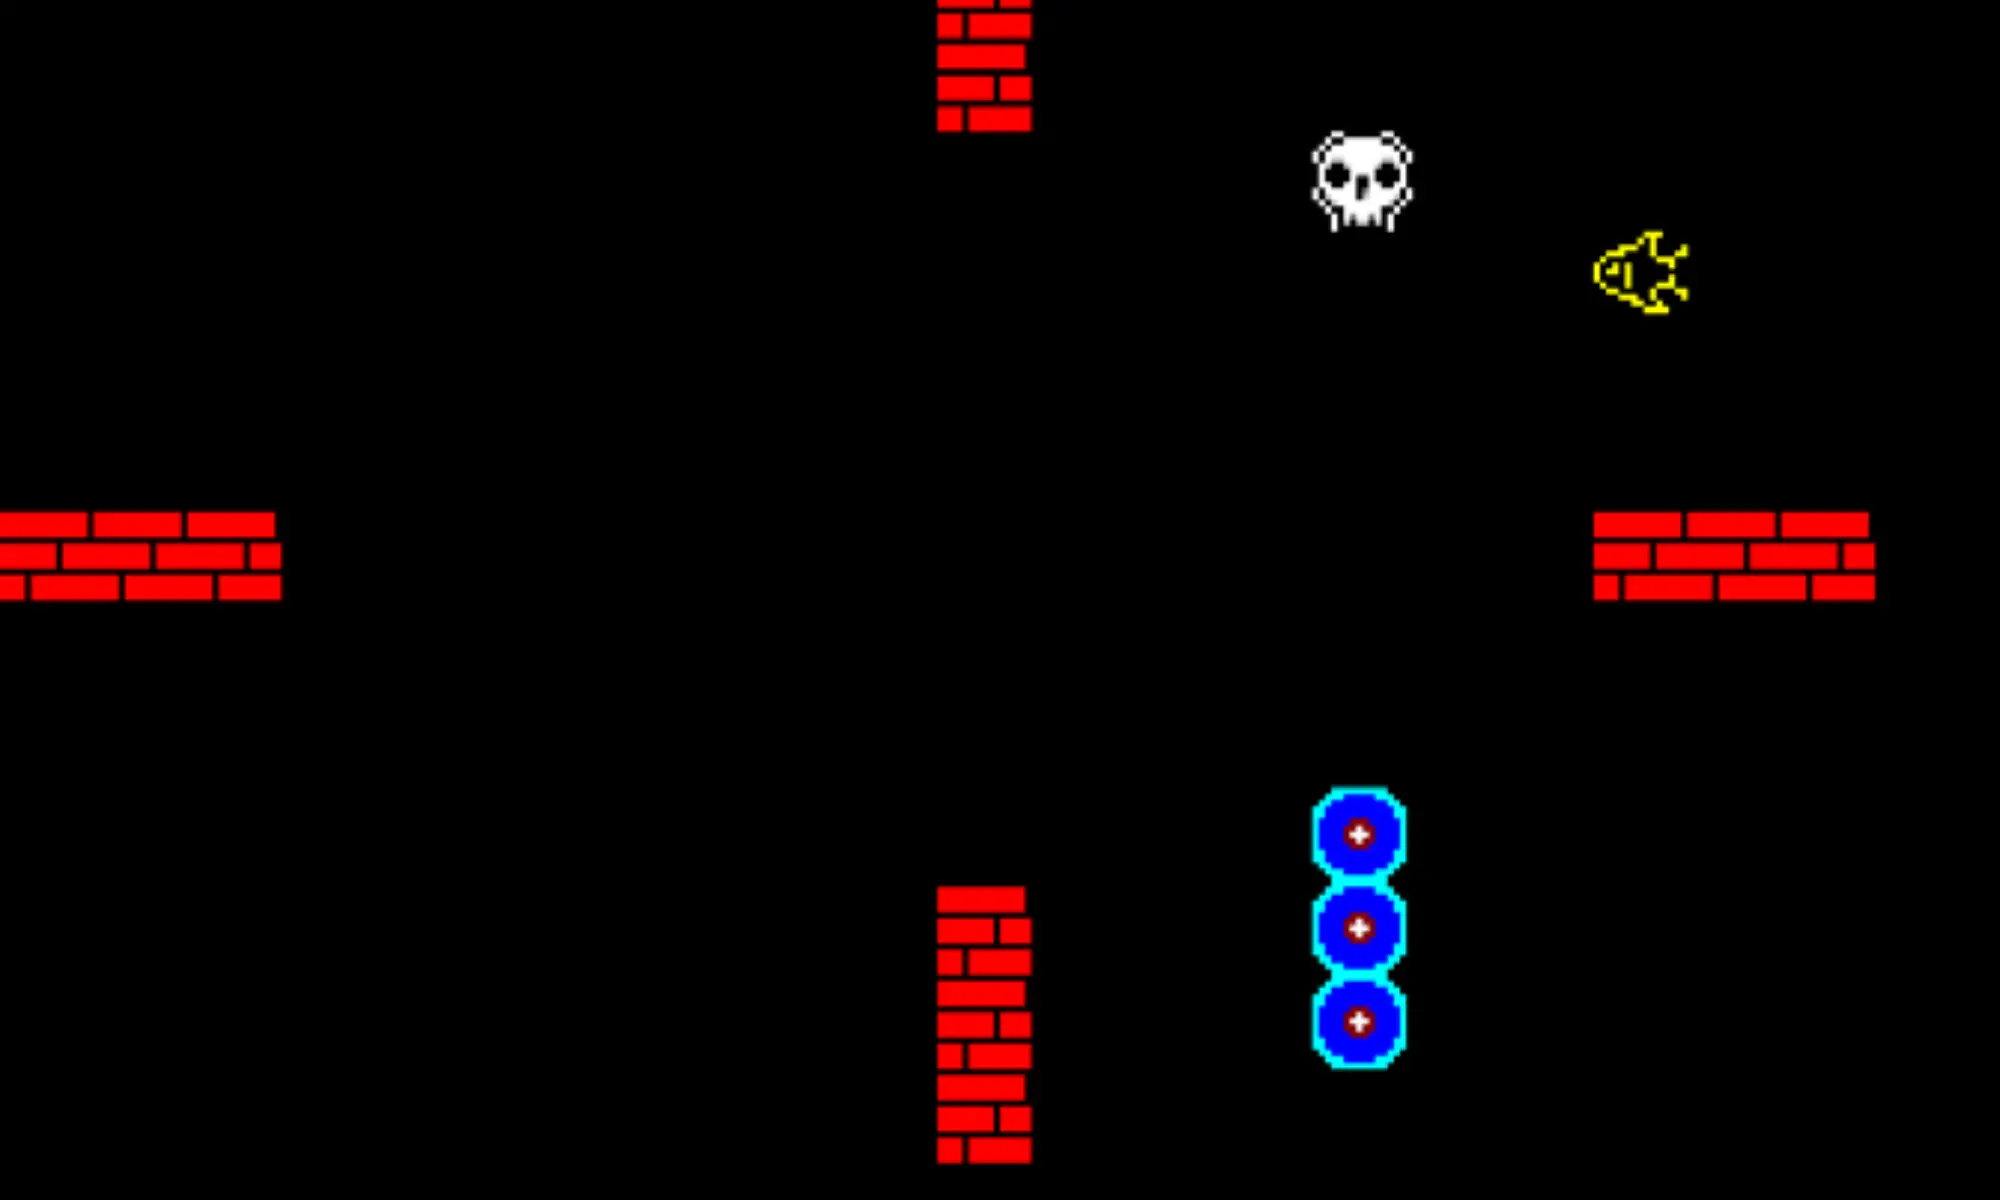
Section 10: Hardware
10.1 Charging
Use the included USB charging cable with Freedom connector to charge your Freedom computer. First connect the cable to your Freedom computer and subsequently connect the cable to a suitable power adapter (5V, 1A). Make sure the adapter is approved and certified for the area where you will be charging the Freedom and is suitable for use with the local power grid. The Freedom’s connector is situated between the buttons. If the connector is protected by the lid, then unscrew the connector lid before attaching the cable. The computer may or may not be switched on during charging. If the computer is switched on, then the icon in the top-right corner on the surface screen indicates the state of charge.
WARNING: It is absolutely crucial to follow the cable connection procedure. The charging/data cable must first be plugged into the Freedom and then into the adapter and power outlet. Failure to follow this procedure may cause irreversible damage to the device.
It takes about 5 hours to charge from near empty state to fully charged. Maximum charging current is less than 500 mA, so there is no difference between charging using the charger or charging from an ordinary computer USB port. Charge the battery at least once every six months.
WARNING: USING SMART CHARGERS THAT ALLOW CHARGING AT VOLTAGES HIGHER THAN 5V (SUCH AS 9V, 12V, 20V CHARGERS) MAY CAUSE IRREVERSIBLE DAMAGE TO THE FREEDOM AND FREEDOM+
WARNING: MAKE SURE THE CONNECTOR IS COMPLETELY DRY AND CLEAN BEFORE CONNECTING THE CHARGER. FAILURE TO FOLLOW THIS PROCEDURE MAY CAUSE IRREVERSIBLE DAMAGE TO THE FREEDOM AND FREEDOM+
Freedom+ owners, show your charging cable some TLC !
1. Wipe your Freedom+ dry before charging.
2. Keep your Freedom+ connector clean and dry, use Qtip and some rubbing alcohol to keep the connector pins shiny as new.
3. Now the cable, press on the individual spring loaded pins (using Qtip) every now and then. This removes any oxidization inside the pins.
4. And lastly, keep your Freedom+ safe. Charge the device with simple 5V chargers, keep away from smart chargers supporting high voltage protocols (eg. 9V/12V/20V).
10.1.1 Powering in hyperbaric environment
The Divesoft Freedom cannot be powered externally and recharged during a dive (e.g. in hyperbaric chamber, in diving bell or mounted on ROV) without a special setting which is available only on request. The unit must be individually tested prior to such use.
10.2 Wrist mount
If you prefer a strap, pass the strap under the bars. Use the Velcro on the strap to tighten. If you prefer a bungee, then remove the screws holding the bars using a Torx screwdriver (T 20 size). Don’t use any other tool; screw heads are easily damaged. If you want to use a silicon protective sleeve, install it before installing the bungee. It is not possible to install the sleeve on the computer with bungee already installed. Pass the bungee through the threaded holes and secure with a knot. There is a special thread inside the holes which does not damage the bungee. Use a small flame to melt the braid of the bungee and make a tip on the end of it for easier pass-through. Both the strap and bungee are included. In any case, the opening on the back of the computer must remain freely accessible. When you mount the computer directly on bare skin avoid closing the opening. The pressure sensor is located there.
10.3 Control elements
The following inputs and combinations thereof are differentiated:
• Press upper key
• Press lower key
• Press both keys
• Long press upper key
• Long press lower key
• Long press both keys
• Coded key press (press
both keys, then release one
key and press it again, then
release both keys)
• Tilt away from yourself
• Tilt toward yourself
• Tilt to the left
• Tilt to the right
• Tap the display glass
• Shine a light on the display
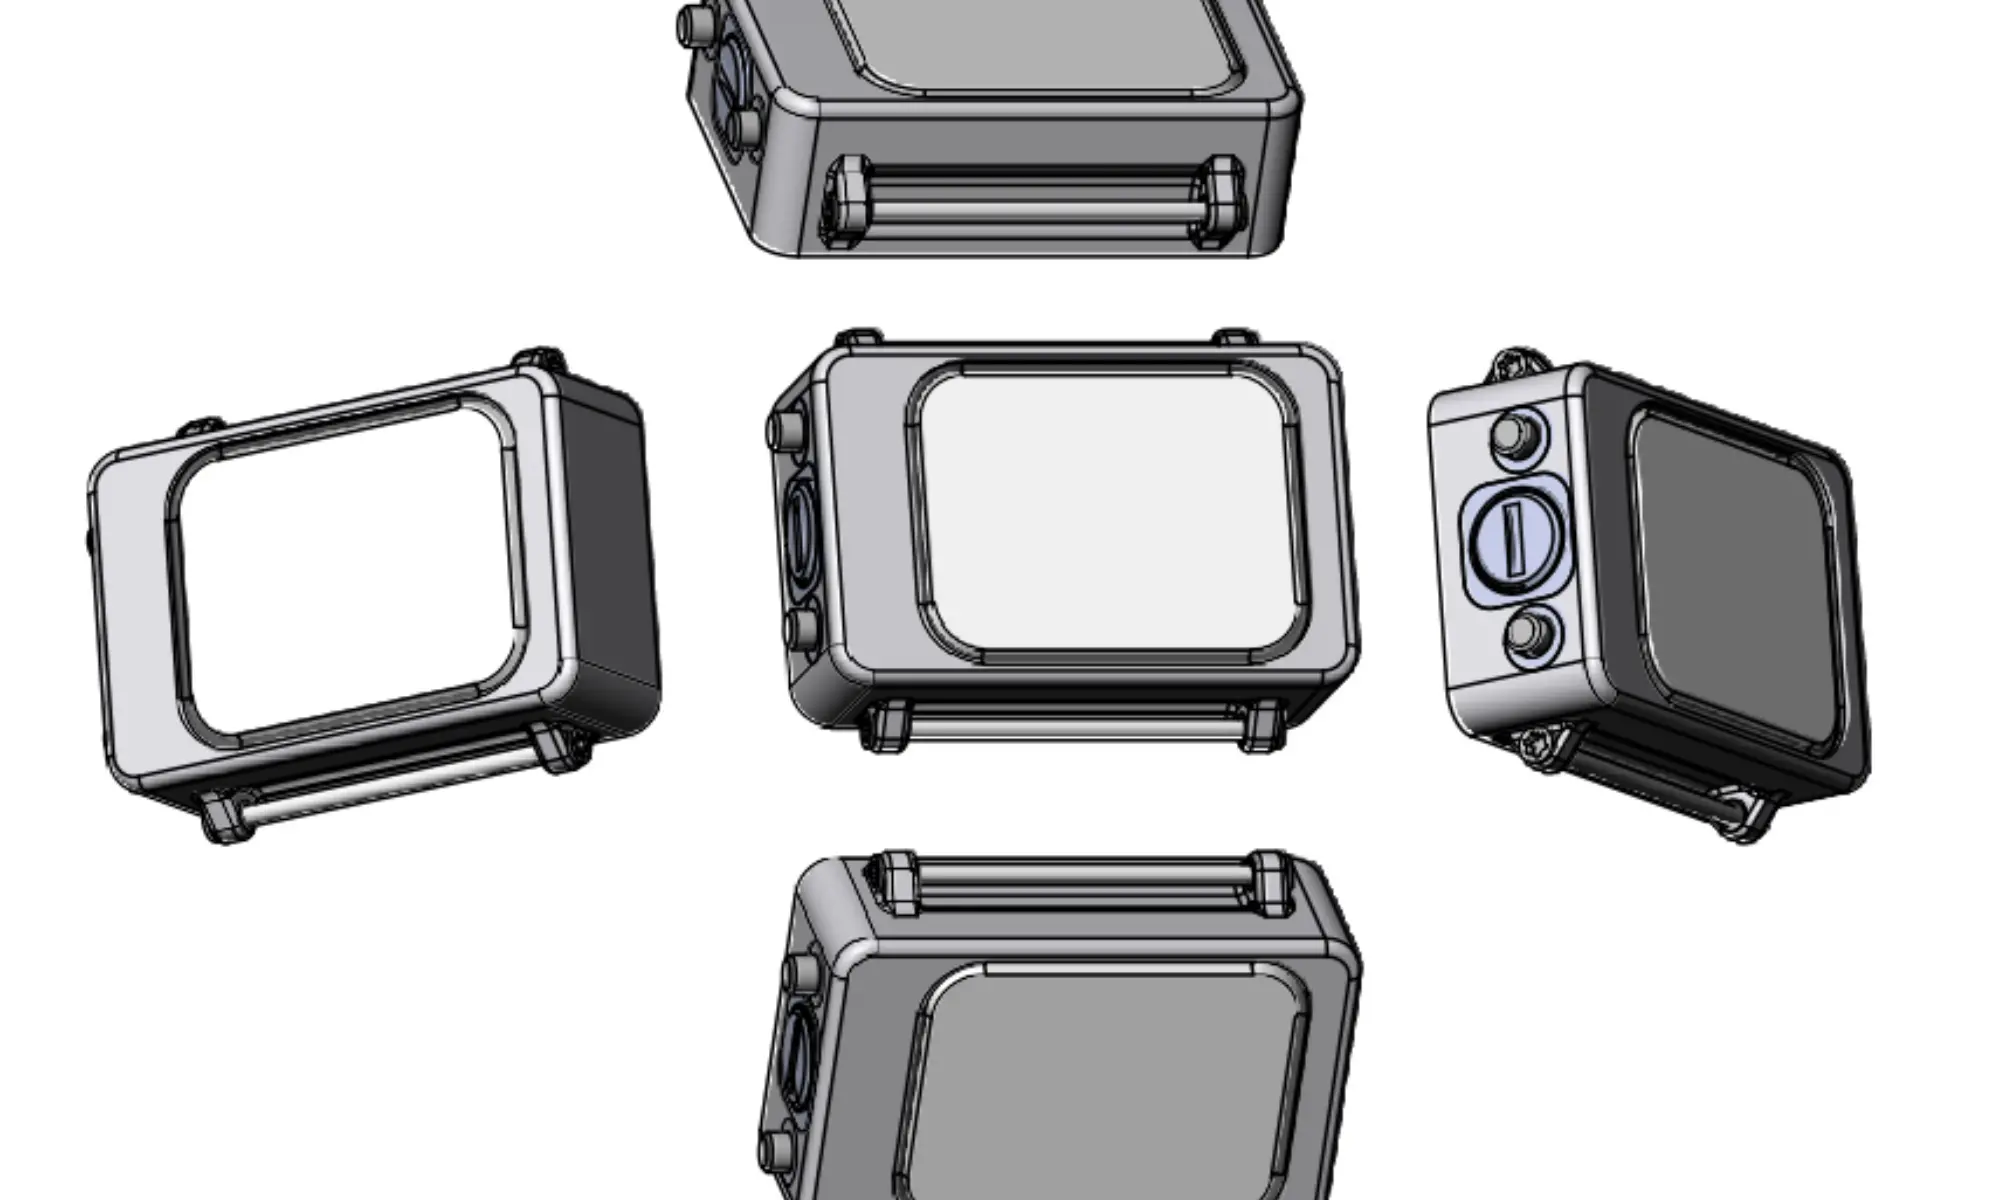
“Long press” means pressing the key for more than 2.5 seconds. The key-press operation is terminated at the moment the key is released or, in case of pressing both keys, when the last key is released. The upper/lower keys and directions of tilting are determined by the display orientation, depending on whether it is set up for the left or right hand. Tilting can be changed in the configuration to tapping on the computer body from any of the four sides. Note: Perform the Horizontal calibration (See section 4.8) if there is no valid response to tilting or tapping
10.4 Physical dimensions

10.5 O2 sensor cable
The cable equipped with the Molex connectors is NOT included in the the Divesoft Freedom distribution package but can be ordered separately from third party dealer. The technical design of the connections on a specific type of rebreather is not the subject of this user manual.
Recommendation: if you are connecting an O2 sensor cable, it is advisable to plug it into the Freedom computer first and then into the oxygen sensors, although this is not always possible.
10.6 Environmental specifications
Recommended operating conditions
Recommended operating temperature range: 0 °C to 40 °C (32 °F to 104 °F)
Maximum operating conditions
Permitted short term operating temperature range: -10 °C to 45 °C (14°F to 113 °F)
Consider the reduced battery capacity at low temperatures.
Long term storage conditions
Storage temperature range: 10 °C to 35 °C (50°F to 95°F)
Don’t expose to direct sunlight
10.7 Compliance
10.7.1 CE marking
Divesoft s.r.o. hereby declares that the Divesoft Freedom is in compliance with the essential requirements and other relevant provisions of Directive 1999/5/EC.
10.7.2 EN 13319
Independent conformity assessment was performed to the harmodized Europian depth gauge standard EN 13319:2000.
10.7.3 FCC compliance
This device complies with Part 15 of the FCC Rules. Operation is subject to the following two conditions: (1) this device may not cause harmful interference, and (2) this device must accept any interference received, including interference that may cause undesired operation.
10.7.4 Industry Canada (IC) Compliance Notice
This device complies with Industry Canada license-exempt RSS standard(s). Operation is subject to the following two conditions: (1) this device may not cause interference, and (2) this device must accept any interference, including interference that may cause undesired operation of the device. This Class B digital apparatus complies with Canadian ICES-003.
10.8 Disposal of waste equipment
Users in private households in the European Union This symbol on the product and accompanying documents means that used electrical and electronic products should not be mixed with general household waste. For proper treatment, recovery and recycling, please take these products to designated collection points where they will be accepted free of charge. Alternatively, in some countries you may be able to return your products to your local retailer upon purchase of an equivalent new product. Disposing of this product correctly will help save valuable resources and prevent any potential negative effects on human health and the environment, which could otherwise arise from inappropriate waste handling.
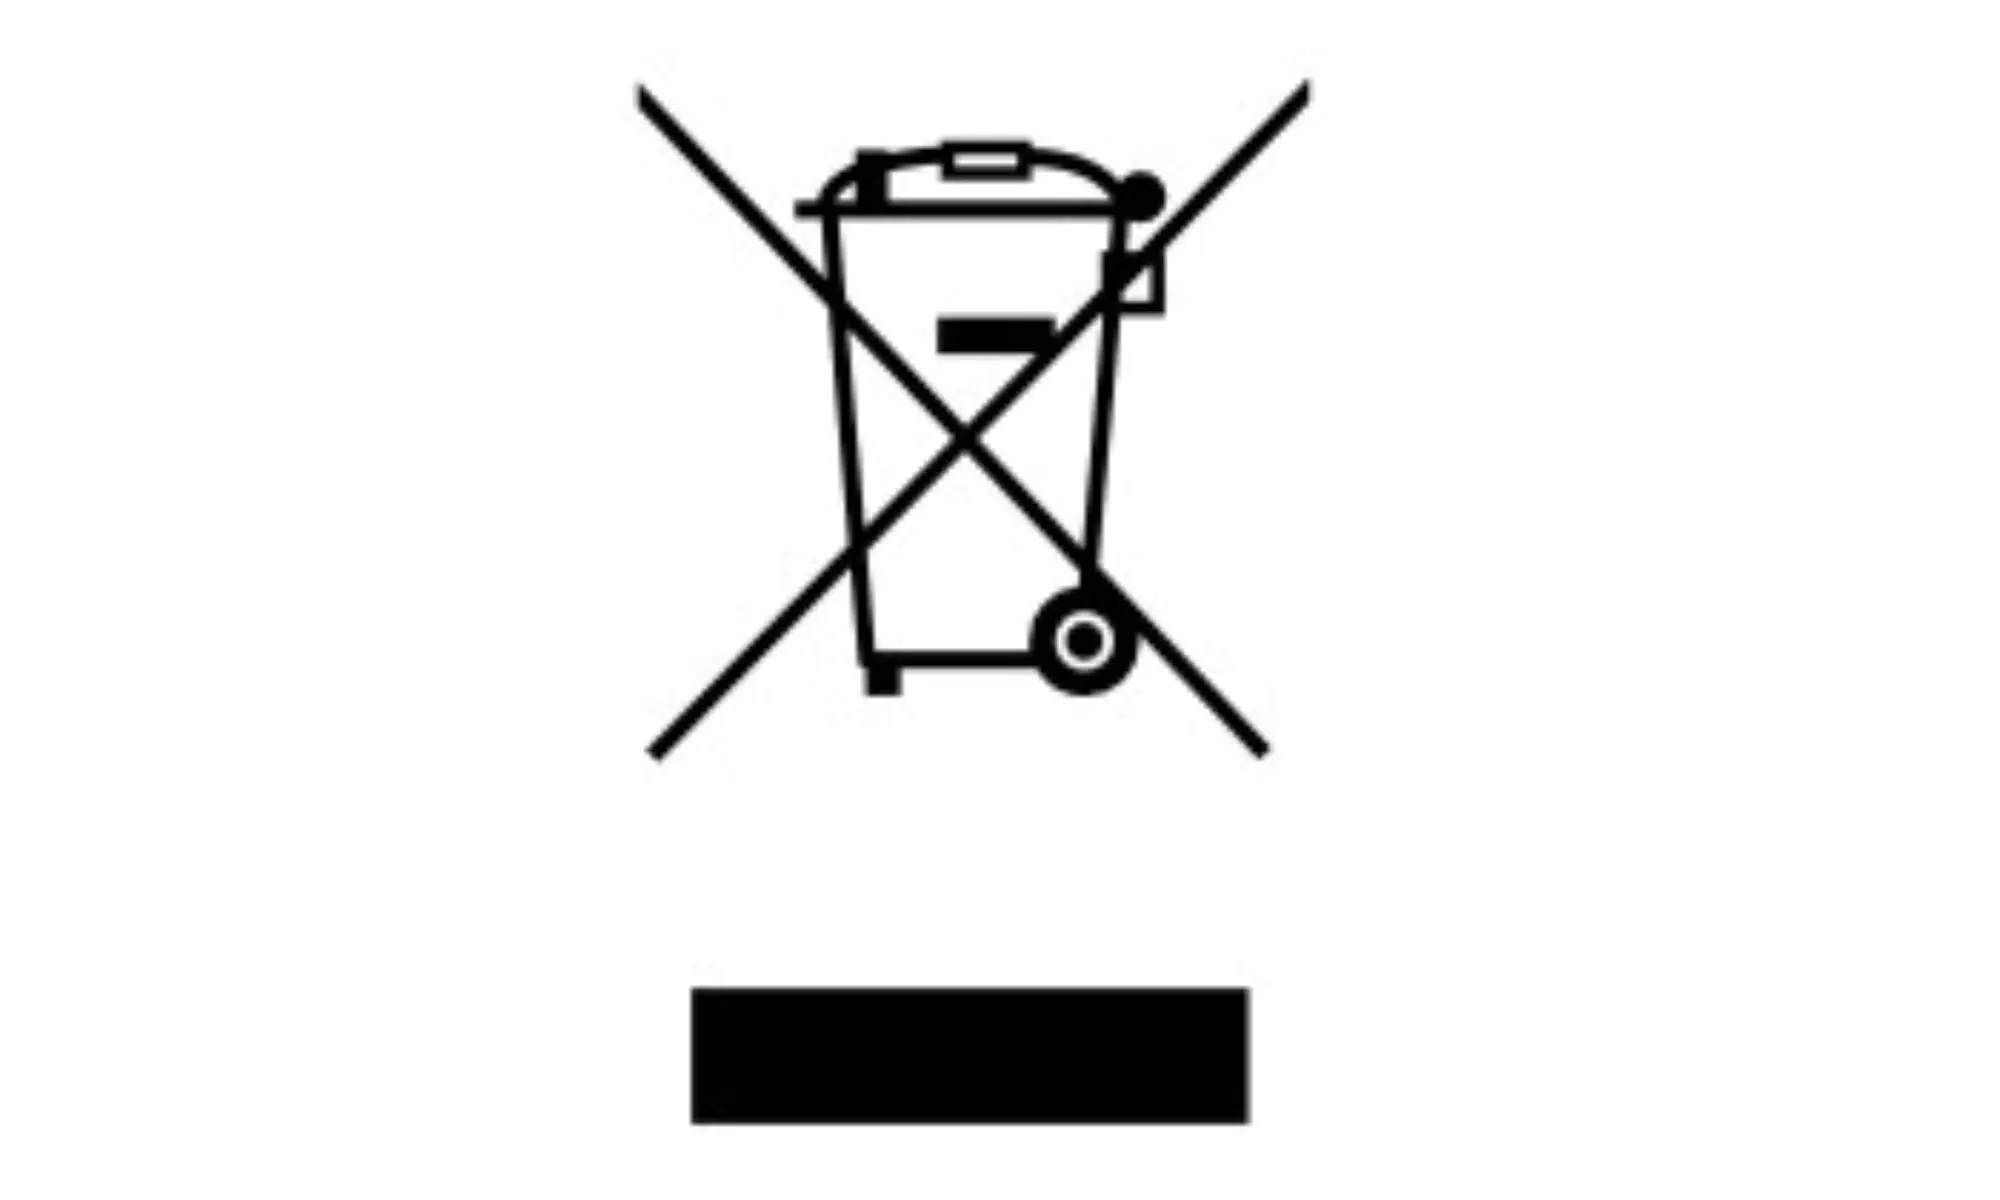
For business users in the European Union
If you wish to discard electrical and electronic equipment, please contact your dealer or supplier for further
information.
Information on Disposal in other Countries outside the European Union
This symbol is only valid in the European Union. If you wish to discard this product please contact your local
authorities or dealer and ask for the correct method of disposal
Bluetooth®
The Bluetooth® word mark and logos are registered trademarks owned by Bluetooth SIG, Inc. and any use of such marks by Divesoft s.r.o. is under license. Other trademarks and trade names are those of their respective owners.
TECHNICAL DATA SHEET - FREEDOM+
Diving decompression computer
DIMENSIONS
External dimensions of the computer body: 81 × 53 × 26 mm (3.19 × 2.09 × 1.02 in) External dimensions including components: 85 × 65 × 26 mm (3.43 × 2.56 × 1.02 in) Weight:192 g (6.8 oz) without strap/bungee
CONSTRUCTION
Hard anodized aluminum body
Acrylic glass with replaceable protective film
connector and button cover: POM-C
Bars: stainless steel
PRESSURE RESISTANCE
Maximum operating depth: 300 m / 1,000 ft Test pressure of each piece: 3.5 MPa
DISPLAY
2.4″ color TFT LCD, 320 × 240 px
DECOMPRESSION CALCULATION
Bühlmann ZHL 16B / ZHL 16C algorithms with fully adjustable gradient factors
DIVING MODES
Gauge, Freediving, OC up to 9 mixtures (Air, Nitrox, Trimix), upgrade to CCR (all in one hardware) Alarms: vibration + visual (colour indication) - strong vibrations can be felt even in a dry suit
OPERATING TEMPERATURES
0 - +40 °C | Short-term: -10 - +45 °C | Storage: +10 - +35 °C
POWER
User non-replaceable rechargeable Li Ion battery Voltage: 3.7 V Capacity: 1000 mAh (3.7 Wh) Charging: USB Type A, 5 V (< 500 mA) Operating time per charge: up to 18 h at brightness 5 / ≈ 9 h at brightness 9 Full charge time: approx. 5 h
DATA INTERFACES
USB (Mass Storage) for logs & FW update
Bluetooth LE for wireless data transfer
BMD-380 certified Bluetooth module
FCC ID: XPYBMD380
Warranty: 24 months (12 months on battery)
Becky is a 5 time Emmy award-winning underwater cameraman and photographer whose work appears on major networks including National Geographic, Discovery Channel and Red Bull. She specializes in capturing images in extreme underwater environments including caves, under ice and deep shipwrecks. Her projects have taken her all over the world from the Arctic to Antarctic and many exciting locations in between.